
Zero Maintenance Cowpea Garden: Imagine a garden bursting with fresh, delicious cowpeas, and the best part? You barely have to lift a finger! Sounds like a dream, right? Well, it doesn’t have to be! For generations, resourceful gardeners have sought ways to simplify their lives while still enjoying the bounty of nature. Cowpeas, also known as black-eyed peas, have a rich history, deeply rooted in African and Southern American cuisine, offering both nutritional value and cultural significance. They’re a staple in many diets, providing essential protein and fiber.
But let’s be honest, not everyone has the time or energy for constant weeding, watering, and pest control. That’s where the magic of a zero maintenance cowpea garden comes in. This DIY guide is your ticket to a thriving garden with minimal effort. We’ll explore simple yet effective tricks and hacks that will allow you to enjoy a plentiful harvest without becoming a slave to your garden. Think of it as unlocking the secret to effortless gardening, allowing you to spend more time savoring the fruits (or in this case, the peas!) of your labor and less time toiling in the sun. So, are you ready to discover the joy of a truly low-maintenance garden? Let’s get started!
Dein pflegeleichter Kuhbohnengarten: So geht’s!
Hey Gartenfreunde! Habt ihr Lust auf eine reiche Ernte ohne stundenlange Arbeit? Dann ist ein pflegeleichter Kuhbohnengarten genau das Richtige für euch! Kuhbohnen sind nicht nur super lecker und gesund, sondern auch unglaublich robust und anspruchslos. Ich zeige euch, wie ihr mit ein paar einfachen Tricks einen Garten anlegt, der fast von alleine wächst. Los geht’s!
Was du für deinen pflegeleichten Kuhbohnengarten brauchst:
* Kuhbohnensamen: Wähle eine Sorte, die für dein Klima geeignet ist. Es gibt Buschbohnen und Stangenbohnen – je nachdem, wie viel Platz du hast.
* Gartenwerkzeug: Spaten, Harke, eventuell eine Hacke.
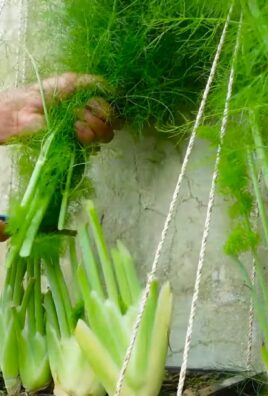
* Mulchmaterial: Stroh, Heu, Holzhackschnitzel oder Laub. Das ist das A und O für einen pflegeleichten Garten!
* Kompost oder organischer Dünger: Für einen guten Start.
* (Optional) Rankhilfe: Wenn du Stangenbohnen anbaust.
* Geduld und ein bisschen Liebe: Das Wichtigste!
Schritt-für-Schritt-Anleitung:
1. Den richtigen Standort wählen
Kuhbohnen lieben die Sonne! Such dir also ein sonniges Plätzchen in deinem Garten aus, das mindestens 6 Stunden Sonne am Tag bekommt. Der Boden sollte gut durchlässig sein, damit sich keine Staunässe bildet. Kuhbohnen sind zwar nicht besonders anspruchsvoll, aber ein guter Boden sorgt für eine bessere Ernte.
2. Den Boden vorbereiten
Auch wenn Kuhbohnen nicht viel brauchen, ist eine gute Bodenvorbereitung wichtig.
1. Unkraut entfernen: Befreie die Fläche gründlich von Unkraut. Das spart dir später viel Arbeit.
2. Boden lockern: Lockere den Boden mit einem Spaten oder einer Grabegabel auf. Das erleichtert den Wurzeln das Wachsen.
3. Kompost einarbeiten: Arbeite Kompost oder organischen Dünger in den Boden ein. Das gibt den Kuhbohnen einen guten Start. Ich verwende gerne selbstgemachten Kompost, aber auch gekaufter Kompost ist super.
4. Boden ebnen: Harke den Boden glatt, damit du die Samen gut aussäen kannst.
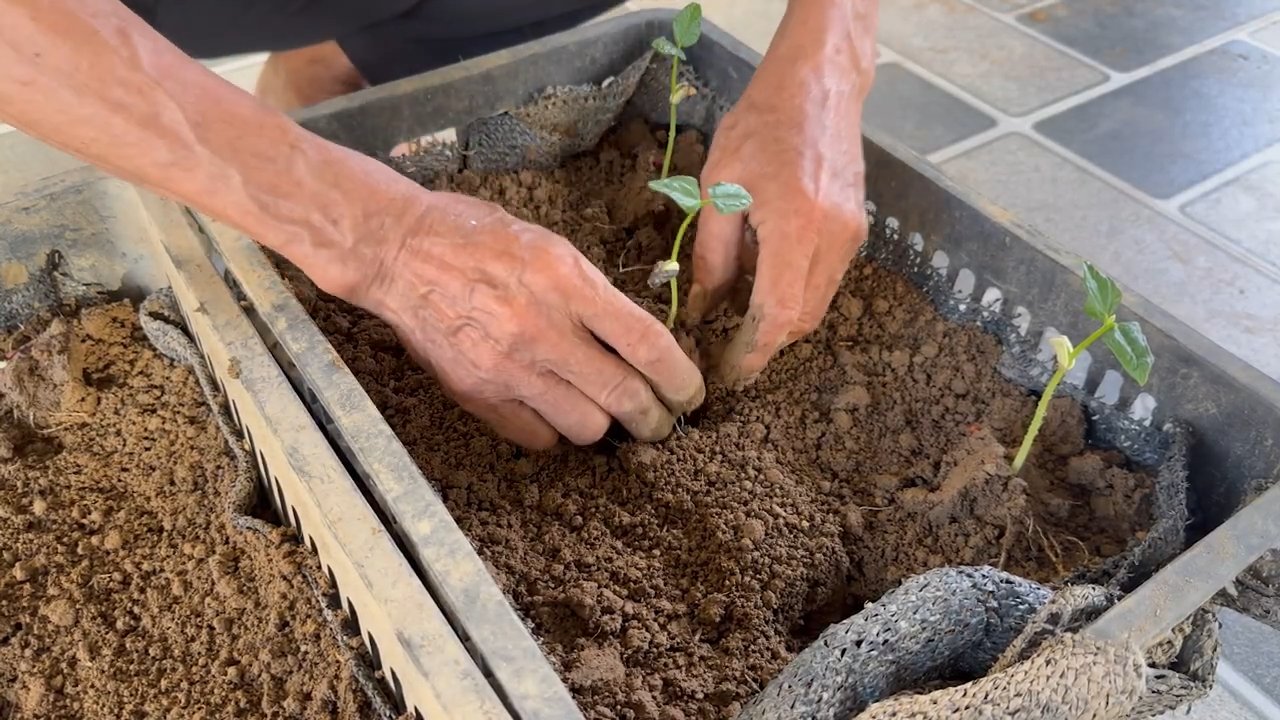
3. Kuhbohnen säen
Jetzt kommt der spannende Teil: das Säen!
1. Samen einweichen (optional): Du kannst die Samen vor dem Säen für ein paar Stunden in Wasser einweichen. Das beschleunigt die Keimung. Ich mache das meistens, aber es geht auch ohne.
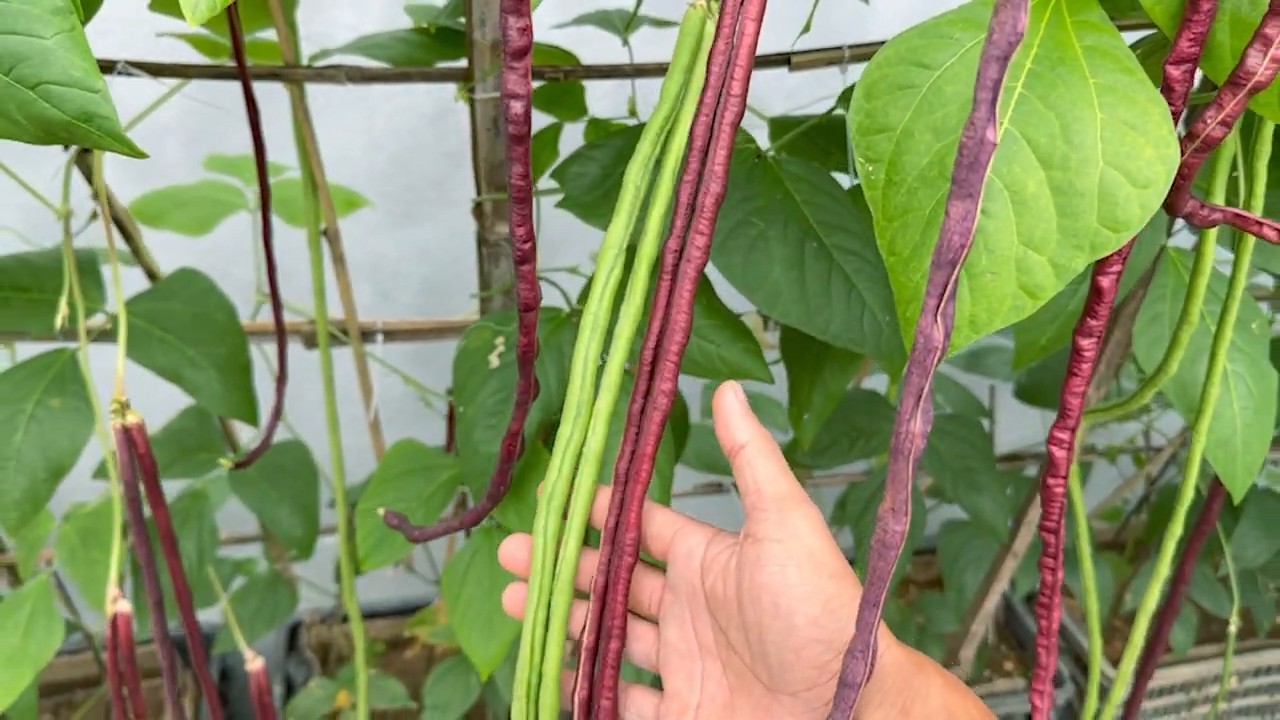
2. Aussaat: Säe die Samen direkt ins Beet. Bei Buschbohnen reichen etwa 5-7 cm Abstand zwischen den Samen und 40-50 cm zwischen den Reihen. Bei Stangenbohnen solltest du etwa 10-15 cm Abstand zwischen den Samen und 60-80 cm zwischen den Reihen lassen.
3. Saattiefe: Die Samen sollten etwa 2-3 cm tief in die Erde.
4. Angießen: Gieße die Samen nach dem Säen vorsichtig an. Achte darauf, dass der Boden feucht, aber nicht nass ist.
4. Mulchen – Der Schlüssel zur Pflegeleichtigkeit
Das Mulchen ist das Geheimnis für einen pflegeleichten Kuhbohnengarten!
1. Mulchmaterial ausbringen: Verteile eine dicke Schicht Mulchmaterial (Stroh, Heu, Holzhackschnitzel oder Laub) um die Pflanzen herum. Die Schicht sollte etwa 5-10 cm dick sein.
2. Vorteile des Mulchens:
* Unkrautunterdrückung: Der Mulch verhindert, dass Unkraut wächst.
* Feuchtigkeitsspeicherung: Der Mulch hält den Boden feucht und reduziert die Verdunstung.
* Bodenschutz: Der Mulch schützt den Boden vor Erosion und Austrocknung.
* Bodenverbesserung: Der Mulch zersetzt sich langsam und verbessert die Bodenstruktur.
5. Rankhilfe anbringen (für Stangenbohnen)
Wenn du Stangenbohnen angebaut hast, brauchen sie eine Rankhilfe.
1. Rankhilfe auswählen: Du kannst verschiedene Arten von Rankhilfen verwenden: Bambusstäbe, ein Rankgitter, ein Zaun oder sogar ein Tipi aus Ästen.
2. Rankhilfe aufstellen: Stelle die Rankhilfe stabil auf, bevor die Pflanzen zu groß werden.
3. Pflanzen anleiten: Leite die jungen Pflanzen vorsichtig an der Rankhilfe entlang. Sie werden sich dann von selbst weiter hochranken.
6. Gießen und Düngen (nur selten nötig)
Kuhbohnen sind sehr trockenheitsresistent und brauchen nur selten gegossen zu werden.
1. Gießen: Gieße nur, wenn der Boden wirklich trocken ist. Vermeide Staunässe.
2. Düngen: Kuhbohnen brauchen in der Regel keine zusätzliche Düngung, besonders wenn du den Boden gut vorbereitet hast. Wenn die Pflanzen trotzdem kümmerlich aussehen, kannst du etwas organischen Dünger geben.
7. Unkraut jäten (nur am Anfang)
Dank des Mulchs sollte Unkraut kein großes Problem sein.
1. Unkraut entfernen: Jäte Unkraut, das trotzdem durch den Mulch wächst, regelmäßig. Am Anfang ist das wichtiger, damit die jungen Pflanzen nicht von Unkraut überwuchert werden.
8. Schädlinge und Krankheiten (meist kein Problem)
Kuhbohnen sind relativ resistent gegen Schädlinge und Krankheiten.
1. Beobachten: Beobachte deine Pflanzen regelmäßig auf Schädlinge und Krankheiten.
2. Natürliche Bekämpfung: Wenn du Schädlinge entdeckst, versuche sie zuerst mit natürlichen Mitteln zu bekämpfen. Zum Beispiel mit Brennnesseljauche oder einem Sud aus Knoblauch.
9. Ernten
Das ist der beste Teil!
1. Erntezeitpunkt: Kuhbohnen können geerntet werden, sobald die Hülsen prall gefüllt sind.
2. Erntemethode: Pflücke die Hülsen vorsichtig von den Pflanzen ab.
3. Regelmäßig ernten: Ernte die Hülsen regelmäßig, damit die Pflanzen weiterhin neue Blüten bilden und Früchte tragen.
Zusätzliche Tipps für deinen pflegeleichten Kuhbohnengarten:
* Fruchtfolge beachten: Baue Kuhbohnen nicht jedes Jahr am selben Standort an. Das hilft, Krankheiten und Schädlinge zu vermeiden.
* Begleitpflanzen: Pflanze Ringelblumen oder Kapuzinerkresse in die Nähe deiner Kuhbohnen. Sie halten Schädlinge fern.
* Samen gewinnen: Lass einige Hülsen an den Pflanzen trocknen und ernte die Samen für das nächste Jahr.
* Boden verbessern: Nach der Ernte kannst du die Pflanzenreste als Gründüngung in den Boden einarbeiten. Das verbessert die Bodenstruktur und versorgt den Boden mit Nährstoffen.
Häufige Fragen (FAQ):
* Wann ist die beste Zeit, um Kuhbohnen zu säen?
Die beste Zeit zum Säen ist nach den Eisheiligen, wenn keine Frostgefahr mehr besteht. In der Regel ist das Mitte Mai bis Anfang Juni.
* Wie lange dauert es, bis Kuhbohnen keimen?
Die Keimung dauert in der Regel 7-14 Tage, je nach Temperatur und Feuchtigkeit.
* Wie oft muss ich Kuhbohnen gießen?
Kuhbohnen sind sehr trockenheitsresistent und brauchen nur selten gegossen zu werden. Gieße nur, wenn der Boden wirklich trocken ist.
* Muss ich Kuhbohnen düngen?
Kuhbohnen brauchen in der Regel keine zusätzliche Düngung, besonders wenn du den Boden gut vorbereitet hast.
* Welche Schädlinge befallen Kuhbohnen?
Kuhbohnen sind relativ resistent gegen Schädlinge. Gelegentlich können Blattläuse oder Bohnenkäfer auftreten.
* Welche Krankheiten befallen Kuhbohnen?
Kuhbohnen sind relativ resistent gegen Krankheiten. Gelegentlich kann es zu Pilzkrankheiten kommen, besonders bei feuchtem Wetter.
* Kann ich Kuhbohnen im Topf anbauen?
Ja,
Conclusion
So, there you have it! Creating a zero-maintenance cowpea garden isn’t just a gardening hack; it’s a pathway to sustainable, effortless food production. It’s about working *with* nature, not against it, to reap the rewards of fresh, delicious cowpeas with minimal effort. The beauty of this method lies in its simplicity and adaptability. You’re essentially creating a self-sustaining ecosystem where the cowpeas thrive with minimal intervention.
Why is this a must-try? Because it frees up your time! Imagine spending less time weeding, watering, and worrying about your garden and more time enjoying the fruits (or rather, the legumes!) of your labor. It’s perfect for busy individuals, beginner gardeners, or anyone looking to embrace a more relaxed and eco-friendly approach to gardening. Plus, you’ll be contributing to soil health and biodiversity in your own backyard.
But don’t stop there! Experiment with different companion plants to see what works best in your specific climate and soil conditions. Try interplanting your cowpeas with herbs like basil or rosemary to deter pests naturally. Consider adding a layer of mulch to further suppress weeds and retain moisture. You could even explore different varieties of cowpeas to find your personal favorite. Some varieties are bushier, some are more vining, and some have different flavor profiles.
This zero-maintenance approach isn’t limited to cowpeas either. You can adapt the principles of companion planting, mulching, and minimal disturbance to other crops as well. Think about creating a similar system for beans, squash, or even tomatoes. The possibilities are endless!
We’re confident that once you experience the ease and abundance of a zero-maintenance cowpea garden, you’ll be hooked. It’s a game-changer for anyone who wants to grow their own food without the constant demands of traditional gardening.
We wholeheartedly encourage you to give this DIY trick a try. Start small, experiment, and adapt the method to suit your specific needs and preferences. And most importantly, share your experience with us! We’d love to hear about your successes, challenges, and any variations you discover along the way. Let’s build a community of zero-maintenance gardeners and inspire others to embrace this sustainable and rewarding approach to growing food. Share your photos, tips, and stories in the comments below or on our social media channels. Let’s cultivate a greener, more effortless future, one cowpea at a time! This method of **zero maintenance cowpea** gardening is truly a gift to both the gardener and the earth.
Frequently Asked Questions (FAQ)
What exactly does “zero maintenance” mean? Does it really require *no* work?
While “zero maintenance” might be a slight exaggeration, it aims to minimize the amount of active intervention required. You’ll still need to initially prepare the soil, plant the seeds, and perhaps provide some initial watering. However, the goal is to create a self-sustaining system that requires minimal weeding, watering, fertilizing, or pest control after the initial establishment. You might need to occasionally check for pests or diseases, but the overall workload is significantly reduced compared to traditional gardening methods. Think of it as “very low maintenance” rather than absolutely zero.
What if I have poor soil? Can I still create a zero-maintenance cowpea garden?
Absolutely! In fact, cowpeas are known for their ability to thrive in poor soil conditions. They are nitrogen-fixing legumes, meaning they can convert atmospheric nitrogen into a form that plants can use, enriching the soil in the process. However, you can still improve your soil before planting. Consider adding compost, well-rotted manure, or other organic matter to improve drainage, aeration, and nutrient content. You can also use cover crops like buckwheat or oats to improve soil structure and suppress weeds before planting your cowpeas. Remember, even with poor soil, the zero-maintenance approach focuses on building soil health over time through natural processes.
What are the best companion plants for cowpeas in a zero-maintenance garden?
Excellent question! Companion planting is crucial for the success of a zero-maintenance garden. Some great companion plants for cowpeas include:
* **Corn:** Provides support for vining cowpea varieties and creates shade.
* **Sunflowers:** Attract beneficial insects and provide shade.
* **Basil:** Repels common cowpea pests like aphids and bean beetles.
* **Rosemary:** Another pest-repelling herb that also attracts pollinators.
* **Marigolds:** Known for their ability to deter nematodes and other soil pests.
* **Radishes:** Can help break up compacted soil and deter certain pests.
Experiment with different combinations to see what works best in your specific garden.
How do I deal with pests and diseases in a zero-maintenance cowpea garden?
The key to pest and disease control in a zero-maintenance garden is prevention. Healthy plants are more resistant to problems. Here are some strategies:
* **Companion planting:** As mentioned above, certain plants can repel pests or attract beneficial insects that prey on pests.
* **Crop rotation:** Avoid planting cowpeas in the same spot year after year to prevent the buildup of soilborne diseases.
* **Good air circulation:** Ensure adequate spacing between plants to promote air circulation and reduce humidity, which can contribute to fungal diseases.
* **Watering at the base of the plants:** Avoid wetting the foliage, as this can also promote fungal diseases.
* **Inspect plants regularly:** Catching problems early is crucial. If you spot pests or diseases, remove affected plants immediately.
* **Beneficial insects:** Encourage beneficial insects like ladybugs, lacewings, and parasitic wasps by providing habitat and avoiding the use of broad-spectrum pesticides.
If you do need to use pesticides, opt for organic options like neem oil or insecticidal soap.
How often should I water my zero-maintenance cowpea garden?
The goal is to minimize watering, but initial watering is important. Water deeply after planting to help the seeds germinate and establish roots. Once the plants are established, you should only need to water during prolonged periods of drought. Mulching helps retain moisture in the soil, reducing the need for watering. Observe your plants closely. If the leaves are wilting or the soil is dry to the touch, it’s time to water.
What if I don’t have a lot of space? Can I still create a zero-maintenance cowpea garden?
Absolutely! You can adapt the principles of zero-maintenance gardening to smaller spaces, such as raised beds, containers, or even vertical gardens. Choose bush varieties of cowpeas that don’t require as much space as vining varieties. Use companion planting strategically to maximize space and deter pests. Even a small zero-maintenance garden can provide a surprising amount of fresh cowpeas.
How long does it take for cowpeas to mature and be ready for harvest?
Cowpeas typically mature in 50-70 days, depending on the variety and growing conditions. You can harvest the pods when they are plump and the beans inside are fully developed. You can also harvest the young, tender leaves for use in salads or as a cooked green.
What are some different varieties of cowpeas I can try?
There are many different varieties of cowpeas to choose from, each with its own unique characteristics. Some popular varieties include:
* **Black-eyed peas:** A classic variety with a distinctive black “eye.”
* **Crowder peas:** A Southern favorite with a creamy texture.
* **Pinkeye Purple Hull:** A variety with pink pods and a mild flavor.
* **Whippoorwill:** An heirloom variety with a speckled appearance.
* **Chinese Red Noodle:** A long, slender variety with a reddish-purple color.
Experiment with different varieties to find your favorites.
How do I save seeds from my zero-maintenance cowpea garden?
Saving seeds is a great way to perpetuate your zero-maintenance garden and ensure a continuous supply of cowpeas. Allow some of the pods to dry completely on the plant. Once the pods are dry and brittle, harvest them and shell the beans. Store the seeds in an airtight container in a cool, dry place.
Is this method suitable for all climates?
While cowpeas are relatively adaptable, they thrive in warm climates with plenty of sunshine. If you live in a cooler climate, you may need to start your cowpeas indoors and transplant them outdoors after the last frost. You may also need to choose a variety that is more tolerant of cooler temperatures. The principles of zero-maintenance gardening can be adapted to different climates, but you may need to adjust your strategies accordingly.
Leave a Comment