
Strawberry plastic bottle gardening: who knew turning trash into treasure could be so delicious and rewarding? I’m so excited to share this incredibly simple and effective DIY project that will have you harvesting juicy, homegrown strawberries even if you’re short on space!
For centuries, humans have cultivated strawberries, cherishing their sweet flavor and vibrant color. From ancient Roman gardens to the sprawling strawberry fields of modern agriculture, this little fruit has always held a special place in our hearts (and stomachs!). But what if I told you that you don’t need a sprawling field to enjoy the taste of freshly picked strawberries?
That’s where this amazing DIY hack comes in. In today’s world, where sustainability is more important than ever, and many of us are living in apartments or smaller homes, finding creative ways to garden is essential. This strawberry plastic bottle gardening method not only helps reduce plastic waste but also allows you to maximize your growing space, whether you have a balcony, patio, or just a sunny windowsill. Imagine the satisfaction of plucking ripe, red strawberries from your own vertical garden – it’s easier than you think! So, let’s dive in and discover how to transform those empty plastic bottles into a thriving strawberry paradise!
Erdbeer-Garten aus Plastikflaschen: Eine DIY-Anleitung
Hallo liebe Gartenfreunde! Habt ihr auch so wenig Platz wie ich, aber trotzdem Lust auf frische Erdbeeren aus dem eigenen Anbau? Dann habe ich hier genau das Richtige für euch: einen vertikalen Erdbeergarten aus Plastikflaschen! Das ist nicht nur super platzsparend, sondern auch eine tolle Möglichkeit, Plastikmüll wiederzuverwerten. Lasst uns loslegen!
Was du brauchst:
* Viele Plastikflaschen (am besten 1,5 oder 2 Liter) – je mehr, desto größer dein Garten!
* Ein scharfes Messer oder eine Schere
* Einen Bohrer oder einen Nagel und Hammer
* Erde (am besten Erdbeer- oder Gemüseerde)
* Erdbeerpflanzen (am besten Jungpflanzen)
* Eine stabile Schnur oder Draht zum Aufhängen
* Optional: Sprühfarbe (um die Flaschen zu verschönern)
* Optional: Vlies oder Jute zum Auskleiden der Flaschen (hilft, die Erde feucht zu halten)
Vorbereitung der Flaschen
Bevor wir mit dem eigentlichen Bau beginnen, müssen wir die Flaschen vorbereiten. Das ist eigentlich ganz einfach, aber achtet bitte auf eure Sicherheit, besonders beim Schneiden!
1. Reinigung: Zuerst solltet ihr alle Flaschen gründlich reinigen. Entfernt Etiketten und Klebereste. Ein bisschen Spülmittel und warmes Wasser helfen dabei. Lasst die Flaschen anschließend gut trocknen.
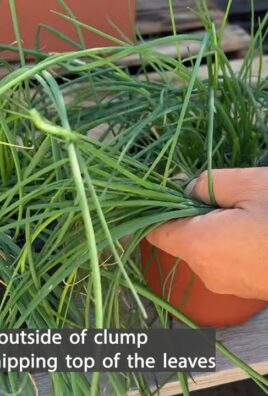
2. Löcher bohren: Jetzt kommt der Teil, bei dem wir die Löcher für die Erdbeerpflanzen machen. Nehmt euch eine Flasche und markiert mit einem Stift die Stellen, an denen die Löcher sein sollen. Ich empfehle, die Löcher versetzt anzuordnen, damit die Pflanzen später genug Platz haben. Die Löcher sollten groß genug sein, damit die Erdbeerpflanzen gut hineinpassen, aber nicht zu groß, damit die Erde nicht herausfällt. Ein Durchmesser von etwa 5-7 cm ist ideal.
* Tipp: Fangt mit kleineren Löchern an und vergrößert sie bei Bedarf. So vermeidet ihr, dass sie zu groß werden.
3. Löcher schneiden: Mit dem Messer oder der Schere schneidet ihr nun die markierten Löcher aus. Seid vorsichtig, damit ihr euch nicht schneidet! Wenn ihr ein Messer benutzt, solltet ihr eine Schneideunterlage verwenden.
4. Befestigungslöcher bohren: Damit wir die Flaschen später aufhängen können, brauchen wir noch Löcher für die Schnur oder den Draht. Bohrt oder stecht mit dem Nagel und Hammer jeweils zwei Löcher in den oberen Rand jeder Flasche. Achtet darauf, dass die Löcher gegenüberliegen und nicht zu nah am Rand sind, damit die Flaschen nicht ausreißen.
* Tipp: Verstärkt die Löcher mit etwas Klebeband, um sie stabiler zu machen.
5. Optional: Verschönern: Wenn ihr möchtet, könnt ihr die Flaschen jetzt noch mit Sprühfarbe verschönern. Lasst eurer Kreativität freien Lauf! Achtet aber darauf, dass die Farbe ungiftig ist und für den Außenbereich geeignet. Lasst die Farbe gut trocknen, bevor ihr mit dem nächsten Schritt fortfahrt.
6. Optional: Auskleiden: Um die Erde feucht zu halten und das Austrocknen zu verhindern, könnt ihr die Flaschen mit Vlies oder Jute auskleiden. Schneidet das Material passend zu und klebt es mit etwas Kleber in die Flaschen.
Zusammenbau des Erdbeergartens
Jetzt kommt der spannende Teil: Wir bauen unseren vertikalen Erdbeergarten zusammen!
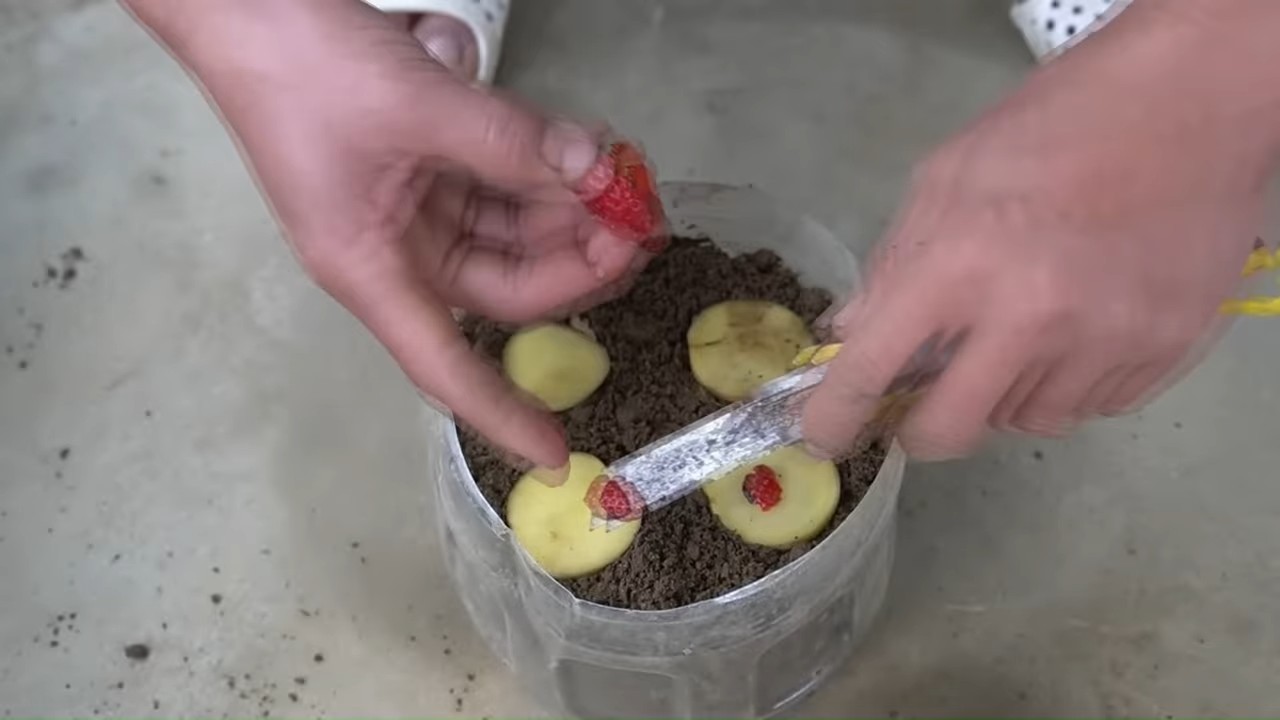
1. Erste Flasche befüllen: Nehmt euch die erste Flasche und befüllt sie mit Erde. Achtet darauf, dass die Erde locker und luftig ist. Drückt sie nicht zu fest an, damit die Wurzeln der Erdbeerpflanzen gut wachsen können.
2. Erdbeerpflanzen einsetzen: Setzt nun die ersten Erdbeerpflanzen in die Löcher ein. Achtet darauf, dass die Wurzeln gut mit Erde bedeckt sind.
3. Zweite Flasche vorbereiten: Nehmt euch die zweite Flasche und fädelt die Schnur oder den Draht durch die Befestigungslöcher.
4. Zweite Flasche befestigen: Hängt die zweite Flasche an die erste. Die Schnur oder der Draht sollte so lang sein, dass die zweite Flasche stabil hängt und nicht verrutscht.
5. Wiederholen: Wiederholt die Schritte 1-4, bis ihr alle Flaschen befüllt und aufgehängt habt.
6. Oberste Flasche befüllen: Die oberste Flasche wird ebenfalls mit Erde befüllt und mit Erdbeerpflanzen bepflanzt.
7. Gießen: Gießt euren neuen Erdbeergarten gründlich. Achtet darauf, dass die Erde gleichmäßig feucht ist.
Pflege deines Erdbeergartens
Damit ihr lange Freude an eurem Erdbeergarten habt, ist die richtige Pflege wichtig.
* Gießen: Erdbeeren brauchen regelmäßig Wasser, besonders an heißen Tagen. Gießt am besten morgens oder abends, damit die Blätter nicht verbrennen. Achtet darauf, dass die Erde nicht austrocknet, aber auch nicht zu nass ist.
* Düngen: Erdbeeren sind Starkzehrer und brauchen regelmäßig Dünger. Verwendet am besten einen speziellen Erdbeerdünger oder einen organischen Dünger. Düngt während der Wachstums- und Erntezeit alle zwei bis drei Wochen.
* Sonnenschein: Erdbeeren lieben die Sonne! Stellt euren Erdbeergarten an einen sonnigen Standort, damit die Pflanzen gut wachsen und viele Früchte tragen.
* Schutz vor Schädlingen: Erdbeeren können von verschiedenen Schädlingen befallen werden, wie z.B. Schnecken, Blattläusen oder Erdbeermilben. Kontrolliert eure Pflanzen regelmäßig und entfernt Schädlinge bei Bedarf. Es gibt auch verschiedene natürliche Mittel, um Schädlinge zu bekämpfen.
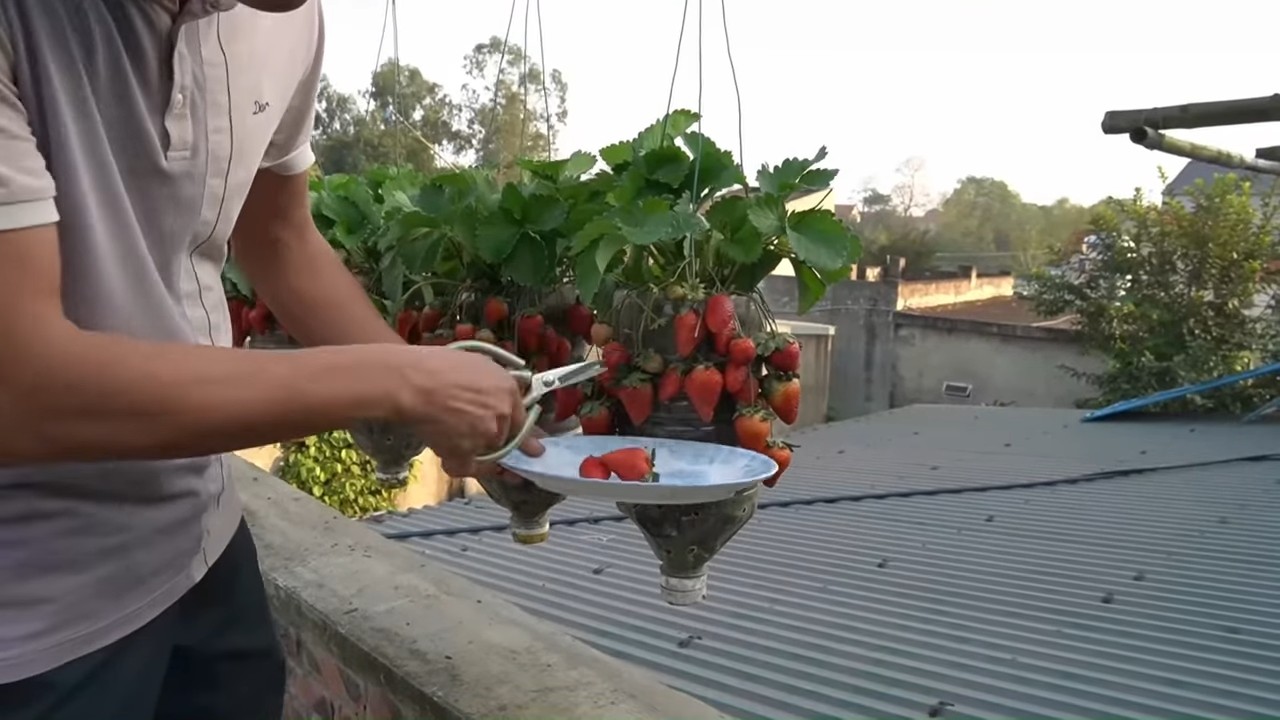
* Ernte: Wenn die Erdbeeren rot und reif sind, könnt ihr sie ernten. Pflückt die Früchte vorsichtig ab, damit ihr die Pflanzen nicht beschädigt.
Weitere Tipps und Tricks
* Sortenwahl: Wählt Erdbeersorten, die für den Anbau im Topf geeignet sind. Es gibt spezielle Sorten, die besonders kompakt wachsen und viele Früchte tragen.
* Drainage: Achtet darauf, dass die Erde in den Flaschen gut drainiert ist, damit sich keine Staunässe bildet. Ihr könnt etwas Kies oder Blähton unter die Erde mischen.
* Überwinterung: Erdbeerpflanzen sind mehrjährig und können überwintert werden. Stellt euren Erdbeergarten im Winter an einen geschützten Ort, z.B. in den Keller oder die Garage. Gießt die Pflanzen nur wenig, damit die Erde nicht austrocknet.
* Erde austauschen: Tauscht die Erde in den Flaschen regelmäßig aus, am besten jedes Jahr im Frühjahr. So bleiben die Pflanzen gesund und vital.
Ich hoffe, diese Anleitung hat euch gefallen und ihr habt jetzt Lust bekommen, euren eigenen Erdbeergarten aus Plastikflaschen zu bauen. Es ist wirklich eine tolle Möglichkeit, Platz zu sparen, Plastikmüll wiederzuverwerten und frische Erdbeeren zu genießen. Viel Spaß beim Gärtnern!
Conclusion
So, there you have it! Turning discarded plastic bottles into a thriving vertical strawberry garden is not just a clever upcycling project; it’s a game-changer for anyone looking to maximize space, minimize waste, and enjoy fresh, homegrown strawberries. This DIY trick offers a sustainable and visually appealing solution for urban gardeners, balcony enthusiasts, and even those with limited outdoor space.
Why is this a must-try? Because it’s incredibly rewarding on multiple levels. You’re actively reducing plastic waste, creating a beautiful and productive garden feature, and enjoying the unparalleled taste of freshly picked strawberries. Store-bought strawberries simply can’t compare to the flavor and satisfaction of harvesting your own. Plus, the vertical design minimizes pest problems and makes harvesting a breeze.
But the beauty of this project lies in its adaptability. Feel free to experiment with different bottle sizes and arrangements to create a garden that perfectly suits your space and aesthetic. Consider painting the bottles in vibrant colors to add a splash of personality, or use different types of soil mixes to optimize growth for your specific climate.
Variations to Consider:
* Herb Garden: While we’ve focused on strawberries, this method works wonderfully for other herbs and small vegetables like lettuce, spinach, or even cherry tomatoes.
* Hanging Garden: Instead of stacking the bottles, try hanging them individually from a balcony railing or pergola for a whimsical, cascading effect.
* Indoor Garden: With proper lighting (grow lights are ideal), you can even bring this strawberry plastic bottle gardening project indoors, allowing you to enjoy fresh strawberries year-round.
* Different Bottle Sizes: Experiment with different sizes of plastic bottles. Larger bottles can accommodate larger strawberry plants or multiple smaller plants.
* Self-Watering System: Incorporate a simple self-watering system by connecting the bottles with tubing and a reservoir. This will reduce the need for frequent watering and ensure your plants stay hydrated.
We wholeheartedly encourage you to give this DIY project a try. It’s a fun, engaging, and ultimately delicious way to contribute to a more sustainable lifestyle. Don’t be afraid to get creative and personalize your strawberry plastic bottle garden to reflect your own unique style.
And most importantly, we want to hear about your experience! Share your photos, tips, and challenges in the comments below. Let’s build a community of strawberry-loving upcyclers and inspire others to embrace the joy of homegrown goodness. Your insights could help someone else create their own thriving vertical garden. Happy gardening!
Frequently Asked Questions (FAQ)
What type of plastic bottles are best for this project?
Ideally, you should use food-grade plastic bottles, such as those used for water, juice, or soda. These are generally made from PET (Polyethylene Terephthalate) or HDPE (High-Density Polyethylene), which are considered safe for growing plants. Avoid using bottles that have contained harsh chemicals or cleaning products. Thoroughly wash and rinse the bottles before using them for your strawberry garden.
What kind of soil should I use for my strawberry plants?
Strawberries thrive in well-draining, slightly acidic soil. A good mix would be equal parts of potting soil, compost, and perlite or vermiculite. The potting soil provides nutrients, the compost adds organic matter, and the perlite or vermiculite improves drainage and aeration. You can also purchase a pre-mixed strawberry potting mix from your local garden center.
How often should I water my strawberry plants in plastic bottles?
Watering frequency depends on the climate, the size of the bottles, and the type of soil you’re using. Generally, you should water your strawberry plants when the top inch of soil feels dry to the touch. Avoid overwatering, as this can lead to root rot. In hot, sunny weather, you may need to water daily, while in cooler weather, you can water every few days. Ensure that the bottles have drainage holes to prevent water from accumulating at the bottom.
How much sunlight do strawberry plants need?
Strawberry plants need at least 6-8 hours of direct sunlight per day to produce a good crop of strawberries. Choose a location for your plastic bottle garden that receives plenty of sunlight. If you’re growing your strawberries indoors, you’ll need to supplement with grow lights to provide adequate light.
How do I fertilize my strawberry plants in plastic bottles?
Strawberry plants are heavy feeders and benefit from regular fertilization. Use a balanced fertilizer specifically formulated for strawberries, following the instructions on the package. You can also use organic fertilizers like compost tea or fish emulsion. Fertilize your plants every 2-4 weeks during the growing season.
How do I protect my strawberry plants from pests and diseases?
Regularly inspect your strawberry plants for signs of pests or diseases. Common pests include aphids, spider mites, and slugs. You can control these pests with insecticidal soap, neem oil, or by handpicking them off the plants. To prevent diseases, ensure good air circulation around the plants and avoid overwatering. You can also use a fungicide if necessary.
Can I grow different varieties of strawberries in plastic bottles?
Yes, you can grow different varieties of strawberries in plastic bottles. However, it’s best to choose varieties that are well-suited to your climate and growing conditions. Some popular varieties for container gardening include everbearing strawberries, which produce fruit throughout the growing season, and day-neutral strawberries, which are less sensitive to day length.
How do I overwinter my strawberry plants in plastic bottles?
In colder climates, you’ll need to protect your strawberry plants from freezing temperatures. You can move the bottles to a sheltered location, such as a garage or shed, or wrap them in burlap or blankets. Water the plants sparingly during the winter months, and resume regular watering and fertilizing in the spring when new growth appears.
How long will my strawberry plants last in plastic bottles?
With proper care, strawberry plants can last for several years in plastic bottles. However, they may become less productive over time. It’s a good idea to replace your plants every 2-3 years to ensure a continuous supply of strawberries. You can propagate new plants from runners (the long stems that grow out from the main plant) or purchase new plants from a garden center.
Is strawberry plastic bottle gardening safe for the environment?
Yes, strawberry plastic bottle gardening is a sustainable and environmentally friendly practice. By upcycling plastic bottles, you’re reducing waste and preventing them from ending up in landfills. You’re also reducing your carbon footprint by growing your own food locally. Plus, you can use organic gardening practices to further minimize your impact on the environment.
Leave a Comment