
Salt and detergent cleaner: sounds like a science experiment gone right, doesn’t it? But trust me, it’s a game-changer for your home! I’m always on the lookout for simple, effective, and budget-friendly ways to tackle household chores, and this DIY cleaner has quickly become one of my go-to solutions. Forget those expensive, chemical-laden products lining the supermarket shelves. We’re going back to basics, harnessing the power of everyday ingredients to create a cleaning powerhouse.
The concept of using salt for cleaning isn’t new. In fact, throughout history, salt has been valued not just for its culinary uses, but also for its abrasive and disinfectant properties. Think back to a time before fancy cleaning sprays – salt was a staple for scrubbing pots, polishing surfaces, and even preserving food. Combining it with detergent, a modern marvel of cleaning technology, creates a synergistic effect that’s tough on grime but gentle on your wallet.
Why do you need this salt and detergent cleaner in your life? Because life’s too short to spend hours scrubbing! Whether you’re battling stubborn stains in the bathroom, tackling greasy messes in the kitchen, or simply looking for a more natural way to keep your home sparkling, this DIY trick is your answer. I’ll show you how to whip up this simple solution and share some of my favorite ways to use it. Get ready to say goodbye to harsh chemicals and hello to a cleaner, greener, and happier home!
DIY Power Cleaner: Salt and Detergent for a Sparkling Home
Hey everyone! I’m always on the lookout for simple, effective, and budget-friendly cleaning solutions. And guess what? I’ve stumbled upon a real winner – a power cleaner made with just salt and detergent! Seriously, these two humble ingredients can tackle some seriously tough grime. I’m going to walk you through how I make and use this amazing cleaner. Get ready to say goodbye to stubborn stains and hello to a sparkling home!
What You’ll Need
Before we dive in, let’s gather our supplies. This is a super simple recipe, so you probably already have everything you need.
* **Table Salt:** Plain old table salt is perfect. The abrasive texture helps scrub away dirt and grime.
* **Dish Detergent:** Any dish detergent will work, but I prefer using a grease-cutting formula for extra cleaning power.
* **Warm Water:** This helps dissolve the salt and activate the detergent.
* **Spray Bottle (Optional):** For easy application, especially on larger surfaces.
* **Mixing Bowl:** To combine the ingredients.
* **Spoon or Whisk:** For stirring.
* **Cleaning Cloths or Sponges:** To wipe down surfaces.
* **Gloves (Optional):** To protect your hands, especially if you have sensitive skin.
Mixing the Magic Potion
Okay, let’s get down to business! This is where we create our cleaning powerhouse.
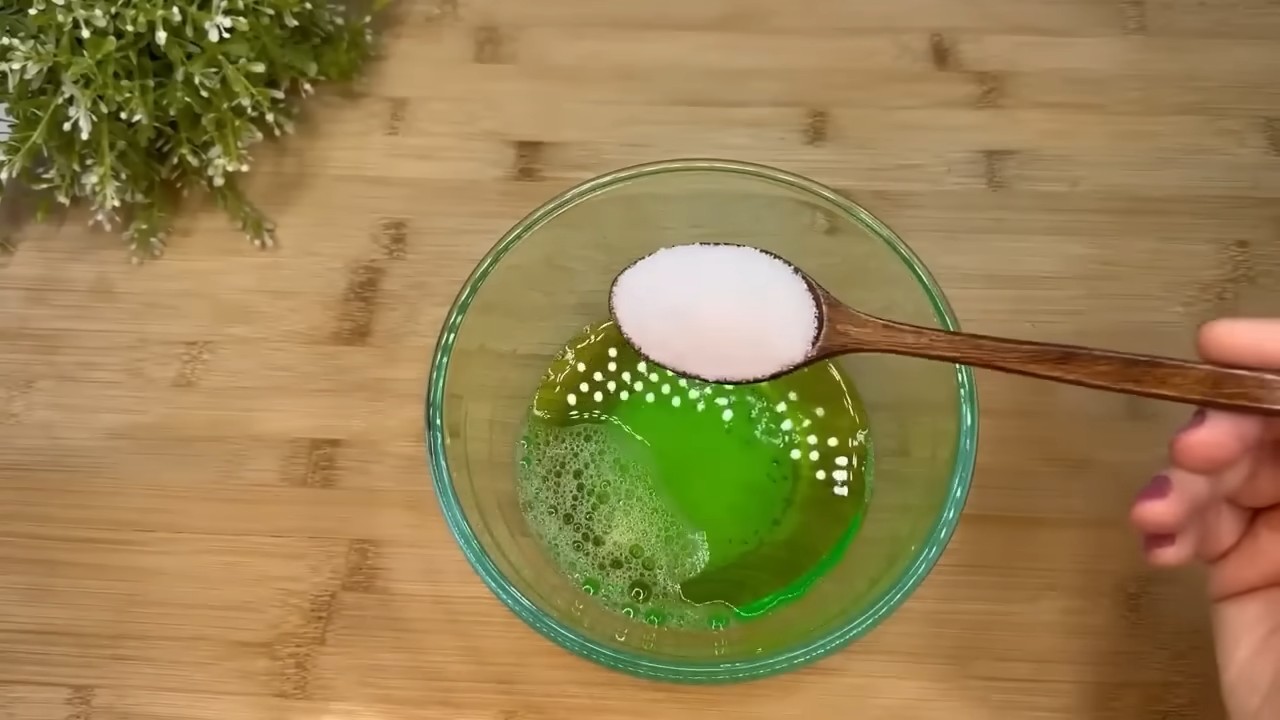
1. **Combine the Ingredients:** In your mixing bowl, add 1/2 cup of table salt. Then, pour in about 1/4 cup of dish detergent.
2. **Add Warm Water:** Slowly add about 1/4 cup of warm water. The amount of water might need adjusting depending on the consistency of your detergent. You want a thick, paste-like consistency.
3. **Mix Thoroughly:** Use your spoon or whisk to mix everything together until the salt is mostly dissolved and you have a smooth paste. Don’t worry if there are a few salt granules remaining; they’ll actually help with scrubbing.
4. **Transfer to Spray Bottle (Optional):** If you prefer using a spray bottle, carefully transfer the mixture into it. You might need to add a little more warm water to thin it out slightly so it sprays easily. Just be careful not to make it too watery.
Putting the Cleaner to Work: Step-by-Step Cleaning Guide
Now for the fun part – putting our DIY cleaner to the test! I’ve used this cleaner on a variety of surfaces, and I’m always impressed with the results. Here’s how I tackle different cleaning tasks:
Cleaning the Kitchen Sink
My kitchen sink is constantly battling food stains, grease, and hard water spots. This cleaner works wonders!
1. **Apply the Cleaner:** Scoop a generous amount of the salt and detergent paste onto a damp sponge or directly into the sink.
2. **Scrub Thoroughly:** Use the sponge to scrub the entire sink, paying extra attention to stained areas and around the drain. The salt will act as a gentle abrasive to lift away grime.
3. **Rinse Well:** Rinse the sink thoroughly with warm water until all traces of the cleaner are gone.
4. **Dry and Shine:** Use a clean, dry cloth to wipe down the sink and reveal its sparkling shine.
Tackling Grimy Bathtub and Shower
Soap scum and mildew can make a bathtub and shower look dingy. This cleaner cuts through the grime like a champ!
1. **Wet the Surface:** Lightly wet the bathtub or shower walls with warm water. This helps the cleaner spread more easily.
2. **Apply the Cleaner:** Apply the salt and detergent paste to a sponge or directly onto the grimy areas.
3. **Scrub Vigorously:** Scrub the surfaces with the sponge, focusing on areas with soap scum, mildew, or hard water stains. For tough stains, let the cleaner sit for a few minutes before scrubbing.
4. **Rinse Thoroughly:** Rinse the bathtub or shower thoroughly with warm water until all traces of the cleaner are gone.
5. **Dry and Admire:** Use a clean, dry cloth to wipe down the surfaces and admire your sparkling clean bathroom!
Cleaning Grout
Grout can be a real pain to clean, but this DIY cleaner makes it much easier.
1. **Apply the Cleaner:** Apply the salt and detergent paste directly onto the grout lines. You can use an old toothbrush for precise application.
2. **Let it Sit:** Allow the cleaner to sit on the grout for about 10-15 minutes to loosen the grime.
3. **Scrub with a Brush:** Use a stiff-bristled brush (like an old toothbrush or grout brush) to scrub the grout lines.
4. **Rinse Thoroughly:** Rinse the area thoroughly with warm water.
5. **Dry and Enjoy:** Wipe the area dry with a clean cloth and enjoy your cleaner, brighter grout!
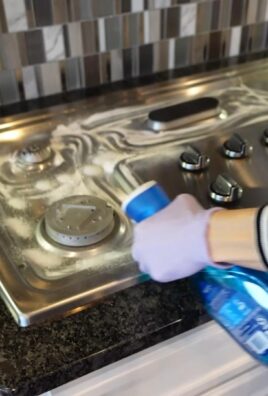
Cleaning Greasy Stovetop
A greasy stovetop is a common kitchen woe. This cleaner helps cut through the grease and grime.
1. **Remove Loose Debris:** Remove any loose food particles or debris from the stovetop.
2. **Apply the Cleaner:** Apply the salt and detergent paste to a sponge or directly onto the greasy areas of the stovetop.
3. **Scrub Gently:** Scrub the stovetop gently with the sponge, avoiding abrasive scrubbing that could scratch the surface.
4. **Wipe Clean:** Wipe the stovetop clean with a damp cloth.
5. **Dry and Polish:** Dry the stovetop with a clean, dry cloth for a sparkling finish.
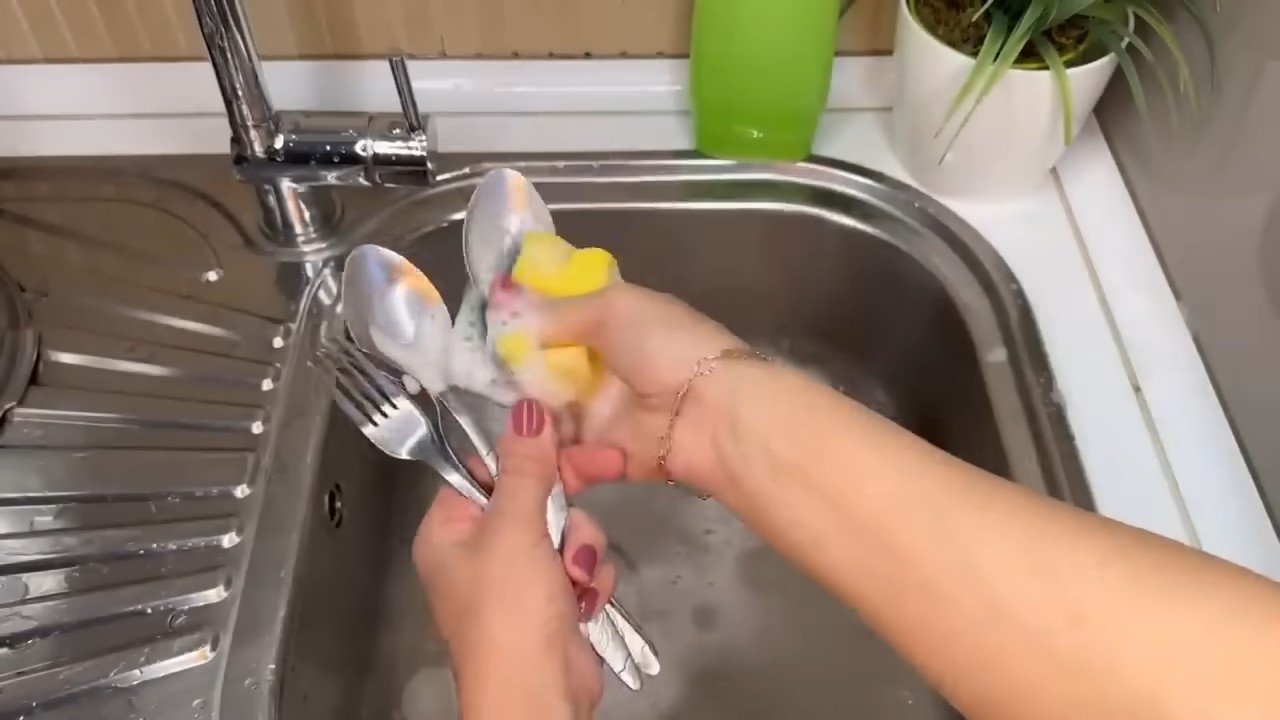
Cleaning Dirty Dishes (For Lightly Soiled Items)
While this isn’t a replacement for your regular dish soap for heavily soiled dishes, it works great for lightly soiled items or for a quick hand wash.
1. **Apply the Cleaner:** Apply a small amount of the salt and detergent paste to a sponge or directly onto the dish.
2. **Wash the Dish:** Wash the dish as you normally would, using the sponge to scrub away any food residue.
3. **Rinse Thoroughly:** Rinse the dish thoroughly with warm water.
4. **Dry and Store:** Dry the dish with a clean towel and store it away.
Important Considerations and Safety Tips
While this cleaner is generally safe and effective, here are a few things to keep in mind:
* **Test in an Inconspicuous Area:** Before using the cleaner on a large surface, test it in a small, inconspicuous area to make sure it doesn’t damage or discolor the material.
* **Avoid Abrasive Surfaces:** While the salt is a gentle abrasive, avoid using this cleaner on delicate or easily scratched surfaces like polished wood or certain types of plastic.
* **Rinse Thoroughly:** Always rinse surfaces thoroughly after cleaning to remove any residue from the salt and detergent.
* **Wear Gloves (Optional):** If you have sensitive skin, wearing gloves while cleaning can help prevent irritation.
* **Storage:** Store any leftover cleaner in an airtight container. It may separate over time, so just give it a good stir before using.
* **Not for All Surfaces:** Avoid using this cleaner on porous surfaces like unsealed grout or natural stone, as the salt can penetrate and cause damage.
Why This Cleaner Works So Well
So, what makes this simple combination of salt and detergent so effective?
* **Salt as an Abrasive:** The salt acts as a gentle abrasive, helping to scrub away dirt, grime, and stains without being too harsh.
* **Detergent for Grease Cutting:** The dish detergent is a powerful degreaser, breaking down grease and oil for easy removal.
* **Synergistic Effect:** The combination of salt and detergent creates a synergistic effect, making the cleaner more effective than either ingredient alone.
Variations and Add-Ins
Want to customize your cleaner? Here are a few ideas:
* **Add Essential Oils:** Add a few drops of your favorite essential oil for a pleasant scent and added cleaning benefits. Lemon, tea tree, and lavender are all great choices.
* **Use Baking Soda:** For extra cleaning power, add a tablespoon of baking soda to the mixture. Baking soda is a natural deodorizer and helps to lift away stains.
* **Vinegar Boost:** For stubborn stains, you can pre-treat the area with vinegar before applying the salt and detergent cleaner.
I hope you found this DIY cleaning guide helpful! I’ve been using this salt and detergent cleaner for a while now, and I’m always amazed at how well it works. It’s a simple, affordable, and effective way to keep your home sparkling clean. Happy cleaning!
Conclusion
So, there you have it! A simple, effective, and incredibly budget-friendly way to tackle stubborn stains and grime using just two common household ingredients: salt and detergent. This DIY cleaning solution isn’t just about saving money; it’s about embracing a more sustainable and conscious approach to cleaning. By ditching harsh chemicals and opting for a natural alternative, you’re not only protecting your home but also contributing to a healthier environment.
This salt and detergent cleaner is a game-changer for anyone looking to simplify their cleaning routine without sacrificing effectiveness. The abrasive nature of salt, combined with the degreasing power of detergent, creates a potent cleaning force that can tackle everything from burnt-on food residue to soap scum and even mildew. It’s truly a versatile solution for various cleaning tasks around the house.
But the beauty of this DIY trick lies in its adaptability. Feel free to experiment with different types of salt. Coarse sea salt can provide extra scrubbing power for tough stains, while fine table salt is gentler on more delicate surfaces. Similarly, you can adjust the type of detergent you use based on the specific cleaning task. For greasy messes, a strong dish soap works wonders. For general cleaning, a mild laundry detergent can be equally effective.
Don’t be afraid to customize the consistency of the paste to suit your needs. For vertical surfaces like shower walls, a thicker paste will cling better and provide longer contact time. For floors or countertops, a slightly thinner consistency might be easier to spread.
Consider adding a few drops of essential oil for a pleasant scent. Lemon, tea tree, or lavender oil not only add a refreshing fragrance but also possess antibacterial and antifungal properties, further enhancing the cleaning power of the solution.
We wholeheartedly encourage you to give this salt and detergent cleaner a try. It’s a simple yet powerful solution that can transform your cleaning routine and leave your home sparkling clean. We are confident that you’ll be amazed by the results.
Once you’ve experienced the magic of this DIY cleaner, we’d love to hear about your experience! Share your before-and-after photos, cleaning tips, and variations in the comments below. Let’s build a community of eco-conscious cleaners who are passionate about finding natural and effective solutions for a sparkling home. Your insights and experiences can inspire others to embrace this simple yet transformative cleaning trick. Let us know what surfaces you cleaned, what kind of stains you tackled, and any modifications you made to the recipe. Your feedback is invaluable and helps us all learn and grow together. So, grab your salt, your detergent, and get ready to experience the cleaning power of this amazing DIY solution!
Frequently Asked Questions (FAQ)
1. What types of detergent can I use with salt for cleaning?
You have several options when it comes to choosing the right detergent for your salt-based cleaner. Dish soap is an excellent choice for tackling grease and grime in the kitchen, especially on stovetops, ovens, and sinks. Its strong degreasing properties work synergistically with the abrasive nature of salt to lift away stubborn residues. Laundry detergent, particularly a mild or unscented variety, is suitable for general cleaning tasks around the house. It’s gentle enough for most surfaces yet effective at removing dirt and stains. For tougher stains or heavily soiled areas, consider using a heavy-duty detergent designed for specific cleaning purposes, such as stain removal or disinfecting. However, always test the solution on an inconspicuous area first to ensure it doesn’t damage the surface. Avoid using detergents containing bleach or harsh chemicals, as they may react negatively with the salt or damage certain materials.
2. Can I use this salt and detergent cleaner on all surfaces?
While this DIY cleaner is generally safe and effective, it’s essential to exercise caution when using it on certain surfaces. Avoid using it on delicate or easily scratched materials such as polished wood, marble, granite, or stainless steel appliances. The abrasive nature of salt can cause scratches or dull the finish on these surfaces. Always test the solution on an inconspicuous area first to ensure it doesn’t damage the material. For sensitive surfaces, consider using a finer grain of salt or diluting the solution with more water. When cleaning painted surfaces, be gentle and avoid excessive scrubbing, as the salt may remove the paint. If you’re unsure whether the cleaner is safe for a particular surface, consult the manufacturer’s instructions or test it on a small, hidden area before applying it to the entire surface.
3. How do I make the salt and detergent paste? What are the right proportions?
Creating the perfect salt and detergent paste is simple and requires just a few basic steps. Start by gathering your ingredients: salt (table salt, sea salt, or kosher salt all work well) and detergent (dish soap or laundry detergent). In a small bowl, combine the salt and detergent. A good starting ratio is approximately 2 parts salt to 1 part detergent, but you can adjust the proportions based on your desired consistency. Mix the ingredients thoroughly until they form a thick, spreadable paste. If the paste is too dry, add a little more detergent. If it’s too runny, add more salt. The ideal consistency should be similar to that of toothpaste, allowing it to cling to surfaces without dripping. Remember to mix well to ensure the salt is evenly distributed throughout the detergent.
4. How long should I leave the salt and detergent paste on a stain before scrubbing?
The amount of time you leave the salt and detergent paste on a stain before scrubbing depends on the severity of the stain and the type of surface you’re cleaning. For light stains or general cleaning, a few minutes may be sufficient. Apply the paste to the stained area, let it sit for 5-10 minutes, and then scrub gently with a sponge or cloth. For tougher, more stubborn stains, you may need to let the paste sit for a longer period, such as 15-30 minutes, or even overnight. This allows the salt and detergent to penetrate the stain and break it down. Before scrubbing, test the paste on an inconspicuous area to ensure it doesn’t damage the surface. When scrubbing, use a circular motion and apply gentle pressure. Avoid excessive scrubbing, as this can scratch or damage the surface. After scrubbing, rinse the area thoroughly with water and dry with a clean cloth.
5. Can I store leftover salt and detergent cleaner? If so, how?
Yes, you can store leftover salt and detergent cleaner for future use. To store it properly, transfer the remaining paste to an airtight container, such as a glass jar or plastic container with a tight-fitting lid. This will prevent the paste from drying out or absorbing moisture from the air. Store the container in a cool, dry place away from direct sunlight and heat. A pantry, cabinet, or storage closet are all suitable options. When you’re ready to use the stored cleaner, simply scoop out the desired amount and apply it to the surface you want to clean. If the paste has dried out slightly, you can add a few drops of water or detergent to restore its original consistency. Properly stored, the salt and detergent cleaner can last for several weeks or even months without losing its effectiveness. However, it’s always a good idea to check the consistency and smell of the cleaner before using it to ensure it hasn’t spoiled.

Leave a Comment