
Propagate chili peppers easily? Absolutely! Imagine turning one vibrant chili pepper plant into a thriving garden full of fiery flavors. That’s the magic we’re unlocking today with a simple, yet incredibly effective DIY trick. For centuries, chili peppers have added zest to cuisines around the globe, from the ancient civilizations of South America, where they originated, to the bustling markets of Asia. They’re not just a spice; they’re a cultural icon!
But let’s be honest, buying new chili pepper plants can get expensive. And sometimes, you just want more of that *perfect* pepper you already have. That’s where this DIY propagation hack comes in. I’m going to show you how to propagate chili peppers easily, saving you money and expanding your garden with minimal effort. Whether you’re a seasoned gardener or just starting out, this method is so straightforward, you’ll be amazed at how quickly you can multiply your chili pepper bounty. Get ready to ditch the garden center and embrace the satisfaction of growing your own peppers from scratch!
Propagating Chili Peppers: A Simple DIY Guide
Hey there, fellow chili enthusiast! Ever wished you could magically multiply your favorite chili pepper plants? Well, you practically can! Propagating chili peppers is surprisingly easy, and I’m going to walk you through a couple of methods that I’ve found incredibly successful. Get ready to expand your chili empire!
Method 1: Propagating Chili Peppers from Cuttings
This method is fantastic for cloning your existing plants. If you have a chili pepper plant that’s producing amazing peppers, this is the way to go to get an exact copy.
What You’ll Need:
* Sharp, clean scissors or pruning shears
* A healthy chili pepper plant (your donor plant!)
* Rooting hormone (optional, but highly recommended)
* Small pots or containers
* Seed starting mix or well-draining potting soil
* Water
* Clear plastic bag or humidity dome (optional, but helpful)
Step-by-Step Instructions:
1. Prepare Your Pots: Fill your small pots or containers with seed starting mix or well-draining potting soil. Moisten the soil thoroughly, but don’t let it get soggy. You want it damp, not swimming.
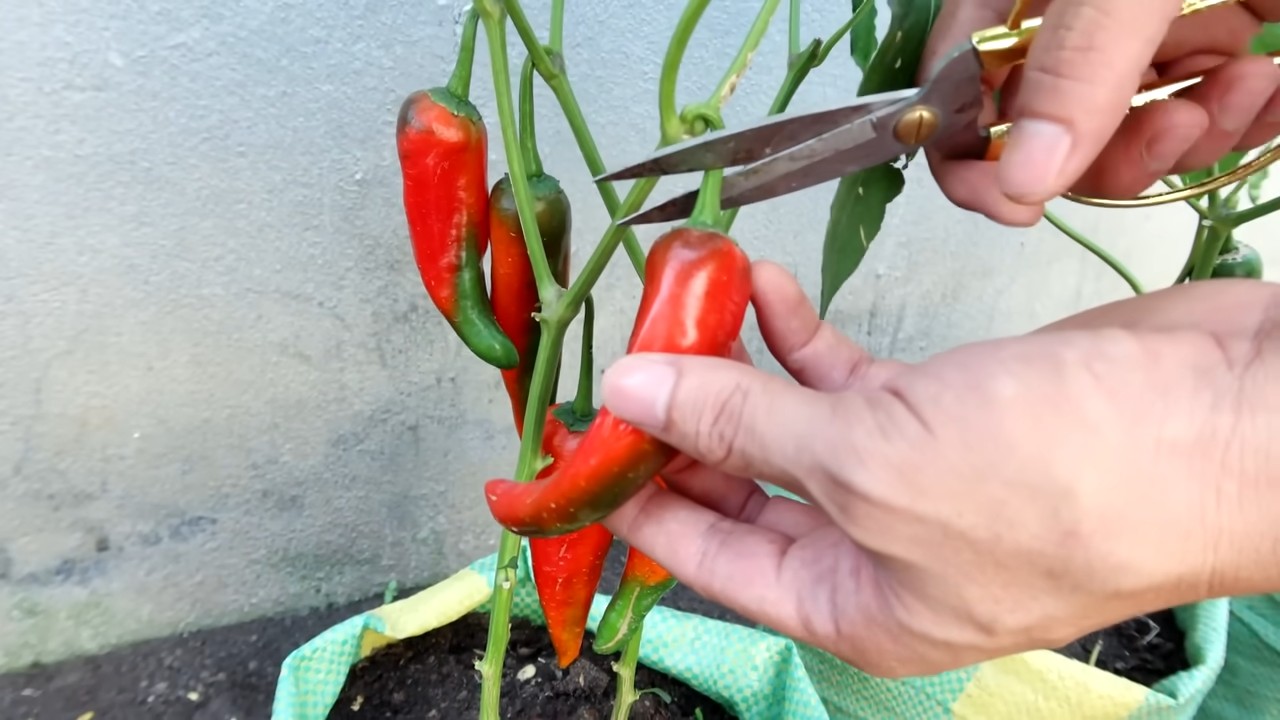
2. Select Your Cuttings: Now comes the fun part! Choose healthy stems from your chili pepper plant. Look for stems that are about 4-6 inches long and have several leaves. Avoid stems that are flowering or have buds, as these will take energy away from root development.
3. Take the Cuttings: Using your sharp, clean scissors or pruning shears, make a clean cut just below a node (the point where a leaf or branch grows from the stem). This is where roots will most likely emerge.
4. Prepare the Cuttings: Remove the leaves from the bottom 1-2 inches of the cutting. This will prevent them from rotting when they’re buried in the soil. You can also trim the remaining leaves in half to reduce water loss.
5. Apply Rooting Hormone (Optional but Recommended): Dip the cut end of the stem into rooting hormone powder or liquid. This will encourage root development and increase your chances of success. Follow the instructions on the rooting hormone package. I’ve found that using rooting hormone significantly speeds up the process.
6. Plant the Cuttings: Make a small hole in the prepared soil with your finger or a pencil. Gently insert the cutting into the hole, making sure the bottom 1-2 inches are buried. Gently press the soil around the stem to secure it.
7. Water the Cuttings: Water the cuttings gently to settle the soil.
8. Create a Humid Environment (Optional but Helpful): Place a clear plastic bag over the pot or use a humidity dome to create a humid environment. This will help prevent the cuttings from drying out. Make sure the bag doesn’t touch the leaves, as this can lead to rot. You can prop the bag up with skewers or chopsticks.
9. Provide Light and Warmth: Place the cuttings in a warm, bright location, but avoid direct sunlight. Direct sunlight can scorch the leaves. A windowsill with indirect light is perfect.
10. Monitor and Water: Check the cuttings regularly to make sure the soil stays moist. Water as needed, but avoid overwatering. If you’re using a plastic bag or humidity dome, remove it for a few hours each day to allow for air circulation and prevent mold growth.
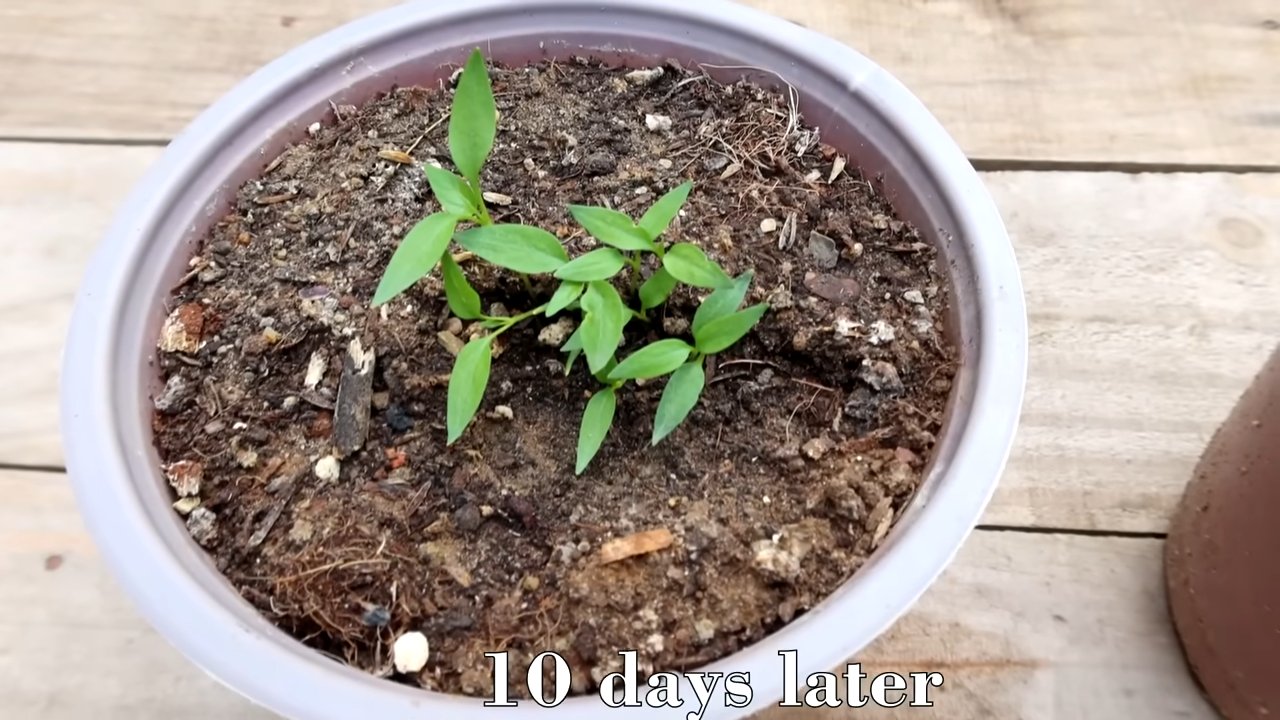
11. Check for Root Development: After a few weeks (usually 2-4), you should start to see new growth. You can gently tug on the cutting to see if it has rooted. If it resists, it means roots have formed!
12. Transplant: Once the cuttings have developed a good root system, you can transplant them into larger pots or directly into your garden.
Method 2: Propagating Chili Peppers from Seeds
This method is great if you want to grow chili peppers from the peppers themselves! It’s a bit more involved than taking cuttings, but it’s incredibly rewarding.
What You’ll Need:
* Ripe chili peppers (from your own plants or store-bought)
* Paper towels
* Small pots or seed trays
* Seed starting mix
* Water
* Heat mat (optional, but helpful)
* Grow light (optional, but helpful)
Step-by-Step Instructions:
1. Harvest the Seeds: Carefully cut open the ripe chili peppers and remove the seeds. Discard any seeds that are discolored or damaged.
2. Dry the Seeds: Place the seeds on a paper towel and let them dry for a few days. This will help prevent them from rotting when you plant them. Make sure they are completely dry before proceeding.
3. Prepare Your Seed Starting Mix: Fill your small pots or seed trays with seed starting mix. Moisten the soil thoroughly.
4. Sow the Seeds: Make small holes in the soil, about 1/4 inch deep. Place 2-3 seeds in each hole. This increases your chances of at least one seed germinating.
5. Cover the Seeds: Gently cover the seeds with soil and lightly water them.
6. Provide Warmth: Chili pepper seeds need warmth to germinate. Place the pots or seed trays on a heat mat or in a warm location. The ideal temperature is around 80-85°F (27-29°C).
7. Provide Light: Once the seeds have germinated, they need plenty of light. Place them under a grow light or in a sunny windowsill.
8. Water Regularly: Keep the soil moist, but not soggy. Water as needed.
9. Thin the Seedlings: Once the seedlings have developed a few sets of true leaves (the leaves that look like miniature versions of the adult leaves), thin them out, leaving only the strongest seedling in each pot or cell.
10. Harden Off the Seedlings: Before transplanting the seedlings into your garden, you need to harden them off. This means gradually exposing them to outdoor conditions. Start by placing them outside for a few hours each day, gradually increasing the amount of time they spend outdoors.
11. Transplant: Once the seedlings have been hardened off, you can transplant them into your garden or larger pots.
Tips for Success
* Cleanliness is Key: Always use clean tools and pots to prevent the spread of disease.
* Don’t Overwater: Overwatering is a common mistake that can lead to root rot. Make sure the soil is well-draining and only water when the top inch of soil is dry.
* Be Patient: Propagating chili peppers can take time. Don’t get discouraged if you don’t see results immediately.
* Experiment: Try different methods and see what works best for you.
* Choose the Right Variety: Some chili pepper varieties are easier to propagate than others. Start with varieties that are known to be easy to grow.
* Provide Adequate Light: Chili peppers need plenty of light to thrive. If you’re growing them indoors, use a grow light.
* Fertilize Regularly: Chili peppers are heavy feeders. Fertilize them regularly with a balanced fertilizer.
* Protect from Pests and Diseases: Keep an eye out for pests and diseases and take action promptly if you see any problems.
Troubleshooting
* Cuttings Not Rooting: Make sure you’re using rooting hormone and providing adequate humidity. Also, check the temperature. Cuttings need warmth to root.
* Seeds Not Germinating: Make sure the seeds are fresh and that you’re providing adequate warmth and moisture. Also, check the seed starting mix. It should be well-draining.
* Seedlings Dying: Overwatering is a common cause of seedling death. Make sure the soil is well-draining and only water when the top inch of soil is dry. Also, check for pests and diseases.
Propagating chili peppers is a rewarding experience that allows you to expand your chili pepper collection and enjoy fresh, homegrown peppers all season long. So, grab your tools, get your hands dirty, and start propagating! Happy growing!
Conclusion
So, there you have it! Propagating chili peppers easily at home is not only achievable but also incredibly rewarding. Forget relying solely on store-bought seedlings or expensive plants. This simple DIY trick empowers you to cultivate your own thriving chili pepper garden, bursting with flavor and vibrant colors, all from the comfort of your own home.
Why is this a must-try? Because it’s cost-effective, sustainable, and gives you complete control over the varieties you grow. Imagine having a constant supply of your favorite chili peppers, from mild jalapeños to fiery habaneros, ready to spice up your culinary creations whenever you desire. Plus, there’s an undeniable satisfaction in nurturing a plant from seed or cutting to a fully grown, fruit-bearing specimen. It’s a connection to nature that’s both grounding and fulfilling.
But the benefits don’t stop there. This method allows you to experiment with different propagation techniques. For instance, you can try propagating from seeds saved from your favorite chili peppers, ensuring you’re growing varieties that are perfectly suited to your local climate and taste preferences. Or, if you have a particularly productive chili pepper plant, you can take cuttings and create clones, guaranteeing consistent results and preserving desirable traits.
Consider these variations to further enhance your chili pepper propagation journey:
* Hydroponic Propagation: For faster root development, try propagating your chili pepper cuttings in a hydroponic setup. This involves suspending the cuttings in water with added nutrients, providing them with optimal conditions for growth.
* Grafting: If you’re feeling adventurous, explore the world of grafting. This technique involves joining two different chili pepper plants together, combining the desirable traits of each. For example, you could graft a disease-resistant rootstock onto a scion from a particularly flavorful chili pepper variety.
* Different Growing Mediums: Experiment with different growing mediums for your seedlings or cuttings. While a standard seed starting mix works well, you can also try using coco coir, perlite, or vermiculite to see which medium yields the best results for you.
* Controlled Environment: Using a grow tent or a greenhouse can significantly improve your success rate, especially in regions with harsh climates. These controlled environments provide consistent temperature, humidity, and light, creating ideal conditions for chili pepper propagation.
We wholeheartedly encourage you to give this DIY trick a try. It’s a fun, educational, and ultimately rewarding experience that will transform the way you think about growing chili peppers. Don’t be afraid to experiment, adapt the techniques to your specific needs, and most importantly, have fun!
Once you’ve successfully propagated your chili peppers, we’d love to hear about your experience. Share your tips, tricks, and photos in the comments below. Let’s create a community of chili pepper enthusiasts, sharing our knowledge and passion for these fiery fruits. What varieties did you propagate? What challenges did you face, and how did you overcome them? Your insights could be invaluable to other aspiring chili pepper growers. So go ahead, get your hands dirty, and start propagating! You’ll be amazed at what you can achieve.
Frequently Asked Questions (FAQ)
Q: What is the best time of year to propagate chili peppers?
A: The ideal time to propagate chili peppers is typically in the spring or early summer. This is when the weather is warm and the days are long, providing optimal conditions for seed germination and root development. However, with the use of grow lights and controlled environments, you can propagate chili peppers year-round. If you are starting from seed, aim to start 6-8 weeks before the last expected frost in your area. For cuttings, spring and summer offer the best chances of success due to the plant’s active growth phase.
Q: What type of chili peppers are easiest to propagate?
A: Generally, milder chili pepper varieties like jalapeños and bell peppers tend to be easier to propagate than hotter varieties like habaneros or ghost peppers. This is because milder varieties often have higher germination rates and are more resilient to environmental stressors. However, with proper care and attention, you can successfully propagate any type of chili pepper. The key is to provide the right conditions and be patient.
Q: How long does it take for chili pepper seeds to germinate?
A: Chili pepper seeds typically take 7-21 days to germinate, depending on the variety, temperature, and moisture levels. To speed up germination, you can soak the seeds in warm water for 24 hours before planting. Maintaining a consistent temperature of 80-85°F (27-29°C) is also crucial for successful germination. Using a heat mat can help maintain this temperature.
Q: What is the best soil for propagating chili peppers?
A: The best soil for propagating chili peppers is a well-draining seed starting mix. This type of mix is typically lightweight and sterile, preventing fungal diseases and providing optimal aeration for root development. Avoid using garden soil, as it can be too heavy and may contain pathogens. You can also create your own seed starting mix by combining equal parts peat moss, perlite, and vermiculite.
Q: How often should I water chili pepper seedlings?
A: Water chili pepper seedlings regularly, keeping the soil consistently moist but not waterlogged. Overwatering can lead to root rot, while underwatering can stunt growth. Check the soil moisture level daily and water when the top inch of soil feels dry to the touch. Use a gentle watering can or spray bottle to avoid disturbing the delicate seedlings.
Q: How much light do chili pepper seedlings need?
A: Chili pepper seedlings need plenty of light to thrive. Aim for at least 6-8 hours of direct sunlight per day, or 14-16 hours of artificial light using grow lights. If using grow lights, position them a few inches above the seedlings to prevent burning. Insufficient light can result in leggy, weak seedlings.
Q: How do I harden off chili pepper seedlings before transplanting them outdoors?
A: Hardening off chili pepper seedlings is essential to acclimate them to outdoor conditions before transplanting. This process involves gradually exposing the seedlings to increasing amounts of sunlight, wind, and temperature fluctuations over a period of 7-10 days. Start by placing the seedlings outdoors in a sheltered location for a few hours each day, gradually increasing the amount of time they spend outdoors.
Q: What are some common problems when propagating chili peppers and how can I fix them?
A: Some common problems include:
* Damping off: A fungal disease that causes seedlings to rot at the soil line. Prevent this by using sterile seed starting mix and avoiding overwatering.
* Leggy seedlings: Caused by insufficient light. Provide more light or move the seedlings closer to the light source.
* Slow growth: Can be caused by low temperatures, nutrient deficiencies, or poor soil quality. Ensure the seedlings are kept warm, fertilize them with a balanced fertilizer, and use a well-draining soil mix.
* Pest infestations: Monitor the seedlings regularly for pests like aphids or spider mites. Treat infestations with insecticidal soap or neem oil.
Q: Can I propagate chili peppers from cuttings?
A: Yes, you can propagate chili peppers from cuttings. Take cuttings from healthy, non-flowering stems, remove the lower leaves, and place the cuttings in water or a rooting medium. Keep the cuttings in a warm, humid environment and wait for roots to develop. Once the roots are a few inches long, you can transplant the cuttings into pots.
Q: What kind of fertilizer should I use for chili pepper seedlings?
A: Use a balanced, water-soluble fertilizer diluted to half strength. A fertilizer with an NPK ratio of 10-10-10 or 20-20-20 is a good choice. Fertilize the seedlings every 2-3 weeks, starting when they have their first true leaves. Avoid over-fertilizing, as this can burn the roots.

Leave a Comment