
Pot Grown Spinach: Imagine stepping outside your door and harvesting fresh, vibrant spinach leaves for your salad, smoothie, or stir-fry. Sounds idyllic, right? Well, it’s totally achievable, even if you don’t have acres of land! For centuries, cultivating food close to home has been a cornerstone of self-sufficiency and a connection to nature. From ancient Roman window boxes overflowing with herbs to the victory gardens of World War II, growing your own food is a time-honored tradition.
But let’s face it, not everyone has the space or time for a sprawling garden. That’s where the magic of container gardening comes in! And that’s why I’m so excited to share these easy and effective DIY tricks for growing your own pot grown spinach. You’ll learn how to select the perfect pot, choose the right soil, and provide the ideal conditions for a bountiful harvest.
Why is this so important? Because fresh, homegrown spinach tastes infinitely better than anything you can buy at the store. Plus, you’ll know exactly what’s going into your food – no pesticides or mystery ingredients! So, whether you’re a seasoned gardener or a complete beginner, get ready to unlock the secrets to growing delicious, nutritious spinach right on your patio, balcony, or even your windowsill. Let’s get started!
Growing Spinach in Pots: A Beginner’s Guide
Hey there, fellow gardening enthusiasts! I’m so excited to share my experience with growing spinach in pots. It’s surprisingly easy, even if you don’t have a huge garden. Fresh, homegrown spinach is so much tastier than the store-bought stuff, and you’ll love having it readily available for salads, smoothies, or a quick sauté. Let’s dive in!
Choosing the Right Pot and Soil
Before we even think about seeds, let’s get the foundation right. The pot and soil are crucial for happy spinach plants.
* **Pot Size:** Spinach needs room for its roots to grow. I recommend a pot that’s at least 6-8 inches deep and wide. A 12-inch pot is even better, especially if you plan on growing multiple plants together. Remember, crowded plants are unhappy plants!
* **Drainage:** This is non-negotiable. Make sure your pot has drainage holes. Spinach hates sitting in soggy soil, which can lead to root rot.
* **Material:** Clay, plastic, or even fabric pots work well. Clay pots dry out faster, so you might need to water more frequently. Plastic pots retain moisture better. Fabric pots are great for aeration and drainage.
* **Soil:** Don’t just grab any old dirt from your backyard! Spinach needs well-draining, nutrient-rich soil. I always use a good quality potting mix specifically designed for vegetables. You can also amend regular potting mix with compost or aged manure to boost its fertility. Avoid using garden soil directly in pots, as it can compact and not drain well.
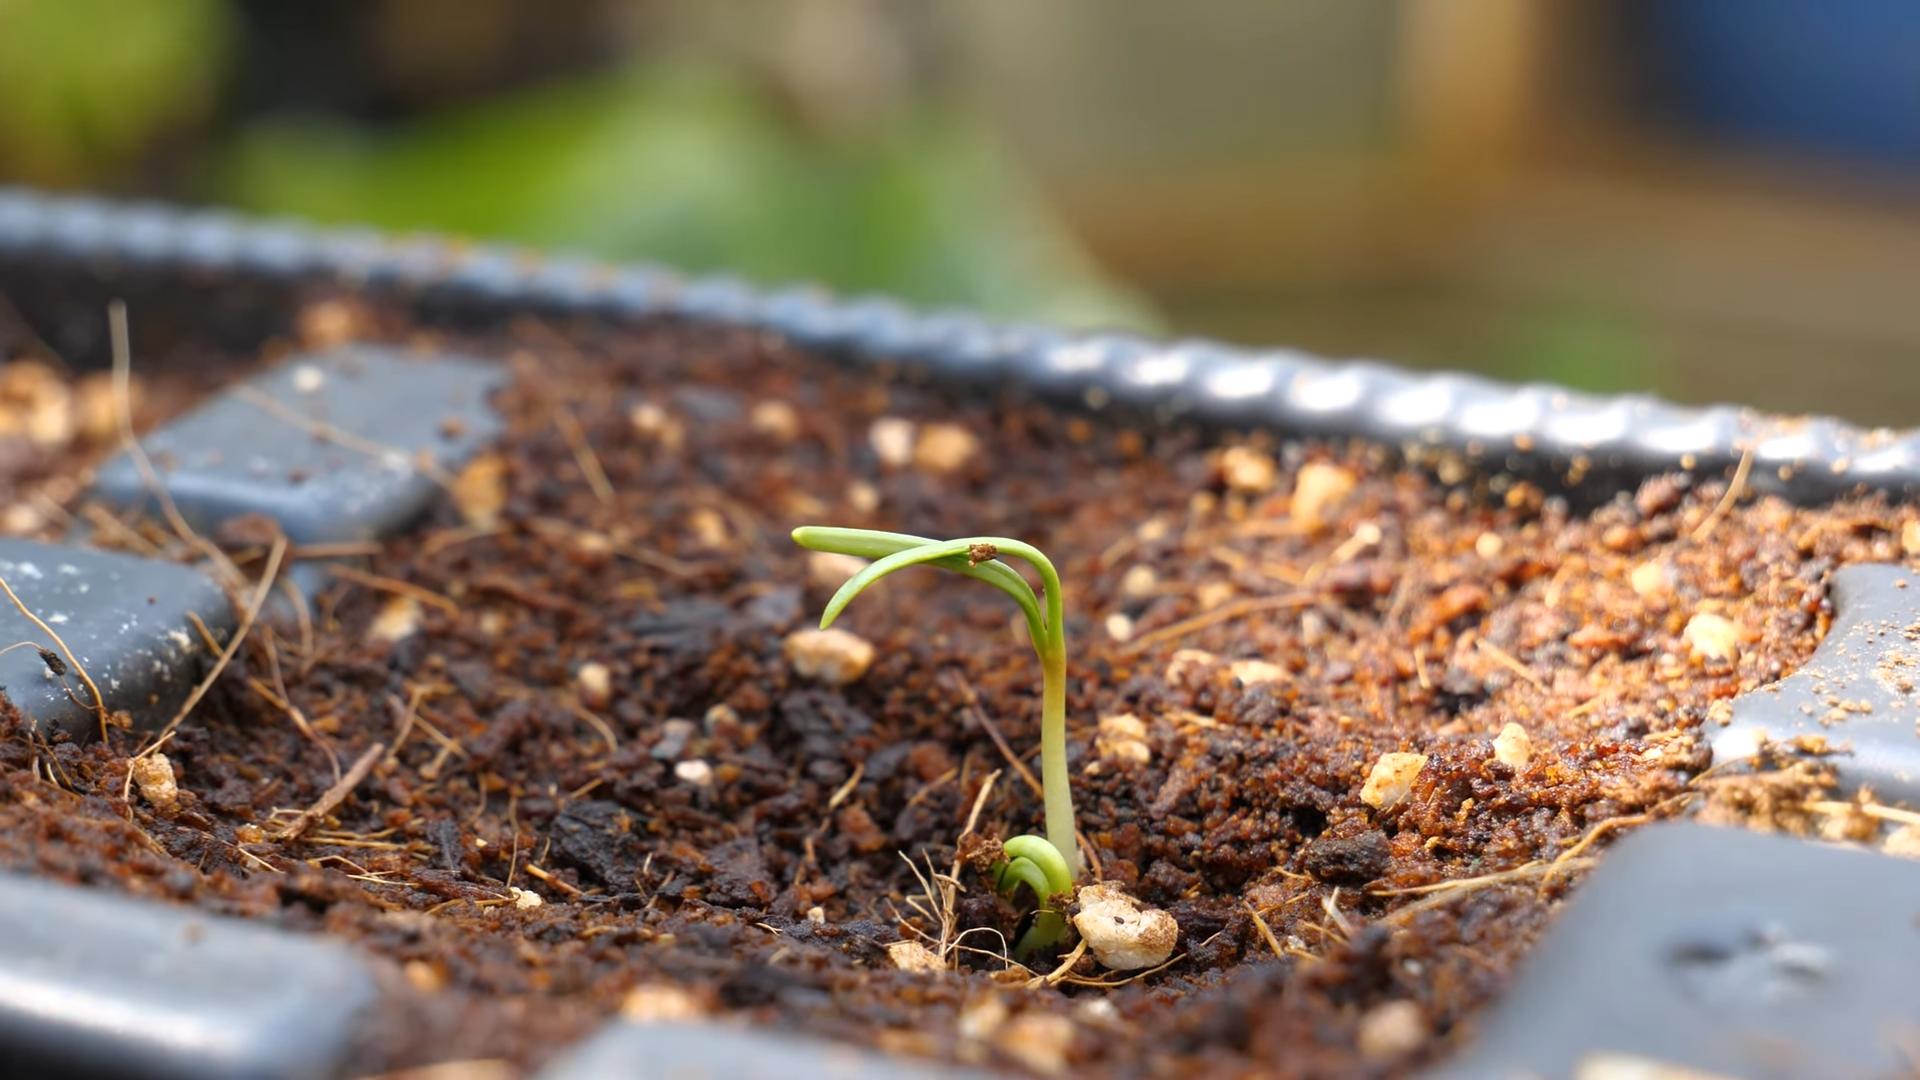
Sowing the Seeds
Now for the fun part – planting those tiny seeds!
1. **Prepare the Soil:** Fill your pot with the potting mix, leaving about an inch of space at the top. Gently pat the soil down to remove any large air pockets.
2. **Sow the Seeds:** Spinach seeds are small, so be careful not to plant them too deep. I usually sow them about ½ inch deep and about 1-2 inches apart. You can sow them closer together if you plan on thinning them out later.
3. **Cover the Seeds:** Lightly cover the seeds with soil.
4. **Water Gently:** Water the soil gently using a watering can with a rose head or a spray bottle. You want to moisten the soil without disturbing the seeds.
5. **Placement:** Place the pot in a location that receives at least 3-6 hours of sunlight per day. Spinach prefers cooler temperatures, so a spot with morning sun and afternoon shade is ideal, especially in warmer climates.
6. **Keep Moist:** Keep the soil consistently moist but not soggy. Check the soil moisture daily and water when the top inch feels dry.
Caring for Your Spinach Plants
Once your spinach seedlings emerge (usually within 5-10 days), it’s time to provide them with the care they need to thrive.
1. **Thinning (If Necessary):** If you sowed your seeds close together, you’ll need to thin them out once they have a few true leaves. This means removing some of the weaker seedlings to give the remaining plants enough space to grow. Snip the unwanted seedlings at the soil line with scissors.
2. **Watering:** As mentioned before, consistent moisture is key. Water deeply whenever the top inch of soil feels dry. Avoid overhead watering, as this can lead to fungal diseases.
3. **Fertilizing:** Spinach is a heavy feeder, meaning it needs plenty of nutrients to grow well. I like to fertilize my spinach plants every 2-3 weeks with a balanced liquid fertilizer diluted to half strength. You can also use a slow-release fertilizer at planting time.
4. **Weeding:** Keep an eye out for weeds and remove them promptly. Weeds compete with your spinach plants for nutrients and water.
5. **Pest Control:** Spinach is relatively pest-resistant, but you might encounter aphids, slugs, or snails. Check your plants regularly and remove any pests by hand. You can also use insecticidal soap or diatomaceous earth to control pests.
6. **Bolting Prevention:** Bolting is when spinach plants prematurely flower and produce seeds. This makes the leaves bitter and unpalatable. Bolting is usually triggered by hot weather or stress. To prevent bolting, keep your spinach plants well-watered, provide them with shade during the hottest part of the day, and harvest the leaves regularly.
Harvesting Your Spinach
The best part – enjoying the fruits (or rather, leaves!) of your labor.
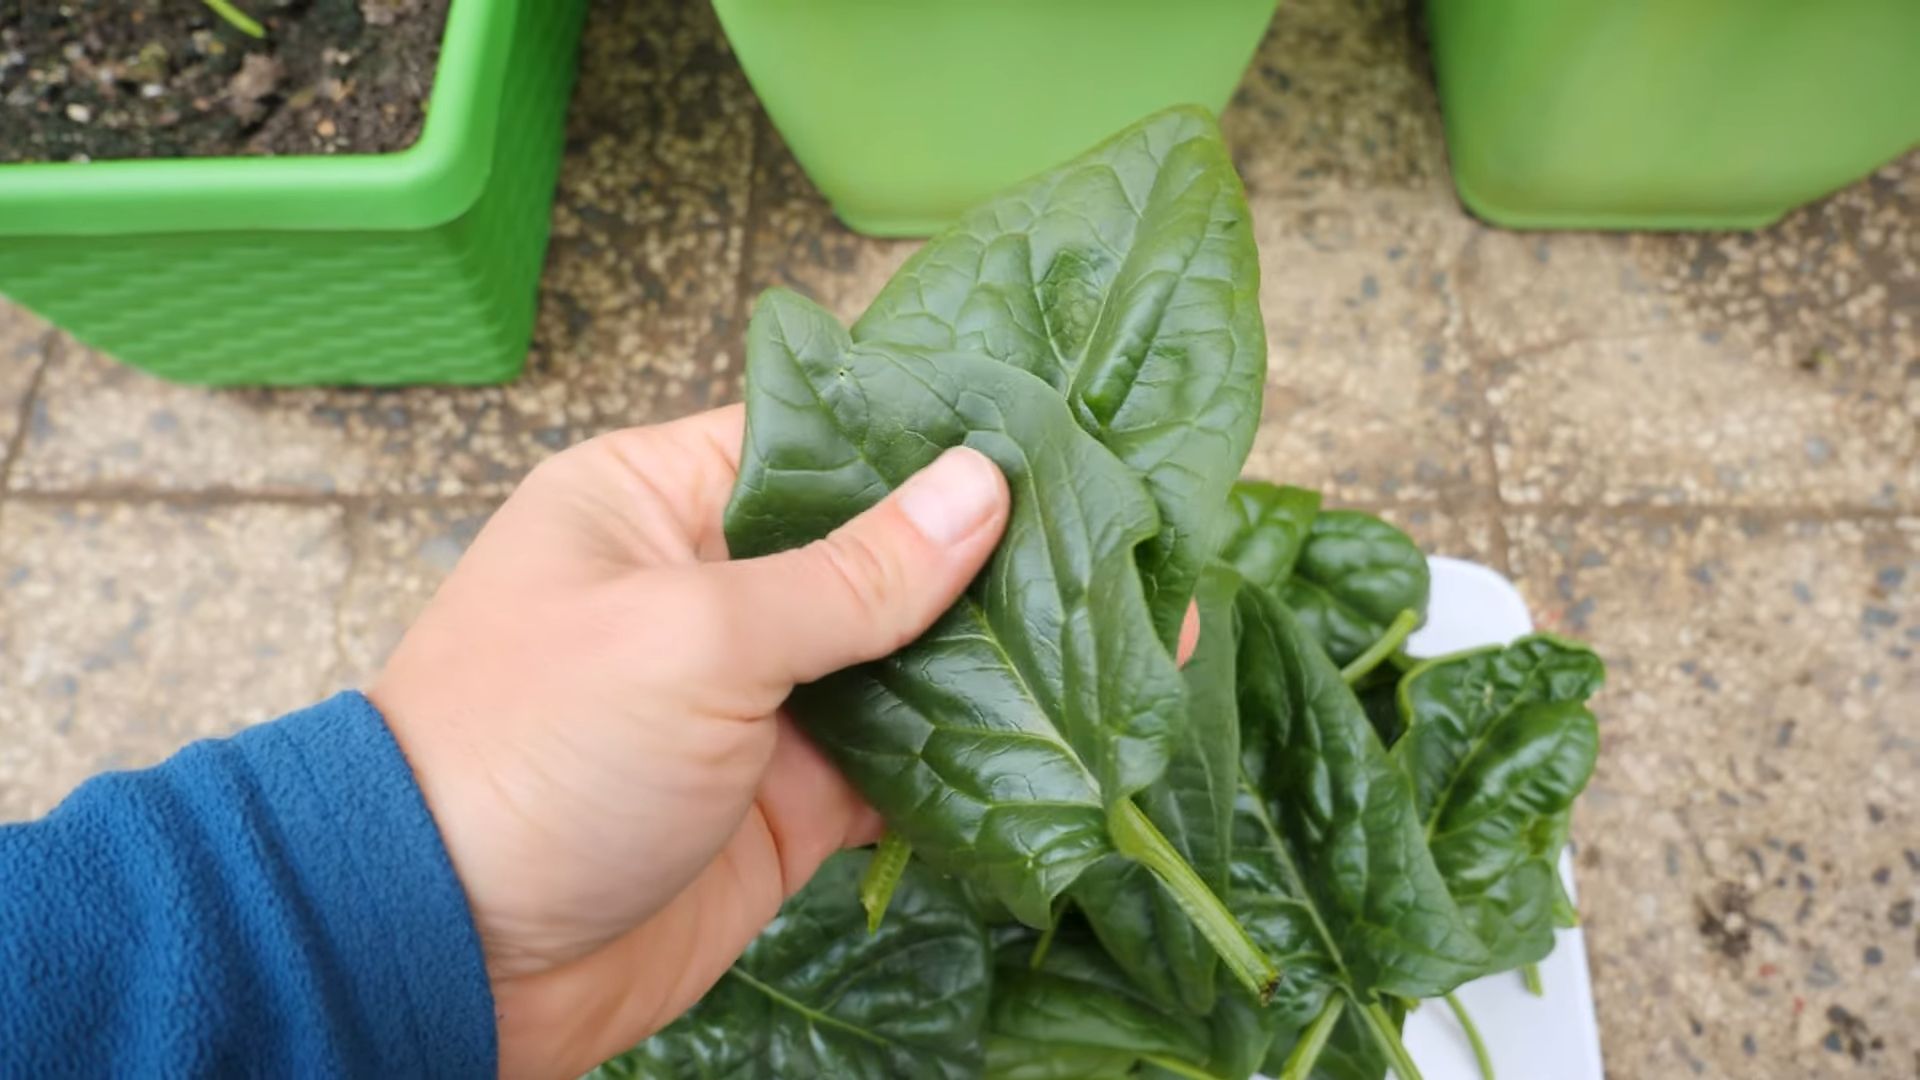
1. **When to Harvest:** You can start harvesting spinach leaves when they are about 4-6 inches long.
2. **How to Harvest:** Harvest the outer leaves first, leaving the inner leaves to continue growing. You can use scissors or simply pinch off the leaves with your fingers.
3. **Harvest Regularly:** Regular harvesting encourages the plant to produce more leaves.
4. **Storage:** Freshly harvested spinach is best used immediately. However, you can store it in the refrigerator for a few days. Wash the leaves thoroughly and pat them dry before storing them in a plastic bag or container.
Troubleshooting
Even with the best care, you might encounter some problems along the way. Here are a few common issues and how to address them:
* **Yellowing Leaves:** This could be a sign of nutrient deficiency, overwatering, or underwatering. Check the soil moisture and fertilize if necessary.
* **Stunted Growth:** This could be due to poor soil, lack of sunlight, or pest infestation. Make sure your spinach plants are getting enough sunlight and nutrients, and check for pests.
* **Bolting:** As mentioned earlier, bolting is usually triggered by hot weather or stress. Provide shade and water regularly to prevent bolting.
* **Pests:** Aphids, slugs, and snails can damage spinach leaves. Remove pests by hand or use insecticidal soap or diatomaceous earth.
Choosing Spinach Varieties for Pots
Not all spinach varieties are created equal, especially when it comes to container gardening. Some are better suited for pots than others. Here are a few of my favorites:
* **Baby’s Leaf Hybrid:** This is a classic choice for baby spinach. It’s fast-growing and produces tender, mild-flavored leaves.
* **Space:** This variety is known for its smooth, dark green leaves and resistance to bolting.
* **Tyee:** Another great choice for hot weather, Tyee is slow to bolt and produces large, flavorful leaves.
* **Bloomsdale Long Standing:** This heirloom variety is known for its crinkled leaves and good flavor. It’s also relatively slow to bolt.
Extending Your Spinach Season
Spinach is a cool-season crop, meaning it grows best in spring and fall. However, with a little planning, you can extend your spinach season and enjoy fresh spinach for a longer period.
* **Succession Planting:** Sow new seeds every 2-3 weeks to ensure a continuous harvest.
* **Shade Cloth:** Use shade cloth to protect your spinach plants from the hot afternoon sun during the summer months.
* **Cold Frames or Greenhouses:** In colder climates, you can use cold frames or greenhouses to protect your spinach plants from frost and extend the growing season into the winter.
Bonus Tip: Companion Planting
Companion planting is the practice of growing different plants together to benefit each other. Some good companion plants for spinach include:
* **Radishes:** Radishes help to deter pests and loosen the soil.
* **Lettuce:** Lettuce and spinach have similar growing requirements and can be grown together in the same pot.
* **Strawberries:** Strawberries help to suppress weeds and attract beneficial insects.
* **Garlic and Onions:** These plants help to repel pests.
Enjoying Your Homegrown Spinach
Now that you’ve successfully grown your own spinach, it’s time to enjoy it! Here are a few of my favorite ways to use fresh spinach:
* **Salads:** Add spinach to your favorite salads for a boost of nutrients and flavor.
* **Smoothies:** Blend spinach into your smoothies for a healthy and delicious drink.
* **Sautéed Spinach:** Sauté spinach with garlic and olive oil for a quick and easy side dish.
* **Spinach Dip:** Use fresh spinach to make a creamy and delicious spinach dip.
* **Omelets and Frittatas:** Add spinach to your omelets and frittatas for a healthy and flavorful breakfast.
* **Soups and Stews:** Add spinach to your soups and stews for a boost of nutrients.
Growing spinach in pots is a rewarding experience that anyone can enjoy. With a little bit of care and attention, you can have a steady supply of fresh, homegrown spinach right at your fingertips. Happy gardening!
Conclusion
So, there you have it! Cultivating your own pot-grown spinach is not just a gardening project; it’s an investment in fresh, flavorful, and readily available greens right at your fingertips. We’ve walked you through the simple steps, highlighting the ease and accessibility of this method, even for those with limited space or gardening experience.
Why is this DIY trick a must-try? Because it empowers you to control the quality and freshness of your spinach. No more wilted, pre-packaged greens from the supermarket! Imagine stepping outside your door and harvesting vibrant, crisp spinach leaves whenever you need them. The taste difference alone is worth the effort. Plus, you’ll be reducing your carbon footprint by cutting down on transportation and packaging waste. It’s a win-win for your taste buds and the environment.
But the benefits extend beyond just convenience and flavor. Growing your own spinach allows you to ensure it’s free from harmful pesticides and herbicides. You know exactly what’s going into your food, giving you peace of mind and promoting a healthier lifestyle. And let’s not forget the therapeutic aspect of gardening. Nurturing your spinach plants can be a relaxing and rewarding experience, providing a welcome escape from the stresses of daily life.
Looking for variations to spice things up? Consider experimenting with different varieties of spinach. Baby spinach is perfect for salads, while savoy spinach holds up well in cooked dishes. You can also try adding companion plants to your pot, such as marigolds to deter pests or basil to enhance the flavor of your spinach. Another fun variation is succession planting. By sowing seeds every few weeks, you can ensure a continuous harvest of fresh spinach throughout the growing season.
Don’t be afraid to get creative with your pot selection, too. While a standard garden pot works perfectly well, you can also repurpose old containers like buckets, tubs, or even hanging baskets. Just make sure your chosen container has adequate drainage to prevent waterlogging.
Ultimately, the success of your pot-grown spinach depends on your willingness to give it a try. Don’t be intimidated by the prospect of gardening. Even if you’ve never grown anything before, you can absolutely succeed with this simple and rewarding project. The key is to follow the basic guidelines we’ve outlined, pay attention to your plants’ needs, and be patient.
We are confident that you’ll be amazed by the results. Imagine the satisfaction of serving a salad made with spinach you grew yourself, or adding a handful of fresh leaves to your morning smoothie. The possibilities are endless!
So, what are you waiting for? Grab a pot, some soil, and some spinach seeds, and get started today. We encourage you to share your experiences with us. Post photos of your pot-grown spinach on social media using [Your Hashtag Here], and let us know how it’s going. We’d love to see your creations and hear your tips and tricks. Together, we can inspire others to embrace the joy of growing their own food and enjoy the delicious rewards of fresh, homegrown spinach. This method of growing spinach in pots is a game changer.
Frequently Asked Questions (FAQ)
1. What is the best type of pot to use for growing spinach?
The ideal pot for growing spinach should be at least 6-8 inches deep and wide to provide enough space for the roots to develop. Terracotta or plastic pots are both suitable, but ensure the pot has drainage holes to prevent waterlogging, which can lead to root rot. A wider pot is generally better as it allows for more plants to be grown together. Consider using a self-watering pot to help maintain consistent moisture levels, especially if you tend to forget to water regularly.
2. What kind of soil should I use for pot-grown spinach?
Spinach thrives in well-draining, fertile soil with a pH between 6.0 and 7.0. A good potting mix specifically formulated for vegetables is an excellent choice. You can also create your own mix by combining equal parts of compost, peat moss (or coconut coir), and perlite or vermiculite. Compost provides essential nutrients, peat moss (or coconut coir) helps retain moisture, and perlite or vermiculite improves drainage and aeration. Avoid using garden soil, as it can be too heavy and may contain pests or diseases.
3. How often should I water my pot-grown spinach?
Spinach needs consistent moisture to thrive, so water your plants regularly, especially during hot and dry weather. Check the soil moisture by sticking your finger about an inch deep. If the soil feels dry, it’s time to water. Water deeply until excess water drains out of the bottom of the pot. Avoid overwatering, as this can lead to root rot. Mulching around the base of the plants with straw or wood chips can help retain moisture and suppress weeds.
4. How much sunlight does pot-grown spinach need?
Spinach prefers full sun (6-8 hours of direct sunlight per day) but can tolerate partial shade, especially in hotter climates. If you live in a region with intense summer heat, providing some afternoon shade can help prevent the leaves from wilting or bolting (going to seed prematurely). If you’re growing spinach indoors, place the pot near a sunny window or use grow lights to supplement natural light. Rotate the pot regularly to ensure even growth.
5. How do I fertilize my pot-grown spinach?
Spinach is a heavy feeder and benefits from regular fertilization. Start by incorporating compost into the potting mix before planting. During the growing season, fertilize every 2-3 weeks with a balanced liquid fertilizer diluted to half strength. Alternatively, you can use a slow-release granular fertilizer at planting time. Avoid over-fertilizing, as this can lead to excessive leaf growth and reduced flavor. Organic fertilizers, such as fish emulsion or seaweed extract, are excellent choices for promoting healthy growth.
6. When is the best time to harvest my pot-grown spinach?
You can start harvesting spinach leaves as soon as they are large enough to eat, typically when they are 4-6 inches long. Harvest the outer leaves first, leaving the inner leaves to continue growing. This cut-and-come-again method allows you to enjoy a continuous harvest over several weeks. Avoid harvesting during the hottest part of the day, as the leaves will be more prone to wilting. Wash the harvested leaves thoroughly before using them.
7. How do I prevent pests and diseases from affecting my pot-grown spinach?
Regularly inspect your spinach plants for signs of pests or diseases. Common pests include aphids, spider mites, and leaf miners. You can control these pests by spraying the plants with insecticidal soap or neem oil. Diseases such as downy mildew and powdery mildew can be prevented by providing good air circulation and avoiding overhead watering. Remove any infected leaves promptly to prevent the spread of disease. Companion planting with marigolds or basil can also help deter pests.
8. Can I grow spinach in pots during the winter?
Yes, you can grow spinach in pots during the winter, especially in mild climates. In colder regions, you can protect your plants by moving the pots indoors or covering them with a cold frame or row cover. Spinach is relatively cold-hardy and can tolerate light frosts. Choose a variety that is specifically bred for winter growing. Provide adequate light and water, and avoid overwatering, as the soil will dry out more slowly in cooler temperatures.
9. What are some common problems when growing spinach in pots and how can I fix them?
Some common problems include bolting (premature flowering), yellowing leaves, and pest infestations. Bolting can be caused by hot weather or stress. To prevent bolting, provide shade during the hottest part of the day and ensure consistent watering. Yellowing leaves can be a sign of nutrient deficiency or overwatering. Fertilize regularly and avoid overwatering. Pest infestations can be controlled with insecticidal soap or neem oil. Regularly inspect your plants and address any problems promptly to ensure a healthy and productive harvest.

Leave a Comment