
Planting Ginger at Home might seem intimidating, but trust me, it’s easier than you think! Imagine harvesting your own fresh, spicy ginger root right from your backyard or even your windowsill. No more last-minute grocery store runs when a recipe calls for that zingy flavor!
Ginger has a rich history, dating back thousands of years in Asian cultures, where it was valued not only as a spice but also for its medicinal properties. From ancient remedies to culinary masterpieces, ginger has played a vital role. Today, we’re bringing that tradition into our homes with this simple DIY guide.
Why should you learn this trick? Well, for starters, homegrown ginger often tastes fresher and more vibrant than what you find in stores. Plus, you’ll know exactly where it came from and how it was grown – no pesticides or questionable practices! Planting Ginger at Home is also a fantastic way to reduce your carbon footprint and connect with nature, even if you only have a small space. I’m excited to share my easy-to-follow steps, so you can enjoy the satisfaction of growing your own ginger. Let’s get started!

Grow Your Own Ginger: A Simple DIY Guide
Hey there, fellow plant enthusiasts! Ever thought about growing your own ginger? It’s surprisingly easy and incredibly rewarding. Imagine having fresh, organic ginger right at your fingertips whenever you need it for cooking, teas, or even just a little health boost. I’ve been doing it for a while now, and I’m excited to share my step-by-step guide with you. Let’s get started!
What You’ll Need
Before we dive in, let’s gather all the necessary supplies. This will make the whole process smoother and more enjoyable.
* Ginger Rhizome: Look for a plump, healthy-looking ginger rhizome (that’s the “root” part we eat) at your local grocery store or nursery. Ideally, it should have visible “eyes” or buds – these are where the new shoots will emerge. Organic ginger is often a better choice, as it’s less likely to have been treated with growth inhibitors.
* Pot: Choose a pot that’s at least 12 inches in diameter and 12 inches deep. Ginger roots grow horizontally, so a wider pot is better than a tall, narrow one. Make sure the pot has drainage holes to prevent waterlogging.
* Potting Mix: Use a well-draining potting mix. A mix of equal parts potting soil, perlite, and compost works wonders. The perlite helps with drainage, and the compost provides essential nutrients.
* Watering Can or Hose: You’ll need a way to water your ginger regularly.
* Spray Bottle (Optional): For misting the ginger, especially in dry climates.
* Warm, Bright Location: Ginger thrives in warm temperatures and bright, indirect sunlight.
* Patience: Growing ginger takes time, so be prepared to wait a few weeks before you see any sprouts.
Preparing the Ginger Rhizome
This is a crucial step to ensure your ginger gets off to a good start.
1. Soaking (Optional but Recommended): I like to soak the ginger rhizome in water overnight before planting. This helps to rehydrate it and encourages the buds to sprout. Just place the rhizome in a bowl of water and let it sit for 12-24 hours.
2. Cutting (If Necessary): If your ginger rhizome is large, you can cut it into smaller pieces, making sure each piece has at least one or two “eyes” or buds. This will allow you to grow multiple ginger plants from a single rhizome. Use a clean, sharp knife to make the cuts.
3. Callousing (Important!): After cutting, let the cut surfaces callous over for a day or two before planting. This helps to prevent rot. Simply place the cut pieces on a paper towel in a cool, dry place.
Planting Your Ginger
Now for the fun part – getting your ginger into the soil!
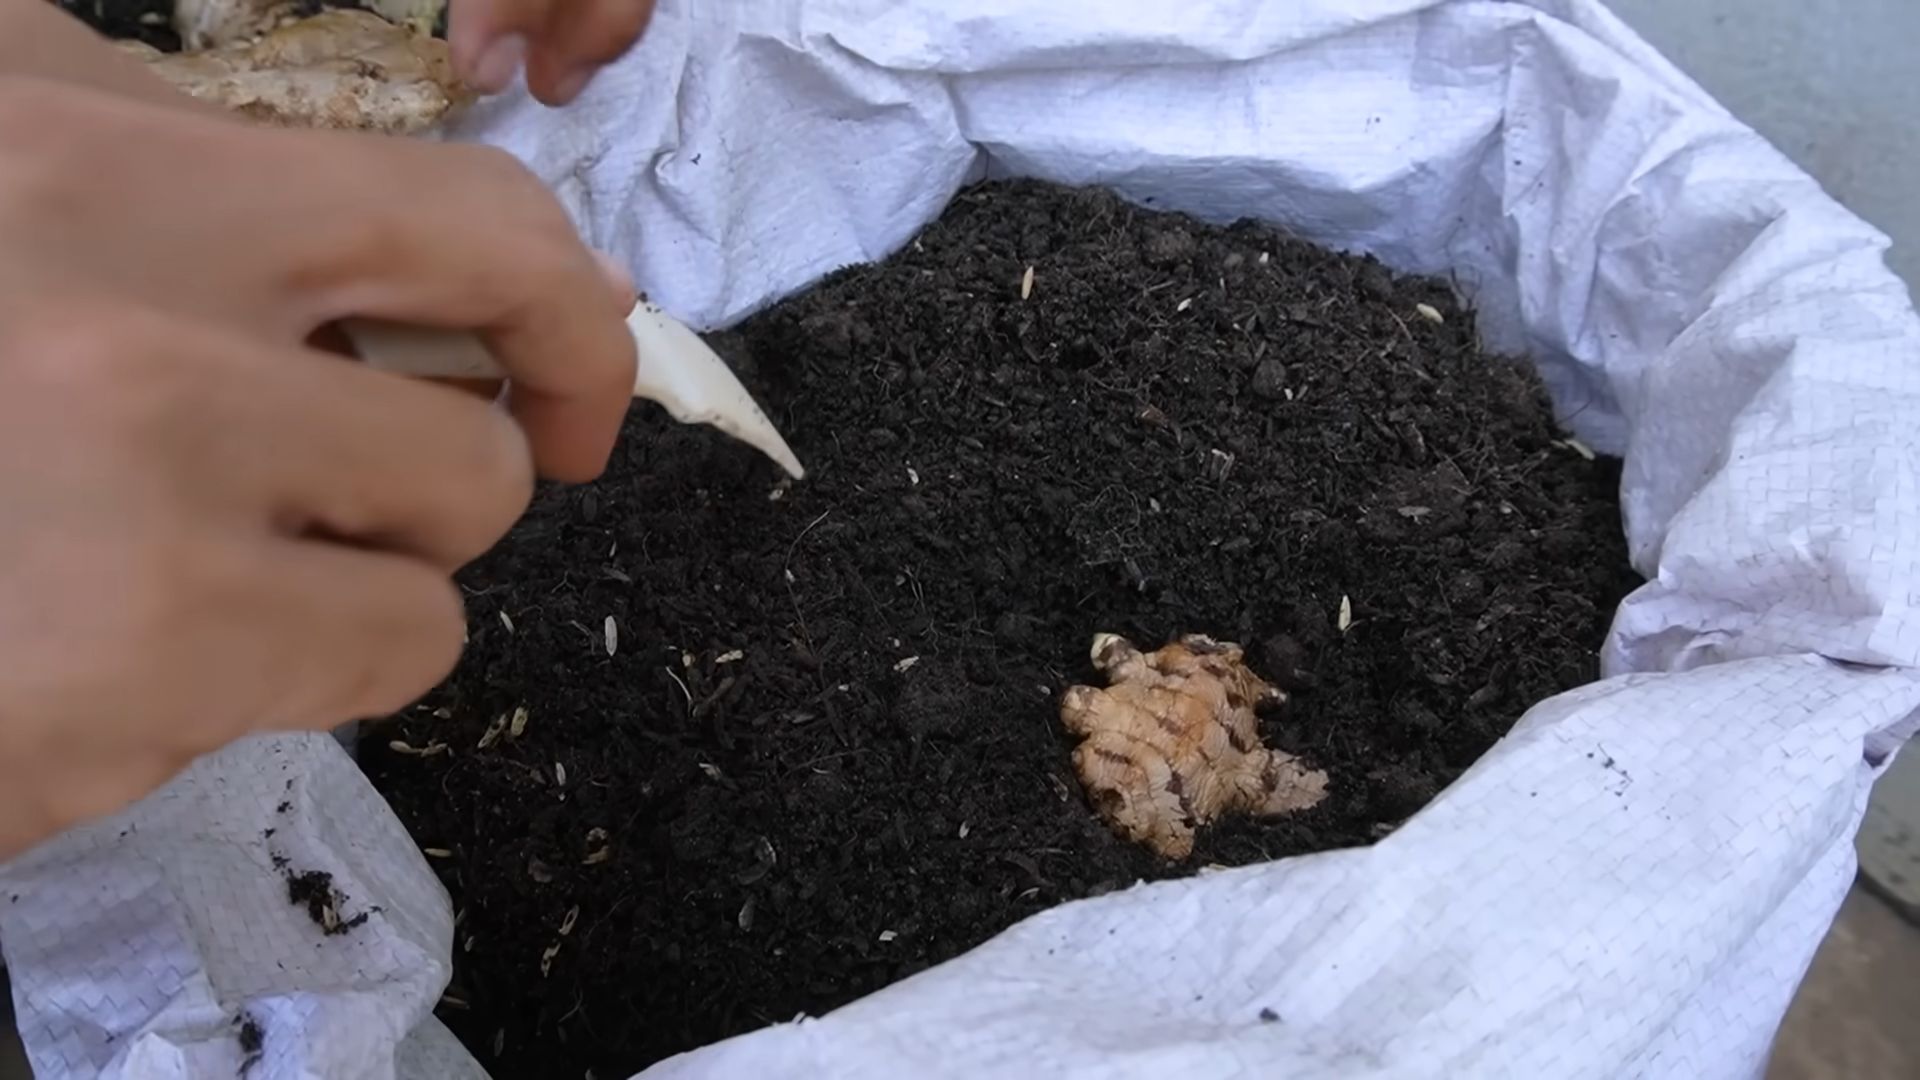
1. Fill the Pot: Fill your pot with the well-draining potting mix, leaving about an inch or two of space at the top.
2. Plant the Rhizome: Place the ginger rhizome on top of the soil, with the “eyes” or buds facing upwards.
3. Cover with Soil: Gently cover the rhizome with about 1-2 inches of soil. Don’t pack the soil down too tightly.
4. Water Thoroughly: Water the soil thoroughly until water drains out of the drainage holes. This will help to settle the soil and provide the ginger with the moisture it needs to start growing.
Caring for Your Ginger Plant
Consistent care is key to a healthy and productive ginger plant.
1. Watering: Keep the soil consistently moist, but not waterlogged. Water when the top inch of soil feels dry to the touch. Overwatering can lead to root rot, so be careful not to overdo it. I usually water mine every 2-3 days, depending on the weather.
2. Sunlight: Place your ginger plant in a location that receives bright, indirect sunlight. Direct sunlight can scorch the leaves, so avoid placing it in a spot that gets intense afternoon sun. A spot near an east-facing window is often ideal.
3. Temperature: Ginger thrives in warm temperatures, ideally between 65°F and 85°F (18°C and 29°C). Avoid exposing your plant to temperatures below 50°F (10°C). If you live in a colder climate, you may need to bring your ginger plant indoors during the winter months.
4. Humidity: Ginger loves humidity. If you live in a dry climate, you can increase the humidity around your plant by misting it regularly with a spray bottle or placing it on a tray filled with pebbles and water. Make sure the bottom of the pot isn’t sitting directly in the water, though.
5. Fertilizing: Feed your ginger plant with a balanced liquid fertilizer every 2-3 weeks during the growing season (spring and summer). Follow the instructions on the fertilizer label. I like to use an organic fertilizer for the best results.
Harvesting Your Ginger
The best part! Here’s how to reap the rewards of your hard work.
1. When to Harvest: You can start harvesting ginger about 8-10 months after planting. The leaves will start to turn yellow and die back when the ginger is ready to harvest.
2. How to Harvest: Gently dig around the plant and lift the rhizome out of the soil. You can harvest the entire rhizome or just a portion of it, leaving the rest to continue growing.
3. Storing Your Ginger: Freshly harvested ginger can be stored in the refrigerator for several weeks. Wrap it in a paper towel and place it in a plastic bag to prevent it from drying out. You can also freeze ginger for longer storage.
Troubleshooting
Even with the best care, you might encounter a few challenges along the way. Here are some common problems and how to address them:
* Yellowing Leaves: This could be a sign of overwatering, underwatering, or nutrient deficiency. Check the soil moisture and adjust your watering schedule accordingly. If the soil is consistently moist, reduce watering. If the soil is dry, water more frequently. You may also need to fertilize your plant.
* Root Rot: This is caused by overwatering and poor drainage. Make sure your pot has drainage holes and that you’re not overwatering your plant. If you suspect root rot, you may need to repot your plant in fresh soil.
* Pests: Ginger plants can be susceptible to pests such as aphids and spider mites. Inspect your plant regularly for signs of pests and treat them with an appropriate insecticide or insecticidal soap. I prefer using neem oil as a natural pest control solution.
* Slow Growth: If your ginger plant is growing slowly, it may not be getting enough sunlight or nutrients. Move it to a brighter location and fertilize it regularly.
Extra Tips and Tricks
* Ginger Tea: Use your freshly harvested ginger to make delicious and healthy ginger tea. Simply slice a few pieces of ginger and steep them in hot water for 10-15 minutes. Add honey or lemon to taste.
* Ginger in Cooking: Fresh ginger adds a wonderful flavor to a variety of dishes, from stir-fries to soups to baked goods. Experiment with different recipes and enjoy the unique taste of homegrown ginger.
* Propagating Ginger: You can easily propagate ginger by dividing the rhizome into smaller pieces, as described earlier. This is a great way to expand your ginger collection.
* Consider the Variety: While common ginger is readily available, exploring different varieties can be fun! Some have spicier notes, others are milder. See what your local nursery offers.
Growing ginger at home is a rewarding experience that allows you to enjoy fresh, organic ginger whenever you need it. With a little patience and care, you can easily grow your own ginger plant and reap the benefits of this amazing spice. Happy gardening!
Conclusion
So, there you have it! Planting ginger at home is not only surprisingly simple, but it’s also incredibly rewarding. Imagine the satisfaction of harvesting your own fresh, flavorful ginger root, knowing exactly where it came from and how it was grown. Forget those bland, store-bought rhizomes that have been sitting on shelves for weeks. With this easy DIY trick, you can have a constant supply of vibrant, aromatic ginger right at your fingertips.
Why is this a must-try? Because it empowers you to take control of your food source, reduces your reliance on grocery stores, and provides you with a superior product. The ginger you grow yourself will be bursting with flavor and packed with beneficial compounds, making it a welcome addition to your cooking, teas, and even natural remedies. Plus, it’s a fantastic way to connect with nature and learn more about the fascinating world of plants.
But the fun doesn’t stop there! Feel free to experiment with different varieties of ginger. Try growing the common ginger (Zingiber officinale) for its classic spicy flavor, or explore other types like galangal or turmeric for a unique twist. You can also adjust the growing conditions to influence the flavor profile of your ginger. For example, slightly drier conditions may result in a more intense, concentrated flavor.
Consider planting your ginger in decorative pots to add a touch of greenery to your home or garden. You can even create a small indoor ginger garden, bringing a bit of the tropics indoors. If you live in a colder climate, you can easily move your potted ginger plants indoors during the winter months to ensure a continuous harvest.
We highly encourage you to give this DIY trick a try. It’s a simple, cost-effective, and incredibly satisfying way to grow your own delicious and healthy ginger. Don’t be intimidated if you’ve never grown anything before – this is a great project for beginners. The steps are straightforward, and the results are well worth the effort.
Once you’ve harvested your first batch of homegrown ginger, we’d love to hear about your experience! Share your tips, tricks, and photos in the comments below. Let’s create a community of home ginger growers and inspire others to embrace the joy of growing their own food. What are you waiting for? Get planting and experience the magic of homegrown ginger today!
Frequently Asked Questions (FAQ)
Q: What kind of ginger should I plant?
A: You can plant any type of ginger rhizome that you find at your local grocery store or nursery. Look for rhizomes that are plump, firm, and have visible “eyes” or buds. Organic ginger is often a good choice, as it’s less likely to have been treated with growth inhibitors. Common ginger (Zingiber officinale) is the most readily available and easiest to grow, but you can also experiment with other varieties like galangal or turmeric if you can find them.
Q: How long does it take to grow ginger?
A: Ginger typically takes around 8-10 months to mature and be ready for harvest. However, you can start harvesting small pieces of ginger after about 4 months, as needed. The longer you let it grow, the larger and more flavorful the rhizomes will become. Be patient, and you’ll be rewarded with a bountiful harvest.
Q: What kind of soil is best for growing ginger?
A: Ginger prefers well-draining, fertile soil that is rich in organic matter. A good potting mix for ginger would be a combination of potting soil, compost, and perlite or vermiculite. This will provide the necessary nutrients and drainage for healthy growth. Avoid heavy clay soils, as they can retain too much moisture and lead to root rot.
Q: How much sunlight does ginger need?
A: Ginger thrives in partial shade. While it needs sunlight to grow, direct sunlight can scorch the leaves. A location that receives morning sun and afternoon shade is ideal. If you’re growing ginger indoors, place it near a bright window but away from direct sunlight.
Q: How often should I water my ginger plant?
A: Water your ginger plant regularly, keeping the soil consistently moist but not waterlogged. Allow the top inch of soil to dry out slightly between waterings. Overwatering can lead to root rot, so it’s important to ensure good drainage. During the warmer months, you may need to water more frequently.
Q: How do I know when it’s time to harvest my ginger?
A: You can start harvesting ginger when the leaves begin to turn yellow and die back. This usually happens around 8-10 months after planting. To harvest, gently dig around the plant and lift the rhizomes from the soil. You can harvest the entire plant or just take a few pieces as needed, leaving the rest to continue growing.
Q: Can I grow ginger indoors?
A: Yes, you can definitely grow ginger indoors! Choose a pot that is at least 12 inches in diameter and fill it with well-draining potting mix. Place the pot in a location that receives bright, indirect sunlight. Water regularly and fertilize every few weeks with a balanced liquid fertilizer. You may need to provide supplemental humidity, especially during the winter months.
Q: What are some common problems when growing ginger?
A: Some common problems when growing ginger include root rot, pests, and nutrient deficiencies. Root rot can be prevented by ensuring good drainage and avoiding overwatering. Pests such as aphids and spider mites can be controlled with insecticidal soap or neem oil. Nutrient deficiencies can be addressed by fertilizing regularly with a balanced liquid fertilizer.
Q: Can I use store-bought ginger to grow new plants?
A: Yes, you can use store-bought ginger to grow new plants, but it’s important to choose rhizomes that are plump, firm, and have visible “eyes” or buds. Organic ginger is often a better choice, as it’s less likely to have been treated with growth inhibitors. Soak the ginger in water overnight before planting to encourage sprouting.
Q: How do I store my harvested ginger?
A: Freshly harvested ginger can be stored in the refrigerator for several weeks. Wrap it in a paper towel and place it in a plastic bag to prevent it from drying out. You can also freeze ginger for longer storage. Simply peel and chop the ginger into small pieces, then freeze it in a single layer on a baking sheet. Once frozen, transfer the ginger to a freezer bag or container. You can also pickle ginger or make ginger syrup for longer-term preservation.
Leave a Comment