
Oven Cleaning Natural Methods: Are you tired of harsh chemicals and lingering fumes every time you tackle that baked-on grime in your oven? I know I was! For generations, our grandmothers relied on simple, natural ingredients to keep their homes sparkling, and it’s time we rediscovered those time-tested secrets.
Think about it: before the age of commercial cleaners, resourceful homemakers used readily available items like baking soda, vinegar, and lemon to achieve impressive results. These methods aren’t just effective; they’re also gentler on the environment and safer for your family. Plus, who wants to spend a fortune on specialized cleaning products when the solution might already be sitting in your pantry?
This article is your ultimate guide to mastering oven cleaning natural methods. We’ll ditch the toxic sprays and embrace a healthier, more sustainable approach. I’ll walk you through easy-to-follow DIY recipes and share my favorite tips and tricks for banishing grease and grime without the harsh chemicals. Get ready to transform your oven into a sparkling clean appliance using the power of nature!

DIY Oven Cleaning: Natural Methods That Actually Work!
Okay, let’s face it: cleaning the oven is probably on everyone’s “least favorite chores” list. But it doesn’t have to be a toxic, fume-filled nightmare! I’m going to walk you through some natural methods that are surprisingly effective and won’t leave you gasping for air. We’re ditching the harsh chemicals and embracing the power of baking soda, vinegar, and a little elbow grease. Trust me, your oven (and your lungs) will thank you!
What You’ll Need
Before we dive in, let’s gather our supplies. This is a pretty low-key operation, so you probably have most of this stuff already:
* Baking Soda
* White Vinegar
* Water
* Spray Bottle
* Spatula or Scraper (plastic is best to avoid scratching)
* Sponge or Scrub Brush (non-abrasive)
* Rubber Gloves (optional, but recommended)
* Old Towels or Rags
* Small Bowl
* Optional: Lemon Juice
Phase 1: The Baking Soda Paste
This is where the magic begins! We’re going to create a powerful, yet gentle, cleaning paste that will loosen all that baked-on gunk.
1. Empty the Oven: First things first, remove everything from your oven – racks, baking stones, thermometers, anything that’s in there. We want a clean slate to work with. Set the racks aside; we’ll tackle those later.
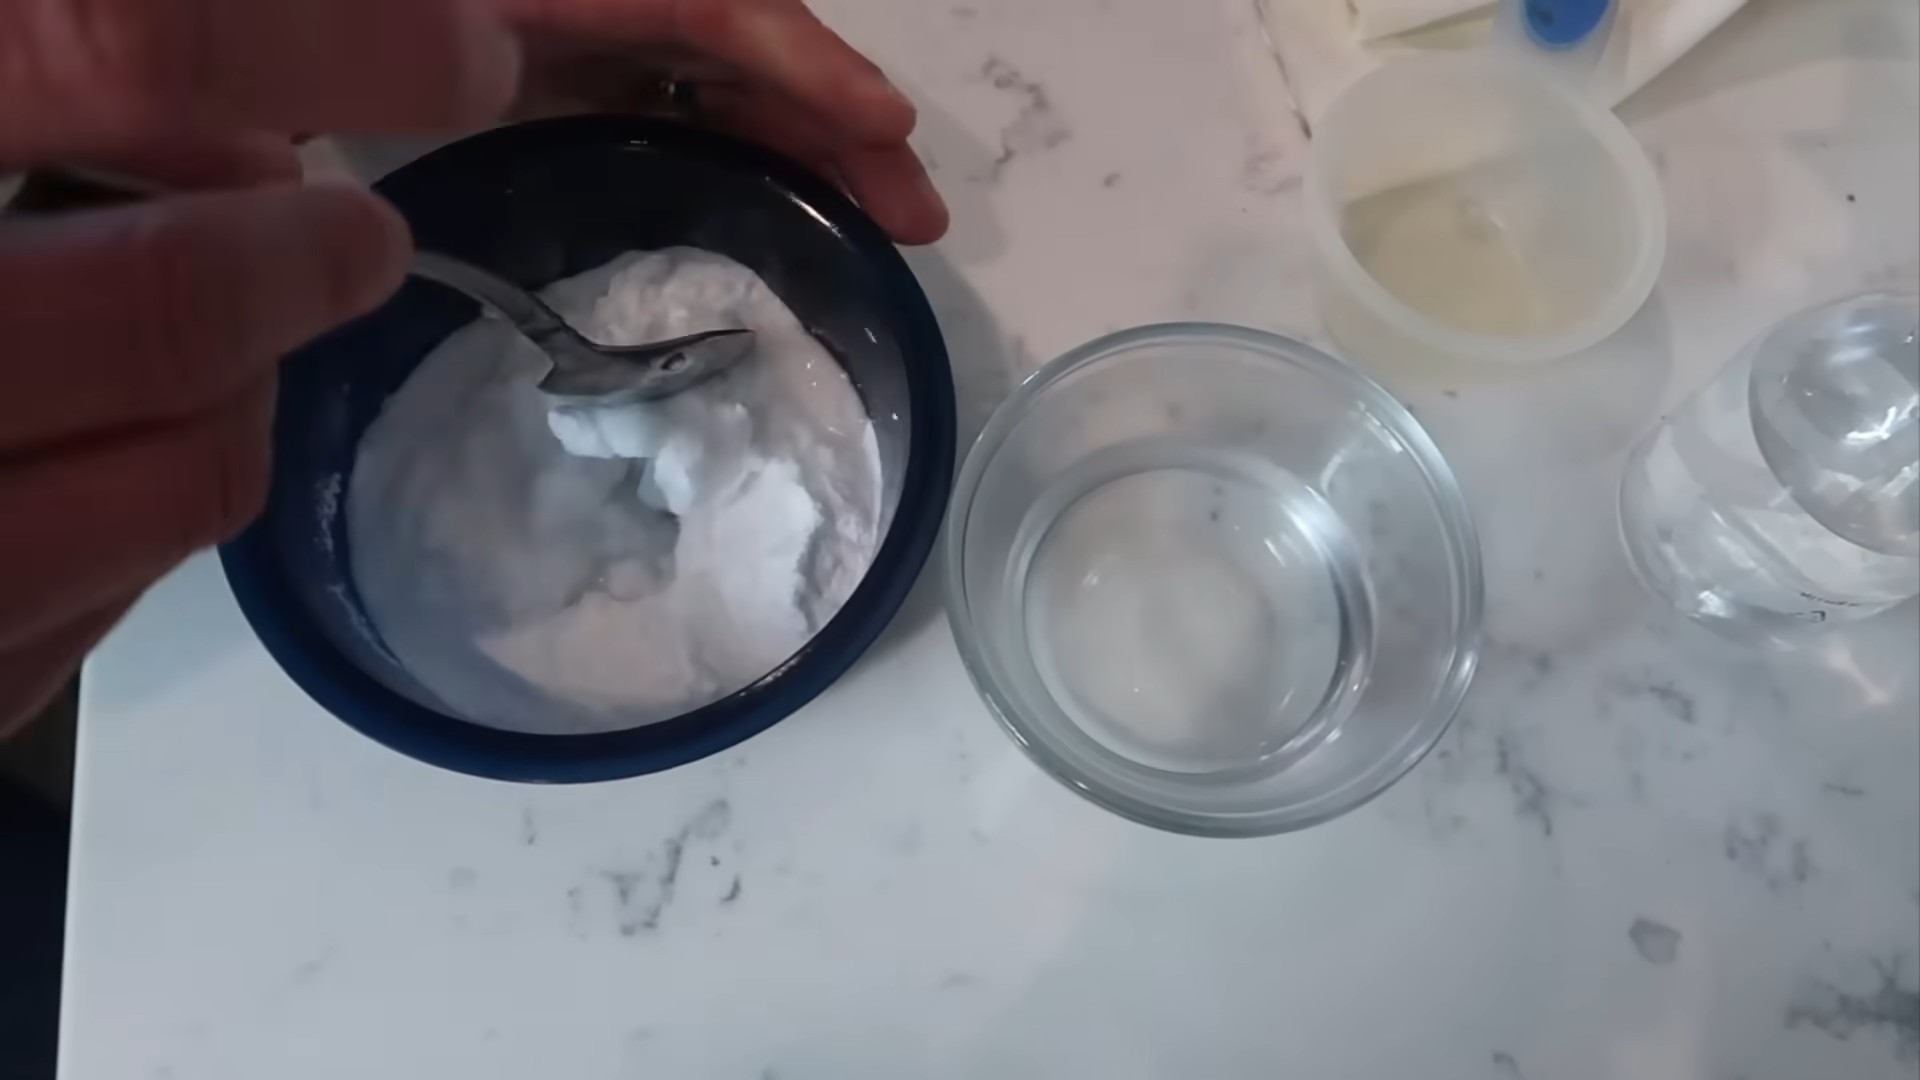
2. Mix the Paste: In your small bowl, combine 1/2 cup of baking soda with a few tablespoons of water. Add the water gradually until you form a thick, spreadable paste. The consistency should be similar to frosting. If you add too much water, just add a little more baking soda to thicken it up.
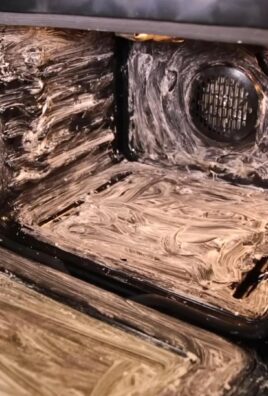
3. Coat the Oven: Now, put on your gloves (if you’re using them) and start spreading the baking soda paste all over the inside of your oven. Avoid the heating elements! Really get in there and coat all the surfaces – the walls, the floor, the door. Don’t be shy; a generous layer is key.
4. Let it Sit: This is the most important part: patience! Let the baking soda paste sit for at least 12 hours, or even better, overnight. The longer it sits, the more time it has to work its magic and loosen the grime. I usually do this before I go to bed so it can work while I sleep.
Phase 2: The Vinegar Power Wash
After the baking soda has had its time to work, we’re going to unleash the power of vinegar! This will react with the baking soda and help lift away all the loosened gunk.
1. Prepare the Vinegar: Fill your spray bottle with white vinegar. You can use it straight, no need to dilute it.
2. Spray the Oven: Generously spray the inside of your oven with the vinegar. You’ll see it start to fizz and bubble as it reacts with the baking soda. This is a good thing! It means it’s working.
3. Wipe it Down: Now, grab your sponge or scrub brush and start wiping down the oven. The baking soda and vinegar mixture should be lifting away easily. If you encounter any stubborn spots, use your spatula or scraper to gently loosen them. Be careful not to scratch the oven surface!
4. Rinse and Repeat: Use a damp cloth or sponge to rinse away any remaining baking soda and vinegar residue. You might need to rinse several times to get everything completely clean.
5. Inspect and Spot Clean: Once you’ve wiped everything down, take a good look at your oven. If you see any remaining stubborn spots, repeat the spraying and wiping process. Sometimes, a little extra elbow grease is needed!
Phase 3: Cleaning the Oven Racks
Don’t forget about those oven racks! They’ve probably seen their fair share of spills and splatters. Here are a couple of ways to clean them:
Option 1: The Bathtub Soak
1. Line the Tub: Place old towels or rags in the bottom of your bathtub to protect the surface from scratches.
2. Soak the Racks: Place the oven racks in the bathtub and fill it with hot water. Add about 1/2 cup of dish soap and 1 cup of baking soda to the water.
3. Let it Soak: Let the racks soak for at least 2-3 hours, or even overnight for really stubborn grime.
4. Scrub and Rinse: After soaking, use a scrub brush to scrub away any remaining grime. Rinse the racks thoroughly with clean water.
Option 2: The Baking Soda Paste (Again!)
1. Apply the Paste: Make another batch of the baking soda paste (1/2 cup baking soda + water).
2. Coat the Racks: Spread the paste all over the oven racks, making sure to cover all the surfaces.
3. Let it Sit: Let the paste sit for several hours, or overnight.
4. Scrub and Rinse: Scrub the racks with a scrub brush and rinse thoroughly with clean water.
Phase 4: The Final Touches
We’re almost there! Just a few more steps to ensure a sparkling clean oven.
1. Dry Everything: Use clean towels or rags to dry the inside of your oven and the oven racks. Make sure everything is completely dry before putting the racks back in.
2. Reassemble: Place the clean oven racks back into the oven.
3. Optional: Lemon Freshness: For an extra touch of freshness, you can squeeze some lemon juice into a bowl of water and place it in the oven. Heat the oven to a low temperature (around 200°F) for about 30 minutes. The lemon steam will help to deodorize the oven and leave it smelling fresh and clean.
Tips and Tricks for a Sparkling Clean Oven
* Prevention is Key: The best way to keep your oven clean is to prevent spills and splatters in the first place. Use oven liners or baking sheets to catch drips.
* Clean Regularly: Don’t wait until your oven is a disaster zone to clean it. A quick wipe-down after each use can prevent grime from building up.
* Tackle Stubborn Spots: For really stubborn spots, try making a paste of baking soda and hydrogen peroxide. Apply the paste to the spot, let it sit for a few minutes, and then scrub.
* Don’t Forget the Door: Pay attention to the oven door, especially the glass. You can use the same baking soda and vinegar method to clean the glass.
* Ventilation is Important: When cleaning your oven, make sure to open a window or turn on your kitchen fan to ventilate the area.
* Be Patient: Cleaning your oven naturally takes time and effort. Don’t get discouraged if it doesn’t look perfect after the first try. Just keep at it, and you’ll eventually get it clean.
* Safety First: Always unplug your oven before cleaning it. And be careful when using sharp objects like scrapers to avoid scratching the oven surface.
* Consider a Steam Clean: Some ovens have a self-cleaning steam function. If yours does, consider using it periodically to help loosen grime. However, even with a steam clean function, you may still need to do some manual cleaning.
* Check Your Oven’s Manual: Always refer to your oven’s manual for specific cleaning instructions and recommendations.
* Don’t Use Abrasive Cleaners: Avoid using abrasive cleaners or scouring pads, as they can scratch the oven surface.
* Clean the Exterior: While you’re at it, don’t forget to clean the exterior of your oven. You can use a damp cloth and some mild dish soap to wipe down the outside surfaces.
* Clean the Control Panel: Use a damp cloth to clean the control panel, being careful not to get any water inside the buttons or dials.
* Regular Maintenance: Regular maintenance, such as wiping up spills and cleaning the oven regularly, will help to keep it in good condition and prevent the buildup of grime.
* Use a Toothbrush: An old toothbrush can be helpful for cleaning hard-to-reach areas, such as around the burners or in the corners of the oven.
* Vinegar and Salt: For extra cleaning power, you can add a tablespoon of salt to your vinegar solution. The salt will act as a mild abrasive to help scrub away grime.
* Baking Soda and Dish Soap: For a different cleaning solution, you can mix baking soda with a few drops of dish soap to create a paste. Apply the paste to the oven surfaces, let it sit for a few minutes, and then scrub.
* Essential Oils: After cleaning your oven, you can add a few drops of your favorite essential oil
Conclusion
So, there you have it! Ditching harsh chemicals and embracing these natural oven cleaning methods is not just a trend; it’s a smarter, healthier, and often more effective way to keep your oven sparkling. We’ve explored the power of baking soda and vinegar, the degreasing prowess of lemon, and the gentle scrubbing action of salt – all readily available ingredients that won’t leave you gasping for fresh air or worrying about lingering toxic residues.
Why is this DIY approach a must-try? Because it’s a win-win-win! You’re saving money by using ingredients you likely already have in your pantry. You’re protecting your health and the environment by avoiding harsh chemicals. And you’re achieving a beautifully clean oven that’s ready to bake up delicious meals for you and your loved ones.
But the beauty of these natural methods lies in their adaptability. Feel free to experiment and find what works best for your oven and your cleaning style. For instance, if you have particularly stubborn baked-on grime, try letting the baking soda paste sit overnight. Or, if you prefer a more citrusy scent, add a few drops of your favorite essential oil (like lemon or orange) to the vinegar solution. You could even create a power paste by combining baking soda, salt, and a little bit of dish soap for extra scrubbing power on those tough spots. Remember to always test any new cleaning solution on a small, inconspicuous area of your oven first to ensure it doesn’t damage the surface.
Don’t be intimidated by the thought of cleaning your oven naturally. It’s a simple process that yields impressive results. The satisfaction of knowing you’re using safe and effective methods is truly rewarding. Plus, the fresh, clean scent of lemon or vinegar is a welcome change from the overpowering chemical odors of conventional oven cleaners.
We truly believe that these natural oven cleaning methods will revolutionize your cleaning routine. They are effective, affordable, and environmentally friendly. So, ditch the harsh chemicals and embrace the power of nature!
Now, it’s your turn! We encourage you to try these DIY oven cleaning tricks and see the difference for yourself. Share your experiences, tips, and variations in the comments below. Let’s create a community of natural cleaning enthusiasts and inspire others to make the switch. We can’t wait to hear your success stories and learn from your unique approaches to keeping your oven sparkling clean the natural way. Let us know which of these **oven cleaning natural methods** worked best for you!
FAQ
Frequently Asked Questions About Natural Oven Cleaning
Q: Are these natural oven cleaning methods really as effective as chemical cleaners?
A: Yes, they can be! While it might require a little more elbow grease and patience, natural oven cleaning methods are surprisingly effective, especially for regular maintenance. Chemical cleaners often rely on harsh chemicals to dissolve grime, but baking soda, vinegar, lemon, and salt work through a combination of abrasion, acidity, and degreasing properties. For heavily soiled ovens, you might need to repeat the process or let the cleaning solutions sit for a longer period. The key is consistency and allowing the natural ingredients to work their magic.
Q: Will baking soda and vinegar damage my oven?
A: No, baking soda and vinegar are generally safe for use in ovens. However, it’s always a good idea to test any cleaning solution on a small, inconspicuous area first, especially if you have a self-cleaning oven with a special coating. Avoid using abrasive scrubbers on delicate surfaces, and always wipe away any residue thoroughly after cleaning. The fizzing reaction between baking soda and vinegar is normal and helps to loosen grime, but be sure to ventilate the area well.
Q: How often should I clean my oven using these natural methods?
A: The frequency of cleaning depends on how often you use your oven and how much it tends to get dirty. For light use, cleaning every 2-3 months might be sufficient. For more frequent use, cleaning every month or even every few weeks might be necessary. Regular maintenance will prevent grime from building up and make the cleaning process easier in the long run. A quick wipe-down after each use can also help to keep your oven cleaner for longer.
Q: Can I use these methods on a self-cleaning oven?
A: While you can use these methods on a self-cleaning oven, it’s important to be cautious. Some self-cleaning ovens have special coatings that can be damaged by certain cleaning agents. Check your oven’s manual for specific recommendations. In general, it’s best to avoid using abrasive scrubbers or harsh chemicals on self-cleaning ovens. Baking soda and vinegar are generally safe, but always test on a small area first. You may also want to consult the manufacturer if you are unsure.
Q: What if I have a really stubborn stain that won’t come off?
A: For stubborn stains, try creating a more concentrated baking soda paste and letting it sit overnight. You can also add a little bit of salt or dish soap to the paste for extra scrubbing power. Another option is to use a steam cleaner to loosen the grime before scrubbing. If all else fails, you can try using a commercial oven cleaner as a last resort, but be sure to follow the instructions carefully and ventilate the area well.
Q: My oven smells like vinegar after cleaning. How can I get rid of the smell?
A: The vinegar smell should dissipate on its own within a few hours. To speed up the process, you can leave the oven door open and ventilate the area well. You can also place a bowl of baking soda or coffee grounds inside the oven to absorb the odor. Another option is to heat a pot of water with lemon slices or orange peels in the oven for a few minutes to create a fresh, citrusy scent.
Q: Can I use these methods to clean the oven door glass?
A: Yes, these methods are safe and effective for cleaning the oven door glass. Baking soda and vinegar can help to remove baked-on grease and grime without scratching the glass. You can also use a lemon wedge to scrub the glass and then wipe it clean with a damp cloth. For particularly stubborn stains, you can try using a razor blade scraper, but be careful not to scratch the glass.
Q: Are there any ingredients I should avoid using when cleaning my oven naturally?
A: Avoid using harsh chemicals like bleach or ammonia, as these can be harmful to your health and the environment. Also, avoid using abrasive scrubbers on delicate surfaces, as they can scratch the oven’s interior. It’s always best to test any new cleaning solution on a small, inconspicuous area first to ensure it doesn’t damage the surface.
Q: Can I use these methods to clean my microwave?
A: Absolutely! Many of these methods, especially the lemon steam cleaning trick, work wonders for cleaning microwaves. The steam loosens food splatters, making them easy to wipe away. Just be sure to use microwave-safe containers and follow the instructions carefully.


Leave a Comment