
Oven cleaning baking soda vinegar – sounds like a science experiment, right? Well, in a way, it is! But trust me, it’s a science experiment that will leave your oven sparkling and you feeling like a domestic goddess (or god!). For generations, resourceful homemakers have relied on the power of simple, natural ingredients to tackle tough cleaning jobs. Think about it – before the age of harsh chemicals and specialized cleaners, baking soda and vinegar were the go-to solutions for everything from deodorizing to scrubbing. This tradition of using what you have on hand is not only budget-friendly but also incredibly satisfying.
Let’s be honest, nobody *loves* cleaning the oven. It’s a greasy, grimy chore that often gets put off until it’s absolutely unavoidable. But a clean oven isn’t just about aesthetics; it’s about safety and efficiency. Built-up grease and food residue can actually affect the way your oven cooks, leading to uneven baking and even potential fire hazards. That’s why I’m so excited to share this simple, effective, and all-natural method for oven cleaning baking soda vinegar. I’ve tried countless oven cleaners over the years, and nothing has worked as well, or as safely, as this DIY trick. So, ditch the harsh chemicals and let’s get that oven sparkling with the power of baking soda and vinegar!

DIY Oven Cleaning with Baking Soda and Vinegar: A Sparkling Clean Oven Awaits!
Okay, let’s face it, cleaning the oven is probably on everyone’s list of least favorite chores. But a sparkling clean oven makes cooking so much more enjoyable (and probably even helps your food cook better!). Forget those harsh chemical cleaners – I’m going to show you how to clean your oven using just baking soda and vinegar. It’s natural, effective, and way easier on your lungs!
What You’ll Need:
* Baking soda
* White vinegar
* Water
* Spray bottle
* Spatula or scraper
* Sponge or cloth
* Rubber gloves (optional, but recommended!)
* Old towel or newspaper (to protect your floor)
Getting Started: Prep Work is Key!
Before we dive into the cleaning process, let’s get everything prepped. This will make the whole thing smoother and less messy.
1. Unplug Your Oven: Safety first! Make sure your oven is completely unplugged from the power outlet. This is super important to avoid any electrical accidents.
2. Remove Oven Racks and Accessories: Take out all the oven racks, baking sheets, pizza stones, or anything else that’s inside. We’ll clean the racks separately later.
3. Protect Your Floor: Lay down an old towel or some newspaper around the base of your oven. This will catch any drips or spills and save you from having to clean the floor afterward. Trust me, you’ll thank me for this tip!
Making the Baking Soda Paste: The Magic Ingredient
This baking soda paste is the star of the show. It’s what’s going to loosen all that baked-on grime and grease.
1. Mix Baking Soda and Water: In a bowl, mix together ½ cup of baking soda with a few tablespoons of water. Add the water gradually until you get a thick, spreadable paste. It should be similar in consistency to frosting.
2. Adjust Consistency if Needed: If the paste is too thick, add a little more water. If it’s too runny, add a bit more baking soda. You want it to be easy to spread but not so thin that it drips everywhere.
Applying the Baking Soda Paste: Get Ready to Get Messy!
Now comes the fun part – applying the baking soda paste to the inside of your oven. Don’t be shy, really get in there!
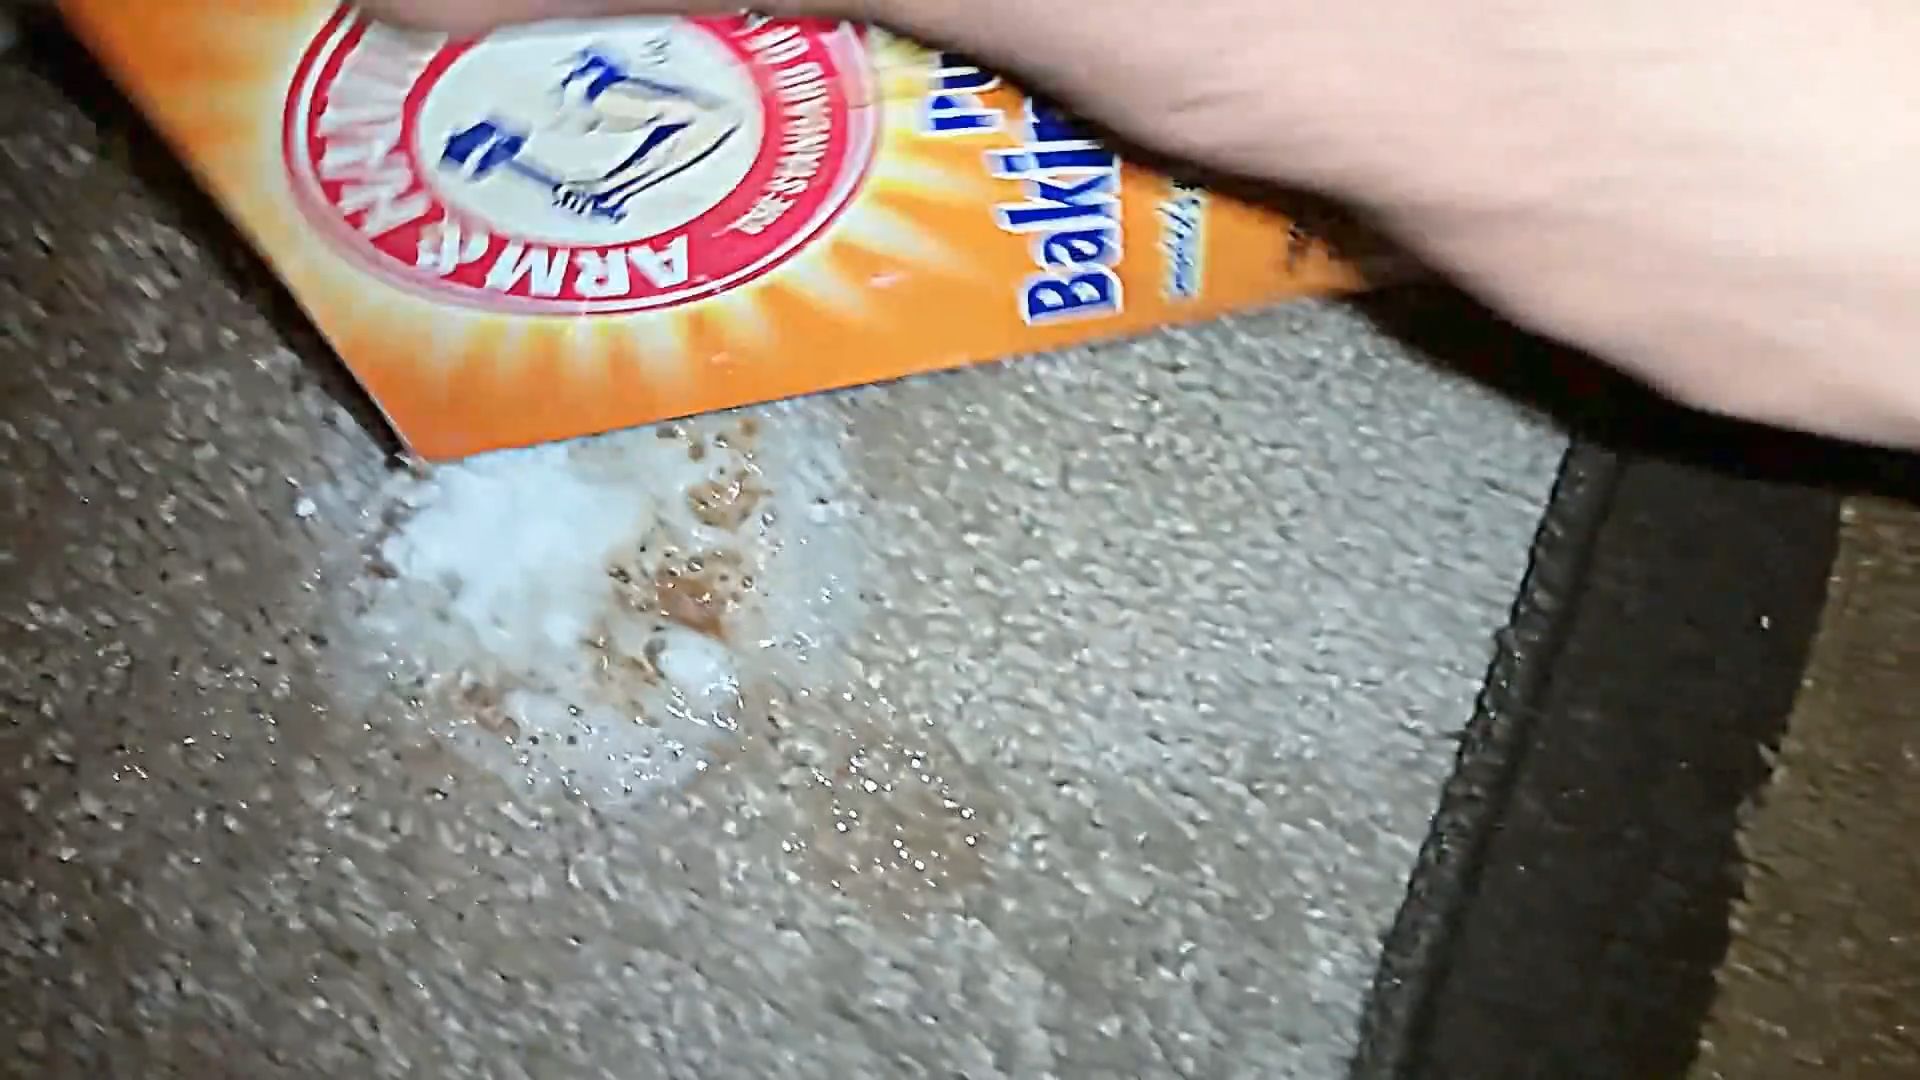
1. Coat the Interior: Using your hands (with gloves on, if you prefer) or a spatula, spread the baking soda paste all over the interior surfaces of your oven. This includes the walls, floor, door, and even the inside of the glass door.
2. Avoid Heating Elements: Be careful not to get any paste on the heating elements. You don’t want to damage them.
3. Focus on Problem Areas: Pay extra attention to areas with heavy buildup of grease and grime. Really slather on the paste in those spots.
4. Let it Sit Overnight: This is the most important step! Let the baking soda paste sit in your oven for at least 12 hours, or even overnight. The longer it sits, the more time it has to work its magic and loosen all that baked-on gunk. I usually do this before bed so it can work its magic while I sleep.
Cleaning the Oven Racks: A Separate Operation
While the baking soda paste is working its magic inside the oven, let’s tackle those dirty oven racks.
1. Fill Your Bathtub (or a Large Sink): Line your bathtub (or a large sink) with an old towel to protect the surface. Then, fill it with hot water.
2. Add Dish Soap and Baking Soda: Add about ½ cup of dish soap and ½ cup of baking soda to the hot water.
3. Soak the Racks: Place the oven racks in the tub and let them soak for several hours, or even overnight. The hot water, dish soap, and baking soda will help to loosen the grease and grime.
4. Scrub the Racks: After soaking, use a scrub brush or sponge to scrub the racks clean. You may need to use a little elbow grease, especially for stubborn spots.
5. Rinse and Dry: Rinse the racks thoroughly with clean water and let them air dry completely before putting them back in the oven.
Removing the Baking Soda Paste: The Big Reveal!
After letting the baking soda paste sit overnight, it’s time to remove it and see the results of our hard work.
1. Wipe Away the Paste: Use a damp sponge or cloth to wipe away as much of the baking soda paste as possible. You may need to rinse the sponge frequently.
2. Use a Spatula for Stubborn Areas: For areas where the paste is particularly stubborn, use a spatula or scraper to gently scrape it away.
3. Rinse Thoroughly: Once you’ve removed most of the paste, rinse the interior of the oven thoroughly with clean water. Make sure to remove all traces of baking soda.
Vinegar Time: The Final Touch
Now for the vinegar! This step will help to remove any remaining baking soda residue and leave your oven sparkling clean.
1. Fill a Spray Bottle with Vinegar: Pour some white vinegar into a spray bottle.
2. Spray the Interior: Spray the interior of the oven with vinegar, focusing on any areas where you see baking soda residue.
3. Wipe Down with a Clean Cloth: Use a clean cloth to wipe down the interior of the oven. The vinegar will react with any remaining baking soda, creating a fizzing action that helps to lift away any lingering grime.
4. Let it Air Dry: Leave the oven door open and let the interior air dry completely. This will help to dissipate the vinegar smell.
Putting it All Back Together: The Grand Finale
Almost there! Now it’s time to put everything back in its place and admire your sparkling clean oven.
1. Replace the Oven Racks: Once the oven racks are completely dry, carefully place them back inside the oven.
2. Plug in the Oven: Plug the oven back into the power outlet.
3. Admire Your Work: Take a step back and admire your sparkling clean oven! You did it!
Optional: A Low-Heat Cycle for Extra Cleanliness
If you want to be extra sure that all the baking soda and vinegar residue is gone, you can run a low-heat cycle in your oven.
1. Set the Oven to a Low Temperature: Set your oven to a low temperature, such as 200 degrees Fahrenheit.
2. Run for 15-20 Minutes: Let the oven run for 15-20 minutes. This will help to evaporate any remaining moisture and residue.
3. Turn Off and Let Cool: Turn off the oven and let it cool completely before using it.
Tips and Tricks for a Super Clean Oven:
* Clean Regularly: The more often you clean your oven, the easier it will be to keep it clean. Try to clean it every few months, or even more frequently if you use it a lot.
* Spot Clean Spills Immediately: If you spill something in your oven, clean it up as soon as possible. This will prevent it from baking onto the surface and becoming harder to remove later.
* Use Oven Liners: Consider using oven liners to catch drips and spills. This will help to keep your oven cleaner in the first place.
* Don’t Use Abrasive Cleaners: Avoid using abrasive cleaners or scouring pads, as they can scratch the interior surfaces of your oven.
* Ventilate the Area: When cleaning your oven, make sure to ventilate the area well by opening windows or turning on a fan.
Troubleshooting: What to Do if Things Go Wrong
* Stubborn Stains: If you have some really stubborn stains that won’t come off with the baking soda and vinegar method, you can try using a paste of baking soda and hydrogen peroxide. Apply the paste to the stains, let it sit for a few minutes, and then scrub it away.
* Baking Soda Residue: If you’re having trouble removing all the baking soda residue, try using a solution of equal parts water and vinegar. Spray the solution onto the residue and then wipe it away with a clean cloth.
* Vinegar Smell: If you’re bothered by the vinegar smell, you can try placing a bowl of baking soda or coffee grounds in the oven overnight to absorb the odor.
And there you have it! A sparkling clean oven using just baking soda and vinegar. It might take a little time and effort, but it’s so worth it to have a clean and healthy cooking environment. Happy cleaning!
Conclusion
So, there you have it! Growing strawberries at home, especially with our simple DIY trick, is not just a gardening project; it’s an investment in fresh, flavorful, and organically grown fruit right at your fingertips. Forget those bland, store-bought berries that lack the vibrant taste of sunshine and homegrown goodness. This method empowers you to control the entire process, from soil selection to harvest, ensuring the highest quality and most delicious strawberries imaginable.
Why is this DIY approach a must-try? Because it’s accessible, cost-effective, and incredibly rewarding. You don’t need acres of land or a green thumb of mythical proportions. With a few readily available materials and a little bit of patience, you can transform your balcony, patio, or even a sunny windowsill into a thriving strawberry patch. Imagine the joy of plucking ripe, juicy berries straight from the plant and enjoying them in your morning yogurt, a refreshing smoothie, or a decadent dessert.
But the benefits extend beyond just taste. Growing your own strawberries reduces your reliance on commercially grown produce, which often travels long distances and is treated with pesticides. You’ll be contributing to a more sustainable food system and enjoying the peace of mind that comes with knowing exactly where your food comes from. Plus, gardening is a fantastic stress reliever and a great way to connect with nature.
Looking for variations? Absolutely! Try experimenting with different strawberry varieties to find your favorites. Some are sweeter, some are larger, and some are more disease-resistant. Consider using vertical planters to maximize space, especially if you have limited room. You can also incorporate companion plants like basil or marigolds to deter pests and attract pollinators. For those in colder climates, consider using cold frames or row covers to extend the growing season. And don’t forget the power of good compost! Adding compost to your soil will provide essential nutrients and improve drainage.
We’ve shown you how to grow strawberries at home, now it’s your turn to get your hands dirty! We wholeheartedly encourage you to give this DIY trick a try. It’s a fun, educational, and delicious project that the whole family can enjoy. And most importantly, don’t be afraid to experiment and adapt the method to suit your specific needs and environment.
Once you’ve harvested your first batch of homegrown strawberries, we’d love to hear about your experience! Share your photos, tips, and stories in the comments below. Let’s create a community of strawberry enthusiasts and inspire others to embrace the joy of homegrown goodness. What are you waiting for? Start growing your own delicious strawberries today!
Frequently Asked Questions
What is the best time of year to plant strawberries?
The best time to plant strawberries depends on your climate and the type of strawberry you’re growing. Generally, early spring or late fall are ideal. In warmer climates, fall planting allows the plants to establish roots before the heat of summer. In colder climates, spring planting gives the plants enough time to grow before the first frost. June-bearing strawberries are typically planted in early spring, while everbearing and day-neutral varieties can be planted in either spring or fall. Always check the specific recommendations for the variety you choose.
What kind of soil is best for growing strawberries?
Strawberries thrive in well-drained, slightly acidic soil with a pH between 5.5 and 6.5. The soil should be rich in organic matter, so amending it with compost or well-rotted manure is highly recommended. Avoid heavy clay soils, as they can retain too much water and lead to root rot. If you have clay soil, consider growing your strawberries in raised beds or containers with a suitable potting mix. Good drainage is crucial for healthy strawberry plants.
How much sunlight do strawberries need?
Strawberries need at least six to eight hours of direct sunlight per day to produce abundant fruit. Choose a location that receives full sun for the majority of the day. If you live in a very hot climate, some afternoon shade may be beneficial to prevent the plants from overheating. Insufficient sunlight can result in smaller berries and reduced yields.
How often should I water my strawberry plants?
Water your strawberry plants regularly, especially during dry periods. The soil should be kept consistently moist but not waterlogged. Water deeply and less frequently, rather than shallowly and often. Avoid overhead watering, as this can promote fungal diseases. Drip irrigation or soaker hoses are excellent options for delivering water directly to the roots. Check the soil moisture regularly and adjust your watering schedule accordingly.
What are some common pests and diseases that affect strawberries?
Strawberries can be susceptible to various pests and diseases, including slugs, snails, aphids, spider mites, and fungal diseases like gray mold and powdery mildew. Regularly inspect your plants for signs of infestation or disease. Remove any affected leaves or berries promptly. Use organic pest control methods, such as introducing beneficial insects or applying neem oil. Ensure good air circulation around the plants to prevent fungal diseases. Crop rotation and disease-resistant varieties can also help minimize problems.
How do I fertilize my strawberry plants?
Fertilize your strawberry plants in early spring and again after the first harvest. Use a balanced fertilizer specifically formulated for berries, following the instructions on the package. Avoid over-fertilizing, as this can lead to excessive foliage growth and reduced fruit production. Organic fertilizers, such as compost tea or fish emulsion, are also excellent options.
How do I protect my strawberries from birds?
Birds love to feast on ripe strawberries, so protecting your plants is essential. Netting is the most effective way to keep birds away. Cover your strawberry plants with bird netting before the berries start to ripen. Make sure the netting is securely anchored to the ground to prevent birds from getting underneath. You can also use scarecrows, reflective tape, or other visual deterrents, but these are often less effective than netting.
How do I overwinter my strawberry plants?
In colder climates, strawberry plants need protection during the winter months. After the first frost, mulch around the plants with straw or pine needles to insulate the roots. In very cold regions, you may need to cover the plants with a row cover or cold frame. Remove the mulch in early spring when new growth begins to emerge.
How long does it take for strawberry plants to produce fruit?
The time it takes for strawberry plants to produce fruit depends on the variety and the planting time. June-bearing strawberries typically produce fruit the following spring after planting. Everbearing and day-neutral varieties may produce some fruit in the first year, but the main harvest will be in the second year. Be patient and provide your plants with proper care, and you’ll be rewarded with delicious strawberries in due time.
Can I grow strawberries in containers?
Yes, strawberries grow very well in containers. Choose a container that is at least 12 inches deep and wide to provide enough room for the roots to grow. Use a well-draining potting mix and ensure the container has drainage holes. Container-grown strawberries may need more frequent watering and fertilizing than those grown in the ground. Vertical planters are also a great option for growing strawberries in limited spaces.


Leave a Comment