
Okra Growing Tips: Ready to ditch the grocery store okra and grow your own delicious, vibrant pods right in your backyard? I’m so excited to share my favorite secrets for a bountiful okra harvest! For generations, okra has been a staple in Southern cuisine and beyond, with roots tracing back to Africa. It’s not just a tasty ingredient; it’s a symbol of resilience and resourcefulness, thriving even in hot climates.
But let’s be honest, growing okra can sometimes feel like a challenge. Maybe your plants are producing only a few pods, or perhaps they’re succumbing to pests. That’s where these DIY tricks and hacks come in! I’ve compiled a collection of simple, yet effective, techniques that will transform your okra growing experience.
Why do you need these okra growing tips? Because fresh, homegrown okra tastes infinitely better than anything you can buy at the store! Plus, gardening is a fantastic way to connect with nature, reduce your carbon footprint, and enjoy the satisfaction of nurturing your own food. So, grab your gardening gloves, and let’s dive into the secrets of successful okra cultivation. I promise, with these tips, you’ll be enjoying a delicious okra gumbo in no time!
Growing Okra Like a Pro: My Foolproof Guide to a Bountiful Harvest
Okra, also known as “lady’s fingers,” is a warm-season vegetable that’s surprisingly easy to grow, even if you don’t have a green thumb! I’ve been growing okra in my backyard garden for years, and I’ve learned a few tricks along the way to ensure a healthy and abundant harvest. This guide will walk you through everything you need to know, from choosing the right variety to dealing with common pests. Get ready to enjoy fresh, homegrown okra all season long!
Choosing the Right Okra Variety
Before you even think about planting, it’s crucial to select an okra variety that suits your climate and preferences. Here’s what I consider when making my choice:
* Climate: Some varieties are more heat-tolerant than others. If you live in a particularly hot region, opt for heat-resistant cultivars.
* Plant Size: Okra plants can grow quite tall, some reaching up to 8 feet! Consider the space you have available and choose a variety accordingly. Dwarf varieties are perfect for smaller gardens or containers.
* Pod Characteristics: Okra pods come in various colors (green, red, purple) and shapes. Some are smoother, while others are ribbed. Think about how you plan to use your okra and choose a variety with the desired pod characteristics.
* Days to Maturity: This refers to the number of days it takes for the plant to produce mature pods after planting. Choose a variety with a shorter maturity time if you have a shorter growing season.
Some of my favorite okra varieties include:
* Clemson Spineless: A classic, reliable variety with smooth, dark green pods. It’s known for its high yields and spineless pods, making harvesting a breeze.
* Burgundy: A beautiful variety with deep red pods that add a pop of color to your garden. The pods turn green when cooked.
* Emerald: Another spineless variety with tender, emerald-green pods. It’s a great choice for pickling or frying.
* Dwarf Green Long Pod: Perfect for small gardens or containers, this variety produces long, slender green pods on compact plants.
Preparing Your Garden for Okra
Okra thrives in warm weather and well-drained soil. Here’s how I prepare my garden bed for planting:
* Sunlight: Okra needs at least 6-8 hours of direct sunlight per day. Choose a location in your garden that receives plenty of sun.
* Soil: Okra prefers well-drained, fertile soil with a pH between 6.0 and 7.0.
* Soil Amendment: Before planting, amend the soil with plenty of compost or well-rotted manure. This will improve drainage, add nutrients, and help retain moisture. I usually add a 2-3 inch layer of compost and work it into the top 6-8 inches of soil.
* Weed Removal: Remove any weeds from the planting area. Weeds compete with okra plants for nutrients and water.
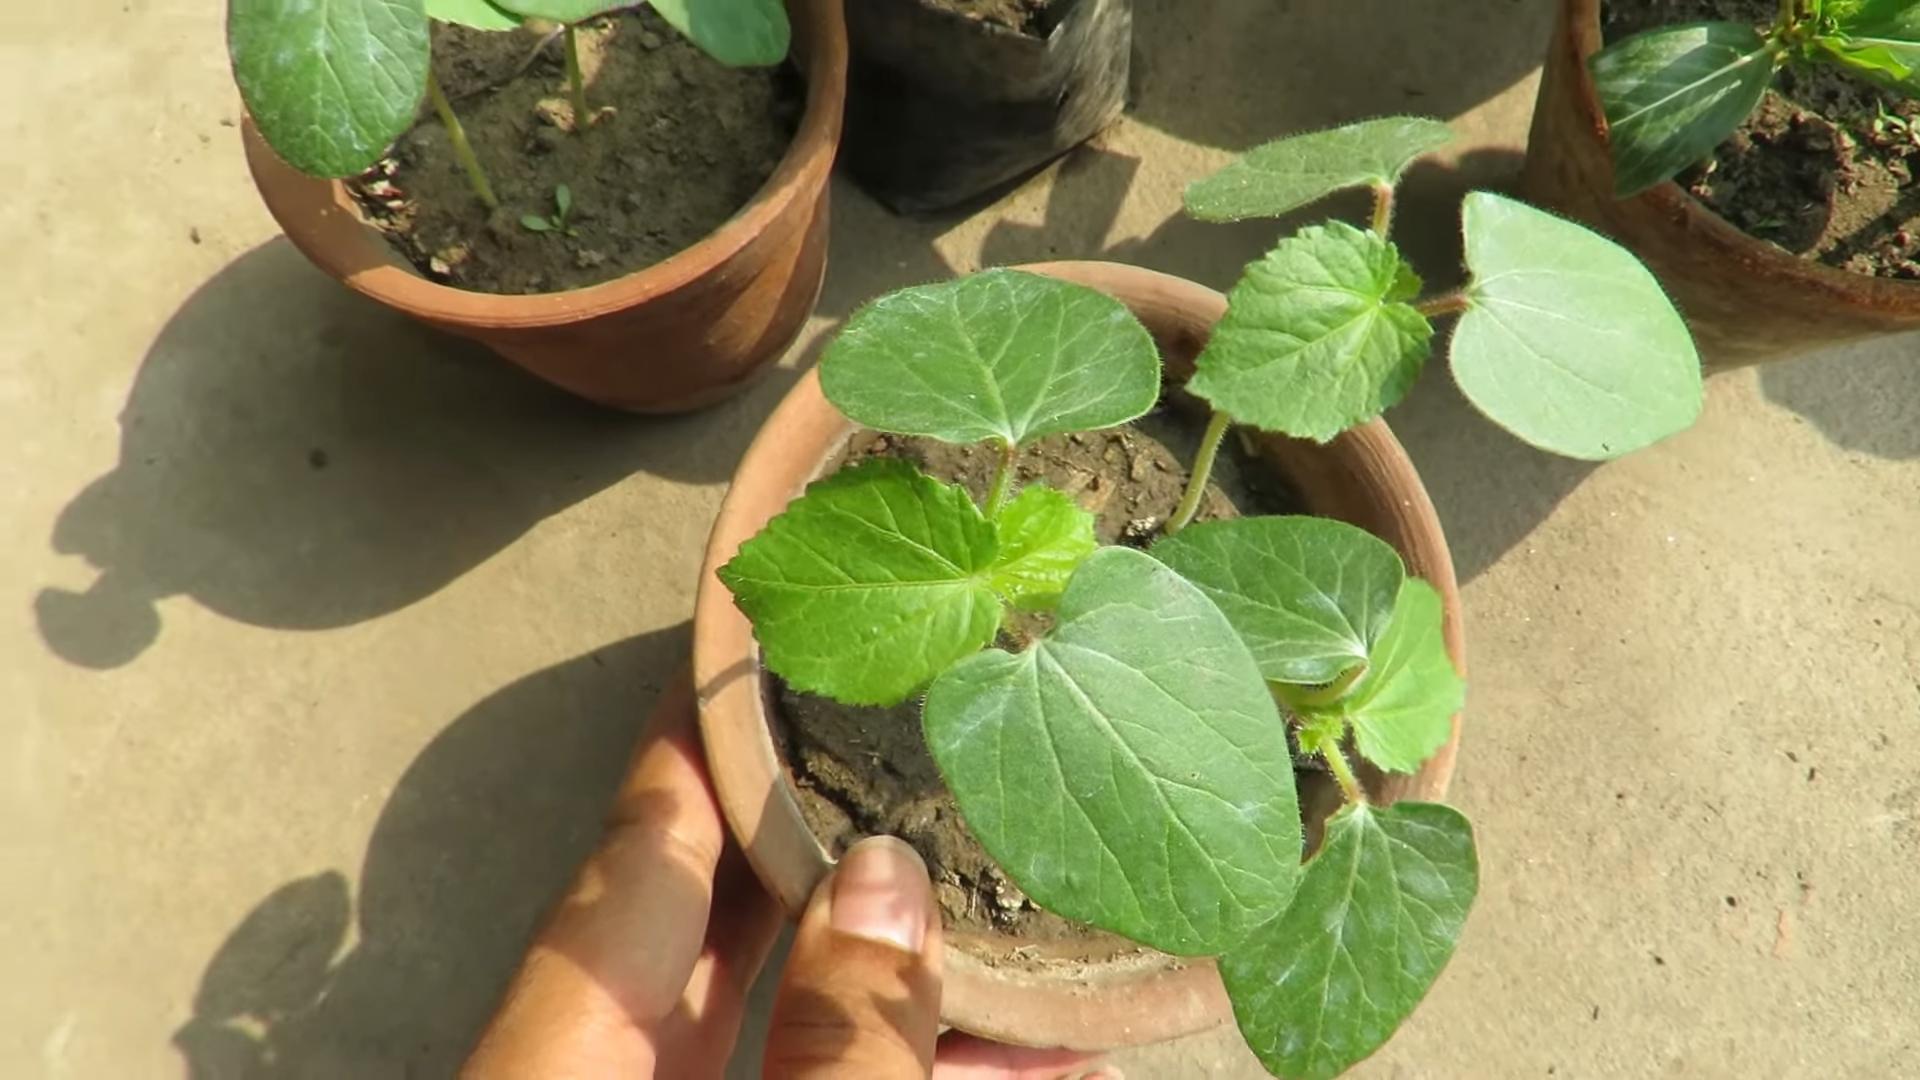
Planting Okra Seeds
Okra is typically grown from seed, and I’ve found that direct sowing is the easiest method. Here’s my step-by-step guide:
1. Soaking the Seeds: To improve germination, soak the okra seeds in warm water for 12-24 hours before planting. This helps soften the seed coat and speeds up the sprouting process.
2. Planting Time: Wait until the soil has warmed up to at least 65°F (18°C) before planting okra seeds. In most regions, this is usually a few weeks after the last frost.
3. Planting Depth: Plant the seeds about ½ to 1 inch deep and 2-3 inches apart.
4. Row Spacing: Space rows 3-4 feet apart to allow for adequate air circulation and sunlight penetration.
5. Watering: Water the soil thoroughly after planting. Keep the soil consistently moist until the seeds germinate, which usually takes 7-14 days.
6. Thinning: Once the seedlings emerge and have a few sets of true leaves, thin them to 12-18 inches apart. This will give the plants enough room to grow and develop.
Caring for Your Okra Plants
Once your okra plants are established, they’re relatively low-maintenance. Here’s what I do to keep them healthy and productive:
* Watering: Water okra plants deeply and regularly, especially during hot, dry weather. Aim for about 1 inch of water per week. Avoid overhead watering, as this can promote fungal diseases. I prefer using a soaker hose or drip irrigation to deliver water directly to the roots.
* Fertilizing: Okra plants benefit from regular fertilization. I usually apply a balanced fertilizer (e.g., 10-10-10) every 4-6 weeks. You can also side-dress the plants with compost or well-rotted manure.
* Weed Control: Keep the area around your okra plants free of weeds. Hand-pull weeds or use a hoe to cultivate the soil. Mulching can also help suppress weed growth.
* Pruning: While not essential, pruning can help improve air circulation and sunlight penetration. I usually remove any yellowing or damaged leaves. You can also prune the lower branches to encourage upward growth.
* Staking: If you’re growing a tall okra variety, you may need to stake the plants to prevent them from falling over, especially in windy areas.
Dealing with Pests and Diseases
Okra is generally a pest-resistant plant, but it can be susceptible to certain pests and diseases. Here’s how I deal with common problems:
* Aphids: These tiny insects can suck the sap from okra leaves, causing them to curl and yellow. I control aphids by spraying the plants with a strong stream of water or using insecticidal soap.
* Flea Beetles: These small, jumping beetles can chew holes in okra leaves. I control flea beetles by using row covers or applying neem oil.
* Corn Earworms: These caterpillars can bore into okra pods, causing damage. I control corn earworms by hand-picking them off the plants or using Bacillus thuringiensis (Bt), a natural insecticide.
* Root-Knot Nematodes: These microscopic worms can attack the roots of okra plants, causing stunted growth and yellowing leaves. I control root-knot nematodes by planting resistant varieties or using soil solarization.
* Fusarium Wilt: This fungal disease can cause okra plants to wilt and die. I prevent Fusarium wilt by planting resistant varieties, practicing crop rotation, and avoiding overwatering.
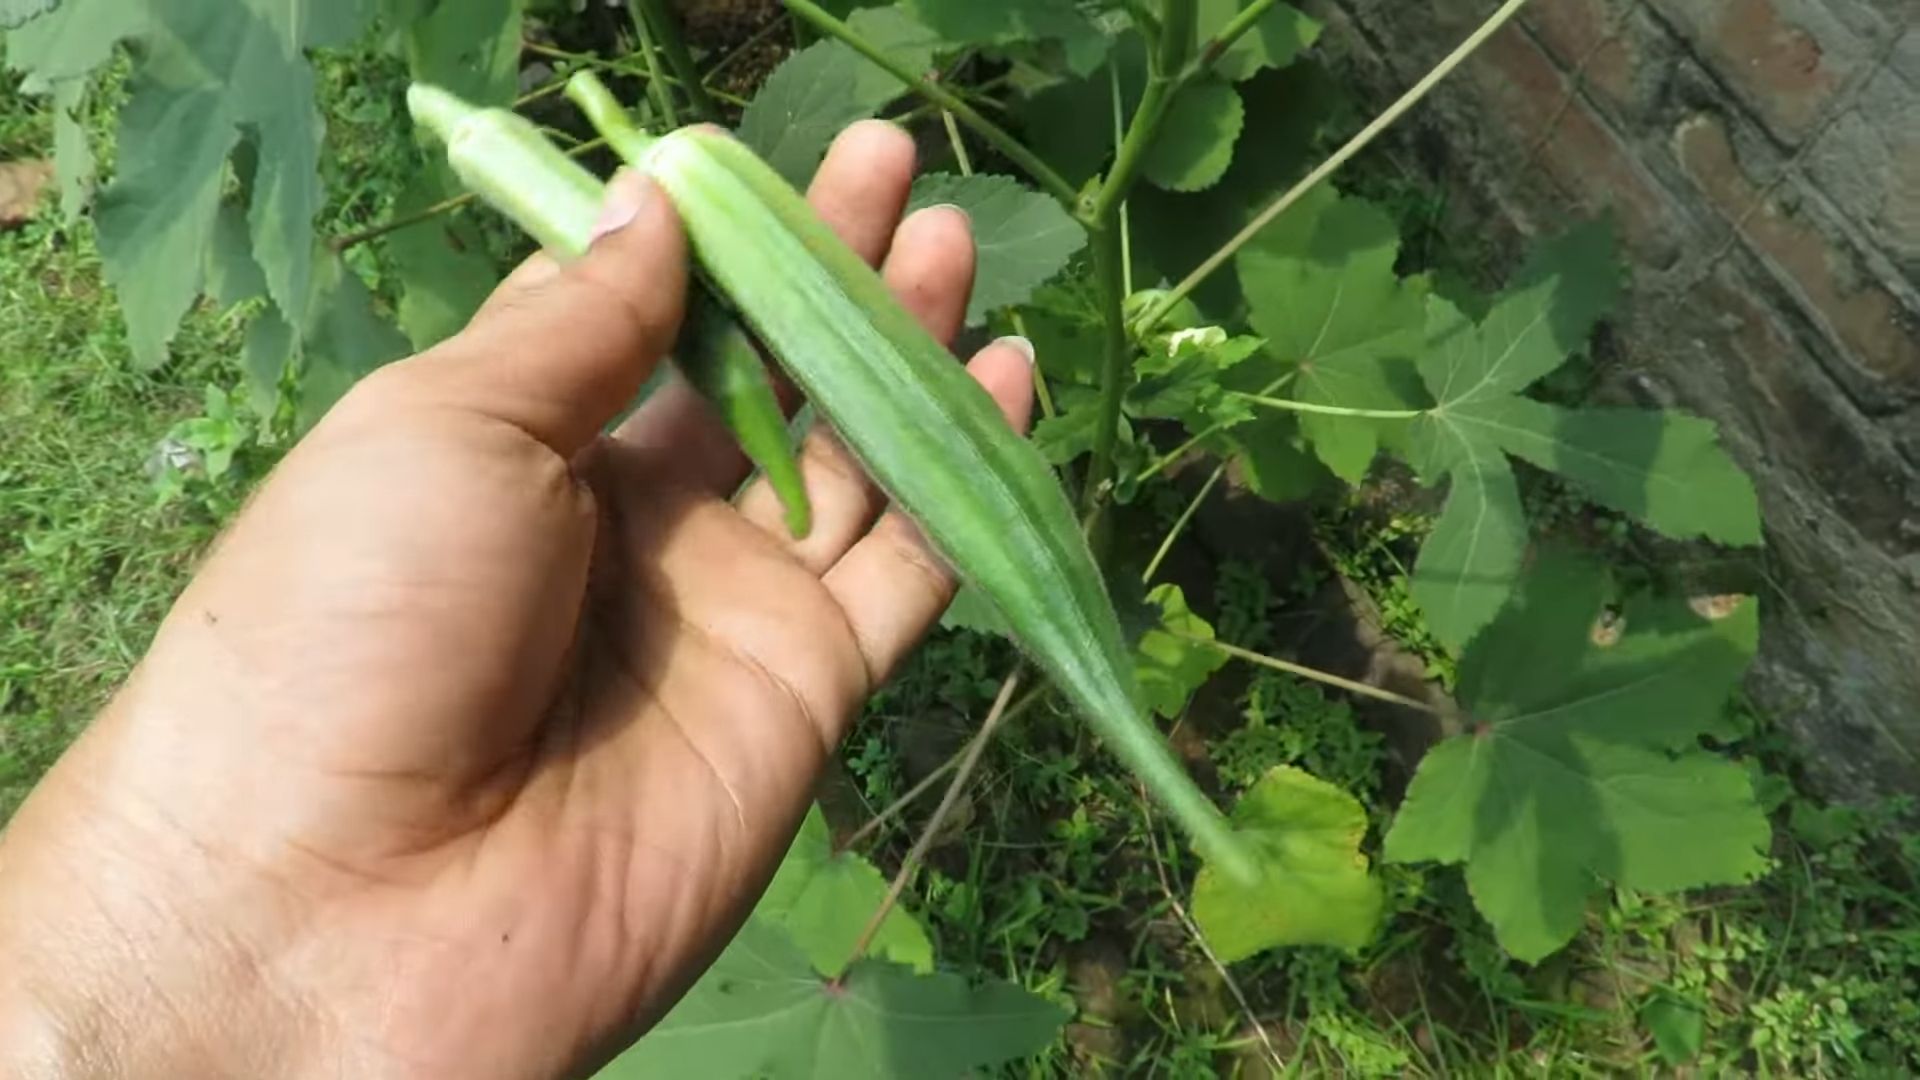
Harvesting Okra
Harvesting okra at the right time is crucial for ensuring tender and flavorful pods. Here’s my harvesting guide:
1. Harvesting Time: Okra pods are typically ready to harvest 50-65 days after planting.
2. Pod Size: Harvest okra pods when they are 2-4 inches long. Larger pods tend to be tough and fibrous.
3. Harvesting Technique: Use a sharp knife or pruning shears to cut the pods from the plant. Wear gloves to protect your hands from the prickly hairs on the pods and stems.
4. Harvesting Frequency: Harvest okra pods every 1-2 days to encourage continuous production.
5. Post-Harvest Handling: Okra pods are best used fresh, but they can be stored in the refrigerator for up to a week.
Enjoying Your Okra Harvest
Now for the best part – enjoying the fruits (or rather, pods!) of your labor! Okra is a versatile vegetable that can be used in a variety of dishes. Here are some of my favorite ways to enjoy my homegrown okra:
* Fried Okra: A classic Southern dish that’s crispy on the outside and tender on the inside.
* Okra Gumbo: A flavorful stew with okra, tomatoes, peppers, and other vegetables.
* Grilled Okra: A simple and delicious way to enjoy the natural flavor of okra.
* Pickled Okra: A tangy and crunchy treat that’s perfect for snacking or adding to salads.
* Roasted Okra: Roasting okra brings out its sweetness and nutty flavor.
Saving Okra Seeds
If you want to save seeds from your okra plants for next year, here’s how I do it:
1. Select Healthy Plants: Choose healthy, vigorous plants with desirable pod characteristics.
2. Allow Pods to Mature: Allow a few pods to mature on the plant. The pods will turn brown and dry out.
3. Harvest the Pods: Once the pods are completely dry, harvest them from the plant.
4. Extract the Seeds: Break open the pods and remove the seeds.
5. Dry the Seeds: Spread the seeds out on a tray and allow
Conclusion
So, there you have it! Mastering the art of growing okra doesn’t have to be a daunting task. By implementing these simple yet effective DIY tricks, you’re well on your way to harvesting a bountiful crop of delicious, tender okra right from your own backyard. We’ve covered everything from soil preparation and seed starting to pest control and harvesting techniques, all designed to maximize your yield and minimize common problems.
The beauty of these methods lies in their accessibility and adaptability. You don’t need fancy equipment or specialized knowledge to succeed. Just a little bit of planning, some elbow grease, and a willingness to experiment. Remember, gardening is a journey, and every season brings new opportunities to learn and refine your skills.
Why is this a must-try? Because fresh, homegrown okra tastes infinitely better than anything you can buy at the store. The flavor is brighter, the texture is more tender, and you have the satisfaction of knowing exactly where your food came from and how it was grown. Plus, growing your own okra is a sustainable and environmentally friendly way to enjoy this nutritious vegetable.
Consider these variations to further personalize your okra growing experience:
* Companion Planting: Experiment with companion plants like basil, peppers, and cucumbers to deter pests and improve soil health.
* Different Varieties: Explore different okra varieties to find the ones that best suit your taste and climate. ‘Clemson Spineless’ is a classic choice, but ‘Burgundy’ offers beautiful red pods, and ‘Emerald’ is known for its smooth texture.
* Vertical Growing: If you’re short on space, try growing okra in containers or using vertical gardening techniques to maximize your yield.
* Succession Planting: Plant okra seeds every few weeks to ensure a continuous harvest throughout the growing season.
Don’t be afraid to get your hands dirty and try these DIY okra growing tips. We’re confident that you’ll be amazed by the results. The key is to be patient, observant, and willing to adapt your approach as needed.
We encourage you to embark on this rewarding gardening adventure and discover the joy of growing your own okra. And most importantly, we want to hear about your experiences! Share your successes, your challenges, and any tips or tricks that you’ve discovered along the way in the comments section below. Let’s build a community of okra enthusiasts and learn from each other. Happy gardening!
Frequently Asked Questions (FAQ)
What is the best time to plant okra seeds?
The ideal time to plant okra seeds is when the soil temperature consistently reaches at least 65°F (18°C). This typically occurs 2-3 weeks after the last expected frost in your area. Okra thrives in warm weather, so waiting until the soil is warm enough will ensure better germination and faster growth. Planting too early in cold soil can lead to seed rot and poor seedling development. You can also start seeds indoors 4-6 weeks before the last frost and transplant them outdoors once the weather warms up.
How much sunlight does okra need?
Okra requires at least 6-8 hours of direct sunlight per day to thrive. Choose a planting location that receives full sun throughout the day. Insufficient sunlight can result in leggy plants, reduced flowering, and lower yields. If you’re growing okra in containers, make sure to place them in a sunny spot or supplement with grow lights if necessary.
What type of soil is best for growing okra?
Okra prefers well-drained, fertile soil with a slightly acidic to neutral pH (6.0-7.0). Amend heavy clay soil with compost, aged manure, or other organic matter to improve drainage and aeration. Sandy soil can be improved by adding organic matter to increase its water-holding capacity. Before planting, consider conducting a soil test to determine the pH and nutrient levels and amend accordingly.
How often should I water okra plants?
Okra plants need consistent moisture, especially during hot, dry weather. Water deeply and regularly, aiming to keep the soil consistently moist but not waterlogged. Water at the base of the plants to avoid wetting the foliage, which can increase the risk of fungal diseases. A good rule of thumb is to water when the top inch of soil feels dry to the touch. Mulching around the plants can help retain moisture and suppress weeds.
What are some common pests and diseases that affect okra?
Common pests that affect okra include aphids, flea beetles, corn earworms, and stink bugs. Diseases include powdery mildew, Fusarium wilt, and root-knot nematodes. Regularly inspect your plants for signs of pests or diseases and take appropriate action. Organic pest control methods include using insecticidal soap, neem oil, or introducing beneficial insects like ladybugs. For diseases, ensure good air circulation, avoid overwatering, and use disease-resistant varieties. Crop rotation can also help prevent soilborne diseases.
When is the best time to harvest okra?
Okra pods are best harvested when they are young and tender, typically 2-4 inches long. Harvesting every 1-2 days will encourage continuous production and prevent the pods from becoming tough and fibrous. Use a sharp knife or pruning shears to cut the pods from the plant, leaving a short stem attached. Wear gloves when harvesting okra, as the pods can be prickly and irritating to the skin.
How can I prevent okra pods from becoming tough?
The key to preventing tough okra pods is to harvest them frequently, when they are young and tender. Overripe pods become tough and fibrous, making them less palatable. Also, ensure that your plants are receiving adequate water and nutrients, as stress can also contribute to tough pods. Choosing a variety known for its tender pods can also help.
Can I save okra seeds for next year?
Yes, you can save okra seeds for next year. Allow some pods to mature fully on the plant until they turn brown and dry. Once the pods are completely dry, harvest them and remove the seeds. Store the seeds in a cool, dry place in an airtight container. Okra seeds can remain viable for several years if stored properly.
How do I deal with yellowing leaves on my okra plants?
Yellowing leaves on okra plants can be caused by several factors, including nutrient deficiencies, overwatering, underwatering, or disease. Check the soil moisture and adjust your watering accordingly. Ensure that your plants are receiving adequate nutrients by fertilizing with a balanced fertilizer. If you suspect a disease, inspect the plants for other symptoms and take appropriate action. Soil testing can help identify nutrient deficiencies and pH imbalances.
Is okra a good companion plant for other vegetables?
Yes, okra is a good companion plant for many vegetables. It can provide shade and support for smaller plants, and its flowers attract beneficial insects. Good companion plants for okra include basil, peppers, cucumbers, eggplant, and melons. Avoid planting okra near fennel, as it can inhibit its growth.
Leave a Comment