
Mushroom Growing Bucket Indoor: Ever dreamt of harvesting fresh, delicious mushrooms right from your own home? Imagine skipping the grocery store trips and enjoying the earthy, savory goodness of homegrown mushrooms whenever you please! Well, stop dreaming and start doing! This DIY guide will walk you through creating your very own mushroom growing bucket, bringing the magic of fungi cultivation indoors.
Mushroom cultivation has a rich history, dating back centuries in various cultures. From ancient China to the Roman Empire, mushrooms have been prized for their culinary and medicinal properties. Today, with increasing interest in sustainable living and homegrown food, indoor mushroom cultivation is experiencing a major revival.
Why should you try this DIY mushroom growing bucket? Because it’s easier than you think! Many people are intimidated by the idea of growing mushrooms, but this method simplifies the process, making it accessible to beginners. Plus, it’s a fantastic way to recycle old buckets and reduce your carbon footprint. I’m excited to share this simple and effective method that will allow you to enjoy fresh, homegrown mushrooms all year round. Get ready to embark on a fun and rewarding journey into the world of Mushroom Growing Bucket Indoor!
DIY Mushroom Growing Bucket: A Beginner’s Guide
Hey there, fellow fungi enthusiasts! Ever dreamed of harvesting your own delicious mushrooms right in your home? Well, you’re in the right place! I’m going to walk you through creating your very own mushroom growing bucket. It’s a surprisingly simple and rewarding project, perfect for beginners like I was not too long ago. Get ready to impress your friends and family with your homegrown gourmet mushrooms!
What You’ll Need
Before we dive in, let’s gather our supplies. This list might seem a bit long, but trust me, it’s all pretty straightforward.
* A 5-gallon bucket with a lid (food-grade is best, but clean and sanitized is fine too)
* Mushroom spawn (Oyster mushrooms are a great choice for beginners)
* Straw (pasteurized)
* Drill with a 1/4-inch drill bit
* Spray bottle filled with water
* Gloves (optional, but recommended for hygiene)
* Bleach (for sanitizing)
* Large pot or container for pasteurizing straw
* Thermometer (to monitor water temperature during pasteurization)
* Measuring cup
* Scale (optional, for precise spawn measurement)
* A clean workspace
Preparing the Straw: The Foundation of Your Fungi Farm
The straw acts as the food source for your mushrooms, so it’s crucial to get this step right. We need to pasteurize it to kill off any competing organisms that might hinder our mushroom growth.
1. Chop the Straw: First, chop the straw into smaller pieces, about 2-4 inches long. This makes it easier to pack into the bucket and allows the mushroom mycelium to colonize it more effectively. I usually use garden shears for this, but you can also use a sharp knife or even a lawnmower (carefully!).
2. Pasteurize the Straw: This is the most important step! Pasteurization kills off unwanted bacteria and fungi that could compete with your mushroom spawn. There are a few ways to do this, but I prefer the hot water method.
* Fill a large pot or container with water. You’ll need enough water to completely submerge the straw.
* Heat the water to 160-180°F (71-82°C). Use a thermometer to monitor the temperature. It’s crucial not to boil the water, as this can damage the straw and make it less suitable for mushroom growth.
* Submerge the chopped straw in the hot water. You might need to weigh it down with a brick or a heavy pot to keep it submerged.
* Maintain the water temperature at 160-180°F (71-82°C) for 60-90 minutes. This ensures that all the unwanted organisms are killed off.
* After pasteurization, carefully remove the straw from the hot water. I usually use tongs or a large strainer.
* Let the straw cool down completely. This can take several hours. You want the straw to be cool enough to handle comfortably.
3. Drain the Straw: Once the straw is cool, you need to drain off the excess water. The straw should be moist, but not soaking wet. You can do this by placing the straw in a colander or on a clean surface and letting it drain for several hours. I usually squeeze out handfuls of straw to remove excess water. The ideal moisture content is when you can squeeze a handful of straw and only a few drops of water come out.
Preparing the Bucket: Creating the Perfect Mushroom Home
Now that our straw is ready, let’s get our bucket prepped for its new inhabitants.
1. Sanitize the Bucket and Lid: Cleanliness is key to successful mushroom growing. Wash the bucket and lid thoroughly with soap and water. Then, sanitize them with a diluted bleach solution (1 part bleach to 10 parts water). Rinse them well with clean water and let them air dry completely.
2. Drill Holes: We need to create holes in the bucket for air exchange and for the mushrooms to grow out of.
* Drill 1/4-inch holes around the sides of the bucket, spacing them about 4-6 inches apart. Start a few inches from the bottom and continue up to the top.
* Drill a few holes in the lid as well. This will help with air circulation.
Layering and Spawning: Planting the Seeds of Deliciousness
This is where the magic happens! We’ll be layering the pasteurized straw and mushroom spawn in the bucket, creating the perfect environment for the mycelium to colonize.
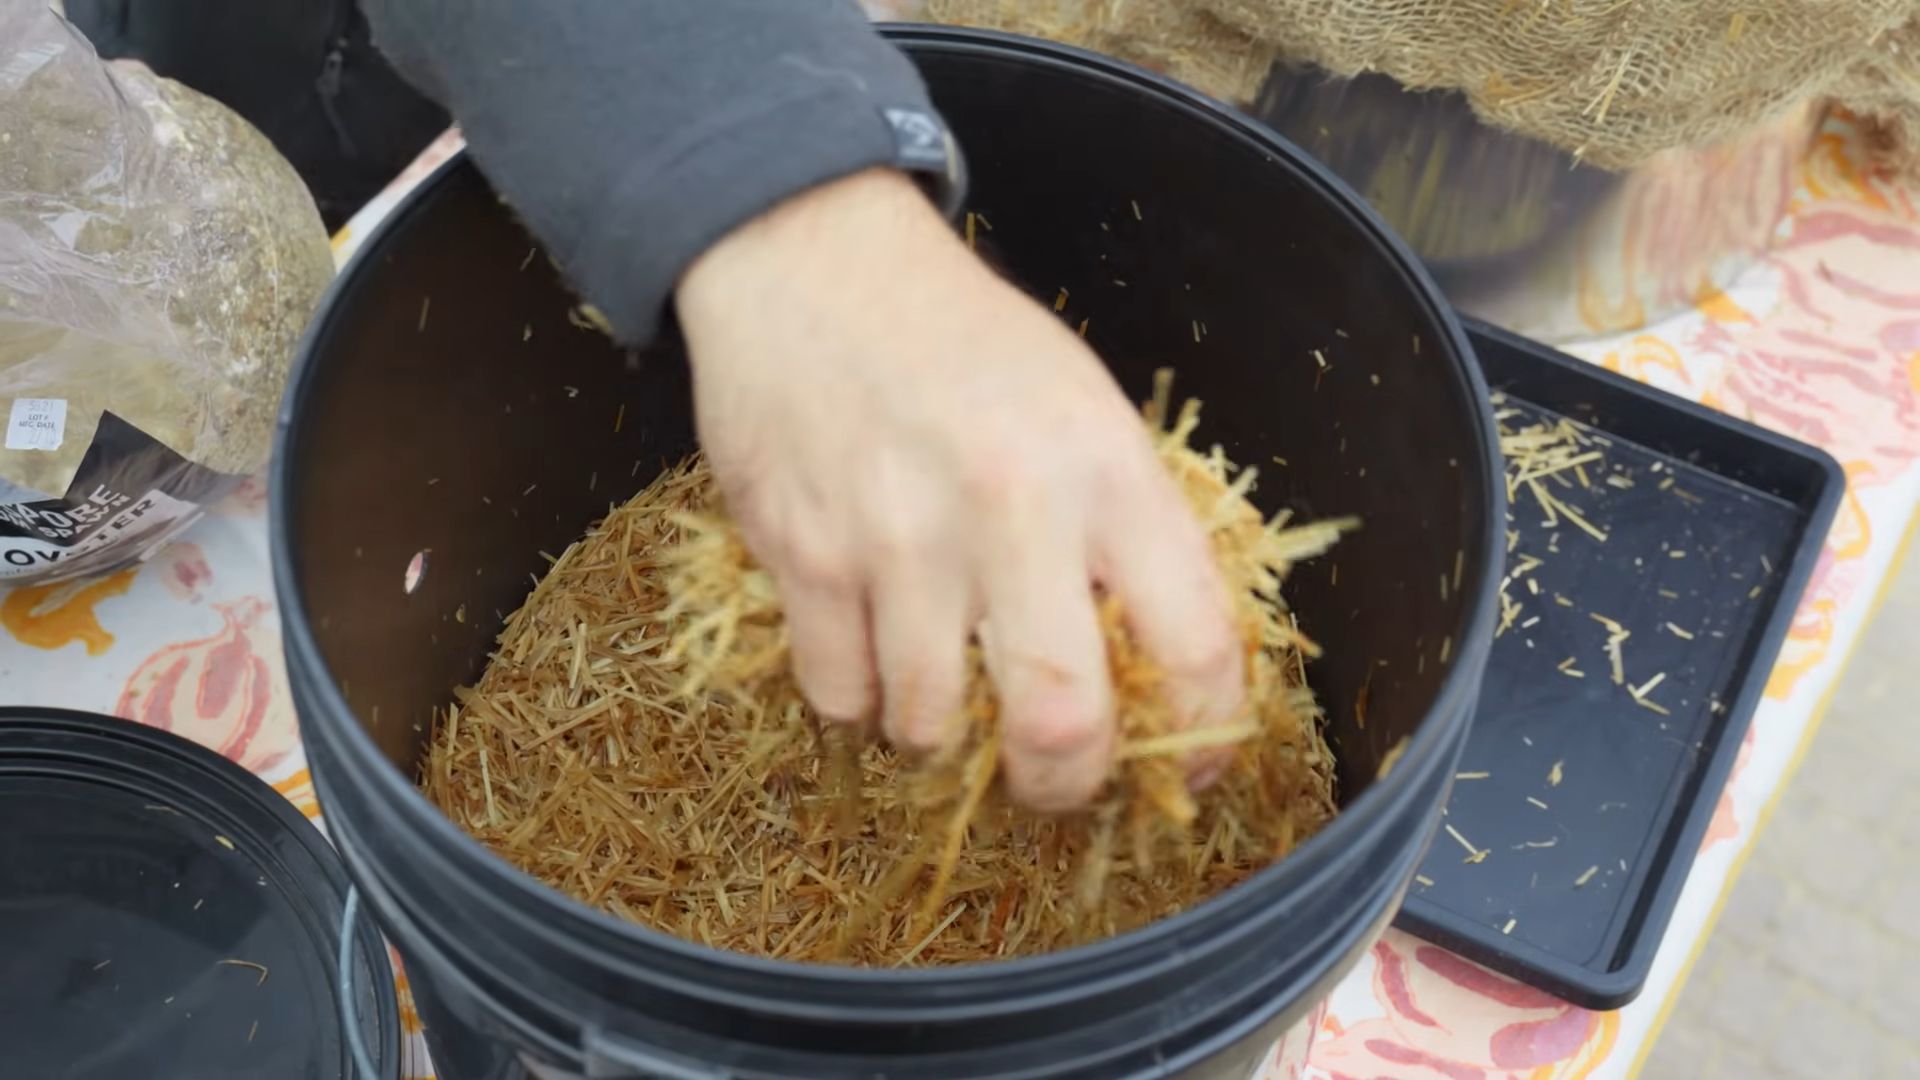
1. Layering: Start by placing a layer of pasteurized straw at the bottom of the bucket, about 2-3 inches thick.
2. Spawning: Sprinkle a layer of mushroom spawn over the straw. Use about 1/4 of your total spawn for this first layer.
3. Repeat: Continue layering straw and spawn, alternating between the two. Each layer of straw should be about 2-3 inches thick, and each layer of spawn should be evenly distributed over the straw.
4. Top Layer: Finish with a layer of straw on top. This helps to retain moisture and protect the spawn.
5. Press Down: Gently press down on the straw to compact it slightly. This helps to create good contact between the straw and the spawn.
6. Moisture Check: The straw should be moist, but not soaking wet. If it seems dry, lightly mist it with water from your spray bottle.
Incubation: The Waiting Game
Now comes the hardest part: waiting! During this phase, the mushroom mycelium will colonize the straw, spreading throughout the bucket and preparing to fruit.
1. Placement: Place the bucket in a dark, humid location with a temperature between 65-75°F (18-24°C). A basement, closet, or garage often works well. Avoid direct sunlight, as this can dry out the straw and inhibit mushroom growth.
2. Humidity: Maintain high humidity around the bucket. You can do this by placing a plastic bag loosely over the bucket (make sure there’s still some air circulation) or by placing a tray of water near the bucket. I often mist the inside of the bag with water to keep the humidity up.
3. Monitoring: Check the bucket regularly for signs of colonization. You should start to see white, fuzzy growth (the mycelium) spreading throughout the straw within a week or two.
4. Patience: This process can take anywhere from 2-4 weeks, depending on the type of mushroom spawn you’re using and the environmental conditions. Be patient and don’t disturb the bucket too much.
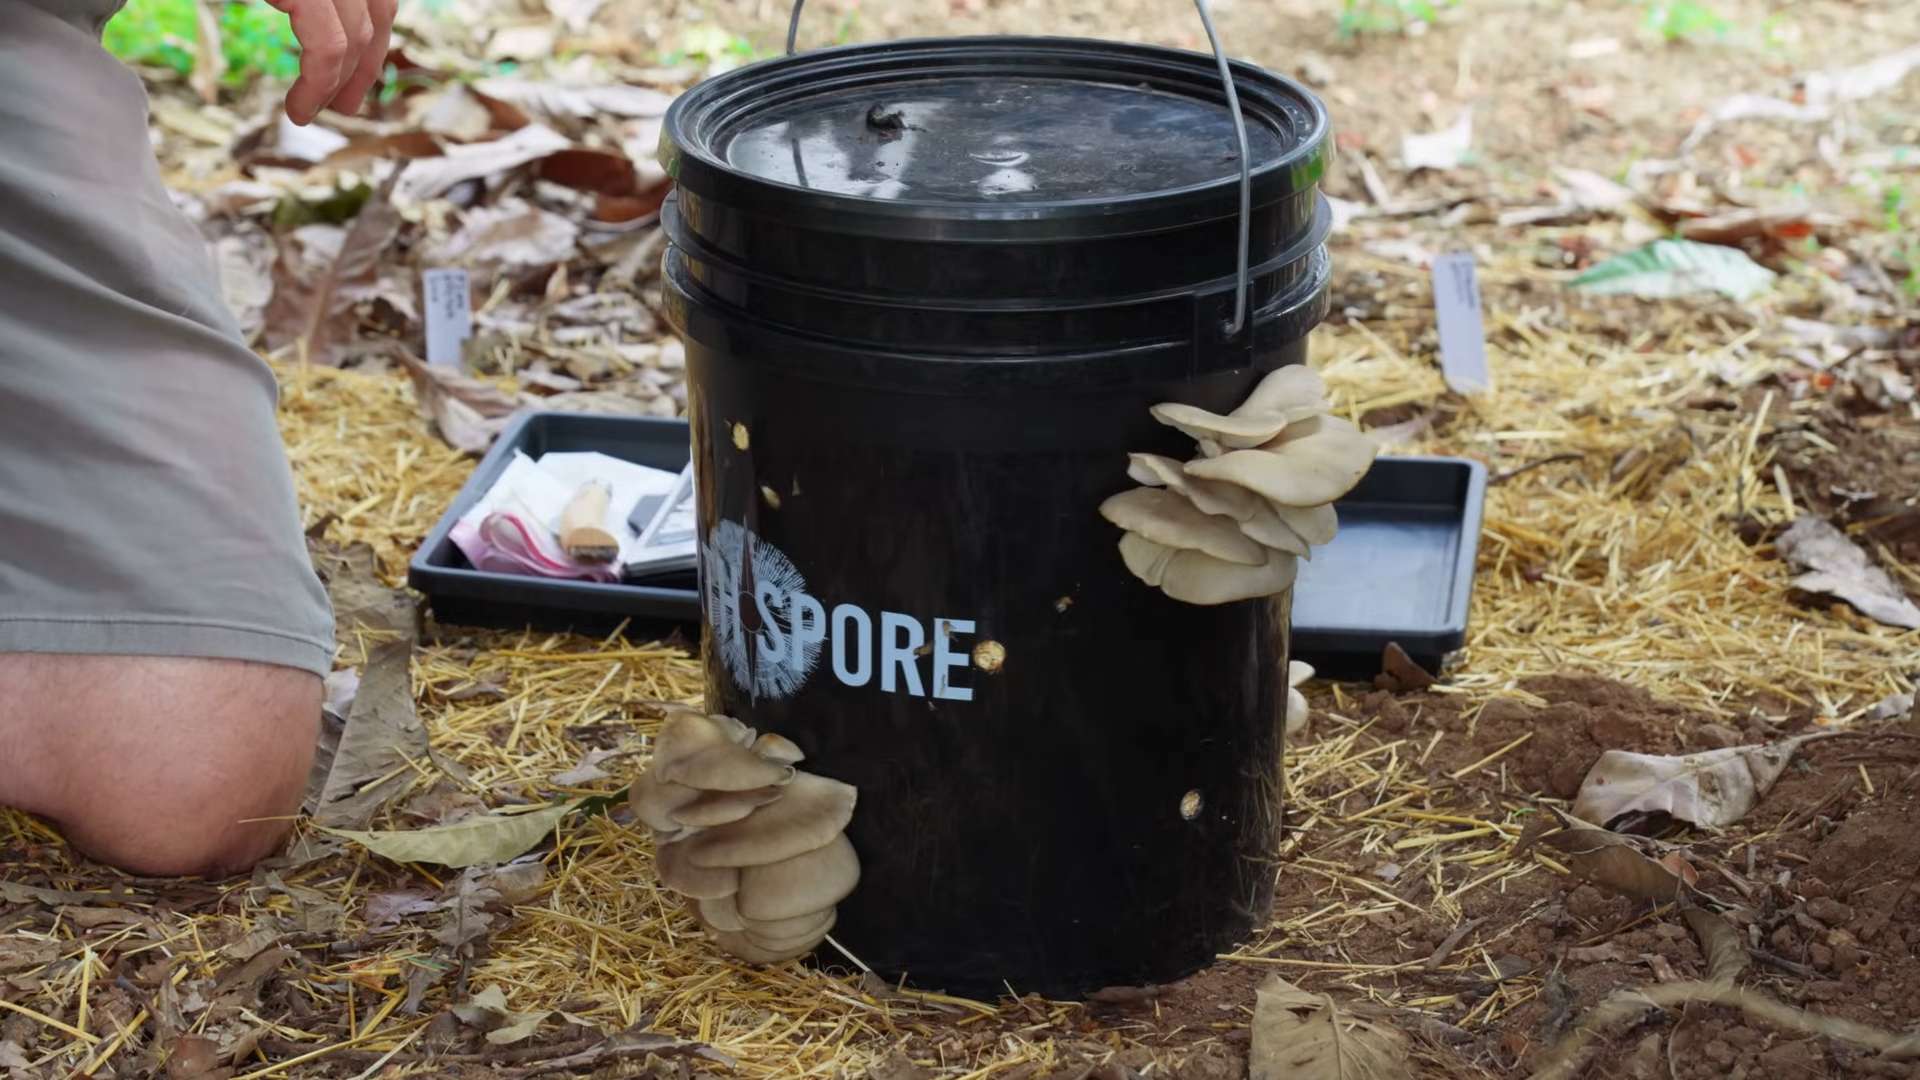
Fruiting: The Moment of Truth
Once the straw is fully colonized (it should be almost completely covered in white mycelium), it’s time to initiate fruiting. This is when the mushrooms will start to form.
1. Light: Move the bucket to a location with indirect light. Mushrooms need some light to fruit properly, but direct sunlight can be harmful.
2. Humidity: Maintain high humidity. Continue to mist the bucket regularly with water, especially around the holes where the mushrooms will grow.
3. Air Exchange: Ensure good air exchange. This is crucial for preventing mold and promoting healthy mushroom growth. You can do this by removing the plastic bag (if you’re using one) and fanning the bucket with a piece of cardboard a few times a day.
4. Watering: Mist the mushrooms directly with water as they start to form. This helps to keep them hydrated and encourages them to grow larger.
5. Harvesting: Harvest the mushrooms when they are fully developed but before they start to drop spores. This is usually when the caps are fully open and the edges are still slightly curled under. To harvest, gently twist the mushrooms off the straw.
Troubleshooting: What to Do When Things Go Wrong
Even with the best preparation, things can sometimes go wrong. Here are a few common problems and how to fix them:
* Mold: If you see green, black, or other colored mold growing in the bucket, it’s a sign of contamination. Unfortunately, there’s not much you can do at this point except discard the bucket and start over. To prevent mold, make sure to pasteurize the straw properly and maintain good hygiene.
* Slow Colonization: If the mycelium is not colonizing the straw quickly enough, it could be due to low temperature, low humidity, or poor air exchange. Try moving the bucket to a warmer location, increasing the humidity, and improving air circulation.
* No Fruiting: If the straw is fully colonized but no mushrooms are forming, it could be due to lack of light, low humidity, or poor air exchange. Try moving the bucket to a location with indirect light, increasing the humidity, and improving air circulation.
* Dry Straw: If the straw is drying out, mist
Conclusion
So, there you have it! Creating your own mushroom growing bucket indoors is not only surprisingly simple, but it’s also incredibly rewarding. Imagine the satisfaction of harvesting fresh, flavorful mushrooms right from your own home, knowing exactly where they came from and how they were grown. This DIY project transforms your kitchen (or any suitable indoor space) into a miniature mushroom farm, offering a sustainable and delicious source of food.
Why is this a must-try? Because it empowers you to take control of your food supply, reduces your reliance on store-bought produce, and provides a fascinating glimpse into the world of mycology. Plus, the taste of homegrown mushrooms is simply unparalleled – richer, earthier, and far more flavorful than anything you can find on supermarket shelves.
But the fun doesn’t stop there! Feel free to experiment with different types of mushrooms. Oyster mushrooms are a fantastic beginner-friendly option, known for their rapid growth and delicious taste. Shiitake mushrooms offer a more complex flavor profile and are equally rewarding to cultivate. You can even try growing lion’s mane mushrooms for a truly unique culinary experience.
Consider these variations to personalize your mushroom growing bucket:
* Substrate Mix: While the recipe calls for a specific substrate, you can experiment with different combinations of straw, sawdust, and coffee grounds to see what works best for your chosen mushroom variety.
* Fruiting Chamber: If you live in a dry climate, you might need to create a more humid fruiting chamber. A simple plastic bag placed loosely over the bucket can help retain moisture. Just be sure to vent it regularly to prevent mold growth.
* Lighting: While mushrooms don’t need direct sunlight, they do benefit from some ambient light. Experiment with different light sources to see what promotes the best growth. A simple LED grow light can make a significant difference.
* Bucket Size: While this guide focuses on a standard bucket, you can adapt the instructions to larger containers for a bigger yield. Just be sure to adjust the substrate and spawn quantities accordingly.
This DIY mushroom growing bucket indoor project is more than just a recipe; it’s an adventure. It’s an opportunity to connect with nature, learn new skills, and enjoy the fruits (or rather, fungi) of your labor.
We wholeheartedly encourage you to give this a try. Don’t be intimidated by the process – it’s much easier than you might think. And once you’ve harvested your first batch of homegrown mushrooms, we’re confident you’ll be hooked.
So, gather your supplies, follow the instructions, and prepare to be amazed. And most importantly, don’t forget to share your experience with us! We’d love to hear about your successes, your challenges, and any variations you’ve tried. Share your photos and stories on social media using #DIYMushroomBucket and let’s build a community of home mushroom growers! Happy growing!
Frequently Asked Questions (FAQ)
What type of bucket should I use?
Ideally, you should use a food-grade plastic bucket. These are readily available online or at hardware stores. Avoid buckets that have previously contained chemicals or other potentially harmful substances. A 5-gallon bucket is a good starting size, but you can adjust the size depending on your needs and available space. Make sure the bucket is clean and free of any debris before you start.
What is mushroom spawn, and where can I get it?
Mushroom spawn is essentially the “seed” of the mushroom. It’s a substrate (usually grain or sawdust) that has been inoculated with mushroom mycelium. You can purchase mushroom spawn online from reputable suppliers specializing in mushroom cultivation. Different mushroom varieties require different types of spawn, so be sure to choose the right spawn for the type of mushroom you want to grow.
What is the best substrate for growing mushrooms in a bucket?
The best substrate depends on the type of mushroom you’re growing. For oyster mushrooms, straw is a popular and readily available option. For shiitake mushrooms, sawdust is often preferred. You can also experiment with other materials like coffee grounds, cardboard, and wood chips. The key is to ensure the substrate is properly pasteurized or sterilized to eliminate competing organisms.
How do I pasteurize or sterilize the substrate?
Pasteurization involves heating the substrate to a temperature that kills most harmful microorganisms without completely sterilizing it. This can be done by soaking the substrate in hot water (around 160-180°F) for an hour or two. Sterilization, on the other hand, involves heating the substrate to a higher temperature (usually in an autoclave or pressure cooker) to kill all microorganisms. Sterilization is generally recommended for more demanding mushroom varieties. For straw, pasteurization is usually sufficient.
How long does it take for mushrooms to grow in a bucket?
The time it takes for mushrooms to grow depends on the mushroom variety, the environmental conditions, and the quality of the spawn and substrate. Oyster mushrooms typically fruit within a few weeks of inoculation, while shiitake mushrooms may take several months. Maintaining optimal temperature, humidity, and light levels can help speed up the process.
What are the ideal temperature and humidity conditions for growing mushrooms in a bucket?
The ideal temperature and humidity conditions vary depending on the mushroom variety. Oyster mushrooms generally prefer temperatures between 60-75°F and high humidity (80-90%). Shiitake mushrooms prefer cooler temperatures (50-65°F) and slightly lower humidity (70-80%). You can monitor temperature and humidity using a thermometer and hygrometer.
How often should I water the mushroom growing bucket?
The frequency of watering depends on the humidity levels and the type of mushroom you’re growing. The substrate should be kept moist but not waterlogged. You can mist the substrate with water several times a day to maintain adequate humidity. Avoid overwatering, as this can lead to mold growth.
What if I see mold growing in my mushroom growing bucket?
Mold is a common problem in mushroom cultivation. If you see mold growing in your bucket, try to identify the type of mold. Some molds are harmless, while others can be detrimental to mushroom growth. If the mold is localized, you can try to remove it with a clean spoon or knife. If the mold is widespread, it may be necessary to discard the entire bucket. Proper pasteurization or sterilization of the substrate can help prevent mold growth.
Can I reuse the substrate after harvesting mushrooms?
Yes, you can often get multiple flushes (harvests) from a single bucket. After harvesting the first flush, allow the substrate to rest for a week or two, then rehydrate it by soaking it in water. You may be able to get several more flushes before the substrate is exhausted. Eventually, the substrate will become depleted of nutrients and will no longer produce mushrooms. At that point, you can compost the spent substrate and use it to enrich your garden soil.
Is growing mushrooms indoors safe?
Yes, growing edible mushrooms indoors is generally safe. However, it’s important to properly identify the mushrooms you’re growing and to avoid consuming any mushrooms that you’re not sure about. Some wild mushrooms are poisonous, so it’s crucial to only grow mushrooms from reputable sources. Also, be aware that some people may be allergic to certain types of mushrooms. If you experience any allergic reactions after consuming homegrown mushrooms, discontinue use and consult a doctor.
Leave a Comment