
Maximize small space storage – that’s the holy grail for anyone living in a cozy apartment, a charming bungalow, or even just trying to declutter a room! Let’s face it, we all accumulate *stuff*, and finding clever ways to tuck it away without sacrificing style or functionality can feel like a constant battle. But fear not, fellow space-challenged friends, because I’m here to share some game-changing DIY tricks and hacks that will transform your tiny abode into an organized oasis.
Throughout history, resourceful individuals have always sought innovative storage solutions. From ancient civilizations utilizing built-in niches in walls to the ingenious space-saving designs of Japanese homes, the need to maximize small space storage has been a constant driver of creativity. Think about it – even the humble trunk, a staple for centuries, was all about making the most of limited travel space!
In today’s world, where urban living often means smaller square footage, these skills are more crucial than ever. We all crave a clutter-free environment, but the reality of limited space can make it seem impossible. That’s where these DIY storage solutions come in. I’m going to show you how to create hidden storage, utilize vertical space, repurpose everyday items, and generally become a master of disguise when it comes to hiding your belongings in plain sight. Get ready to say goodbye to clutter and hello to a beautifully organized and functional home!
Growing Tomatoes Indoors: A Comprehensive DIY Guide
Hey there, fellow gardening enthusiasts! Ever dreamt of biting into a juicy, sun-ripened tomato in the dead of winter? Well, dream no more! Growing tomatoes indoors is totally achievable, and I’m here to walk you through every step of the process. It might seem daunting, but trust me, with a little patience and the right setup, you’ll be enjoying homegrown tomatoes year-round.
Choosing the Right Tomato Variety
First things first, not all tomato varieties are created equal when it comes to indoor growing. We need to pick varieties that are well-suited for container gardening and indoor conditions.
* Determinate vs. Indeterminate: This is crucial! Determinate tomatoes grow to a specific size and produce all their fruit at once, making them ideal for smaller spaces. Indeterminate varieties, on the other hand, keep growing and producing fruit throughout the season, requiring more space and support. For indoors, I highly recommend determinate or dwarf determinate varieties.
* Dwarf Varieties: These are specifically bred for compact growth and are perfect for containers. Look for names like “Tiny Tim,” “Micro Tom,” “Venus,” or “Patio.”
* Determinate Varieties: If you have a bit more space, determinate varieties like “Roma,” “Celebrity,” or “Early Girl” (though Early Girl can get quite large, so be mindful) can also work well.
* Cherry Tomatoes: Cherry tomatoes tend to do well indoors, even some indeterminate types, as their smaller fruit size means less energy expenditure for the plant. “Sweet Million” or “Black Cherry” are good options, but be prepared to prune them regularly.
Setting Up Your Indoor Tomato Garden
Okay, now that we’ve got our seeds (or seedlings!), let’s create the perfect environment for our tomato babies.
* Light, Light, Light! This is the most critical factor. Tomatoes need at least 6-8 hours of direct sunlight per day. If you don’t have a south-facing window that provides this, you’ll absolutely need grow lights.
* Types of Grow Lights: LED grow lights are the most energy-efficient and produce less heat. Fluorescent grow lights (T5 or T8) are also a good option, but they need to be closer to the plants. High-Pressure Sodium (HPS) or Metal Halide (MH) lights are very powerful but generate a lot of heat and are generally overkill for a small indoor setup.
* Light Placement: Position your grow lights a few inches above the plants, adjusting the height as they grow. I usually start with the lights about 6 inches above the seedlings and move them up as the plants get taller.
* Potting Mix: Don’t use garden soil! It’s too heavy and doesn’t drain well. Use a high-quality potting mix specifically formulated for containers. I like to mix in some perlite or vermiculite to improve drainage and aeration.
* Container Size: The size of your pot depends on the variety you’re growing. Dwarf varieties can thrive in 5-gallon pots, while larger determinate varieties will need at least 10-gallon pots. Make sure the pot has drainage holes!
* Temperature: Tomatoes prefer temperatures between 65-85°F (18-29°C). Avoid placing them near drafty windows or heating vents.
* Humidity: Tomatoes like moderate humidity (around 40-60%). If your indoor air is too dry, you can use a humidifier or place a tray of water near the plants.
Step-by-Step Planting and Growing Guide
Alright, let’s get our hands dirty!
1. Starting from Seed (Optional): If you’re starting from seed, sow them indoors 6-8 weeks before the last expected frost (or whenever you want to start your indoor growing season).
* Seed Starting Mix: Use a seed starting mix, which is finer and less nutrient-rich than potting mix.
* Planting Depth: Sow the seeds about ¼ inch deep.
* Warmth and Moisture: Keep the soil consistently moist and warm (around 70-75°F/21-24°C). A heat mat can help with germination.
* Light After Germination: Once the seedlings emerge, provide them with plenty of light to prevent them from becoming leggy.
2. Transplanting Seedlings (or Planting Purchased Seedlings):
* Harden Off Seedlings: If you started your own seedlings, gradually acclimate them to indoor conditions by exposing them to longer periods of time each day.
* Prepare the Pot: Fill your chosen container with potting mix, leaving a few inches of space at the top.
* Planting Depth: Dig a hole large enough to accommodate the root ball. When transplanting, you can bury the stem deeper than it was in the original container. Tomatoes can grow roots along their stems, which will make them stronger.
* Water Thoroughly: Water the plant well after planting to settle the soil.
3. Watering:
* Consistency is Key: Water deeply and regularly, allowing the top inch of soil to dry out between waterings. Overwatering can lead to root rot.
* Watering Time: Water in the morning so the foliage has time to dry before nightfall, reducing the risk of fungal diseases.
* Check the Soil: Stick your finger into the soil to check the moisture level. If it feels dry an inch down, it’s time to water.
4. Fertilizing:
* Start After a Few Weeks: Begin fertilizing your tomato plants a few weeks after transplanting.
* Tomato-Specific Fertilizer: Use a fertilizer specifically formulated for tomatoes. These fertilizers are typically higher in phosphorus and potassium, which are essential for fruit production.
* Follow Instructions: Follow the instructions on the fertilizer label carefully. Over-fertilizing can burn the roots.
* Frequency: Fertilize every 2-3 weeks.
5. Pruning:
* Suckers: Prune suckers, which are the small shoots that grow between the main stem and the branches. Removing suckers encourages the plant to focus its energy on fruit production.
* Lower Leaves: As the plant grows, remove any yellowing or dead leaves from the bottom of the plant. This improves air circulation and reduces the risk of disease.
* Determinate Varieties: Determinate varieties require less pruning than indeterminate varieties.
6. Pollination:
* Indoor Pollination: Since there are no bees or wind indoors, you’ll need to hand-pollinate your tomato plants.
* How to Hand-Pollinate: There are a few ways to do this:
* Shake the Plant: Gently shake the plant a few times a day to release pollen.
* Use a Cotton Swab: Use a cotton swab to collect pollen from one flower and transfer it to another.
* Use an Electric Toothbrush: Gently vibrate the back of each flower with an electric toothbrush for a few seconds. This releases the pollen.
* Timing: Pollinate your plants in the morning when the pollen is driest.
7. Supporting the Plant:
* Staking or Caging: As your tomato plant grows, it will need support to prevent the branches from breaking under the weight of the fruit.
* Types of Support: Use stakes, cages, or trellises to support the plant.
* Secure the Plant: Tie the plant to the support with soft twine or plant ties.
8. Pest and Disease Control:
* Inspect Regularly: Regularly inspect your tomato plants for pests and diseases.
* Common Pests: Common pests include aphids, whiteflies, and spider mites.
* Organic Pest Control: Use organic pest control methods, such as insecticidal soap or neem oil, to control pests.
* Common Diseases: Common diseases include early blight, late blight, and powdery mildew.
* Good Air Circulation: Ensure good air circulation around the plants to prevent fungal diseases.
* Remove Infected Leaves: Remove any infected leaves immediately.
9. Harvesting:
* Color and Firmness: Harvest your tomatoes when they are fully colored and slightly soft to the touch.
* Gently Twist: Gently twist the tomato from the vine.
* Enjoy! Enjoy your homegrown tomatoes!
Troubleshooting Common Issues
Even with the best care, you might encounter some challenges along the way. Here are a few common issues and how to address them:
* Blossom End Rot: This is caused by a calcium deficiency. Ensure your potting mix
Conclusion
So, there you have it! Mastering the art of maximizing small space storage doesn’t have to be a daunting task. With these simple yet effective DIY tricks, you can transform your cramped living area into an organized and functional haven. We’ve explored clever solutions for every room, from utilizing vertical space in the kitchen to creating hidden storage compartments in the living room. The beauty of these projects lies in their adaptability. Feel free to personalize them to match your unique style and needs.
Think about adding decorative baskets to your newly installed shelves for a touch of rustic charm. Or, consider painting your repurposed furniture in a vibrant color to brighten up your space. For those with a penchant for minimalism, opt for clear storage containers to keep your belongings visible and easily accessible. The possibilities are endless!
But why is this DIY approach a must-try? Because it empowers you to take control of your living environment. It allows you to create storage solutions that are perfectly tailored to your specific requirements, without breaking the bank. Plus, there’s a certain satisfaction that comes from knowing you built something with your own two hands. You’re not just buying a storage unit; you’re crafting a solution that reflects your personality and ingenuity.
Imagine the peace of mind that comes with knowing everything has its place. No more frantic searches for misplaced items. No more cluttered countertops or overflowing drawers. Just a clean, organized, and inviting space that you can truly call your own.
We urge you to give these DIY tricks a try. Start small, perhaps with a single project, and gradually work your way up. Don’t be afraid to experiment and get creative. And most importantly, don’t forget to share your experiences with us! We’d love to see how you’ve transformed your small space using these techniques. Post pictures of your finished projects on social media using #SmallSpaceStorageDIY, or leave a comment below sharing your tips and tricks. Let’s inspire each other to create beautiful and functional living spaces, no matter how limited our square footage may be. Remember, maximizing small space storage is not just about decluttering; it’s about creating a more comfortable and enjoyable life.
Frequently Asked Questions (FAQ)
What if I’m not very handy with tools? Can I still do these DIY projects?
Absolutely! Many of the projects we’ve discussed are designed for beginners. Start with simpler tasks like repurposing old containers or installing floating shelves. There are tons of online tutorials and videos that can guide you through each step. Don’t be afraid to ask for help from friends or family members who have experience with DIY projects. The key is to take your time, follow the instructions carefully, and don’t be discouraged if you make a mistake. Even experienced DIYers make mistakes sometimes! The important thing is to learn from them and keep trying. Consider starting with no-tool or minimal-tool projects like using over-the-door organizers or utilizing storage ottomans.
I live in a rental apartment. Are there any DIY storage solutions that won’t damage the walls?
Yes, there are plenty of renter-friendly options! Command strips are a lifesaver for hanging lightweight items like shelves, picture frames, and even small storage baskets. Look for adhesive hooks that are specifically designed for heavier items. Over-the-door organizers are another great option, as they don’t require any drilling or hardware. You can also use freestanding storage units like bookshelves, rolling carts, and storage ottomans. When in doubt, always check with your landlord before making any permanent changes to your apartment. Another great tip is to take pictures of the space before you start any DIY project, so you can easily restore it to its original condition when you move out.
How can I maximize storage in a tiny kitchen?
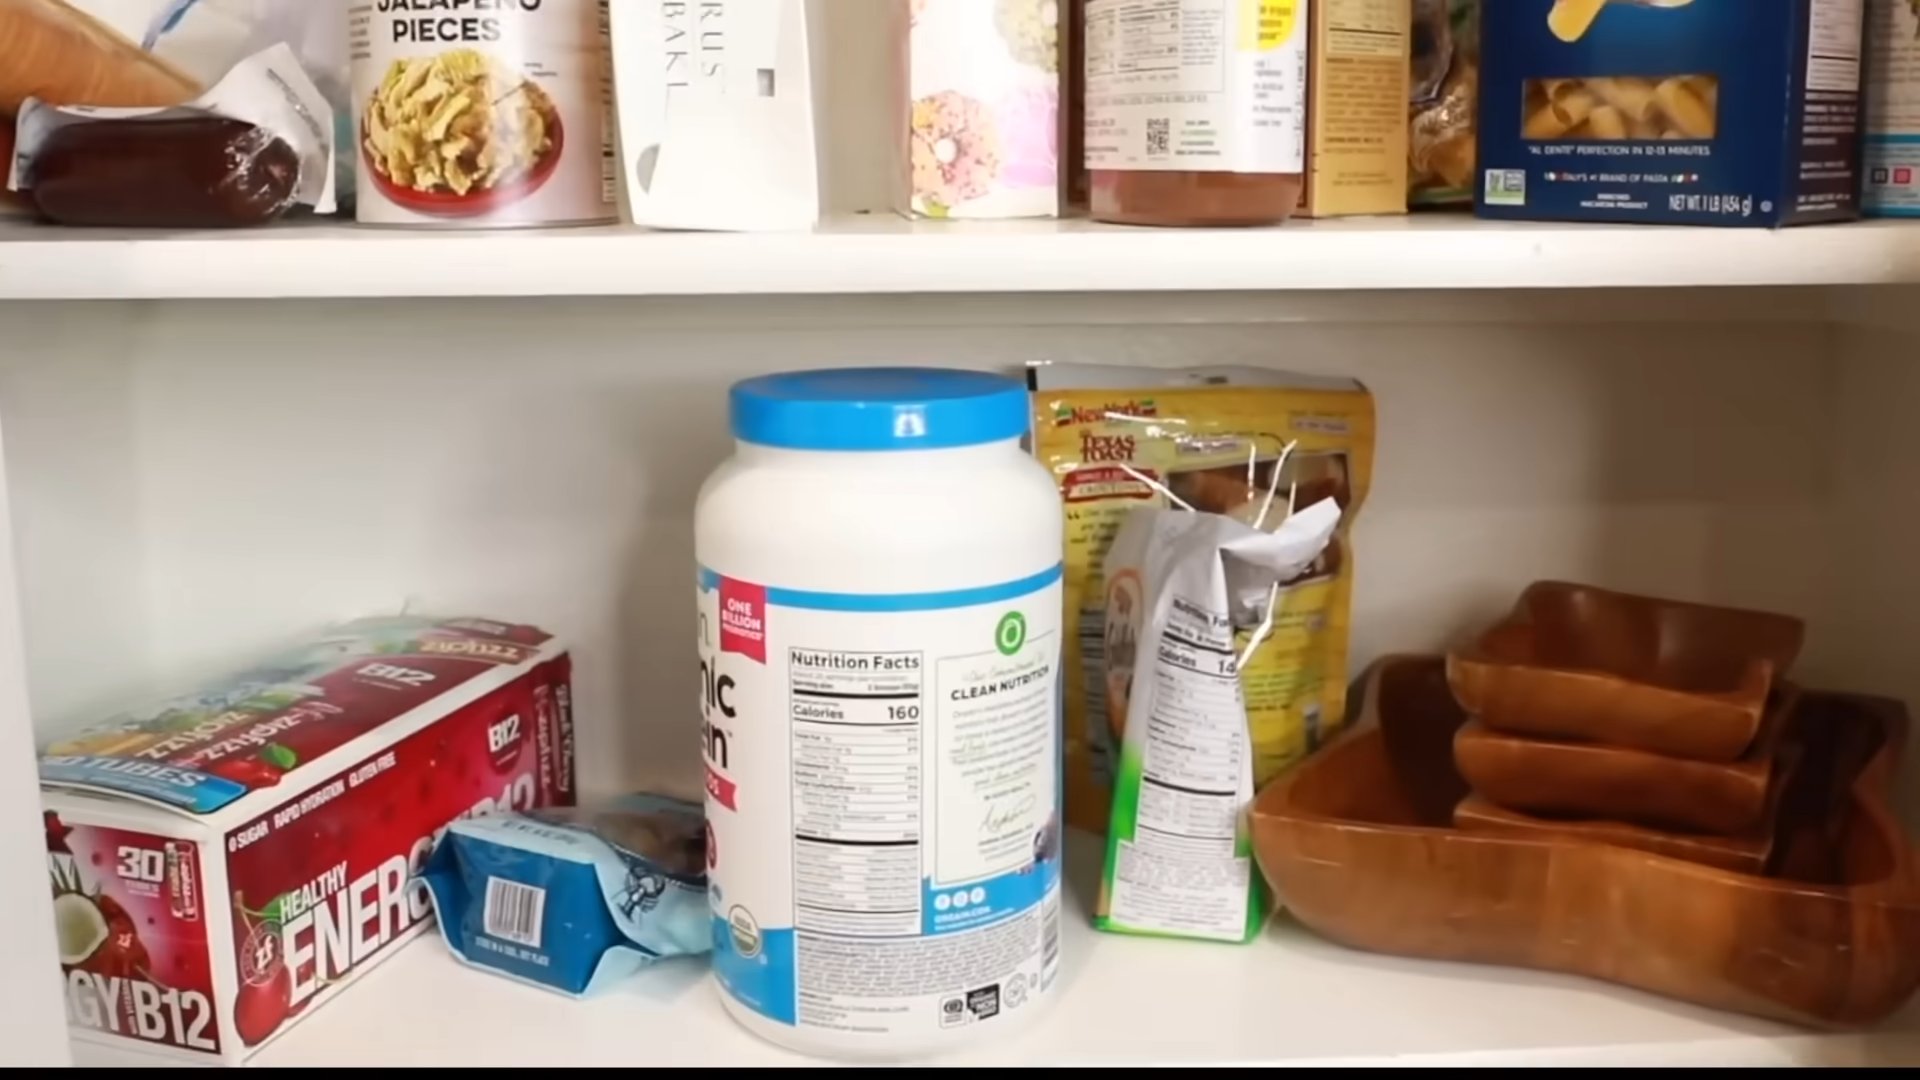
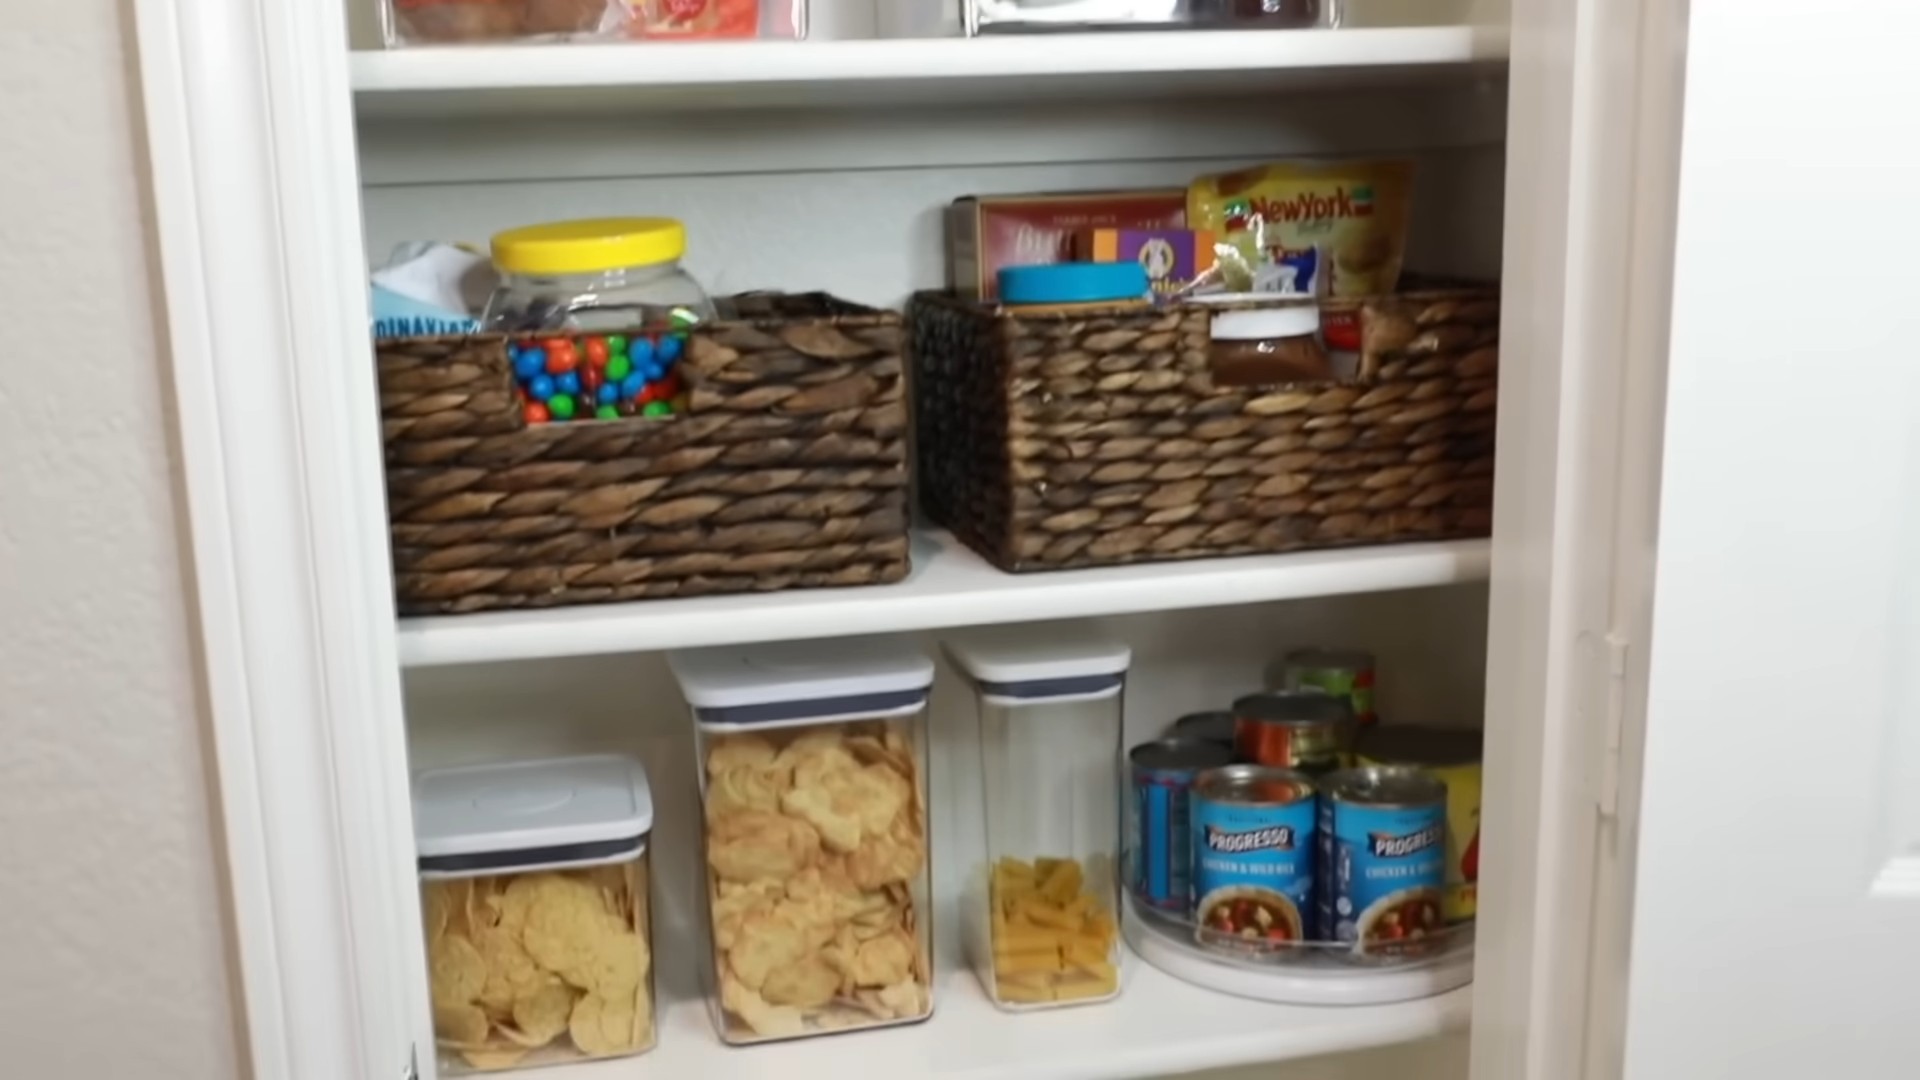
A small kitchen can be a challenge, but with some clever planning, you can make the most of the available space. Utilize vertical space by installing shelves above your cabinets or using a pot rack to hang your cookware. Consider using magnetic knife strips to free up counter space. Install a spice rack on the inside of a cabinet door. Use drawer dividers to keep your utensils and gadgets organized. And don’t forget about the space under your sink! Install a pull-out organizer to store cleaning supplies. You can also use stackable containers to maximize storage in your pantry. Think vertically and utilize every nook and cranny!
What are some creative ways to store clothes in a small bedroom?
In a small bedroom, every inch counts. Consider using under-bed storage containers to store out-of-season clothing or extra linens. Install shelves above your closet rod to create additional storage space. Use slimline hangers to maximize closet space. A rolling clothing rack can provide extra hanging space without taking up too much room. You can also use storage ottomans or benches to store blankets, pillows, or shoes. If you have limited closet space, consider investing in a wardrobe or armoire. And don’t forget about the back of your door! Install an over-the-door organizer to store shoes, accessories, or toiletries.
How do I declutter before I start organizing?
Decluttering is an essential first step before you start organizing. Go through each room in your house and get rid of anything you don’t need, use, or love. Be honest with yourself about what you truly need and what you can live without. Donate, sell, or recycle items that are in good condition. Throw away anything that is broken or unusable. Once you’ve decluttered, you’ll have a much better idea of how much storage space you actually need. A good rule of thumb is to get rid of anything you haven’t used in the past year. You can also try the KonMari method, which involves holding each item and asking yourself if it sparks joy. If it doesn’t, get rid of it!
Where can I find affordable storage solutions?
You don’t have to spend a fortune to create effective storage solutions. Check out thrift stores, garage sales, and online marketplaces for discounted storage containers, shelves, and furniture. Repurpose old items like jars, boxes, and baskets into storage containers. Look for sales and clearance items at your local home goods store. You can also find free or low-cost materials online. Get creative and think outside the box! Remember, the best storage solutions are often the ones that are both functional and affordable.
How can I maintain my organized space once I’ve created it?
Maintaining an organized space requires ongoing effort. Make it a habit to put things away immediately after you use them. Don’t let clutter accumulate. Set aside a few minutes each day to tidy up. Regularly declutter and get rid of items you no longer need. Use storage containers to keep your belongings organized. Label your containers so you know what’s inside. And most importantly, be consistent! The more you stick to your organization system, the easier it will be to maintain. Consider setting a reminder on your phone to do a quick tidy-up each day.
What are some good resources for finding DIY storage ideas?
There are tons of online resources for finding DIY storage ideas. Check out websites like Pinterest, YouTube, and home improvement blogs. Look for tutorials and videos that provide step-by-step instructions. You can also find inspiration in magazines and books. Don’t be afraid to experiment and adapt ideas to fit your own needs and style. The internet is a treasure trove of information, so take advantage of it!
How can I make my storage solutions look aesthetically pleasing?
Storage doesn’t have to be purely functional; it can also be aesthetically pleasing. Choose storage containers that complement your decor. Use decorative baskets and bins to hide clutter. Arrange your belongings in an organized and visually appealing way. Add personal touches like photos, artwork, or plants. Consider painting your storage units in a color that matches your walls. The key is to create a space that is both functional and beautiful. Remember, your storage solutions should enhance your living space, not detract from it.

Leave a Comment