
Home melon growing tips are what you need to transform your backyard into a personal oasis of juicy, sun-ripened goodness! Imagine biting into a perfectly sweet, homegrown melon, the flavors exploding on your tongue – a far cry from the bland, store-bought varieties. But let’s be honest, the thought of cultivating these sprawling fruits can seem daunting, right? That’s where I come in!
For centuries, melons have been cherished across cultures, from the watermelons depicted in ancient Egyptian tombs to the cantaloupes gracing Renaissance tables. They’re not just delicious; they’re symbols of abundance and summer joy. But you don’t need to be a seasoned farmer to experience that joy yourself.
In this article, I’m going to share some simple, yet effective, DIY tricks and hacks that will make home melon growing tips accessible to everyone, regardless of your experience level or garden size. We’ll debunk common myths, explore easy-to-implement techniques, and troubleshoot potential problems, ensuring you’re well-equipped to nurture your own thriving melon patch. Why spend money on lackluster melons when you can easily grow your own, bursting with flavor and freshness? Let’s get our hands dirty and unlock the secrets to a bountiful melon harvest!

Growing Melons at Home: A Sweet DIY Project
Hey there, fellow gardening enthusiasts! Ever dreamt of biting into a juicy, homegrown melon, bursting with flavor that store-bought ones just can’t match? Well, dream no more! Growing melons at home is totally achievable, even if you don’t have acres of land. I’m going to walk you through everything you need to know to cultivate your own delicious melons, right in your backyard (or even on your balcony!).
Choosing Your Melon Variety
First things first, let’s talk melons! There are so many varieties to choose from, and the best one for you will depend on your climate, space, and personal preferences. Here are a few popular options:
* Watermelons: These are the classic summer treat! Look for smaller, “icebox” varieties like Sugar Baby or Bush Sugar Baby if you’re short on space. Larger varieties like Crimson Sweet need more room to sprawl.
* Cantaloupes: These fragrant melons are relatively easy to grow. Athena and Hale’s Best Jumbo are reliable choices.
* Honeydew Melons: These sweet, pale green melons require a longer growing season than cantaloupes. Honeycrisp is a popular variety.
* Specialty Melons: Don’t be afraid to experiment! Consider Galia melons (with their netted skin and sweet, aromatic flesh) or Charentais melons (known for their intense flavor).
Preparing Your Melon Patch
Melons are sun-loving, hungry plants, so proper preparation is key to success.
* Sunlight: Melons need at least 6-8 hours of direct sunlight per day. Choose a location that gets plenty of sunshine.
* Soil: Melons thrive in well-drained, fertile soil. Amend your soil with plenty of compost or well-rotted manure before planting. This will improve drainage, add nutrients, and help retain moisture.
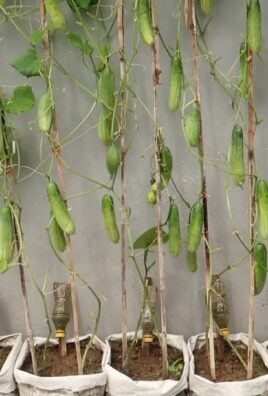
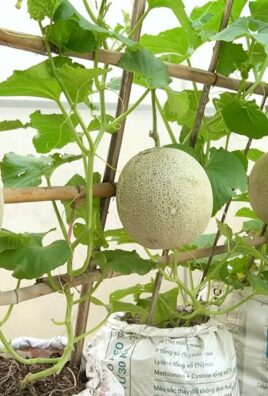
* Space: Melons need plenty of space to sprawl. Watermelons, in particular, can take up a lot of room. If you’re growing in a small space, consider using a trellis to train the vines vertically.
* pH: Melons prefer a soil pH between 6.0 and 6.8. You can test your soil pH with a home testing kit or by sending a sample to your local agricultural extension office.
Starting Your Melon Seeds
You can either start your melon seeds indoors or direct sow them in the garden. Starting indoors gives you a head start, especially in cooler climates.
* Starting Indoors:
1. Timing: Start your seeds about 4-6 weeks before the last expected frost.
2. Containers: Use peat pots or biodegradable pots to avoid disturbing the roots when transplanting.
3. Soil: Use a seed-starting mix.
4. Planting: Plant 2-3 seeds per pot, about 1 inch deep.
5. Watering: Keep the soil consistently moist but not soggy.
6. Warmth: Melons need warm temperatures to germinate. Use a heat mat to keep the soil temperature between 80-90°F (27-32°C).
7. Light: Once the seeds germinate, provide plenty of light. A sunny windowsill or grow lights will work.
8. Thinning: Once the seedlings have their first true leaves, thin them to one plant per pot. Choose the strongest seedling and snip off the others at the soil line.
* Direct Sowing:
1. Timing: Direct sow your seeds after the last expected frost, when the soil temperature has warmed to at least 70°F (21°C).
2. Planting: Plant seeds about 1 inch deep, spacing them according to the variety’s recommendations.
3. Watering: Keep the soil consistently moist until the seeds germinate.
4. Protection: Protect young seedlings from pests and cold weather with row covers.
Transplanting Your Melon Seedlings
If you started your seeds indoors, it’s time to transplant them to the garden!
1. Harden Off: Before transplanting, you need to “harden off” your seedlings. This means gradually exposing them to outdoor conditions over a period of 7-10 days. Start by placing them in a sheltered spot outdoors for a few hours each day, gradually increasing the amount of time they spend outside.
2. Timing: Transplant your seedlings after the last expected frost, when the soil has warmed to at least 70°F (21°C).
3. Planting: Dig a hole that is slightly larger than the pot. Gently remove the seedling from the pot, being careful not to disturb the roots. Place the seedling in the hole and backfill with soil. Water thoroughly.
4. Spacing: Space your melon plants according to the variety’s recommendations. Watermelons typically need more space than cantaloupes.
5. Mulching: Mulch around your melon plants with straw or black plastic. Mulch will help retain moisture, suppress weeds, and warm the soil.
Caring for Your Melon Plants
Once your melon plants are in the ground, it’s important to provide them with proper care.
* Watering: Melons need consistent moisture, especially during fruit development. Water deeply and regularly, especially during dry spells. Avoid overhead watering, which can promote fungal diseases. Drip irrigation is an excellent option.
* Fertilizing: Melons are heavy feeders. Fertilize them regularly with a balanced fertilizer. You can also side-dress them with compost or well-rotted manure.
* Weeding: Keep your melon patch free of weeds. Weeds compete with melon plants for water and nutrients.
* Pest Control: Melons can be susceptible to pests such as aphids, squash bugs, and cucumber beetles. Monitor your plants regularly and take action if you see signs of infestation. Insecticidal soap or neem oil can be effective for controlling many pests.
* Disease Control: Melons can also be susceptible to diseases such as powdery mildew and fusarium wilt. Choose disease-resistant varieties and practice good sanitation to prevent disease problems.
* Pollination: Melons need to be pollinated in order to produce fruit. Bees are the primary pollinators of melons. Attract bees to your garden by planting flowers that they love. If you’re not seeing many bees, you may need to hand-pollinate your melon flowers.
1. Hand-Pollination: Identify the male and female flowers. The female flowers have a small fruit at the base of the flower. Use a small paintbrush to transfer pollen from the male flower to the female flower. Do this in the morning, when the pollen is fresh.
Supporting Your Melons
As your melons grow, they may need some support, especially if you’re growing them on a trellis.
* Trellising: If you’re growing melons on a trellis, tie the vines to the trellis with twine or plant ties. You may also need to support the developing fruits with slings made from pantyhose or netting.
* Ground Support: If you’re growing melons on the ground, place a piece of cardboard or straw under each melon to prevent it from rotting.
Harvesting Your Melons
Knowing when to harvest your melons is crucial for getting the best flavor.
* Watermelons:
1. Thump Test: Thump the watermelon. A ripe watermelon will sound hollow.
2. Ground Spot: The ground spot (the spot where the watermelon rested on the ground) should be yellow or cream-colored.
3. Tendril: The tendril closest to the watermelon should be brown and dry.
* Cantaloupes:
1. Aroma: A ripe cantaloupe will have a sweet, musky aroma.
2. Stem Slip: The stem should slip easily from the melon when it’s ripe.
3. Color: The skin should be a golden color.
* Honeydew Melons:
1. Aroma: A ripe honeydew melon will have a slightly sweet aroma.
2. Blossom End: The blossom end (the end opposite the stem) should be slightly soft.
3. Color: The skin should be a creamy white color.
Enjoying Your Homegrown Melons
Congratulations! You’ve successfully grown your own melons. Now it’s time to enjoy the fruits (or rather, melons) of your labor.
* Storage: Store ripe melons in the refrigerator for up to a week.
* Serving: Serve your melons chilled. They’re delicious on their own or in salads, smoothies, and desserts.
* Seed Saving: If you

Conclusion
So, there you have it! Growing your own melons at home isn’t just a fun project; it’s a gateway to experiencing the unparalleled sweetness and satisfaction that comes from nurturing your food from seed to table. We’ve explored the essential steps, from selecting the right varieties and preparing the soil to providing optimal sunlight and water. But the real magic lies in the DIY tricks we’ve uncovered – the secrets that can transform a novice gardener into a melon-growing maestro.
Why is this a must-try? Because store-bought melons, while convenient, often lack the intense flavor and juicy texture of homegrown varieties. Commercial growers prioritize factors like shelf life and transportability, which can compromise the taste. By taking control of the growing process, you can ensure that your melons are harvested at peak ripeness, bursting with natural sugars and vitamins. Plus, there’s an undeniable sense of accomplishment that comes from enjoying the fruits (or rather, melons) of your labor.
But don’t stop there! Experiment with different melon varieties to discover your favorites. Try growing cantaloupe, honeydew, watermelon, or even some of the more exotic types like Galia or Charentais. Each variety has its unique flavor profile and growing requirements, so you can tailor your garden to your specific tastes.
Consider variations on the DIY techniques we’ve discussed. For example, if you live in a cooler climate, you might try using black plastic mulch to warm the soil and extend the growing season. Or, if you’re short on space, you could train your melon vines to grow vertically on a trellis. The possibilities are endless!
Ultimately, the best way to learn is by doing. So, grab some seeds, prepare your garden, and get ready to embark on your own melon-growing adventure. Don’t be afraid to make mistakes – that’s how we learn and improve. And most importantly, have fun!
We are confident that these home melon growing tips will help you achieve a bountiful harvest.
We encourage you to try these DIY tricks and share your experiences with us. Let us know what worked for you, what challenges you faced, and any other tips you’ve discovered along the way. Together, we can create a community of passionate melon growers who are dedicated to sharing their knowledge and helping each other succeed. Share your photos and stories on social media using #HomegrownMelons and let’s inspire others to join the fun! Your feedback is invaluable and helps us refine our advice and provide even better resources for aspiring gardeners. Happy growing!
Frequently Asked Questions (FAQ)
Q: What are the best melon varieties to grow at home?
A: The best melon varieties for home growing depend on your climate, space, and personal preferences. For beginners, cantaloupe and honeydew are often good choices as they are relatively easy to grow. Watermelons require more space and a longer growing season, but the reward is well worth the effort. Consider smaller “icebox” watermelons if you have limited space. Experiment with different varieties to find your favorites! Look for disease-resistant varieties that are well-suited to your local climate. Local nurseries and garden centers can provide valuable advice on which varieties thrive in your area.
Q: How much sunlight do melons need?
A: Melons are sun-loving plants and require at least 6-8 hours of direct sunlight per day to thrive. Choose a planting location that receives full sun throughout the day. If you live in a particularly hot climate, some afternoon shade may be beneficial to prevent the fruits from scorching. Insufficient sunlight can lead to smaller, less flavorful melons.
Q: What kind of soil is best for growing melons?
A: Melons prefer well-drained, fertile soil that is rich in organic matter. Amend your soil with compost or well-rotted manure before planting to improve drainage and fertility. The ideal soil pH for melons is between 6.0 and 6.8. You can test your soil pH using a home testing kit or by sending a sample to a local agricultural extension office. Avoid heavy clay soils, as they can retain too much moisture and lead to root rot.
Q: How often should I water my melon plants?
A: Melons need consistent moisture, especially during fruit development. Water deeply and regularly, aiming to keep the soil consistently moist but not waterlogged. Avoid overhead watering, as this can promote fungal diseases. Drip irrigation or soaker hoses are excellent options for delivering water directly to the roots. Reduce watering as the fruits begin to ripen to concentrate the sugars and enhance the flavor.
Q: How do I know when my melons are ripe?
A: Determining when a melon is ripe can be tricky, but there are a few telltale signs to look for. For cantaloupe, the stem should slip easily from the vine with a gentle tug. The skin should also have a sweet aroma and a slightly golden hue. For honeydew, the blossom end should be slightly soft and the skin should have a waxy feel. For watermelon, thump the melon with your knuckles – a ripe watermelon will have a deep, hollow sound. The underside of the watermelon, where it rests on the ground, should also be a creamy yellow color.
Q: What are some common pests and diseases that affect melons?
A: Common pests that affect melons include aphids, squash bugs, and cucumber beetles. Diseases include powdery mildew, fusarium wilt, and anthracnose. Regularly inspect your plants for signs of pests or diseases and take action promptly. Organic pest control methods, such as insecticidal soap or neem oil, can be effective for controlling pests. Ensure good air circulation around your plants to prevent fungal diseases. Choose disease-resistant varieties whenever possible.
Q: Can I grow melons in containers?
A: Yes, you can grow melons in containers, but you’ll need to choose a large container (at least 20 gallons) and select a compact or bush-type variety. Ensure that the container has good drainage and use a high-quality potting mix. Container-grown melons will require more frequent watering and fertilization than those grown in the ground. Provide support for the vines as they grow.
Q: How can I improve the sweetness of my homegrown melons?
A: Several factors can influence the sweetness of your homegrown melons. Ensure that your plants receive adequate sunlight and water. Avoid over-fertilizing with nitrogen, as this can promote leafy growth at the expense of fruit development. Reduce watering as the fruits begin to ripen to concentrate the sugars. Harvest your melons at peak ripeness for the best flavor.
Q: What are some DIY tricks to improve melon growth?
A: Some DIY tricks include using black plastic mulch to warm the soil, creating a support system for the vines, and hand-pollinating the flowers to ensure fruit set. You can also try adding Epsom salts to the soil to provide magnesium, which can improve fruit quality. Regularly prune the vines to encourage fruit production.
Q: How do I save seeds from my homegrown melons?
A: To save seeds from your homegrown melons, allow the fruit to fully ripen on the vine. Scoop out the seeds and rinse them thoroughly to remove any pulp. Spread the seeds on a paper towel to dry completely. Store the dried seeds in an airtight container in a cool, dark, and dry place. Properly stored melon seeds can remain viable for several years.
Leave a Comment