
High Yield Tomatoes at Home – imagine plucking juicy, sun-ripened tomatoes straight from your own garden, bursting with flavor far superior to anything you’d find in a store. Sounds like a dream, right? Well, it doesn’t have to be! For centuries, gardeners have been perfecting the art of cultivating these vibrant fruits, and now, I’m here to share some of their best-kept secrets with you.
From the ancient Aztecs, who first domesticated the wild tomato, to Italian grandmothers passing down their cherished growing techniques, the tomato has a rich and fascinating history. But let’s face it, not everyone has a green thumb, and sometimes, even experienced gardeners struggle to achieve a truly bountiful harvest. That’s where these DIY tricks and hacks come in.
Are you tired of puny, tasteless tomatoes? Do you dream of overflowing baskets of plump, red goodness? This article is your ultimate guide to achieving high yield tomatoes at home, even if you’re a beginner. We’ll explore simple, yet effective techniques that will transform your tomato plants into prolific producers. Get ready to impress your friends and family with the most delicious, homegrown tomatoes they’ve ever tasted!
Tomaten-Turbo: So erntest du eine Rekordernte im eigenen Garten!
Hallo liebe Gartenfreunde! Ich bin total begeistert, euch heute meinen ultimativen DIY-Trick für eine unglaubliche Tomatenernte zu zeigen. Schluss mit mickrigen Früchtchen und enttäuschenden Erträgen! Mit diesen einfachen Schritten verwandelt ihr eure Tomatenpflanzen in wahre Erntemaschinen. Lasst uns loslegen!
Was du brauchst: Die Zutaten für den Tomaten-Erfolg
Bevor wir starten, hier eine Liste mit allem, was du für diesen DIY-Tomaten-Boost benötigst:
* Tomatensamen oder Jungpflanzen: Wähle deine Lieblingssorten! Achte auf robuste, krankheitsresistente Sorten, besonders wenn du in einer Gegend mit feuchtem Klima wohnst.
* Anzuchterde: Für die Aussaat oder das Umtopfen der Jungpflanzen.
* Töpfe oder Anzuchtschalen: In verschiedenen Größen, je nach Wachstumsstadium der Pflanzen.
* Gartenerde: Hochwertige, nährstoffreiche Erde für das endgültige Auspflanzen ins Beet oder in Kübel.
* Tomatendünger: Ein spezieller Dünger für Tomaten, der reich an Kalium ist.
* Kompost oder Hornspäne: Für eine natürliche Langzeitdüngung.
* Pflanzstäbe oder Tomatenkäfige: Zur Unterstützung der Pflanzen.
* Gartenschere: Zum Ausgeizen und Entfernen von Blättern.
* Gießkanne oder Gartenschlauch: Zum Bewässern der Pflanzen.
* Mulchmaterial: Stroh, Holzhackschnitzel oder Rasenschnitt, um den Boden feucht zu halten und Unkraut zu unterdrücken.
* Backpulver: Ja, richtig gelesen! Das ist unser Geheimtipp für süßere Tomaten.
* Bittersalz (Magnesiumsulfat): Für gesunde Blätter und eine bessere Nährstoffaufnahme.
* Eierschalen: Eine natürliche Kalziumquelle, die Blütenendfäule vorbeugt.
* Kaffeesatz: Ein natürlicher Dünger und Schneckenabwehr.
Phase 1: Die Vorbereitung – Der Grundstein für eine reiche Ernte
Die richtige Vorbereitung ist das A und O für gesunde und ertragreiche Tomatenpflanzen. Hier zeige ich dir, wie du den perfekten Start ermöglichst:
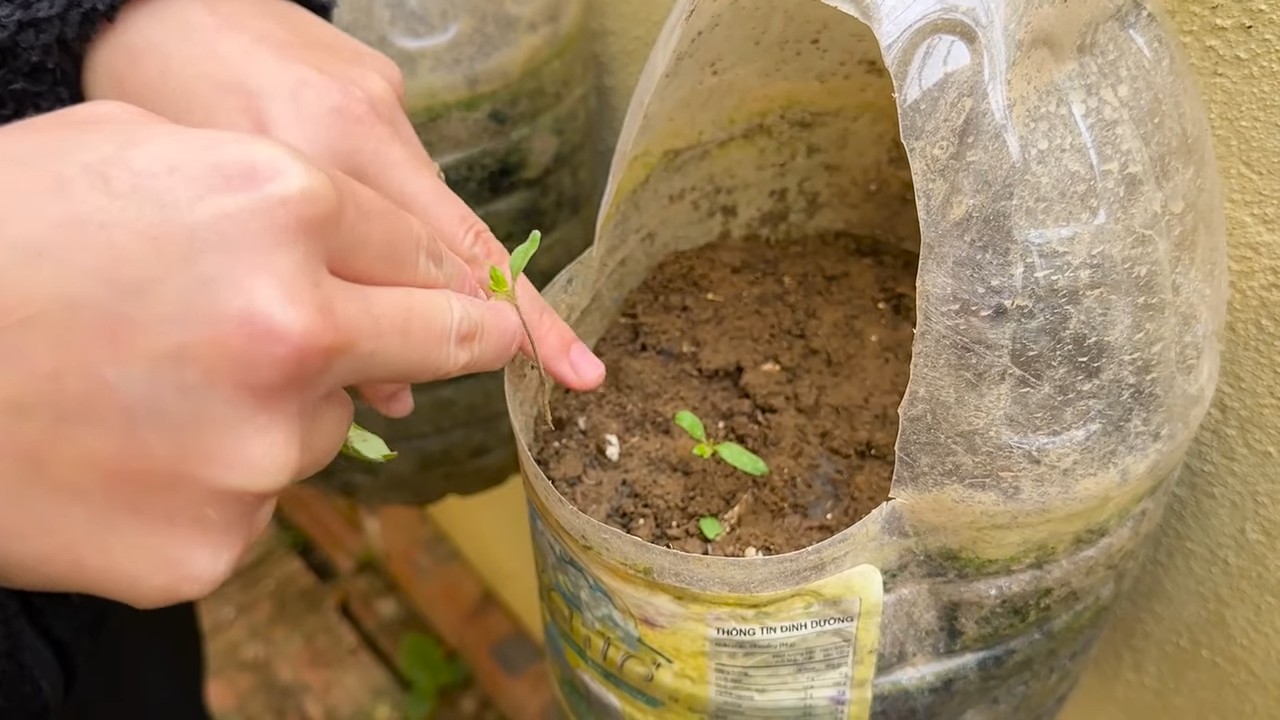
1. Aussaat oder Kauf von Jungpflanzen:
* Aussaat: Wenn du deine Tomaten selbst aussäen möchtest, beginne damit etwa 6-8 Wochen vor dem letzten erwarteten Frost. Fülle Anzuchtschalen mit Anzuchterde und säe die Samen etwa 0,5 cm tief ein. Halte die Erde feucht und stelle die Schalen an einen warmen, hellen Ort.
* Jungpflanzen: Wenn du Jungpflanzen kaufst, achte darauf, dass sie gesund aussehen und keine Anzeichen von Krankheiten oder Schädlingen aufweisen. Wähle Pflanzen mit kräftigen Stängeln und grünen Blättern.
2. Pikieren der Jungpflanzen:
* Sobald die Jungpflanzen ihre ersten richtigen Blätter (neben den Keimblättern) entwickelt haben, ist es Zeit, sie zu pikieren. Das bedeutet, dass du sie in größere Töpfe umpflanzt, damit sie mehr Platz zum Wachsen haben.
* Fülle die größeren Töpfe mit Anzuchterde und mache ein kleines Loch in die Mitte. Hebe die Jungpflanzen vorsichtig aus den Anzuchtschalen und setze sie in die neuen Töpfe. Achte darauf, dass die Wurzeln nicht beschädigt werden. Fülle die Töpfe mit Erde auf und gieße die Pflanzen gut an.
3. Abhärten der Jungpflanzen:
* Bevor du die Tomatenpflanzen ins Freie pflanzt, musst du sie abhärten. Das bedeutet, dass du sie langsam an die Bedingungen im Freien gewöhnst. Stelle die Pflanzen tagsüber für ein paar Stunden ins Freie und hole sie abends wieder herein. Steigere die Zeit im Freien jeden Tag, bis die Pflanzen schließlich den ganzen Tag draußen bleiben können.
Phase 2: Das Auspflanzen – Der Umzug ins Tomatenparadies
Jetzt geht es ans Eingemachte! Das Auspflanzen ist ein entscheidender Schritt, der über Erfolg oder Misserfolg deiner Tomatenernte entscheiden kann.
1. Der richtige Zeitpunkt:
* Warte, bis keine Frostgefahr mehr besteht, bevor du die Tomatenpflanzen ins Freie pflanzt. In den meisten Regionen ist das Mitte Mai der Fall.
2. Der perfekte Standort:
* Tomaten lieben die Sonne! Wähle einen sonnigen Standort mit mindestens 6-8 Stunden direkter Sonneneinstrahlung pro Tag. Der Boden sollte locker, gut durchlässig und nährstoffreich sein.
3. Die Pflanzung:
* Grabe Löcher, die etwas größer sind als die Töpfe, in denen sich die Tomatenpflanzen befinden. Gib etwas Kompost oder Hornspäne in die Löcher, um den Boden anzureichern.
* Nimm die Tomatenpflanzen vorsichtig aus den Töpfen und setze sie in die Löcher. Achte darauf, dass der Wurzelballen nicht beschädigt wird. Fülle die Löcher mit Erde auf und drücke sie leicht an.
* Wichtig: Pflanze die Tomatenpflanzen tiefer, als sie vorher im Topf standen. Das fördert die Bildung von zusätzlichen Wurzeln am Stängel und sorgt für eine stabilere Pflanze. Entferne dazu die untersten Blätter und setze die Pflanze so tief, dass die untersten Blätter knapp über dem Boden sind.
4. Die Stütze:
* Setze sofort nach dem Pflanzen Pflanzstäbe oder Tomatenkäfige neben die Pflanzen. Tomatenpflanzen können sehr schwer werden, wenn sie viele Früchte tragen, und benötigen daher eine Stütze, um nicht umzuknicken.
5. Der erste Guss:
* Gieße die Tomatenpflanzen nach dem Pflanzen gründlich an.
Phase 3: Die Pflege – Liebe und Aufmerksamkeit für eine üppige Ernte
Die Pflege ist das A und O, um deine Tomatenpflanzen gesund und ertragreich zu halten. Hier sind meine besten Tipps:
1. Bewässerung:
* Tomaten brauchen regelmäßig Wasser, besonders während der Fruchtbildung. Gieße die Pflanzen am besten morgens, damit die Blätter tagsüber abtrocknen können. Vermeide es, die Blätter zu gießen, da dies Pilzkrankheiten fördern kann. Gieße direkt an die Wurzeln.
* Achte darauf, dass der Boden immer leicht feucht ist, aber nicht nass. Eine Mulchschicht hilft, die Feuchtigkeit im Boden zu halten.
2. Düngung:
* Tomaten sind Starkzehrer und benötigen regelmäßig Dünger. Beginne etwa 2-3 Wochen nach dem Auspflanzen mit dem Düngen. Verwende einen speziellen Tomatendünger, der reich an Kalium ist. Kalium fördert die Fruchtbildung und sorgt für aromatische Tomaten.
* Du kannst auch Kompost oder Hornspäne als Langzeitdünger verwenden.
* Mein Geheimtipp: Gib alle paar Wochen eine kleine Menge Bittersalz (Magnesiumsulfat) ins Gießwasser. Magnesium ist wichtig für die Photosynthese und sorgt für gesunde, grüne Blätter.
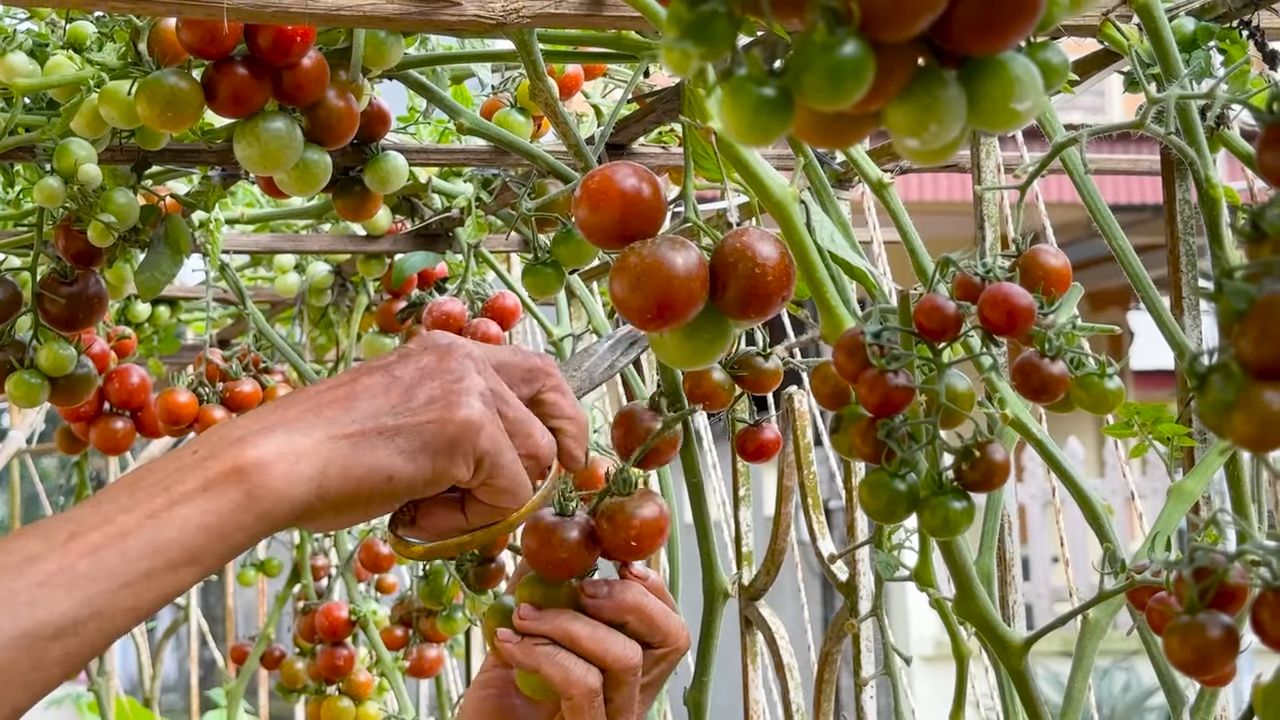
3. Ausgeizen:
* Tomatenpflanzen bilden in den Blattachseln Seitentriebe, die sogenannten Geiztriebe. Diese Triebe nehmen der Pflanze unnötig Kraft und sollten regelmäßig ausgegeizt werden.
* Breche die Geiztriebe einfach mit den Fingern aus, solange sie noch klein sind. Am besten machst du das morgens, wenn die Pflanzen trocken sind.
4. Entfernen von Blättern:
* Entferne die unteren Blätter der Tomatenpflanzen, sobald sie gelb werden oder Anzeichen von Krankheiten aufweisen. Das verbessert die Belüftung der Pflanzen und beugt Pilzkrankheiten vor.
5. Schutz vor Krankheiten und Schädlingen:
* Tomatenpflanzen sind anfällig für verschiedene Krankheiten und Schädlinge. Achte auf Anzeichen von Problemen und handle schnell.
* Blüten
Conclusion
So, there you have it! Transforming your backyard (or even your balcony!) into a tomato-producing powerhouse is more achievable than you might think. This DIY trick for achieving high yield tomatoes at home isn’t just about saving money; it’s about connecting with your food, understanding the growing process, and experiencing the immense satisfaction of harvesting your own delicious, sun-ripened tomatoes.
We’ve covered the essential steps, from selecting the right tomato varieties and preparing the soil to providing adequate support and implementing our secret weapon – the strategic pruning and sucker removal technique. Remember, consistent care and attention are key. Don’t be afraid to experiment!
Consider these variations to tailor the method to your specific needs and environment:
* **For container gardeners:** Choose determinate tomato varieties that are naturally compact and well-suited for pots. Ensure your containers are large enough (at least 15 gallons) and provide excellent drainage. You can also incorporate slow-release fertilizer into the potting mix for sustained nutrient delivery.
* **For those in cooler climates:** Start your tomato seeds indoors 6-8 weeks before the last expected frost. Harden off the seedlings gradually before transplanting them outdoors. Consider using row covers or cloches to protect your plants from late frosts and extend the growing season.
* **For organic gardeners:** Use organic fertilizers and pest control methods. Compost tea, fish emulsion, and neem oil are excellent options for nourishing your plants and deterring pests naturally.
* Experiment with companion planting: Basil, marigolds, and carrots are known to be beneficial companions for tomatoes, helping to deter pests and improve growth.
This DIY method is a game-changer for anyone serious about maximizing their tomato harvest. It’s a blend of proven techniques and simple adjustments that can lead to truly impressive results. Don’t just take our word for it – try it yourself!
We’re confident that you’ll be amazed by the abundance of juicy, flavorful tomatoes you’ll be harvesting. The taste of homegrown tomatoes is simply unmatched, and the pride you’ll feel in nurturing your plants from seed to table is truly rewarding.
So, grab your gardening gloves, gather your supplies, and get ready to embark on your tomato-growing adventure. We encourage you to document your progress, share your successes (and even your challenges!), and connect with fellow gardeners in the comments below. Let’s create a community of thriving tomato growers! Share your photos, tips, and experiences. What varieties are you growing? What challenges are you facing? What successes are you celebrating? Your insights can help others achieve their tomato-growing dreams.
Happy gardening, and may your tomato plants be overflowing with deliciousness! Remember, achieving high yield tomatoes at home is within your reach – all it takes is a little knowledge, effort, and a whole lot of love.
Frequently Asked Questions (FAQ)
What are the best tomato varieties for high yields?
The best tomato varieties for high yields depend on your climate, growing conditions, and personal preferences. However, some consistently high-yielding varieties include:
* **’Big Beef’:** A classic hybrid known for its large, flavorful fruits and disease resistance.
* **’Early Girl’:** A reliable early-season variety that produces a good crop of medium-sized tomatoes.
* **’Roma’:** A paste tomato ideal for sauces and canning, known for its prolific production.
* **’Sungold’:** A cherry tomato with an exceptionally sweet and fruity flavor, producing abundant clusters of golden fruits.
* **’Black Krim’:** An heirloom variety with a unique smoky flavor and high yields when properly supported.
* **’Celebrity’:** A widely adapted hybrid that produces medium-sized, flavorful tomatoes with good disease resistance.
Consider your local climate and growing season when selecting varieties. Look for varieties that are resistant to common tomato diseases in your area.
How often should I water my tomato plants?
Watering frequency depends on factors such as weather, soil type, and plant size. Generally, tomato plants need about 1-2 inches of water per week. Water deeply and less frequently, rather than shallowly and often. This encourages deep root growth, which makes the plants more drought-tolerant. Check the soil moisture before watering. The top inch or two of soil should be dry to the touch before you water again. Avoid overhead watering, as this can promote fungal diseases. Use a soaker hose or drip irrigation to water at the base of the plants.
What is the best type of fertilizer for tomatoes?
Tomatoes are heavy feeders and require a balanced fertilizer to thrive. A fertilizer with an NPK ratio (nitrogen, phosphorus, potassium) of 5-10-5 or 10-10-10 is a good starting point. Phosphorus is particularly important for fruit development. You can also use organic fertilizers such as compost, compost tea, fish emulsion, or bone meal. Apply fertilizer according to the package directions. Avoid over-fertilizing, as this can lead to excessive foliage growth and reduced fruit production. Side-dress your tomato plants with fertilizer every 4-6 weeks throughout the growing season.
How do I deal with common tomato pests and diseases?
Prevention is key when it comes to tomato pests and diseases. Choose disease-resistant varieties, practice good sanitation, and provide adequate air circulation. Common tomato pests include aphids, tomato hornworms, and whiteflies. Control these pests with insecticidal soap, neem oil, or handpicking. Common tomato diseases include early blight, late blight, and blossom end rot. Treat these diseases with copper fungicide or other appropriate treatments. Remove and destroy any infected leaves or plants to prevent the spread of disease. Ensure proper watering and fertilization to keep your plants healthy and resilient.
Why are my tomato blossoms falling off without producing fruit?
Blossom drop can be caused by several factors, including:
* **Temperature extremes:** Temperatures above 90°F or below 55°F can interfere with pollination.
* **High humidity:** High humidity can also hinder pollination.
* **Lack of pollination:** Tomatoes are self-pollinating, but they may need help from wind or insects. Gently shake the plants or use a small brush to transfer pollen from one flower to another.
* **Nutrient deficiencies:** A lack of phosphorus or calcium can cause blossom drop.
* **Stress:** Stress from drought, overwatering, or pests can also lead to blossom drop.
Ensure your plants are getting adequate water and nutrients, and protect them from extreme temperatures.
How important is pruning for high tomato yields?
Pruning is crucial for achieving high yield tomatoes at home, especially for indeterminate varieties. Removing suckers (the shoots that grow between the main stem and the branches) directs the plant’s energy towards fruit production rather than foliage growth. This results in larger, more flavorful tomatoes and improved air circulation, which helps prevent diseases. Prune regularly throughout the growing season, removing suckers when they are small.
How do I know when my tomatoes are ripe?
The color of the tomato should be uniform and vibrant, depending on the variety. The tomato should feel slightly soft to the touch but not mushy. The tomato should easily detach from the vine with a gentle twist. The aroma of the tomato should be fragrant and sweet. Taste a tomato to confirm its ripeness.
Can I grow tomatoes indoors?
Yes, you can grow tomatoes indoors, but it requires some extra effort. Choose determinate varieties that are well-suited for containers. Provide adequate light, either with a sunny window or grow lights. Ensure proper ventilation and humidity. Pollinate the flowers manually. Water and fertilize regularly.
What is blossom end rot and how do I prevent it?
Blossom end rot is a condition caused by a calcium deficiency in the developing fruit. It appears as a dark, leathery spot on the bottom of the tomato. To prevent blossom end rot, ensure your soil has adequate calcium levels. Add lime or gypsum to the soil before planting. Water consistently to maintain even soil moisture. Avoid over-fertilizing with nitrogen, as this can interfere with calcium uptake.
How can I improve the flavor of my homegrown tomatoes?
Several factors can influence the flavor of your homegrown tomatoes:
* **Variety:** Choose varieties known for their flavor.
* **Sunlight:** Tomatoes need plenty of sunlight to develop their flavor.
* **Soil:** Well-drained soil rich in organic matter is essential.
* **Watering:** Avoid overwatering, as this can dilute the flavor.
* **Ripening:** Allow the tomatoes to ripen fully on the vine for the best flavor.
Leave a Comment