
Growing sprouts at home is easier than you might think, and I’m here to show you how! Forget those expensive, pre-packaged sprouts from the grocery store – we’re about to embark on a fun and incredibly rewarding DIY adventure that will bring fresh, nutritious greens right to your kitchen counter.
Sprouting, in its essence, is an ancient practice. Cultures around the world, particularly in Asia, have long recognized the incredible nutritional power packed within these tiny powerhouses. Think about it: these are seeds just bursting with life, ready to transform into full-fledged plants. They’re a concentrated source of vitamins, minerals, and enzymes, making them a fantastic addition to any diet.
But why should you bother with growing sprouts at home? Well, for starters, it’s incredibly cost-effective. A small bag of seeds can yield a surprisingly large amount of sprouts. More importantly, you have complete control over the process, ensuring they’re grown organically and free from any unwanted additives. Plus, let’s be honest, there’s something deeply satisfying about nurturing life from a tiny seed and then enjoying the fruits (or rather, the sprouts!) of your labor. In this article, I’ll share some simple yet effective DIY tricks and hacks that will have you sprouting like a pro in no time. Get ready to unlock the secrets to fresh, healthy, and delicious sprouts, all from the comfort of your own home!
Sprossen selber ziehen: Eine einfache Anleitung für Anfänger
Hallo liebe Gartenfreunde und Gesundheitsbewusste! Ich zeige euch heute, wie ihr ganz einfach zu Hause eure eigenen Sprossen ziehen könnt. Es ist super einfach, kostengünstig und ihr habt immer frische, vitaminreiche Leckerbissen zur Hand. Los geht’s!
Was sind Sprossen überhaupt?
Sprossen sind im Grunde genommen gekeimte Samen. Wenn Samen mit Wasser in Berührung kommen, beginnen sie zu keimen und entwickeln kleine Wurzeln und Blätter. Diese jungen Pflänzchen sind vollgepackt mit Nährstoffen, Vitaminen und Enzymen. Sie sind eine tolle Ergänzung für Salate, Suppen, Sandwiches oder einfach zum Knabbern zwischendurch.
Warum Sprossen selber ziehen?
Es gibt viele gute Gründe, Sprossen selbst zu ziehen:
* Frische: Ihr habt immer frische Sprossen zur Hand, die nicht lange transportiert wurden.
* Kontrolle: Ihr wisst genau, was in euren Sprossen steckt, da ihr die Samen selbst auswählt und keine Pestizide oder andere Chemikalien verwendet.
* Kostengünstig: Sprossen selber zu ziehen ist viel günstiger als sie im Supermarkt zu kaufen.
* Nachhaltig: Ihr reduziert Verpackungsmüll und unterstützt eine nachhaltige Lebensweise.
* Gesundheit: Sprossen sind reich an Vitaminen, Mineralstoffen und Enzymen.
* Einfach: Es ist wirklich kinderleicht und macht Spaß!
Welche Samen eignen sich für Sprossen?
Es gibt eine große Auswahl an Samen, die sich für die Sprossenzucht eignen. Hier sind einige beliebte Optionen:
* Alfalfa: Milde, leicht nussige Sprossen, die reich an Vitaminen und Mineralstoffen sind.
* Radieschen: Scharfe, würzige Sprossen, die Salaten eine besondere Note verleihen.
* Brokkoli: Mild-würzige Sprossen, die reich an Sulforaphan sind, einem Stoff mit antioxidativen Eigenschaften.
* Linsen: Herzhafte Sprossen, die eine gute Proteinquelle sind.
* Mungbohnen: Knackige Sprossen, die in der asiatischen Küche sehr beliebt sind.
* Kresse: Scharfe, pfeffrige Sprossen, die Salaten und Suppen eine besondere Würze verleihen.
* Sonnenblumenkerne: Nussige Sprossen, die reich an Vitamin E sind.
* Rettich: Ähnlich wie Radieschen, aber etwas milder im Geschmack.
* Kichererbsen: Herzhafte Sprossen, die eine gute Proteinquelle sind.
* Amaranth: Mild-süße Sprossen, die reich an Eisen sind.
* Quinoa: Mild-nussige Sprossen, die eine gute Proteinquelle sind.
Wichtig: Achtet darauf, dass ihr nur Samen verwendet, die speziell für die Sprossenzucht geeignet sind. Diese sind unbehandelt und frei von Pestiziden.
Was ihr zum Sprossen ziehen braucht
Ihr braucht nicht viel, um mit der Sprossenzucht zu beginnen:
* Samen: Wählt eure Lieblingssamen aus.
* Ein Sprossenglas oder eine Keimschale: Es gibt spezielle Sprossengläser mit Siebdeckel oder Keimschalen mit mehreren Etagen. Ihr könnt aber auch ein normales Einmachglas mit einem Stück Mulltuch oder einem feinmaschigen Sieb verwenden.
* Wasser: Am besten gefiltertes Wasser oder abgekochtes, abgekühltes Wasser.
* Ein dunkler Ort: Die Samen keimen am besten an einem dunklen Ort.
* Ein heller Ort: Sobald die Sprossen gekeimt sind, brauchen sie Licht, um grün zu werden.
Sprossen ziehen im Sprossenglas: Schritt für Schritt
Das Sprossenglas ist eine einfache und beliebte Methode, um Sprossen zu ziehen. So geht’s:
1. Samen einweichen
Gebt die Samen in das Sprossenglas und füllt es mit Wasser. Die Einweichzeit hängt von der Art der Samen ab. Hier sind einige Richtwerte:
* Alfalfa: 4-6 Stunden
* Radieschen: 4-6 Stunden
* Brokkoli: 6-8 Stunden
* Linsen: 8-12 Stunden
* Mungbohnen: 8-12 Stunden
* Kresse: 15-20 Minuten
* Sonnenblumenkerne: 4-6 Stunden
Ich empfehle, die Samen über Nacht einzuweichen, dann seid ihr auf der sicheren Seite.
2. Wasser abgießen und spülen
Gießt das Einweichwasser ab und spült die Samen gründlich mit frischem Wasser. Achtet darauf, dass alle Samen gut befeuchtet sind.
3. Sprossenglas aufstellen
Stellt das Sprossenglas schräg auf, so dass das überschüssige Wasser ablaufen kann. Am besten stellt ihr es in eine Schüssel oder auf ein Abtropfgitter.
4. Regelmäßig spülen
Spült die Sprossen 2-3 Mal täglich mit frischem Wasser. Das ist wichtig, um Schimmelbildung zu vermeiden und die Sprossen feucht zu halten.
5. Dunkel lagern
Stellt das Sprossenglas an einen dunklen Ort. Ein Küchenschrank oder eine Schublade sind ideal.
6. Licht
Sobald die Sprossen gekeimt sind (nach ca. 2-3 Tagen), stellt ihr das Sprossenglas an einen hellen Ort, aber nicht in die direkte Sonne. Dadurch werden die Sprossen grün und entwickeln ihren vollen Geschmack.
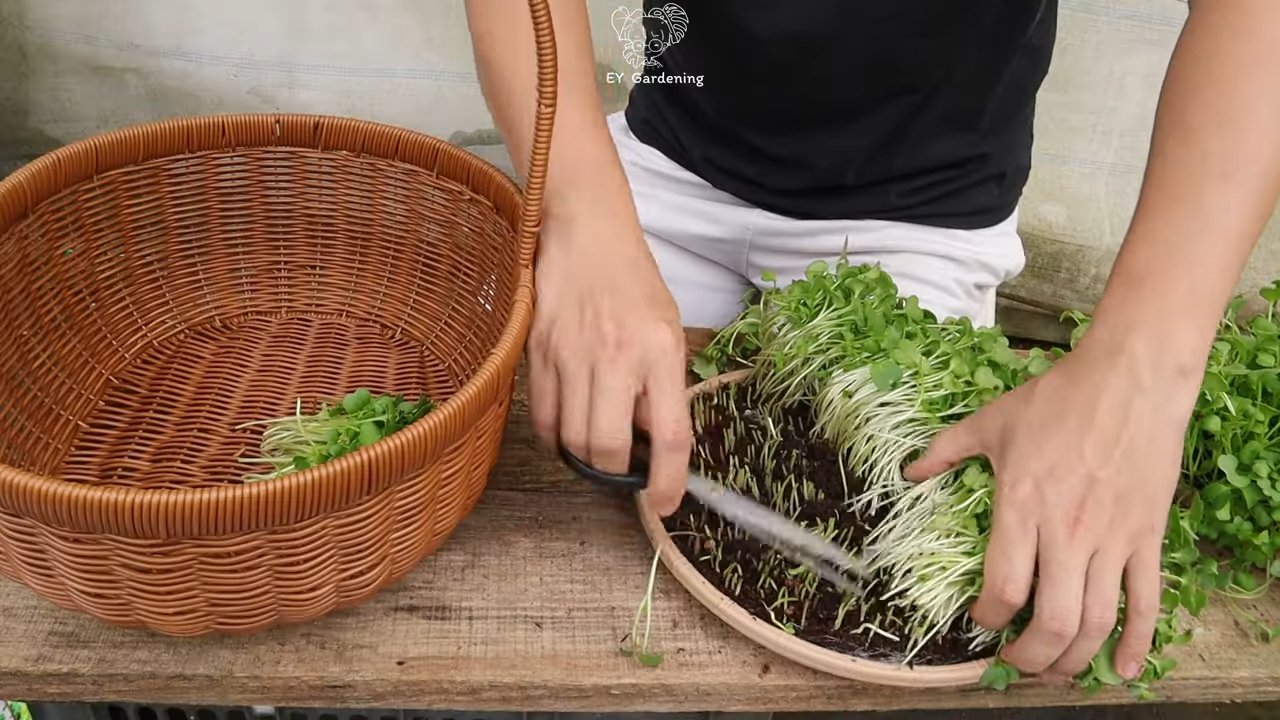
7. Ernten
Die Sprossen sind in der Regel nach 5-7 Tagen erntereif. Sie sollten kleine Blätter entwickelt haben und knackig sein.
8. Lagern
Bewahrt die geernteten Sprossen im Kühlschrank auf. Sie halten sich dort ca. 3-5 Tage.
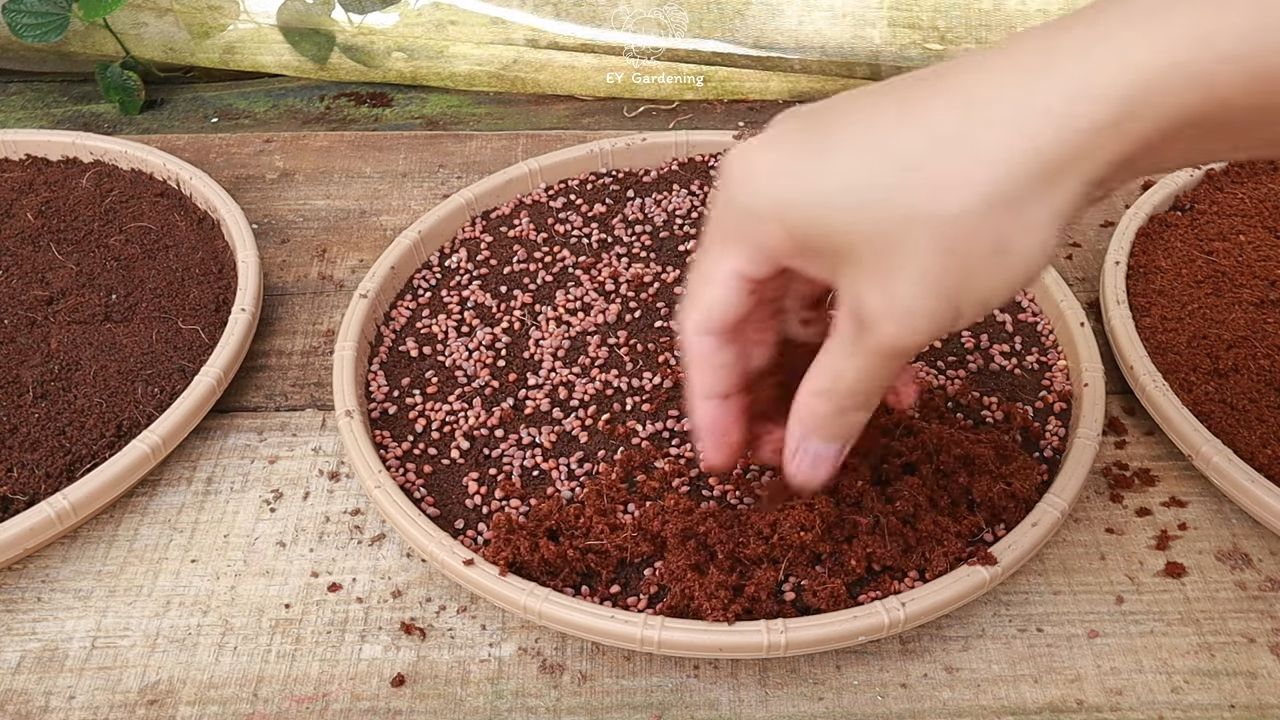
Sprossen ziehen in der Keimschale: Schritt für Schritt
Die Keimschale ist eine weitere gute Option, um Sprossen zu ziehen. Sie bietet mehr Platz für die Sprossen und ermöglicht eine bessere Belüftung.
1. Samen einweichen
Weicht die Samen wie oben beschrieben ein.
2. Keimschale vorbereiten
Befeuchtet die Keimschale mit Wasser.
3. Samen verteilen
Verteilt die eingeweichten Samen gleichmäßig auf der Keimschale. Achtet darauf, dass sie nicht zu dicht liegen, damit sie genügend Platz zum Wachsen haben.
4. Dunkel lagern
Stellt die Keimschale an einen dunklen Ort.
5. Regelmäßig befeuchten
Befeuchtet die Samen 2-3 Mal täglich mit einer Sprühflasche. Sie sollten immer feucht, aber nicht nass sein.
6. Licht
Sobald die Sprossen gekeimt sind, stellt ihr die Keimschale an einen hellen Ort, aber nicht in die direkte Sonne.
7. Ernten
Die Sprossen sind in der Regel nach 5-7 Tagen erntereif.
8. Lagern
Bewahrt die geernteten Sprossen im Kühlschrank auf.
Häufige Fehler und wie man sie vermeidet
Auch beim Sprossen ziehen können Fehler passieren. Hier sind einige häufige Fehler und wie ihr sie vermeiden könnt:
* Schimmelbildung: Schimmelbildung ist das häufigste Problem beim Sprossen ziehen. Sie entsteht durch mangelnde Belüftung und zu hohe Feuchtigkeit. Um Schimmelbildung zu vermeiden, solltet ihr die Sprossen regelmäßig spülen, für eine gute Belüftung sorgen und nicht zu viele Samen auf einmal verwenden.
* Falsche Samen: Verwendet nur Samen, die speziell für die Sprossenzucht geeignet sind. Andere Samen können mit Pestiziden behandelt sein oder nicht keimen.
* Zu wenig oder zu viel Wasser: Die Sprossen sollten immer feucht, aber nicht nass sein. Zu wenig Wasser führt dazu, dass sie austrocknen, zu viel Wasser fördert die Schimmelbildung.
* Zu wenig Licht: Sobald die Sprossen gekeimt sind, brauchen sie Licht, um grün zu werden. Zu wenig Licht führt dazu, dass sie blass und geschmacklos bleiben.
* Unsaubere Geräte: Reinigt eure Sprossengläser oder Keimschalen regelmäßig, um die Ausbreitung von Bakterien zu verhindern.
Meine persönlichen Tipps für erfolgreiche Spross
Conclusion
So, there you have it! Growing sprouts at home is not only incredibly easy and cost-effective, but it’s also a fantastic way to inject a burst of fresh, vibrant flavor and nutrition into your daily meals. Forget those expensive, pre-packaged sprouts from the grocery store that often lack the vitality and freshness you crave. With just a few simple supplies and a little bit of patience, you can cultivate your own thriving sprout garden right in your kitchen.
Think about it: a constant supply of crunchy, nutrient-packed sprouts at your fingertips, ready to elevate your salads, sandwiches, soups, and stir-fries. The possibilities are truly endless! Plus, you’ll have the satisfaction of knowing exactly where your food comes from and that it’s free from any unwanted additives or preservatives.
This DIY trick is a must-try for anyone looking to improve their diet, reduce their grocery bill, and connect with the natural world in a tangible way. It’s a project that’s perfect for beginners and seasoned gardeners alike, and it’s a wonderful activity to share with children, teaching them about the magic of plant growth and the importance of healthy eating.
But don’t just take our word for it! We encourage you to embark on your own sprouting adventure and discover the joy of growing your own fresh, delicious sprouts. Experiment with different types of seeds to find your favorites. Try mixing and matching varieties for a unique flavor profile. Consider using different sprouting containers, such as mason jars, sprouting trays, or even repurposed plastic containers.
Variations to Consider:
* Sprout Blends: Combine different types of seeds for a complex flavor and nutrient profile. A mix of alfalfa, radish, and broccoli sprouts is a popular choice.
* Spicy Sprouts: Add a touch of heat by including mustard or cress seeds in your sprout mix.
* Sunflower Sprouts: These sprouts have a nutty flavor and are packed with protein. They require a slightly different sprouting method, as they prefer to be grown in soil.
* Mung Bean Sprouts: A classic sprout, perfect for Asian-inspired dishes. Use a dark environment to encourage long, white sprouts.
* Lentil Sprouts: These sprouts are a great source of protein and fiber. They have a mild, earthy flavor.
Don’t be afraid to get creative and customize your sprouting experience to suit your own tastes and preferences. The most important thing is to have fun and enjoy the process!
We’re confident that once you experience the satisfaction of growing your own sprouts at home, you’ll be hooked. It’s a simple, rewarding, and incredibly healthy way to enhance your culinary creations.
So, what are you waiting for? Grab some seeds, a jar, and get sprouting! We can’t wait to hear about your experiences. Share your photos, tips, and favorite sprout recipes in the comments below. Let’s build a community of sprout enthusiasts and spread the word about this amazing DIY trick! Happy sprouting!
Frequently Asked Questions (FAQ)
What types of seeds can I use for sprouting?
A wide variety of seeds can be used for sprouting, including alfalfa, broccoli, radish, clover, mung beans, lentils, chickpeas, sunflower seeds, and mustard seeds. Make sure to use seeds specifically intended for sprouting, as seeds sold for planting may be treated with chemicals that are not safe for consumption. Avoid using seeds from your garden that may have been exposed to pesticides or herbicides. Look for seeds labeled “for sprouting” or “for culinary use.”
How long does it take for sprouts to grow?
The sprouting time varies depending on the type of seed and the environmental conditions. Generally, most sprouts will be ready to harvest in 3 to 7 days. Alfalfa and clover sprouts typically take 5 to 7 days, while radish and broccoli sprouts may be ready in as little as 3 to 5 days. Mung bean sprouts can be harvested in 2 to 3 days. Keep an eye on your sprouts and harvest them when they reach your desired size and flavor.
How do I prevent mold from growing on my sprouts?
Mold growth is a common concern when sprouting, but it can be easily prevented by following a few simple steps. First, ensure that your sprouting container is clean and sanitized before each use. Rinse the seeds thoroughly before sprouting and rinse the sprouts at least twice a day with fresh, cool water. Make sure to drain the water completely after each rinse to prevent excess moisture from accumulating. Provide adequate air circulation by placing the sprouting container in a well-ventilated area. Avoid overcrowding the container with too many seeds. If you notice any signs of mold, discard the entire batch of sprouts immediately.
How do I store sprouts after they are grown?
Once your sprouts are ready to harvest, rinse them thoroughly and drain them well. Gently pat them dry with a clean paper towel or salad spinner. Store the sprouts in an airtight container in the refrigerator. They should last for up to a week if stored properly. Check the sprouts regularly for any signs of spoilage and discard them if they become slimy or develop an off odor.
Are there any health benefits to eating sprouts?
Yes, sprouts are packed with nutrients and offer a wide range of health benefits. They are a good source of vitamins, minerals, enzymes, and antioxidants. Sprouts are also low in calories and high in fiber, making them a healthy addition to any diet. Eating sprouts can help boost your immune system, improve digestion, and protect against chronic diseases.
Can I grow sprouts in soil?
While most sprouts are grown without soil, some varieties, such as sunflower sprouts and pea shoots, are best grown in soil. To grow sprouts in soil, spread a thin layer of soil in a shallow tray or container. Sprinkle the seeds evenly over the soil and cover them with a thin layer of soil. Water gently and keep the soil moist but not soggy. Place the tray in a bright, indirect light and harvest the sprouts when they reach your desired size.
What if my sprouts smell bad?
A foul odor is a sign that your sprouts have gone bad and should be discarded immediately. This is usually caused by bacterial contamination or mold growth. To prevent this, make sure to rinse your sprouts thoroughly and frequently, and provide adequate air circulation.
Can I eat the roots of the sprouts?
Yes, the roots of most sprouts are edible and perfectly safe to consume. They are often just as nutritious as the rest of the sprout. However, some people may find the roots to be slightly bitter or have a different texture than the rest of the sprout. It’s a matter of personal preference whether or not you choose to eat the roots.
Are there any sprouts I should avoid?
While most sprouts are safe to eat, there are a few varieties that should be avoided. Bean sprouts, especially those grown in dark, humid conditions, have been linked to foodborne illnesses. It’s best to cook bean sprouts thoroughly before eating them. Also, avoid eating sprouts that have a strong, bitter taste or an unpleasant odor, as this may indicate spoilage or contamination.
Can I grow sprouts in the summer?
Yes, you can grow sprouts year-round, including in the summer. However, you may need to take extra precautions to prevent overheating and mold growth. Keep the sprouting container in a cool, dark place and rinse the sprouts more frequently during hot weather. You can also try using a sprouting tray with a built-in ventilation system to improve air circulation.
Leave a Comment