
Growing Spinach Indoors can seem like a daunting task, but trust me, with a few simple tricks and a little DIY spirit, you can enjoy fresh, vibrant spinach right from your own home, no matter the season! Imagine stepping into your kitchen and snipping off a handful of tender spinach leaves for your morning smoothie or a quick salad – that’s the magic we’re about to unlock together.
For centuries, spinach has been a nutritional powerhouse, celebrated for its health benefits and versatility in the kitchen. From ancient Persia, where it’s believed to have originated, to its adoption by cultures worldwide, spinach has always been a staple. But what if you don’t have a sprawling garden or the perfect outdoor climate? That’s where the beauty of indoor gardening comes in!
In today’s busy world, access to fresh, healthy produce can be a challenge. Supermarket spinach, while convenient, often lacks the flavor and nutrients of homegrown varieties. Plus, who knows how long it’s been sitting on the shelf? That’s why learning how to grow spinach indoors is more relevant than ever. Not only will you have a constant supply of delicious greens, but you’ll also gain the satisfaction of nurturing your own food. This DIY guide will provide you with easy-to-follow steps and clever hacks to ensure your indoor spinach thrives. So, let’s ditch the store-bought stuff and embark on this exciting journey of growing spinach indoors!
Growing Spinach Indoors: Your Comprehensive DIY Guide
Hello, dear garden friends! Do you want to harvest fresh spinach, even in winter? Then you’ve come to the right place! I’ll show you how you can easily grow spinach indoors. It’s easier than you think, and you’ll be rewarded with delicious, vitamin-rich leaves. Let’s get started!
What You Need: The Materials List
Before we get started, here is a list of everything you’ll need for your indoor spinach project:
- Spinach seeds: Choose a variety that is suitable for growing in containers. “Bloomsdale Long Standing” or “Baby’s Leaf” are good options.
- Starter pots or trays: Small pots or trays for sowing.
- Larger pots or containers: At least 15 cm (6 inches) deep and wide enough to accommodate several plants.
- High-quality potting soil: A well-draining, nutrient-rich soil is ideal.
- Grow light (optional, but recommended): Especially in the darker months, a grow light provides sufficient light.
- Spray bottle: For moistening the soil.
- Watering can: For watering the plants.
- Fertilizer (optional): An organic liquid fertilizer can promote growth.
- A bright location: A windowsill with plenty of sunlight is perfect.
The Preparation: Everything to Get Started
Before we start planting, we need to make a few preparations. This is important so that the spinach feels comfortable and grows well.
- Prepare the pots: Fill the starter pots or trays with potting soil. Press the soil down lightly, but not too firmly.
- Prepare the seeds (optional): You can soak the spinach seeds in lukewarm water for a few hours before planting. This speeds up germination.
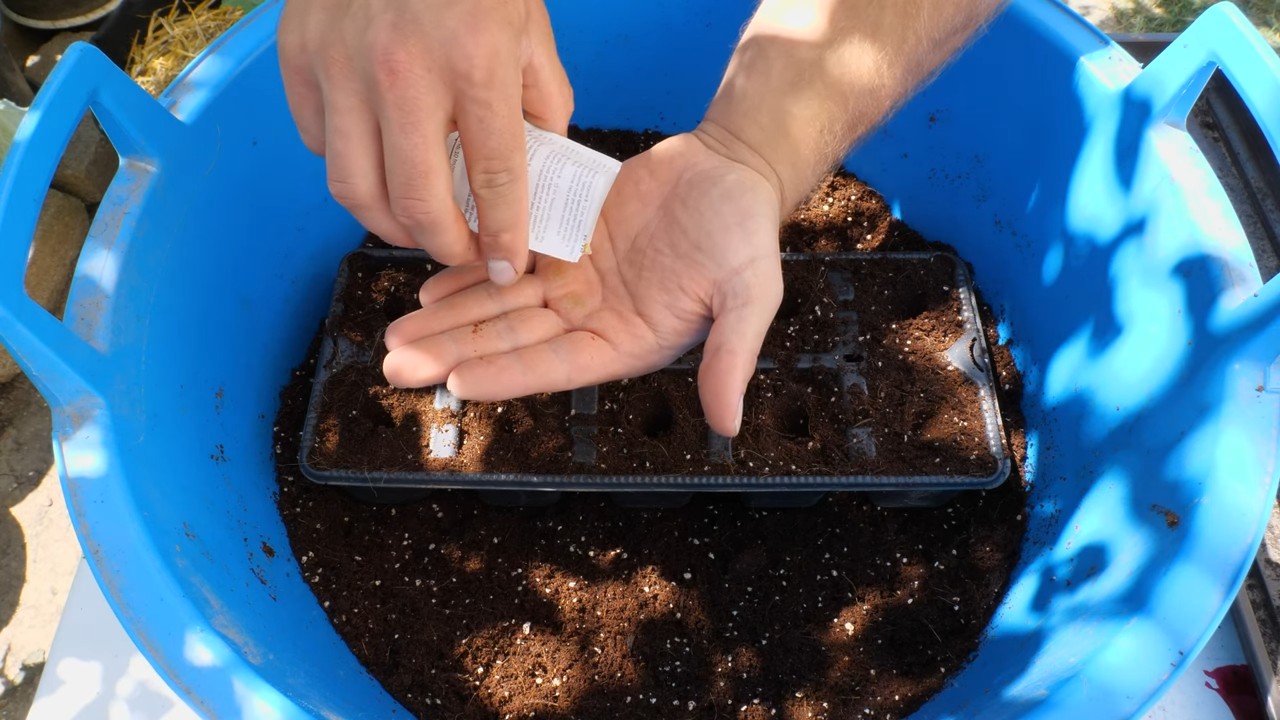
Sowing: The Foundation for Your Harvest
Now comes the exciting part: we are sowing the spinach seeds!
- Sow the seeds: Distribute 2-3 seeds per starter pot or tray. Cover the seeds with a thin layer of soil (about 0.5 cm / 0.2 inches).
- Moisten: Gently moisten the soil with a spray bottle. The soil should be damp, but not wet.
- The location: Place the starter pots in a bright, warm place. A temperature between 15 and 20 degrees Celsius (59-68°F) is ideal.
- Patience: Now it’s time to wait! Germination usually takes 7-14 days. Keep the soil moist during this time.
Pricking Out: Giving the Little Seedlings More Space
Once the spinach seedlings have a few leaves (about 2-3 weeks after sowing), it’s time to prick them out. This means we transplant them into larger pots so they have more space to grow.
- Prepare the larger pots: Fill the larger pots or containers with potting soil.
- Carefully lift the seedlings: Gently loosen the spinach seedlings from the starter pots. Be careful not to damage the roots.
- Planting: Place the seedlings in the larger pots. The distance between the plants should be about 5-7 cm (2-3 inches).
- Watering in: Water the plants thoroughly after transplanting.
Care: So Your Spinach Thrives
Proper care is crucial for a bountiful harvest. Here are a few tips to keep your spinach happy:
- Watering: Water the spinach regularly, but avoid waterlogging. The soil should always be slightly moist.
- Light: Spinach needs a lot of light. Place the pots in a bright location or use a grow light.
- Temperature: Spinach likes it cool. A temperature between 15 and 20 degrees Celsius (59-68°F) is ideal. Avoid direct sunlight in summer, as this can lead to leaf burn.
- Fertilizer (optional): Fertilize the spinach every 2-3 weeks with an organic liquid fertilizer. This promotes growth and leaf formation.
- Ventilation: Ensure good ventilation to prevent fungal diseases.
The Harvest: Finally, Fresh Spinach!
After about 4-6 weeks, you can harvest your first spinach!
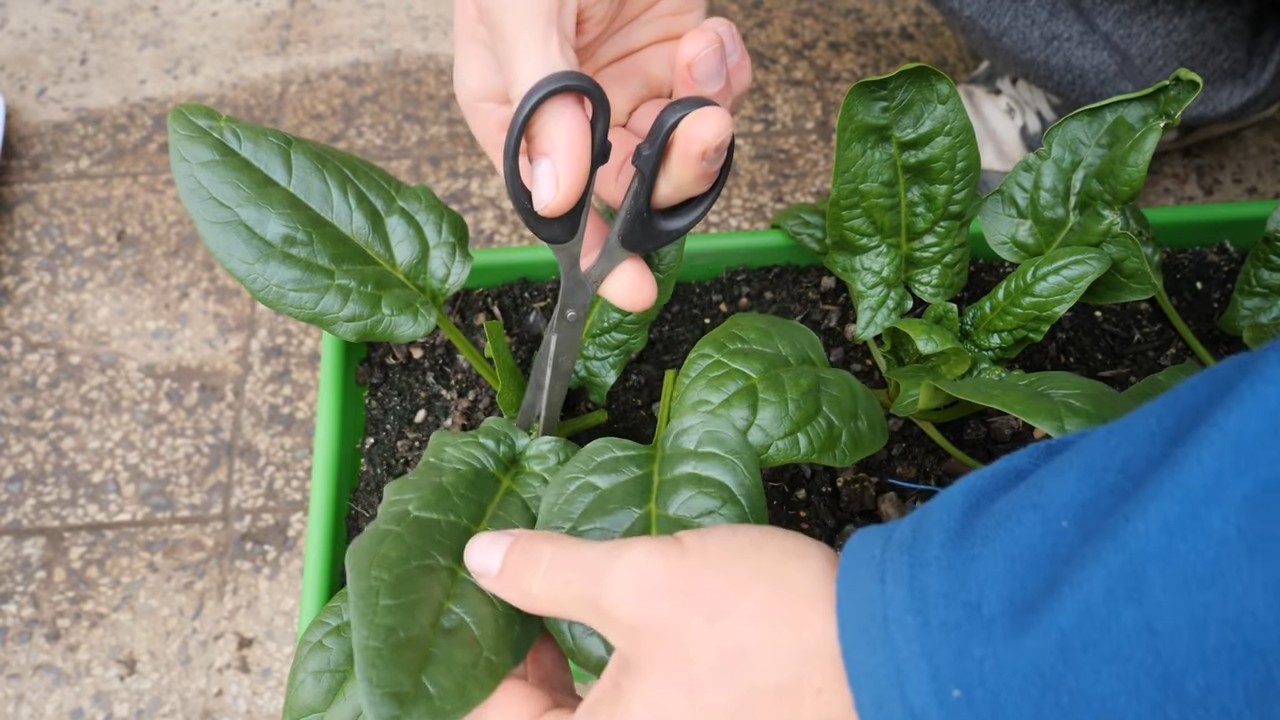
- Harvest the leaves: Cut off the outer leaves as soon as they are large enough. Leave the inner leaves so they can continue to grow.
- Harvest regularly: Harvest the spinach regularly to encourage the growth of new leaves.
Additional Tips and Tricks for Successful Indoor Spinach Cultivation
- Variety selection: When choosing a variety, make sure it is suitable for growing in pots. Some varieties are more compact and better suited for indoor growing than others.
- Pests: Check your spinach plants regularly for pests like aphids or spider mites. In case of infestation, you can use natural pesticides.
- Diseases: Watch for signs of diseases like powdery mildew. Good ventilation and avoiding waterlogging can help prevent diseases.
- Crop rotation: If you grow spinach regularly, change the soil in the pots regularly to prevent nutrient deficiencies.
- Spinach as baby leaf: You can also harvest spinach as baby leaf. For this, you harvest the leaves when they are still very young and tender.
- The right soil: Use a high-quality potting soil that is well-draining and contains sufficient nutrients. You can also mix some compost or organic fertilizer into the soil.
- Lack of light: In the winter months, it can be difficult to provide the spinach with enough light. A grow light is a good investment in this case.
- Overwatering: Avoid overwatering, as this can lead to root rot. Only water the spinach when the soil feels dry.
- Regular checks: Check your spinach plants regularly for pests, diseases, and nutrient deficiencies. The earlier you identify problems, the easier it is to fix them.
- Harvest time: It’s best to harvest spinach in the morning when the leaves are still fresh and crisp.
- Storage: Spinach does not last long. It is best to process it immediately after harvesting. However, you can also store it in the refrigerator for a few days.
- Creative recipes: Use your homegrown spinach for salads, smoothies, soups, casseroles, or as a side dish to various meals. The possibilities are endless!
Common Problems and Solutions
Even with indoor spinach cultivation, problems can occur. Here are a few common problems and how you can solve them:
Powdery mildew: Powdery mildew can be prevented with good ventilation and by avoiding waterlogging.
Yellow leaves: Yellow leaves can be a sign of a nutrient deficiency. Fertilize the spinach with an organic liquid fertilizer.
Limp leaves: Limp leaves can be a sign of a lack of water. Water the spinach thoroughly.
Aphids: Aphids can be controlled with a natural pesticide.
Conclusion
So, there you have it! Growing spinach indoors isn’t just a whimsical idea for gardening enthusiasts; it’s a practical, rewarding, and surprisingly simple way to enjoy fresh, nutritious greens year-round. Forget those limp, pre-packaged spinach bags from the grocery store. Imagine stepping into your kitchen and harvesting vibrant, crisp spinach leaves whenever you need them. The difference in taste and texture is truly remarkable, and the satisfaction of nurturing your own food from seed to plate is unparalleled.
This DIY trick is a must-try for several compelling reasons. First and foremost, it grants you control over the quality of your spinach. You know exactly what goes into its growth – no harmful pesticides or herbicides, just good old-fashioned care and attention. Secondly, it’s incredibly convenient. No more last-minute trips to the store when you realize you’re out of spinach for your smoothie or salad. Your personal spinach supply is always readily available. Thirdly, it’s a fantastic way to connect with nature, even when you’re stuck indoors. The simple act of tending to your spinach plants can be incredibly therapeutic and grounding.
But the beauty of growing spinach indoors lies not only in its practicality but also in its adaptability. Feel free to experiment with different varieties of spinach. Baby spinach is perfect for salads, while savoy spinach holds up well in cooked dishes. You can also try growing other leafy greens alongside your spinach, such as lettuce or kale, to create a mini indoor salad garden. Consider adding a small fan to your growing area to improve air circulation and prevent fungal diseases. And if you’re feeling adventurous, you can even try hydroponic spinach growing for an even more efficient and space-saving setup.
Don’t be intimidated by the thought of indoor gardening. Starting small is perfectly fine. Begin with a single container and a few spinach seeds, and gradually expand your operation as you gain confidence and experience. The key is to provide your spinach plants with adequate light, water, and nutrients, and to monitor them regularly for any signs of pests or diseases.
We wholeheartedly encourage you to give this DIY trick a try. It’s a small investment of time and effort that yields a significant return in terms of fresh, healthy food and personal satisfaction. Once you’ve experienced the joy of harvesting your own homegrown spinach, you’ll never look at store-bought spinach the same way again.
And most importantly, we want to hear about your experiences! Share your tips, tricks, and triumphs in the comments below. Let us know what varieties of spinach you’re growing, what challenges you’ve encountered, and what solutions you’ve discovered. Together, we can create a thriving community of indoor spinach growers and inspire others to embrace the joys of homegrown food. So, grab your seeds, potting mix, and grow lights, and get ready to embark on a delicious and rewarding journey of growing spinach indoors. Let’s get growing!
Frequently Asked Questions (FAQ)
What kind of lighting is best for growing spinach indoors?
Spinach needs a good amount of light to thrive, typically 12-14 hours per day. Natural sunlight from a south-facing window can work, but often isn’t sufficient, especially during winter months. The best option is to use grow lights. Fluorescent grow lights (T5 or T8) are a good starting point and are relatively inexpensive. LED grow lights are more energy-efficient and have a longer lifespan, making them a worthwhile investment in the long run. Make sure the lights are positioned close enough to the plants (a few inches) without burning them. Observe your plants; if they are leggy (tall and spindly), they need more light.
How often should I water my indoor spinach plants?
Watering frequency depends on several factors, including the size of the container, the type of potting mix, and the ambient temperature and humidity. As a general rule, water your spinach plants when the top inch of soil feels dry to the touch. Avoid overwatering, as this can lead to root rot. Ensure your containers have drainage holes to allow excess water to escape. A good way to check is to stick your finger into the soil. If it feels moist, hold off on watering. If it feels dry, it’s time to water. Water thoroughly until you see water draining from the bottom of the pot.
What kind of soil should I use for growing spinach indoors?
Spinach prefers well-draining soil that is rich in organic matter. A good potting mix specifically formulated for vegetables is ideal. You can also create your own mix by combining equal parts of potting soil, compost, and perlite or vermiculite. The compost provides nutrients, while the perlite or vermiculite improves drainage and aeration. Avoid using garden soil, as it can be too heavy and may contain pests or diseases.
How do I fertilize my indoor spinach plants?
Spinach is a relatively heavy feeder, so it benefits from regular fertilization. Use a balanced liquid fertilizer (e.g., 10-10-10) diluted to half strength. Fertilize every two to three weeks, following the instructions on the fertilizer label. You can also use organic fertilizers, such as compost tea or fish emulsion. Avoid over-fertilizing, as this can lead to leaf burn.
What are some common pests and diseases that affect indoor spinach plants, and how can I prevent them?
Common pests that can affect indoor spinach plants include aphids, spider mites, and whiteflies. To prevent infestations, inspect your plants regularly for any signs of pests. If you spot any, you can try washing them off with a strong stream of water or using insecticidal soap. Ensure good air circulation around your plants to deter pests.
Common diseases include fungal diseases like powdery mildew and downy mildew. To prevent these diseases, avoid overwatering, provide good air circulation, and ensure your plants have adequate light. If you notice any signs of disease, remove the affected leaves immediately and treat the plants with a fungicide if necessary.
When and how should I harvest my indoor spinach?
You can start harvesting spinach leaves when they are about 4-6 inches long. Harvest the outer leaves first, leaving the inner leaves to continue growing. This is known as “cut-and-come-again” harvesting. You can harvest spinach multiple times from the same plant. To harvest, simply snip off the leaves with scissors or pinch them off with your fingers.
Can I grow spinach indoors year-round?
Yes, you can grow spinach indoors year-round, provided you provide the plants with adequate light, water, and nutrients. Indoor growing allows you to control the environment and avoid the seasonal limitations of outdoor gardening.
What are some good spinach varieties to grow indoors?
Some good spinach varieties for indoor growing include ‘Baby’s Leaf Hybrid,’ ‘Bloomsdale Long Standing,’ and ‘Tyee Hybrid.’ These varieties are relatively compact and quick-growing, making them well-suited for indoor containers.
How much space do I need to grow spinach indoors?
Spinach doesn’t require a lot of space. You can grow it in containers as small as 6 inches in diameter, but larger containers (8-12 inches) will allow the plants to grow larger and produce more leaves. You can also grow spinach in raised beds or vertical gardens.
My spinach leaves are turning yellow. What could be the problem?
Yellowing leaves can indicate several problems, including overwatering, underwatering, nutrient deficiencies, or pest infestations. Check the soil moisture and adjust your watering accordingly. Fertilize your plants with a balanced fertilizer to address any nutrient deficiencies. Inspect the leaves for any signs of pests. If the problem persists, consult a gardening expert or your local nursery for further assistance.


Leave a Comment