
Growing Romanesco Cauliflower might seem like a daunting task, but trust me, with a few clever tricks and a little DIY spirit, you can cultivate this fractal beauty right in your own backyard! Forget those bland, store-bought veggies; imagine harvesting your very own vibrant, geometrically stunning Romanesco, ready to impress your friends and family.
For centuries, gardeners have been captivated by the unique charm of Romanesco cauliflower. Originating in Italy, this vegetable isn’t just a feast for the eyes; it’s a delicious and nutritious addition to any meal. But let’s be honest, sometimes getting those picture-perfect heads can be a bit tricky. That’s where these DIY hacks come in!
Why do you need these tricks? Well, growing Romanesco Cauliflower successfully requires understanding its specific needs. From soil preparation to pest control, I’m going to share my tried-and-true methods for ensuring a bountiful harvest. We’ll tackle common challenges like bolting, nutrient deficiencies, and those pesky cabbage worms. So, grab your gardening gloves, and let’s unlock the secrets to growing this extraordinary vegetable. I promise, with a little effort and these DIY tips, you’ll be enjoying homegrown Romanesco in no time!
Growing Romanesco Cauliflower: A Step-by-Step Guide to Fractal Fun!
Okay, let’s dive into the wonderful world of Romanesco cauliflower! This isn’t your average veggie; it’s a stunning fractal masterpiece that’s as delicious as it is beautiful. I’m going to walk you through everything you need to know to grow your own Romanesco, from seed to harvest. Trust me, the effort is totally worth it!
Choosing the Right Variety and Starting Seeds
First things first, you need to pick your Romanesco variety. There aren’t a ton of options, but ‘Natalino’ is a popular and reliable choice. Look for seeds from a reputable supplier to ensure good germination rates.
Here’s how I start my Romanesco seeds indoors:
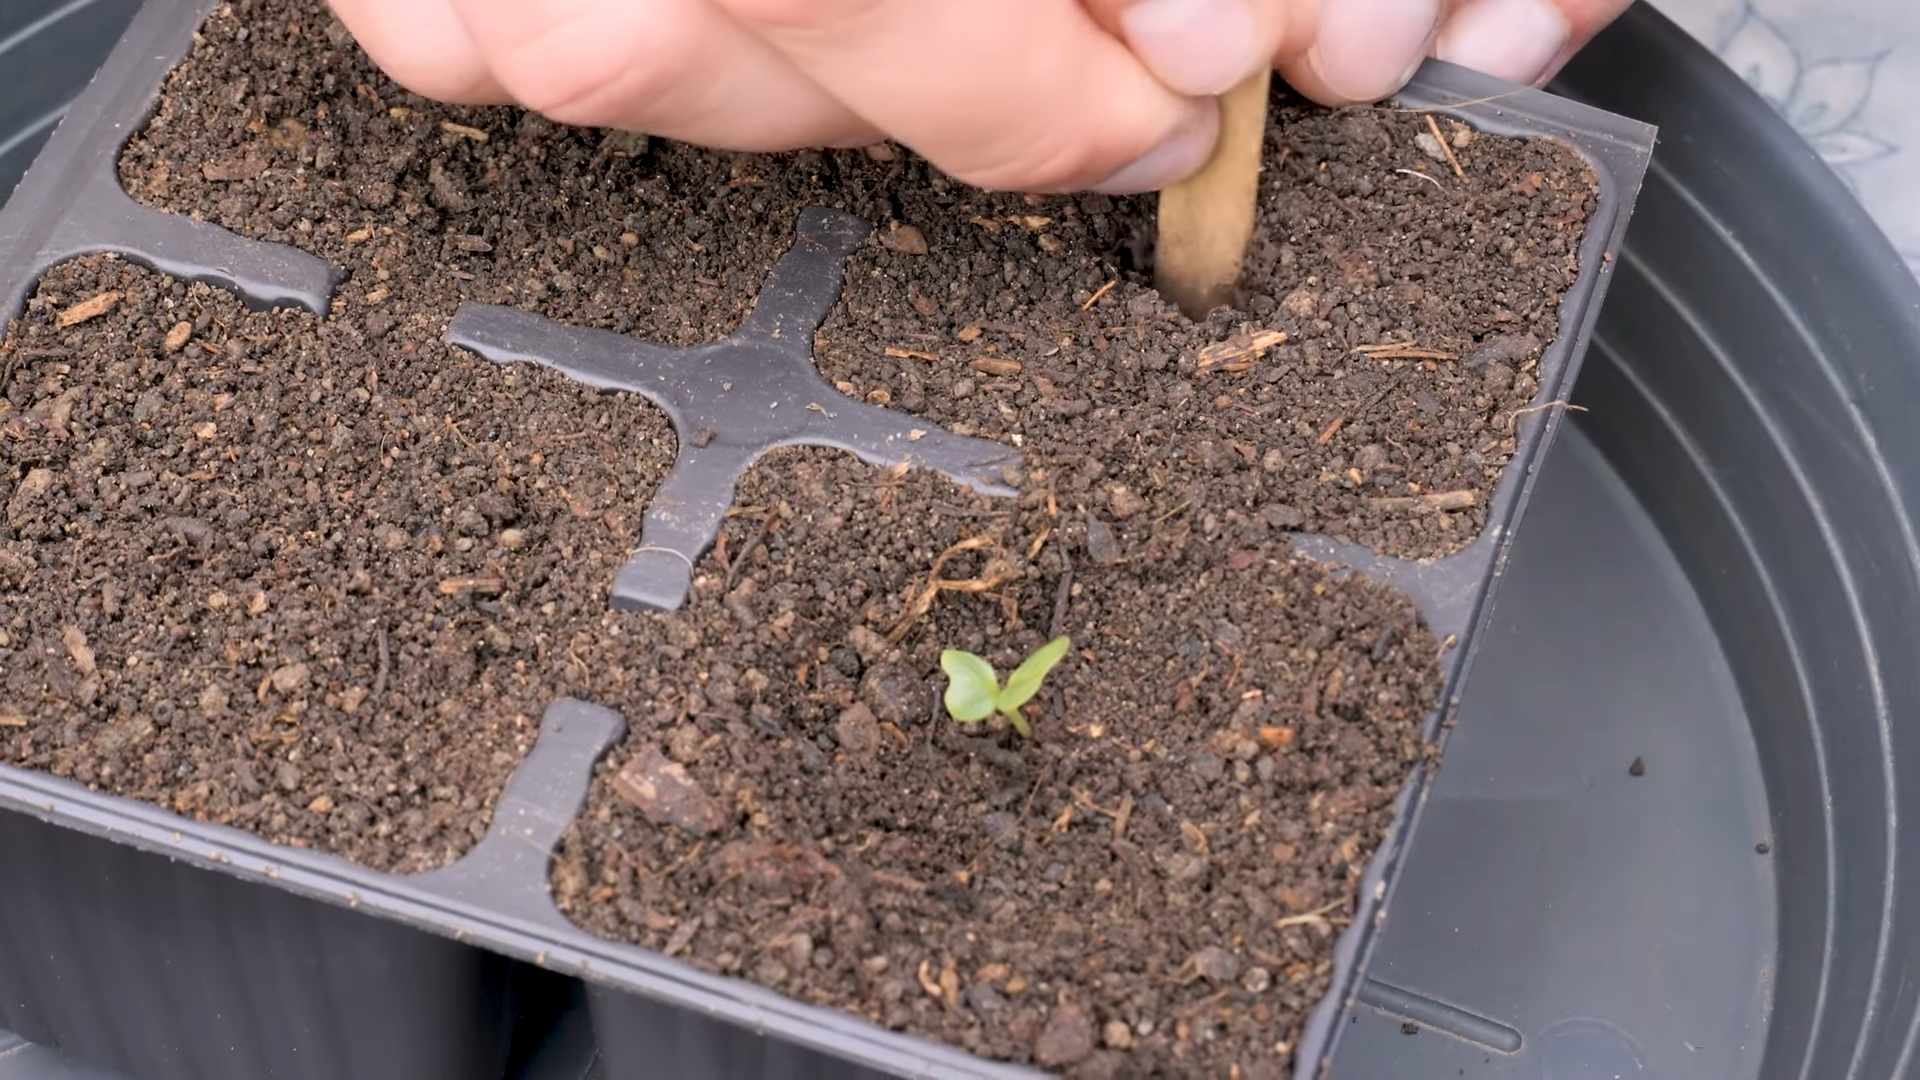
1. Gather Your Supplies: You’ll need seed starting trays or small pots, seed starting mix (this is crucial – regular potting soil is too heavy), a spray bottle, and your Romanesco seeds. A heat mat and grow light are optional but highly recommended for faster and stronger seedlings.
2. Prepare the Seed Starting Mix: Moisten the seed starting mix with water until it’s damp but not soggy. You want it to hold together when you squeeze it, but not drip.
3. Sow the Seeds: Fill your seed starting trays or pots with the moistened mix. Make a small indentation (about ¼ inch deep) in the center of each cell or pot. Place one or two seeds in each indentation.
4. Cover the Seeds: Gently cover the seeds with a thin layer of seed starting mix.
5. Water Gently: Use a spray bottle to mist the surface of the soil. Avoid pouring water directly onto the seeds, as this can dislodge them.
6. Provide Warmth and Light: Place the seed starting trays or pots on a heat mat (if using) and under a grow light (if using). If you don’t have a heat mat or grow light, find a warm, sunny spot in your home.
7. Keep the Soil Moist: Check the soil moisture daily and mist with water as needed to keep it consistently damp.
8. Germination: Romanesco seeds typically germinate in 5-10 days.
9. Thin Seedlings (If Necessary): If you planted two seeds per cell or pot and both germinate, thin them out by snipping off the weaker seedling at the soil line. This will give the stronger seedling more room to grow.
Hardening Off Your Seedlings
Before you transplant your Romanesco seedlings outdoors, you need to “harden them off.” This process gradually acclimates them to the outdoor environment, preventing shock and ensuring they thrive.
Here’s how I harden off my seedlings:
1. Start Slowly: Begin by placing your seedlings outdoors in a sheltered location (like a porch or patio) for just an hour or two on the first day. Make sure they’re protected from direct sunlight and strong winds.
2. Gradually Increase Exposure: Each day, increase the amount of time your seedlings spend outdoors by an hour or two.
3. Monitor the Weather: If the weather is particularly harsh (e.g., strong winds, heavy rain, extreme temperatures), bring your seedlings back indoors.
4. After a Week or Two: After a week or two of gradually increasing exposure, your seedlings should be ready to be transplanted into your garden.
Preparing the Garden Bed
Romanesco cauliflower needs rich, well-drained soil to thrive. Before transplanting, it’s crucial to prepare your garden bed properly.
Here’s what I do to get my garden bed ready:
1. Choose a Sunny Location: Romanesco needs at least 6 hours of direct sunlight per day.
2. Test the Soil: A soil test will tell you the pH level and nutrient content of your soil. Romanesco prefers a slightly acidic to neutral soil pH (around 6.0-7.0).
3. Amend the Soil: Based on your soil test results, amend the soil with compost, aged manure, or other organic matter to improve drainage, fertility, and water retention. I usually add a generous amount of compost – it’s like a superfood for plants!
4. Work the Soil: Use a garden fork or tiller to work the amendments into the soil to a depth of at least 12 inches.
5. Create Raised Beds (Optional): Raised beds can improve drainage and warm up the soil more quickly in the spring.
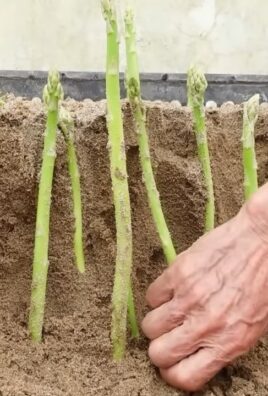
Transplanting Your Seedlings
Now for the exciting part – transplanting your Romanesco seedlings into the garden!
Follow these steps for a successful transplant:
1. Choose the Right Time: Transplant your seedlings when the danger of frost has passed and the soil has warmed up to at least 60°F (15°C). I usually wait until a few weeks after the last expected frost date.
2. Water the Seedlings: Water your seedlings thoroughly a few hours before transplanting. This will help them to slip out of their containers more easily.
3. Dig Holes: Dig holes in your prepared garden bed that are slightly larger than the root balls of your seedlings. Space the holes about 18-24 inches apart.
4. Remove Seedlings from Containers: Gently remove the seedlings from their containers, being careful not to damage the roots. If the roots are tightly bound, gently loosen them with your fingers.
5. Place Seedlings in Holes: Place each seedling in a hole, making sure that the top of the root ball is level with the surrounding soil.
6. Fill in the Holes: Fill in the holes with soil, gently firming it around the base of the seedlings.
7. Water Thoroughly: Water the transplanted seedlings thoroughly to help them settle in.
8. Mulch (Optional): Apply a layer of mulch around the base of the plants to help retain moisture, suppress weeds, and regulate soil temperature. I like to use straw or shredded leaves.
Caring for Your Romanesco Plants
Once your Romanesco plants are in the ground, they’ll need regular care to thrive.
Here’s what I do to keep my Romanesco plants happy and healthy:
1. Watering: Romanesco needs consistent moisture, especially during head formation. Water deeply and regularly, especially during dry spells. Aim for about 1-1.5 inches of water per week.
2. Fertilizing: Romanesco is a heavy feeder, so it needs regular fertilization. I like to use a balanced organic fertilizer every few weeks. You can also side-dress with compost or aged manure.
3. Weeding: Keep the garden bed free of weeds, as they can compete with your Romanesco plants for nutrients and water.
4. Pest Control: Romanesco can be susceptible to pests like cabbage worms, aphids, and flea beetles. Inspect your plants regularly and take action if you see any signs of infestation. I prefer to use organic pest control methods, such as insecticidal soap or neem oil. You can also cover your plants with row covers to prevent pests from reaching them.
5. Bolting Prevention: Bolting (premature flowering) can occur if Romanesco plants are exposed to prolonged periods of hot weather. To prevent bolting, provide shade during the hottest part of the day and ensure consistent watering.
Harvesting Your Romanesco
The moment you’ve been waiting for! Harvesting your beautiful Romanesco.
Here’s how I know when it’s time to harvest:
1. Check the Head Size: Romanesco heads are typically ready to harvest when they reach about 6-8 inches in diameter.
2. Check the Firmness: The head should be firm and compact.
3. Check the Color: The head should be a vibrant green color.
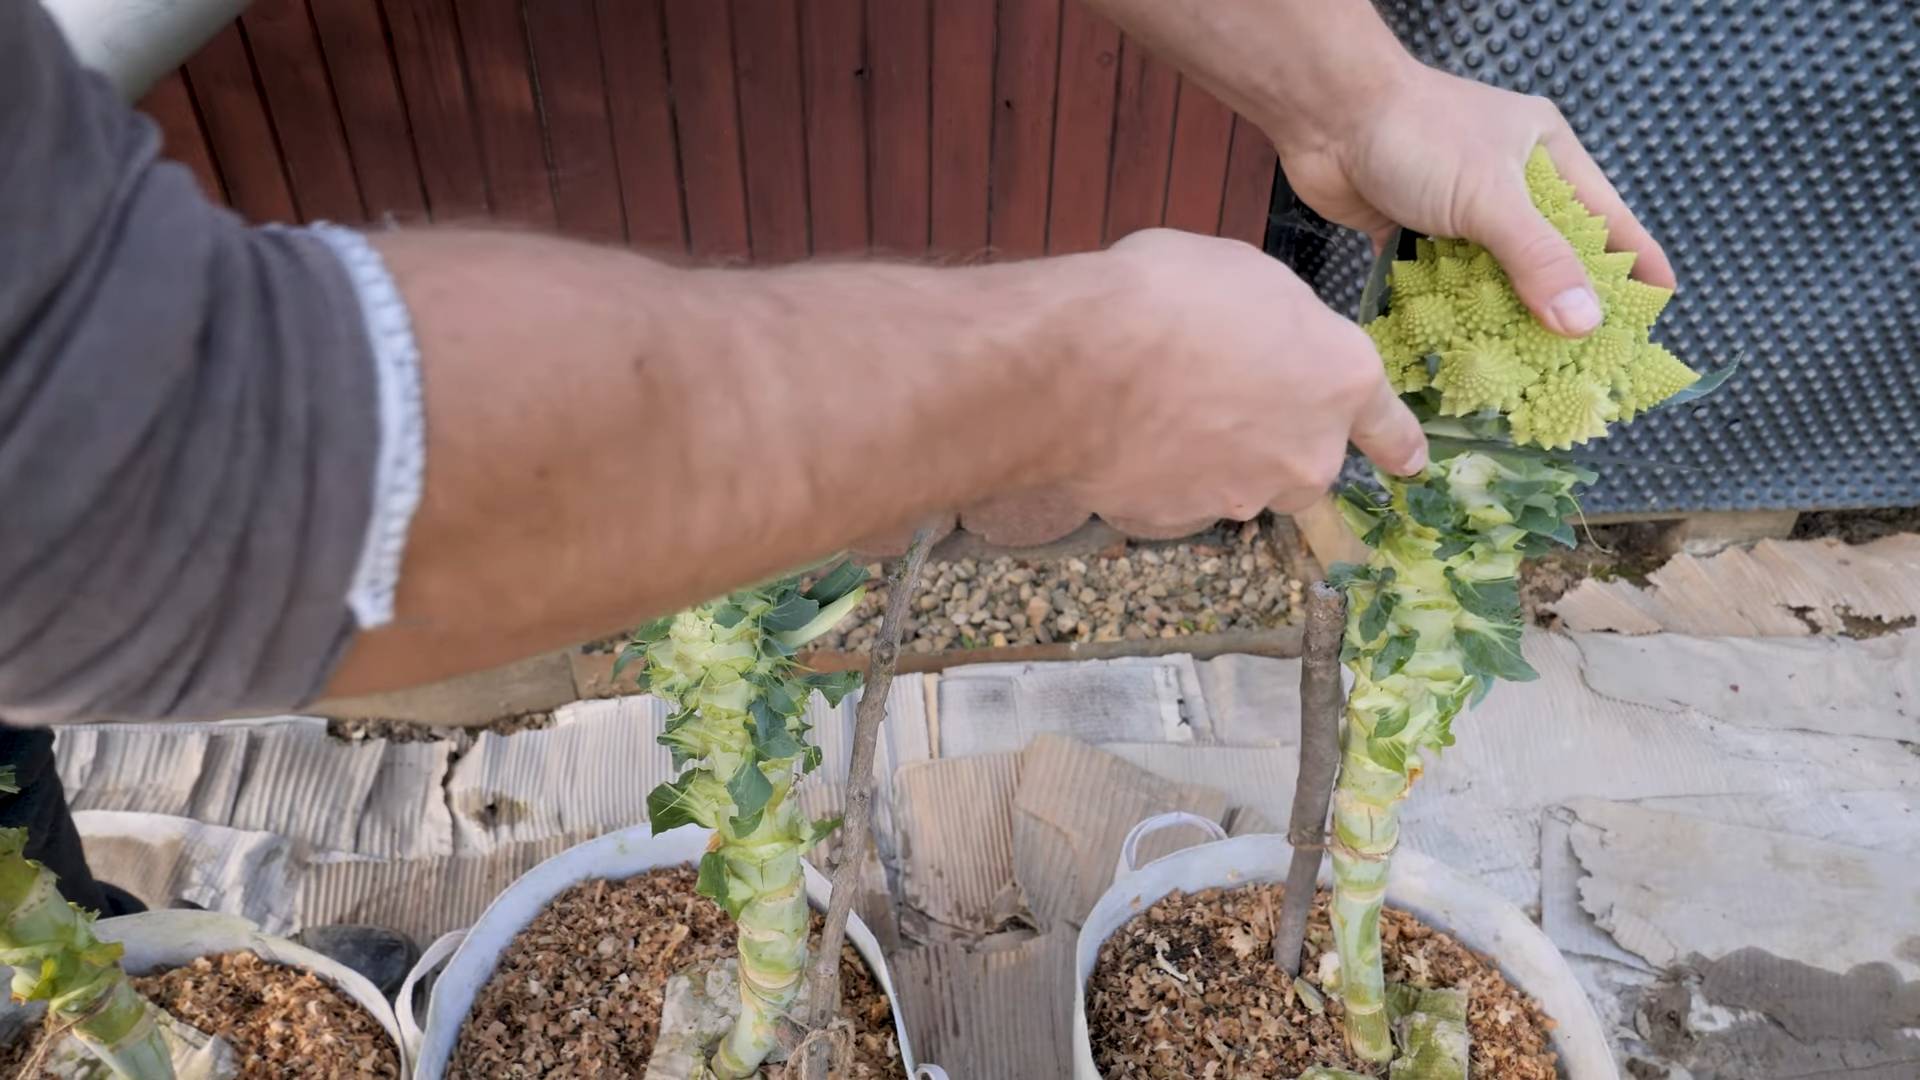
4. Harvesting Technique: Use a sharp knife to cut the head from the plant, leaving a few inches of stem attached.
5. Enjoy Your Harvest: Romanesco can be eaten raw, steamed, roasted, or added to soups and stews. It has a mild, nutty flavor that’s absolutely delicious.
Troubleshooting Common Problems
Even with the best care, you might encounter some problems while growing Romanesco. Here are a few common issues and how to address them:
* Cabbage Worms: These green caterpillars can devour the leaves of your Romanesco plants. Handpick them off the plants or use Bacillus thuringiensis (Bt), an organic insecticide.
* Aphids: These tiny insects suck the sap from plants, causing them to weaken and become distorted. Spray aphids with insecticidal soap or neem oil.
* Flea Beetles: These small, jumping beetles can create tiny holes in the leaves of your Romanesco plants. Cover your plants with row covers or use diatomaceous earth.
* Clubroot: This fungal disease causes the roots of plants to become swollen and distorted. Prevent clubroot by practicing crop rotation and maintaining a soil pH of 7.0 or higher
Conclusion
So, there you have it! Growing Romanesco cauliflower might seem intimidating at first glance, but with a little patience, the right conditions, and these simple DIY tricks, you can cultivate your own stunning, fractal florets right in your backyard. Forget the exorbitant prices at the grocery store and the uncertainty of where your produce comes from. This is about taking control, connecting with nature, and enjoying the unparalleled satisfaction of harvesting something truly special that you nurtured from seed (or seedling) to table.
Why is this a must-try? Because beyond the visual appeal, Romanesco cauliflower boasts a delicate, nutty flavor that’s far superior to its more common white cousin. It’s also packed with vitamins and nutrients, making it a healthy and delicious addition to your diet. But more than that, growing your own Romanesco is an experience. It’s a lesson in patience, a celebration of nature’s artistry, and a conversation starter that will have your friends and neighbors marveling at your gardening prowess.
Don’t be afraid to experiment! Once you’ve mastered the basics, consider trying different varieties of Romanesco. Some are more heat-tolerant than others, and some boast slightly different colors and textures. You can also play around with companion planting to deter pests and improve soil health. Marigolds, for example, are known to repel nematodes, while herbs like rosemary and thyme can help ward off cabbage moths.
And speaking of variations, consider the different ways you can enjoy your homegrown Romanesco. Roasting it with olive oil and garlic brings out its natural sweetness, while steaming it and tossing it with a lemon-herb vinaigrette makes for a light and refreshing side dish. You can even add it to soups, stews, or stir-fries for a boost of flavor and nutrition. Don’t limit yourself to just the florets either; the leaves are also edible and can be cooked like kale or collard greens.
The key to success with growing Romanesco cauliflower lies in consistent care and attention. Regular watering, proper fertilization, and vigilant pest control are essential for ensuring a bountiful harvest. But don’t let that scare you off! With a little planning and effort, you can overcome any challenges and reap the rewards of your labor.
We wholeheartedly encourage you to give this DIY trick a try. Start small, learn from your mistakes, and don’t be afraid to ask for help. The gardening community is a supportive and welcoming one, and there are plenty of resources available online and in your local area to guide you along the way.
Most importantly, we want to hear about your experience! Share your photos, tips, and challenges in the comments below. Let’s create a community of Romanesco growers and inspire others to embrace the joy of homegrown produce. What worked for you? What didn’t? What are your favorite ways to prepare Romanesco cauliflower? Your insights could be invaluable to other gardeners who are just starting out. So, get your hands dirty, embrace the challenge, and prepare to be amazed by the beauty and bounty of growing Romanesco cauliflower. Happy gardening!
Frequently Asked Questions (FAQ)
What are the most common problems when growing Romanesco cauliflower, and how can I prevent them?
The most common problems include cabbage worms, clubroot, and bolting. Cabbage worms can be prevented by using row covers, handpicking them off the plants, or using Bacillus thuringiensis (Bt), a natural insecticide. Clubroot is a soilborne disease that can be prevented by ensuring good soil drainage, maintaining a slightly alkaline soil pH (around 7.0), and practicing crop rotation. Bolting (premature flowering) is often caused by heat stress, so choose heat-tolerant varieties, provide shade during the hottest part of the day, and ensure consistent watering.
How much sun does Romanesco cauliflower need?
Romanesco cauliflower needs at least 6 hours of direct sunlight per day to thrive. More is even better, especially in cooler climates. If you live in a very hot climate, providing some afternoon shade can help prevent bolting.
What kind of soil is best for growing Romanesco cauliflower?
Romanesco cauliflower prefers well-drained, fertile soil that is rich in organic matter. Amend your soil with compost or well-rotted manure before planting to improve drainage and fertility. A slightly alkaline soil pH (around 7.0) is ideal.
How often should I water my Romanesco cauliflower plants?
Water your Romanesco cauliflower plants deeply and regularly, especially during dry periods. Aim to keep the soil consistently moist but not waterlogged. A good rule of thumb is to water when the top inch of soil feels dry to the touch. Mulching around the plants can help retain moisture and suppress weeds.
When is the best time to harvest Romanesco cauliflower?
Harvest your Romanesco cauliflower when the head is firm, compact, and has reached its desired size. The exact size will depend on the variety, but most heads are ready to harvest when they are about 6-8 inches in diameter. Use a sharp knife to cut the head from the plant, leaving a few leaves attached.
Can I grow Romanesco cauliflower in containers?
Yes, you can grow Romanesco cauliflower in containers, but you’ll need a large container (at least 12 inches in diameter) to accommodate the plant’s root system. Use a high-quality potting mix and ensure that the container has good drainage. Water and fertilize regularly, as container-grown plants tend to dry out and deplete nutrients more quickly than those grown in the ground.
What are some good companion plants for Romanesco cauliflower?
Good companion plants for Romanesco cauliflower include marigolds, rosemary, thyme, dill, and nasturtiums. These plants can help deter pests, attract beneficial insects, and improve soil health. Avoid planting Romanesco cauliflower near other members of the brassica family (such as broccoli, cabbage, and kale), as they can compete for nutrients and attract the same pests.
How do I fertilize my Romanesco cauliflower plants?
Fertilize your Romanesco cauliflower plants regularly with a balanced fertilizer that is rich in nitrogen, phosphorus, and potassium. Apply fertilizer according to the package directions, and be sure to water it in well. You can also side-dress your plants with compost or well-rotted manure every few weeks to provide a steady supply of nutrients.
My Romanesco cauliflower is not forming a head. What could be the problem?
There are several reasons why your Romanesco cauliflower might not be forming a head. These include insufficient sunlight, poor soil fertility, inconsistent watering, and extreme temperatures. Make sure your plants are getting at least 6 hours of direct sunlight per day, that the soil is fertile and well-drained, that you are watering regularly, and that the plants are not exposed to excessive heat or cold.
Can I save seeds from my Romanesco cauliflower?
Saving seeds from Romanesco cauliflower can be challenging, as it is a biennial plant, meaning it typically takes two years to produce seeds. You would need to overwinter the plant and allow it to flower and produce seeds in the second year. Furthermore, Romanesco cauliflower is often a hybrid variety, meaning that the seeds may not produce plants that are true to type. If you are interested in saving seeds, choose an open-pollinated variety and be prepared for some variation in the offspring.
Leave a Comment