
Growing Roma Tomatoes can seem daunting, but trust me, with a few simple tricks and DIY hacks, you’ll be harvesting baskets of juicy, flavorful tomatoes in no time! Forget those bland, store-bought imitations – imagine sinking your teeth into a sun-ripened Roma, bursting with that classic Italian taste.
For generations, Roma tomatoes have been a staple in Italian cuisine, prized for their meaty texture and rich flavor, perfect for sauces, pastes, and canning. Think of Nonna’s secret sauce recipe, passed down through generations – chances are, Roma tomatoes were the star ingredient! But you don’t need a sprawling Italian garden to enjoy this culinary treasure.
In today’s busy world, finding time for gardening can be a challenge. That’s where these DIY tricks come in. I’m going to share some easy-to-follow tips that will help you maximize your yield, even if you only have a small balcony or patio. From simple soil amendments to clever staking techniques, these hacks will empower you to successfully growing Roma Tomatoes and enjoy the satisfaction of harvesting your own homegrown goodness. Plus, you’ll save money and reduce your reliance on commercially grown produce. So, let’s get our hands dirty and unlock the secrets to a bountiful Roma tomato harvest!
Growing Roma Tomatoes Yourself: Your Comprehensive DIY Guide
Hey garden friends! I love having fresh, aromatic Roma tomatoes in my garden. They are so versatile – perfect for sauces, soups, salads, and even for canning. And the best part? They are really easy to grow yourself! In this article, I’ll show you step by step how to successfully plant and care for your own Roma tomatoes. Let’s get started!
What You Need for Growing Roma Tomatoes
Before we begin, let’s make sure you have everything you need. Here is a list of the most important materials and tools:
- Roma tomato seeds or young plants: You can either buy seeds and start your own plants or get young plants directly from a garden center.
- Seed starting mix: For starting seeds, special seed starting mix is ideal as it is low in nutrients and loose.
- Pots or seedling trays: For starting the seeds.
- Potting soil: High-quality potting soil for planting out in the garden bed or in larger pots.
- Tomato fertilizer: Special fertilizer for tomatoes that is rich in potassium.
- Plant stakes or tomato cages: Roma tomatoes need support as they grow quite tall and bear heavy fruit.
- Watering can or garden hose: for regular watering.
- Pruning shears: For pruning the side shoots.
- Pickaxe or spade: For preparing the soil in the bed.
- Mulching material (e.g., straw or wood chips): To protect the soil and control weeds.
- Patience and love: The most important thing of all!
Phase 1: Starting from Seed (if you’re starting with seeds)
If you decide to grow your Roma tomatoes from seed, it’s best to start about 6-8 weeks before the last expected frost.
- Prepare the seedling trays: Fill your seedling trays or small pots with seed starting mix. Press the soil down lightly.
- Sow the seeds: Place 2-3 seeds per pot or cell. Cover the seeds with a thin layer of soil (approx. 0.5 cm).
- Water: Moisten the soil carefully with a spray bottle. The soil should be damp, but not wet.
- Location: Place the seedling trays in a warm, bright place. A temperature of 20-25°C is ideal for germination. A mini-greenhouse or a clear plastic cover can help to retain moisture.
- Germination: The seeds usually germinate within 7-14 days.
- Pricking out: As soon as the seedlings have developed their first true leaves (not the seed leaves), it’s time to prick them out. This means you carefully take the strongest seedlings out of the seedling trays and transplant them into separate pots with potting soil. Be careful not to damage the roots.
Phase 2: Preparing the Bed or Pots
Whether you plant your Roma tomatoes in a garden bed or in pots, proper preparation is crucial.
- Choose a location: Roma tomatoes love the sun! Choose a location that gets at least 6-8 hours of sunlight per day.
- Soil improvement (for beds): Loosen the soil thoroughly and remove weeds. Work in compost or well-rotted manure to enrich the soil with nutrients. A pH between 6.0 and 6.8 is ideal.
- Pot size (for pots): Choose pots with a diameter of at least 30 cm and a capacity of at least 20 liters. Larger pots are better as they offer more space for the roots and the plants dry out less quickly.
- Filling the pots: Fill the pots with high-quality potting soil.
Phase 3: Planting Out
As soon as the danger of frost is over and the soil temperature is at least 15°C, you can plant out your Roma tomatoes.
- Hardening off: Before you bring the plants outdoors, you should harden them off for a few days. Place them outside for a few hours during the day and bring them back in at night. This way, they slowly get used to the sun and wind.
- Planting distance: Plant the Roma tomatoes in the bed with a spacing of about 60-80 cm from each other. In pots, each plant should have its own pot.
- Planting: Dig a hole that is slightly larger than the plant’s root ball. Carefully place the plant in it and fill the hole with soil. Press the soil down lightly.
- Plant deep: You can plant Roma tomatoes a little deeper than they were previously in the pot. The stems will then form additional roots, which makes the plant more stable.
- Watering in: Water the plants thoroughly after planting.
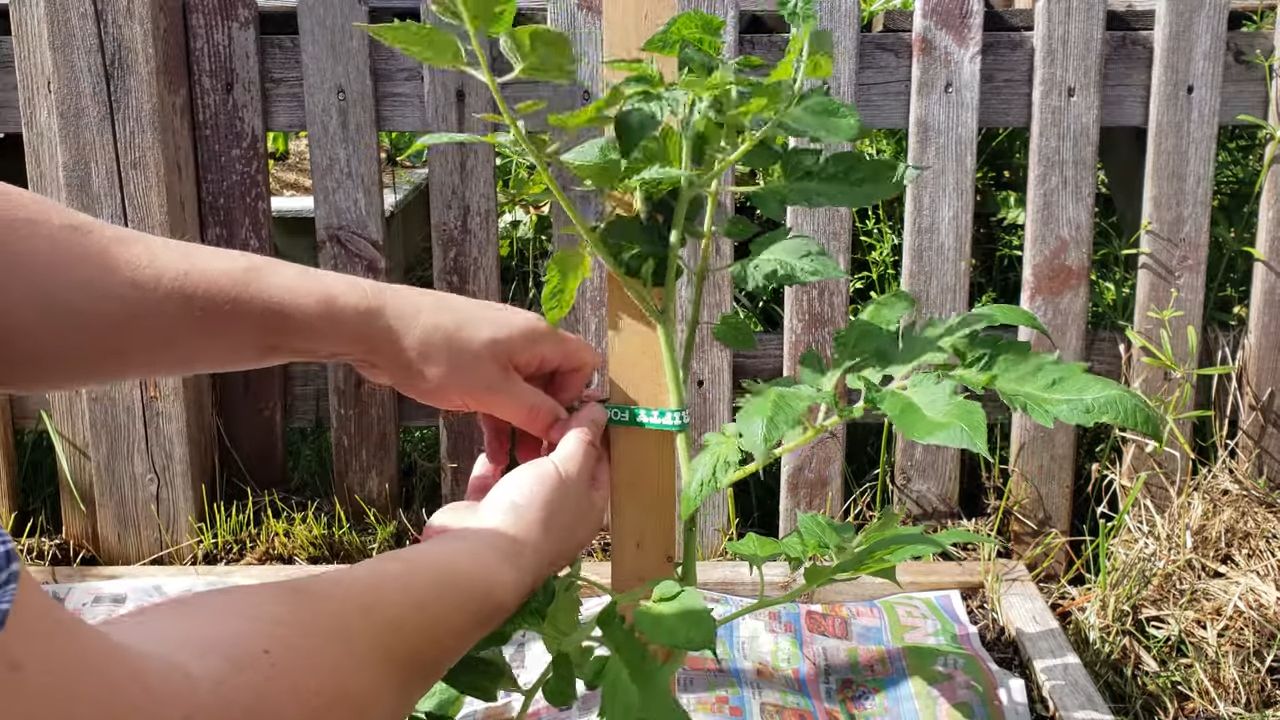
- Add support: Immediately place a plant stake or a tomato cage next to each plant. This gives them support from the beginning.
Phase 4: Caring for Your Roma Tomatoes
Proper care is crucial for a bountiful harvest.
- Watering: Water your Roma tomatoes regularly, especially during dry weather. Make sure the soil is always slightly moist, but avoid waterlogging. It’s best to water in the morning so the leaves can dry off during the day.
- Fertilizing: Fertilize your Roma tomatoes every 2-3 weeks with a special tomato fertilizer. Follow the instructions on the packaging.
- Pruning suckers: Roma tomatoes form side shoots in the leaf axils. You should regularly remove these so-called “suckers” as they unnecessarily drain energy from the plant. Simply pinch off the shoots with your fingers or cut them with pruning shears.
- Mulching: Cover the soil around the plants with mulching material like straw or wood chips. This keeps the soil moist, suppresses weeds, and protects the fruit from dirt.
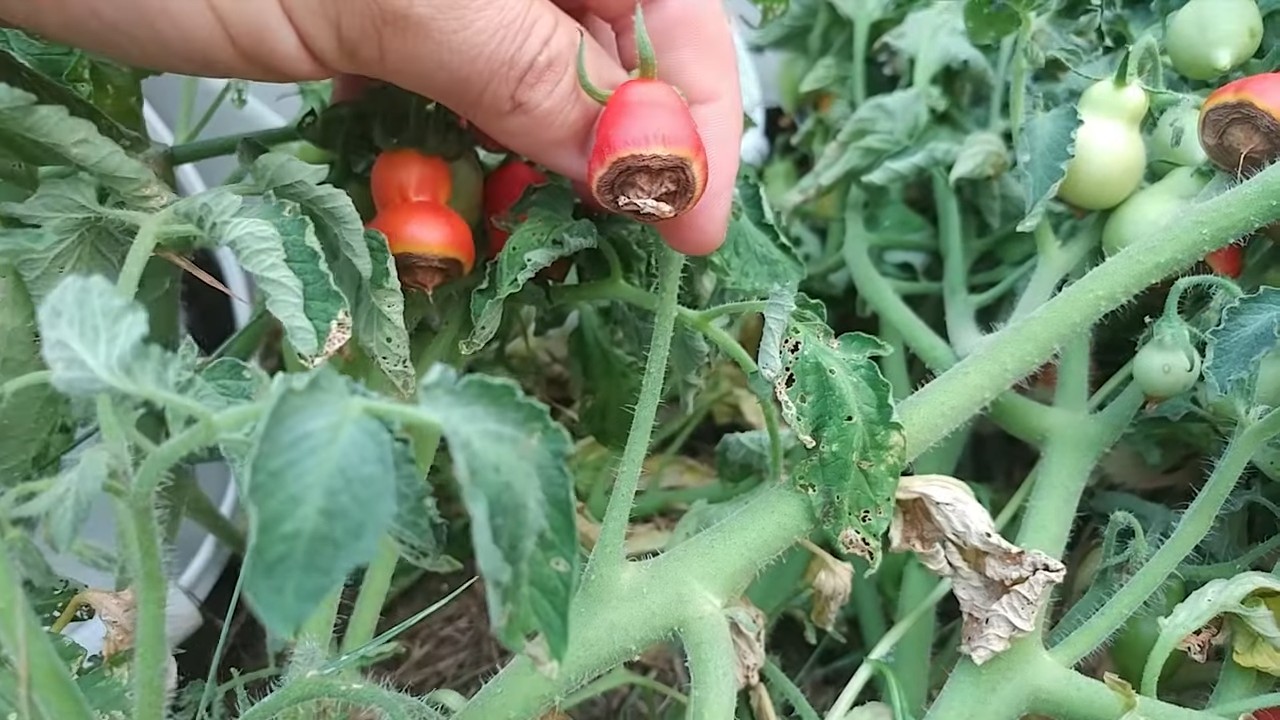
- Disease and pest control: Watch for signs of diseases or pests. If necessary, you can use organic plant protection products.
- Tying up: Regularly tie the tomato plants to the plant stake or tomato cage so they don’t fall over.
Phase 5: The Harvest
Finally! The moment you’ve been waiting for.
- Recognizing ripeness: Roma tomatoes are ripe when they have a deep red color and can be easily detached from the stem.
- Harvesting: Gently pick the ripe tomatoes.
- Storage: Store the harvested tomatoes in a cool, dry place. They keep best when not stored in the refrigerator.
Additional Tips for Successful Roma Tomato Cultivation
Irrigation system: If you have little time, you can use an automatic irrigation system…
Variety selection: There are different varieties of Roma tomatoes. Find out which variety best suits your needs and your climate.
Crop rotation: Do not plant tomatoes in the same location every year to prevent diseases.
Conclusion
So, there you have it! Mastering the art of growing Roma tomatoes doesn’t require a green thumb blessed by the gardening gods. It’s about understanding the plant’s needs, providing the right environment, and employing a few clever DIY tricks to maximize your yield. We’ve explored everything from seed starting to soil preparation, staking techniques to pest control, and even a fantastic homemade fertilizer recipe that will have your Roma tomatoes bursting with flavor.
Why is this DIY approach a must-try? Because it empowers you to take control of your food source, ensuring you’re consuming tomatoes free from harmful chemicals and packed with the nutrients that nature intended. Plus, there’s an unparalleled satisfaction in nurturing a plant from a tiny seed to a bountiful harvest. Imagine the delicious sauces, salsas, and sun-dried tomatoes you can create with your homegrown bounty!
But the journey doesn’t end here. Feel free to experiment with different variations to suit your specific climate and growing conditions. For example, if you live in a particularly hot region, consider providing your Roma tomatoes with some afternoon shade to prevent sunscald. If you’re short on space, try growing them in containers on your patio or balcony. You can even explore different companion planting options, such as basil or marigolds, to deter pests and enhance the flavor of your tomatoes.
And speaking of flavor, don’t be afraid to tweak the homemade fertilizer recipe to your liking. Add a little extra bone meal for increased phosphorus, which promotes strong root development and abundant fruit production. Or, incorporate some Epsom salts for a boost of magnesium, which can help prevent blossom-end rot. The possibilities are endless!
Ultimately, the key to successful Roma tomato growing is observation and adaptation. Pay close attention to your plants, learn from your mistakes, and don’t be afraid to try new things. With a little patience and perseverance, you’ll be rewarded with a harvest of juicy, flavorful Roma tomatoes that will rival anything you can find in the store.
We wholeheartedly encourage you to embark on this rewarding gardening adventure. Start small, learn as you go, and most importantly, have fun! And once you’ve harvested your first batch of homegrown Roma tomatoes, we’d love to hear about your experience. Share your tips, tricks, and triumphs in the comments section below. Let’s create a community of passionate Roma tomato growers and learn from each other’s successes and failures. Happy gardening! Remember, the best tomatoes are the ones you grow yourself, and with these DIY techniques, you’re well on your way to a truly exceptional harvest.
Frequently Asked Questions (FAQ)
What is the best time to start Roma tomato seeds indoors?
The ideal time to start Roma tomato seeds indoors is typically 6-8 weeks before the last expected frost in your area. This allows the seedlings to develop a strong root system and be ready for transplanting outdoors once the weather warms up. Check your local weather forecasts and gardening resources to determine the average last frost date for your region. Starting too early can result in leggy, weak seedlings, while starting too late may delay your harvest.
How often should I water my Roma tomato plants?
Watering frequency depends on several factors, including the weather, soil type, and the size of your plants. As a general rule, Roma tomato plants need about 1-2 inches of water per week. Water deeply and infrequently, rather than shallowly and frequently. This encourages the roots to grow deeper into the soil, making the plants more drought-tolerant. Check the soil moisture regularly by sticking your finger about an inch into the soil. If it feels dry, it’s time to water. Avoid overhead watering, as this can increase the risk of fungal diseases. Instead, water at the base of the plants, using a soaker hose or drip irrigation system.
What are the signs of common Roma tomato diseases and how can I prevent them?
Roma tomatoes are susceptible to several common diseases, including early blight, late blight, and blossom-end rot. Early blight is characterized by dark brown spots on the lower leaves, which eventually spread upwards. Late blight is a more serious disease that can quickly kill entire plants. It is characterized by water-soaked lesions on the leaves and stems, followed by a white, cottony growth. Blossom-end rot is a physiological disorder caused by calcium deficiency, resulting in a dark, leathery spot on the bottom of the tomatoes.
To prevent these diseases, choose disease-resistant varieties of Roma tomatoes. Ensure good air circulation around the plants by spacing them properly and pruning away any suckers or overcrowded foliage. Avoid overhead watering and water at the base of the plants. Mulch around the plants to prevent soil from splashing onto the leaves. Monitor your plants regularly for signs of disease and take action immediately if you notice any problems. Fungicides can be used to control fungal diseases, but it’s important to choose a product that is specifically labeled for use on tomatoes. For blossom-end rot, ensure that your soil has adequate calcium levels and water consistently to prevent fluctuations in soil moisture.
How do I know when my Roma tomatoes are ripe?
Roma tomatoes are typically ready to harvest when they are fully colored (usually red or deep red), slightly soft to the touch, and easily detach from the vine. The color should be uniform and vibrant, without any green or yellow patches. Gently squeeze the tomato; it should give slightly under pressure. If it’s rock hard, it’s not ripe yet. The stem should also be easy to separate from the plant. If you have to tug or twist the tomato, it’s probably not quite ready. The best time to harvest Roma tomatoes is in the morning, after the dew has dried.
Can I grow Roma tomatoes in containers?
Yes, Roma tomatoes can be successfully grown in containers, making them a great option for gardeners with limited space. Choose a large container, at least 15-20 gallons in size, with good drainage holes. Use a high-quality potting mix that is specifically formulated for vegetables. Provide a sturdy stake or cage to support the plants as they grow. Water regularly, as container-grown plants tend to dry out more quickly than those grown in the ground. Fertilize regularly with a balanced fertilizer, following the instructions on the label. Place the container in a sunny location that receives at least 6-8 hours of direct sunlight per day.
What are some good companion plants for Roma tomatoes?
Companion planting can be a great way to improve the health and yield of your Roma tomato plants. Some good companion plants for tomatoes include basil, marigolds, onions, garlic, carrots, and parsley. Basil is said to improve the flavor of tomatoes and repel pests. Marigolds also repel pests, such as nematodes and whiteflies. Onions and garlic can help deter aphids and other insects. Carrots can help loosen the soil and improve drainage. Parsley attracts beneficial insects, such as ladybugs and lacewings, which prey on aphids and other pests. Avoid planting tomatoes near brassicas, such as cabbage, broccoli, and cauliflower, as they can compete for nutrients.
How can I prevent pests from attacking my Roma tomato plants?
There are several things you can do to prevent pests from attacking your Roma tomato plants. Start by choosing disease-resistant varieties. Inspect your plants regularly for signs of pests and take action immediately if you notice any problems. Handpick pests, such as tomato hornworms, off the plants. Use insecticidal soap or neem oil to control aphids, whiteflies, and other soft-bodied insects. Install row covers to protect your plants from pests early in the season. Encourage beneficial insects, such as ladybugs and lacewings, by planting flowers that attract them. Rotate your crops each year to prevent pests from building up in the soil.
What is the best way to store Roma tomatoes?
The best way to store Roma tomatoes depends on their ripeness. Ripe tomatoes should be stored at room temperature, away from direct sunlight. Storing them in the refrigerator can cause them to lose their flavor and texture. If you have a large harvest of ripe tomatoes, you can preserve them by canning, freezing, or drying them. Green tomatoes can be ripened at room temperature by placing them in a paper bag with an apple or banana. The ethylene gas released by the fruit will help to speed up the ripening process.
Leave a Comment