
Growing Potatoes at Home can seem like a daunting task, conjuring images of vast fields and complex machinery. But what if I told you that you could enjoy the satisfaction of harvesting your own delicious, homegrown potatoes, even with limited space? Forget the grocery store spuds – we’re diving headfirst into the wonderful world of DIY potato cultivation!
For centuries, potatoes have been a staple food source, playing a crucial role in feeding populations worldwide. Originating in the Andes Mountains of South America, these humble tubers have journeyed across continents, becoming a cornerstone of countless cuisines. Think of the Irish potato famine, a stark reminder of the potato’s significance in human history. Now, you can connect with that history, in a small way, by growing your own!
In today’s world, where we’re increasingly conscious of where our food comes from, growing potatoes at home offers a fantastic opportunity to reconnect with nature and enjoy fresh, organic produce. Plus, let’s be honest, there’s nothing quite like the taste of a potato you’ve nurtured from seed to harvest. This DIY guide will equip you with simple, effective tricks and hacks to successfully cultivate potatoes, regardless of your gardening experience. Whether you have a sprawling backyard or just a sunny balcony, get ready to embark on a rewarding journey of homegrown goodness!
Kartoffeln zu Hause anbauen: Dein umfassender DIY-Leitfaden
Hey Kartoffelfreunde! Habt ihr euch jemals gefragt, wie es wäre, eure eigenen Kartoffeln anzubauen? Es ist einfacher als ihr denkt und super befriedigend, wenn ihr eure selbst geernteten Kartoffeln auf dem Teller habt. In diesem Artikel zeige ich euch Schritt für Schritt, wie ihr das ganz einfach zu Hause machen könnt. Los geht’s!
Was du brauchst: Die Vorbereitung
Bevor wir loslegen, brauchen wir natürlich das richtige Equipment und die richtigen Materialien. Hier ist eine Liste, damit du alles griffbereit hast:
* Saatkartoffeln: Das sind spezielle Kartoffeln, die zum Anpflanzen gezüchtet wurden. Du findest sie in Gartencentern oder online. Vermeide Speisekartoffeln aus dem Supermarkt, da diese oft behandelt wurden und nicht keimen.
* Ein Gefäß: Das kann ein großer Topf, ein Eimer, ein Pflanzsack oder sogar ein alter Reifen sein. Wichtig ist, dass es Abzugslöcher hat, damit das Wasser ablaufen kann.
* Erde: Eine Mischung aus Gartenerde und Kompost ist ideal. Sie sollte locker und nährstoffreich sein.
* Wasser: Regelmäßiges Gießen ist wichtig, besonders in trockenen Perioden.
* Sonnenlicht: Kartoffeln brauchen mindestens 6 Stunden Sonnenlicht pro Tag.
* Optional: Dünger (organisch oder mineralisch) für zusätzlichen Nährstoffschub.
Schritt-für-Schritt-Anleitung: Vom Keimen bis zur Ernte
Jetzt, wo wir alles haben, können wir mit dem Anbau beginnen. Ich habe den Prozess in übersichtliche Schritte unterteilt, damit nichts schiefgeht.
1. Die Saatkartoffeln vorbereiten: Vorkeimen
Das Vorkeimen ist ein wichtiger Schritt, um den Wachstumsprozess zu beschleunigen. So geht’s:
1. Wähle deine Saatkartoffeln aus: Suche nach festen, gesunden Kartoffeln mit “Augen” (kleinen Knospen).
2. Lege die Kartoffeln in eine Eierpappe oder einen Karton: Die Augen sollten nach oben zeigen.
3. Stelle die Kartoffeln an einen hellen, kühlen Ort: Ideal ist ein Raum mit etwa 10-15 Grad Celsius.
4. Warte, bis die Augen austreiben: Das dauert in der Regel 2-4 Wochen. Die Triebe sollten etwa 1-2 cm lang sein.
2. Das Pflanzgefäß vorbereiten: Der richtige Start
Ein guter Start ist die halbe Miete. So bereitest du dein Pflanzgefäß vor:
1. Wähle dein Gefäß: Stelle sicher, dass es groß genug ist (mindestens 30 cm Durchmesser und Tiefe) und Abzugslöcher hat.
2. Fülle das Gefäß mit Erde: Gib eine Schicht Erde (ca. 10-15 cm) in den Topf. Die Erde sollte locker und feucht sein.
3. Optional: Mische etwas organischen Dünger unter die Erde, um den Kartoffeln einen zusätzlichen Nährstoffschub zu geben.
3. Die Kartoffeln pflanzen: Ab in die Erde!
Jetzt kommt der spannende Teil: das Pflanzen der Kartoffeln.
1. Setze die Saatkartoffeln in die Erde: Lege die vorgekeimten Kartoffeln mit den Trieben nach oben auf die Erdschicht.
2. Bedecke die Kartoffeln mit Erde: Gib eine weitere Schicht Erde (ca. 5-10 cm) darüber.
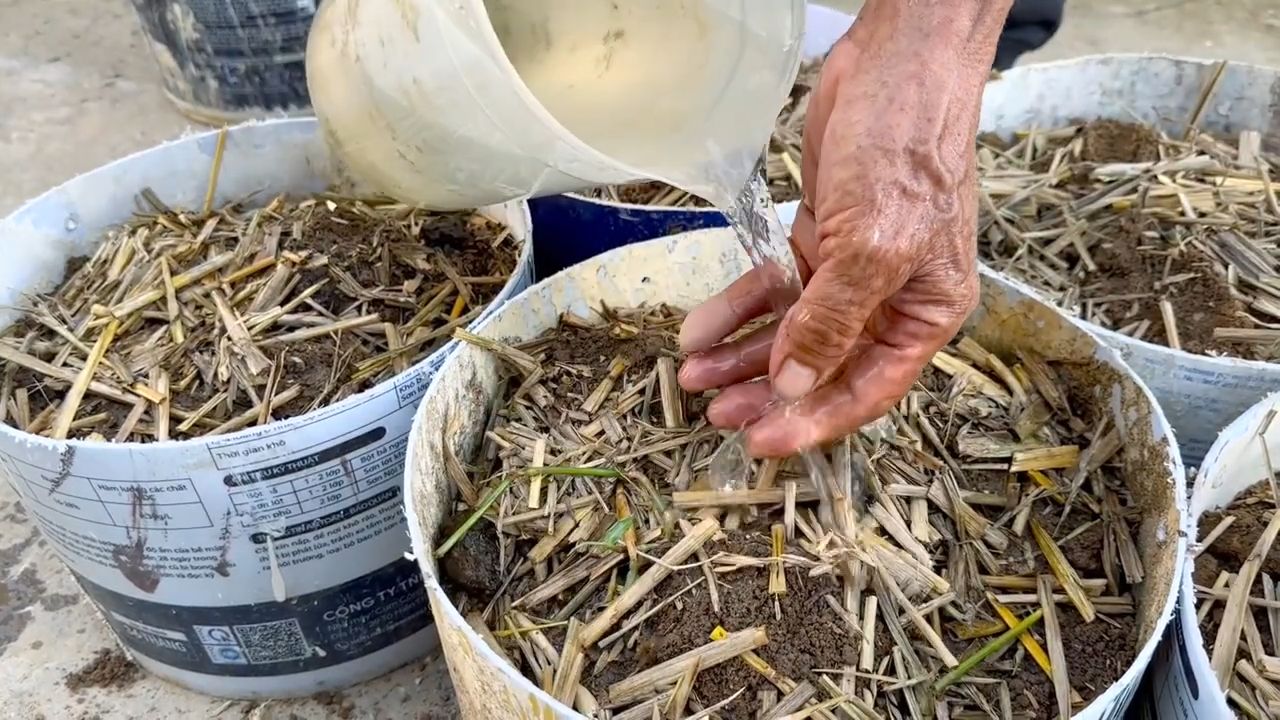
3. Gieße die Erde: Befeuchte die Erde gut, aber vermeide Staunässe.
4. Die Pflege: Gießen, Anhäufeln und Düngen
Die richtige Pflege ist entscheidend für eine reiche Ernte.
1. Gießen: Gieße die Kartoffeln regelmäßig, besonders in trockenen Perioden. Die Erde sollte immer leicht feucht sein.
2. Anhäufeln: Wenn die Kartoffelpflanzen etwa 20 cm hoch sind, häufele Erde um die Stängel an. Das fördert die Bildung neuer Kartoffeln und schützt die Knollen vor Sonnenlicht. Wiederhole das Anhäufeln alle paar Wochen, bis der Topf fast voll ist.
3. Düngen: Dünge die Kartoffeln alle paar Wochen mit einem organischen oder mineralischen Dünger. Achte darauf, die Anweisungen auf der Verpackung zu befolgen.
4. Sonnenlicht: Stelle sicher, dass die Kartoffelpflanzen genügend Sonnenlicht bekommen (mindestens 6 Stunden pro Tag).
5. Die Ernte: Der Lohn der Arbeit
Nach etwa 3-4 Monaten sind deine Kartoffeln erntereif.
1. Wann ernten?: Die Kartoffelpflanzen werden gelb und beginnen abzusterben. Das ist ein Zeichen, dass die Kartoffeln reif sind.
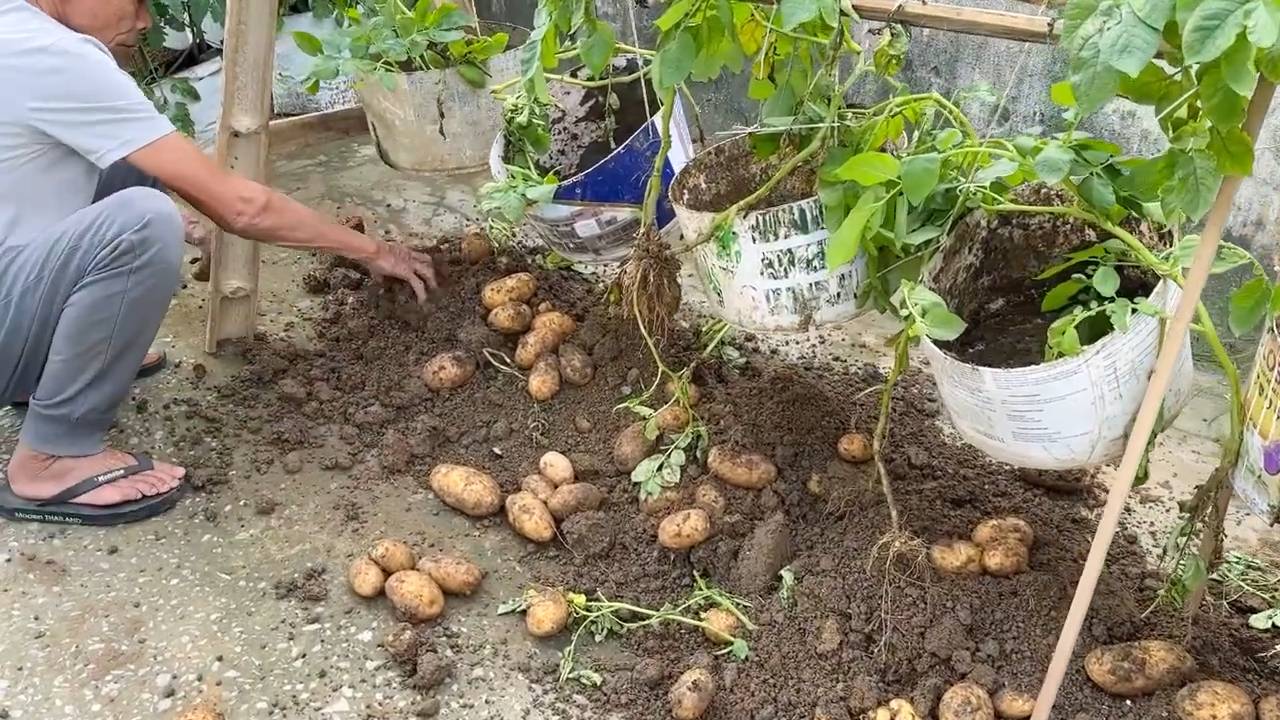
2. Wie ernten?: Kippe den Topf aus oder grabe vorsichtig mit einer Grabegabel die Kartoffeln aus der Erde.
3. Lagern: Lasse die Kartoffeln ein paar Stunden an der Luft trocknen, bevor du sie an einem kühlen, dunklen und trockenen Ort lagerst.
Zusätzliche Tipps und Tricks für eine erfolgreiche Kartoffelernte
Hier sind noch ein paar zusätzliche Tipps, die dir helfen können, deine Kartoffelernte zu optimieren:
* Wähle die richtige Sorte: Es gibt viele verschiedene Kartoffelsorten, die sich in Geschmack, Größe und Reifezeit unterscheiden. Informiere dich, welche Sorte für deine Bedürfnisse am besten geeignet ist.
* Achte auf Schädlinge und Krankheiten: Kartoffeln können von verschiedenen Schädlingen und Krankheiten befallen werden. Kontrolliere deine Pflanzen regelmäßig und ergreife bei Bedarf Maßnahmen.
* Verwende eine Fruchtfolge: Baue Kartoffeln nicht jedes Jahr am selben Ort an. Wechsle die Pflanzen ab, um den Boden gesund zu halten und Krankheiten vorzubeugen.
* Experimentiere mit verschiedenen Anbaumethoden: Es gibt viele verschiedene Möglichkeiten, Kartoffeln anzubauen. Probiere verschiedene Methoden aus, um herauszufinden, welche für dich am besten funktioniert.
Häufige Probleme und Lösungen
Auch beim Kartoffelanbau können Probleme auftreten. Hier sind einige häufige Probleme und wie du sie lösen kannst:
* Kartoffelpflanzen werden gelb: Das kann verschiedene Ursachen haben, z. B. Wassermangel, Nährstoffmangel oder Krankheiten. Überprüfe die Bodenfeuchtigkeit und dünge die Pflanzen bei Bedarf.
* Kartoffeln werden von Schädlingen befallen: Es gibt verschiedene Schädlinge, die Kartoffeln befallen können, z. B. Kartoffelkäfer oder Drahtwürmer. Verwende bei Bedarf biologische Schädlingsbekämpfungsmittel.
* Kartoffeln faulen: Das kann durch Staunässe oder Krankheiten verursacht werden. Stelle sicher, dass der Boden gut entwässert ist und entferne befallene Kartoffeln.
Fazit: Dein eigenes Kartoffelparadies
Ich hoffe, dieser Leitfaden hat dir geholfen, deine eigenen Kartoffeln zu Hause anzubauen. Es ist ein lohnendes Projekt, das dir frische, selbst angebaute Kartoffeln direkt auf den Teller bringt. Viel Spaß beim Gärtnern und guten Appetit!
Conclusion
So, there you have it! Growing potatoes at home, while it might seem daunting at first, is a surprisingly rewarding and accessible endeavor. We’ve walked through the entire process, from selecting the right seed potatoes to harvesting your own homegrown bounty. But why should you dedicate your time and garden space to this particular project?
The answer is multifaceted. Firstly, the taste of freshly dug, homegrown potatoes is simply unparalleled. Forget the bland, mass-produced spuds you find in the supermarket; these potatoes burst with earthy flavor and a creamy texture that will elevate your meals to a whole new level. Secondly, you have complete control over the growing process. You can choose organic methods, avoid harmful pesticides, and ensure that your potatoes are grown in the healthiest possible environment. This is especially important if you’re concerned about the quality and safety of your food.
Beyond the taste and control, growing potatoes at home is also an incredibly educational and therapeutic experience. It’s a chance to connect with nature, learn about the life cycle of plants, and appreciate the hard work that goes into producing our food. Plus, it’s a fantastic activity to share with children, teaching them valuable lessons about gardening, sustainability, and healthy eating.
But the benefits don’t stop there. Consider the cost savings! While the initial investment in seed potatoes and supplies might seem like a hurdle, you’ll quickly recoup your expenses with the abundance of potatoes you’ll harvest. And let’s not forget the satisfaction of knowing that you grew your own food, from seed to table.
Now, let’s talk about variations. While we’ve focused on the traditional method of growing potatoes in the ground, there are plenty of other options to explore. Container gardening is a great choice for those with limited space, allowing you to grow potatoes on balconies, patios, or even indoors. You can also experiment with different potato varieties, from the classic Russet Burbank to the colorful Yukon Gold or the fingerling potatoes with their unique shape and flavor. Each variety offers a different taste and texture, so don’t be afraid to try something new.
Another variation to consider is the “no-dig” method, which involves layering organic matter on top of the soil instead of tilling. This method is not only easier on your back but also improves soil health and reduces weed growth. You can also try growing potatoes in straw bales, which provides excellent drainage and insulation.
Growing potatoes at home is more than just a gardening project; it’s a lifestyle choice. It’s a commitment to fresh, healthy food, sustainable practices, and a deeper connection with nature. So, what are you waiting for? Grab some seed potatoes, prepare your garden, and get ready to experience the joy of growing your own delicious potatoes.
We encourage you to embark on this rewarding journey and share your experiences with us. Let us know what varieties you’re growing, what challenges you’ve faced, and what successes you’ve achieved. Share your photos, tips, and tricks with our community, and let’s learn and grow together. After all, the best way to learn is by doing, and the best way to share is by inspiring others. Happy growing!
Frequently Asked Questions (FAQ)
What are seed potatoes and where can I get them?
Seed potatoes are simply potatoes that are specifically grown to be planted and produce new potato plants. They are different from the potatoes you buy in the grocery store, which may have been treated to prevent sprouting. Seed potatoes are certified disease-free and are available from garden centers, nurseries, and online retailers. Look for reputable suppliers to ensure you’re getting high-quality seed potatoes. You can also use potatoes from your own garden if they are disease-free.
How do I prepare seed potatoes for planting?
Before planting, it’s a good idea to “chit” your seed potatoes. This involves placing them in a cool, bright location for a few weeks to encourage them to sprout. This gives them a head start when you plant them in the ground. To chit your potatoes, place them in egg cartons or trays with the “eyes” facing upwards. Keep them in a cool, well-lit area (but not in direct sunlight) for about 2-3 weeks, until the sprouts are about an inch long.
What kind of soil is best for growing potatoes?
Potatoes prefer well-drained, loose soil that is rich in organic matter. Avoid heavy clay soils, as they can become waterlogged and prevent the potatoes from developing properly. Amend your soil with compost, aged manure, or other organic materials to improve drainage and fertility. A slightly acidic soil pH of 6.0 to 6.5 is ideal.
How much sunlight do potatoes need?
Potatoes need at least six hours of sunlight per day to thrive. Choose a location in your garden that receives full sun for the majority of the day. If you’re growing potatoes in containers, make sure to place them in a sunny spot.
How often should I water my potato plants?
Potatoes need consistent moisture, especially during tuber formation. Water deeply and regularly, especially during dry periods. Avoid overwatering, as this can lead to rot. A good rule of thumb is to water when the top inch of soil feels dry to the touch.
What is “hilling” and why is it important?
Hilling is the process of mounding soil around the base of the potato plants as they grow. This encourages the plants to produce more tubers along the buried stems. It also helps to protect the developing potatoes from sunlight, which can cause them to turn green and produce solanine, a toxic compound. Hill your potato plants every few weeks as they grow, until the mounds are about 12 inches high.
How do I know when my potatoes are ready to harvest?
The timing of your harvest will depend on the variety of potato you’re growing and when you planted them. Generally, early-season potatoes can be harvested about 70-80 days after planting, while late-season potatoes may take 100-120 days. You can harvest “new potatoes” (small, immature potatoes) a few weeks after the plants flower. For mature potatoes, wait until the foliage starts to die back and turn yellow. This indicates that the tubers have reached their full size and are ready to be harvested.
How do I store my harvested potatoes?
Store your harvested potatoes in a cool, dark, and well-ventilated place. A root cellar is ideal, but a basement or garage can also work. Avoid storing potatoes in the refrigerator, as this can cause them to develop a sweet taste. Store them in burlap sacks or ventilated containers to prevent moisture buildup. Properly stored potatoes can last for several months.
What are some common potato pests and diseases?
Some common potato pests include potato beetles, aphids, and wireworms. Common diseases include blight, scab, and rot. Practice good garden hygiene to prevent pests and diseases. This includes removing weeds, rotating crops, and using disease-resistant potato varieties. If you encounter pests or diseases, treat them promptly with appropriate organic or chemical controls.
Can I grow potatoes in containers?
Yes, you can definitely grow potatoes in containers! Choose a large container (at least 10 gallons) with drainage holes. Fill the container with well-draining potting mix and plant your seed potatoes. As the plants grow, add more soil to the container, burying the stems to encourage tuber formation. Water regularly and fertilize as needed. Container-grown potatoes are a great option for those with limited space.
What are some good companion plants for potatoes?
Good companion plants for potatoes include beans, peas, cabbage, corn, and marigolds. These plants can help to deter pests, improve soil health, and enhance the growth of your potatoes. Avoid planting potatoes near tomatoes, cucumbers, or sunflowers, as these plants can compete for nutrients or attract pests.
Is it safe to eat green potatoes?
No, it is not safe to eat green potatoes. The green color indicates the presence of solanine, a toxic compound that can cause nausea, vomiting, and diarrhea. Avoid eating any potatoes that have turned green, and discard them properly. To prevent potatoes from turning green, store them in a dark place and hill your plants regularly to protect the tubers from sunlight.
Leave a Comment