
Growing peanuts in plastic bottles might sound like something out of a science fiction novel, but trust me, it’s a surprisingly simple and rewarding DIY project! Have you ever wondered where your favorite peanut butter comes from, or felt a twinge of curiosity watching squirrels bury their treasures? Well, now you can experience the magic of peanut cultivation right on your windowsill or balcony.
Peanuts, though often called nuts, are actually legumes, and their history stretches back thousands of years to South America. Indigenous cultures revered them, using them in rituals and as a vital food source. Today, peanuts are a global staple, and growing them yourself connects you to that rich history in a tangible way.
But why bother growing peanuts in plastic bottles? Well, space is often a constraint for many of us, and this method is perfect for urban gardeners or anyone with limited outdoor space. Plus, it’s a fantastic way to recycle those plastic bottles that might otherwise end up in a landfill. Imagine the satisfaction of harvesting your own homegrown peanuts, knowing you’ve contributed to a more sustainable lifestyle. This DIY trick is a game-changer because it allows anyone, regardless of their gardening experience or space limitations, to enjoy the unique experience of growing peanuts in plastic bottles. I’m excited to show you how!
Erdnüsse im Plastikflaschen-Garten: Dein DIY-Guide für den Anbau zu Hause
Hey Gartenfreunde! Habt ihr schon mal darüber nachgedacht, Erdnüsse in Plastikflaschen anzubauen? Klingt verrückt, oder? Aber es ist ein super einfaches und platzsparendes Projekt, das auch noch richtig Spaß macht. Ich zeige euch, wie ihr aus alten Plastikflaschen kleine Erdnuss-Oasen zaubern könnt. Los geht’s!
Was du brauchst: Die Materialliste
Bevor wir loslegen, hier eine Liste mit allem, was du für dein Erdnuss-Flaschen-Projekt brauchst:
* Plastikflaschen: Am besten eignen sich 1,5-Liter- oder 2-Liter-Flaschen. Je größer, desto besser für die Wurzeln.
* Erdnüsse: Unbehandelte, rohe Erdnüsse (am besten aus dem Bioladen oder Gartencenter). Geröstete oder gesalzene Erdnüsse keimen nicht!
* Erde: Hochwertige Blumenerde oder eine Mischung aus Gartenerde, Kompost und Sand.
* Messer oder Schere: Zum Zuschneiden der Plastikflaschen.
* Bohrer oder Nagel: Für die Entwässerungslöcher.
* Wasser: Zum Gießen, natürlich!
* Optional: Kleine Steine oder Tonscherben für die Drainage.
* Optional: Etiketten und Stift zum Beschriften der Flaschen.
Die Vorbereitung: Flaschen und Erde
Bevor wir mit dem Pflanzen beginnen, müssen wir die Flaschen vorbereiten und die Erde mischen.
1. Die Flaschen vorbereiten
1. Reinigung: Spüle die Plastikflaschen gründlich mit Wasser und Spülmittel aus, um alle Rückstände zu entfernen.
2. Zuschneiden: Schneide die Flaschen etwa 10-15 cm unterhalb des Flaschenhalses ab. Du kannst die abgeschnittenen Oberteile später als kleine Mini-Gewächshäuser verwenden, um die Keimung zu beschleunigen.
3. Entwässerungslöcher: Bohre oder steche mit einem Nagel mehrere kleine Löcher in den Boden der Flaschen. Diese Löcher sind wichtig, damit überschüssiges Wasser ablaufen kann und die Wurzeln nicht faulen.
2. Die Erde vorbereiten
1. Mischen: Wenn du keine fertige Blumenerde verwendest, mische Gartenerde, Kompost und Sand im Verhältnis 2:1:1. Der Kompost sorgt für Nährstoffe, der Sand für eine gute Drainage.
2. Auflockern: Lockere die Erde gut auf, damit sie nicht zu fest ist und die Wurzeln leicht hindurchwachsen können.
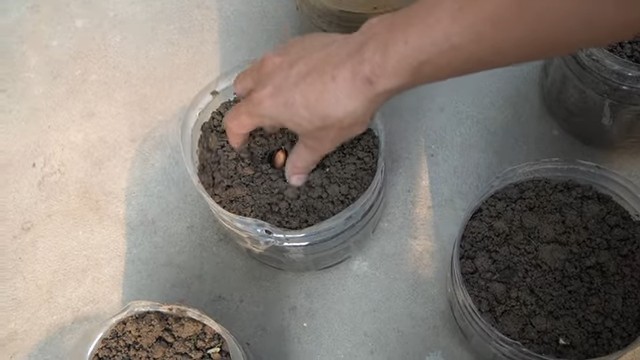
Die Pflanzung: Erdnüsse in die Erde bringen
Jetzt kommt der spannende Teil: Wir pflanzen die Erdnüsse!
1. Drainage: Lege eine dünne Schicht kleine Steine oder Tonscherben auf den Boden der Flaschen. Das verbessert die Drainage zusätzlich und verhindert Staunässe.
2. Erde einfüllen: Fülle die Flaschen mit der vorbereiteten Erde. Lasse etwa 2-3 cm Platz bis zum Rand.
3. Erdnüsse pflanzen: Drücke die Erdnüsse etwa 2-3 cm tief in die Erde. Pro Flasche kannst du 2-3 Erdnüsse pflanzen. Wenn alle keimen, kannst du später die schwächsten Pflanzen entfernen.
4. Angießen: Gieße die Erde vorsichtig an, bis sie gut durchfeuchtet ist. Achte darauf, dass das Wasser durch die Entwässerungslöcher abfließen kann.
5. Beschriften: Beschrifte die Flaschen mit dem Datum der Pflanzung und der Sorte der Erdnüsse (falls du verschiedene Sorten verwendest).
Die Pflege: Gießen, Düngen und Beobachten
Erdnüsse sind relativ pflegeleicht, aber ein paar Dinge solltest du beachten, damit sie gut wachsen.
1. Gießen: Gieße die Erdnüsse regelmäßig, aber nicht zu viel. Die Erde sollte immer leicht feucht sein, aber nicht nass. Vermeide Staunässe, da dies zu Wurzelfäule führen kann. An heißen Tagen musst du möglicherweise täglich gießen, an kühleren Tagen reicht es alle paar Tage.
2. Standort: Stelle die Flaschen an einen sonnigen und warmen Ort. Erdnüsse lieben die Sonne! Ein Südfenster oder ein geschützter Platz im Garten sind ideal.
3. Düngen: Dünge die Erdnüsse alle 2-3 Wochen mit einem organischen Dünger. Ein Flüssigdünger für Gemüse oder ein Komposttee sind gut geeignet.
4. Beobachten: Beobachte die Pflanzen regelmäßig auf Schädlinge oder Krankheiten. Blattläuse oder Spinnmilben können gelegentlich auftreten. Bei Bedarf kannst du sie mit einem biologischen Schädlingsbekämpfungsmittel behandeln.
5. Stützen: Wenn die Pflanzen größer werden, kann es notwendig sein, sie zu stützen, damit sie nicht umknicken. Du kannst dafür kleine Stäbe oder Bambusstäbe verwenden.
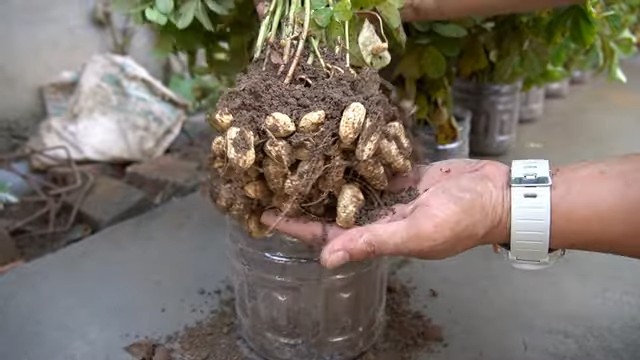
Die Ernte: Wenn die Erdnüsse reif sind
Die Erntezeit ist der aufregendste Teil! Erdnüsse sind in der Regel nach etwa 4-5 Monaten reif.
1. Anzeichen der Reife: Die Blätter der Pflanzen werden gelb und trocken. Die Hülsen der Erdnüsse sind prall gefüllt und die Schale ist hart.
2. Ernten: Ziehe die Pflanzen vorsichtig aus der Erde. Schüttle die Erde ab und sammle die Erdnüsse ein.
3. Trocknen: Lege die Erdnüsse zum Trocknen an einen warmen und trockenen Ort. Du kannst sie auf einem Tablett oder einem Gitter ausbreiten. Lasse sie etwa 1-2 Wochen trocknen, bis die Schale vollständig trocken ist.
4. Lagern: Lagere die getrockneten Erdnüsse an einem kühlen und trockenen Ort. In einem luftdichten Behälter halten sie sich mehrere Monate.
Extra-Tipps für den Erdnuss-Erfolg
* Frühstart: Du kannst die Erdnüsse auch im Haus vorziehen, um ihnen einen Vorsprung zu geben. Säe sie in kleinen Töpfen aus und pflanze sie nach den letzten Frösten in die Plastikflaschen um.
* Sortenwahl: Es gibt verschiedene Erdnusssorten. Informiere dich, welche Sorten in deiner Region gut wachsen.
* Mulchen: Eine Schicht Mulch (z.B. Stroh oder Holzhackschnitzel) um die Pflanzen herum hilft, die Feuchtigkeit im Boden zu halten und Unkraut zu unterdrücken.
* Experimentieren: Probiere verschiedene Anbaumethoden aus. Du kannst z.B. auch mehrere Flaschen miteinander verbinden, um ein größeres Beet zu schaffen.
Häufige Probleme und Lösungen
* Keine Keimung: Wenn die Erdnüsse nicht keimen, kann das verschiedene Gründe haben. Die Erdnüsse waren möglicherweise nicht frisch oder wurden falsch gelagert. Die Erde war möglicherweise zu trocken oder zu nass. Versuche es mit frischen Erdnüssen und achte auf die richtige Bewässerung.
* Gelbe Blätter: Gelbe Blätter können ein Zeichen für Nährstoffmangel sein. Dünge die Pflanzen mit einem geeigneten Dünger.
* Wurzelfäule: Wurzelfäule wird durch Staunässe verursacht. Achte auf eine gute Drainage und gieße nicht zu viel.
* Schädlinge: Blattläuse oder Spinnmilben können gelegentlich auftreten. Bekämpfe sie mit einem biologischen Schädlingsbekämpfungsmittel.
Ich hoffe, dieser Guide hilft dir dabei, deine eigenen Erdnüsse in Plastikflaschen anzubauen. Es ist ein tolles Projekt, um Kinder an das Gärtnern heranzuführen und zu zeigen, wie man aus Abfall etwas Nützliches machen kann. Viel Spaß beim Gärtnern!
Conclusion
So, there you have it! Growing peanuts in plastic bottles is not just a quirky gardening experiment; it’s a surprisingly effective and rewarding way to cultivate your own fresh, delicious peanuts, even if you’re short on space or live in an apartment. This method offers a unique opportunity to witness the entire peanut life cycle up close, from the initial sprouting to the formation of those fascinating underground pods.
Why is this DIY trick a must-try? Because it democratizes peanut cultivation. Forget needing acres of farmland; all you need are some recycled plastic bottles, good quality soil, peanut seeds, and a sunny spot. It’s an incredibly accessible project for beginners, children, and seasoned gardeners alike. Plus, it’s a fantastic way to reduce your environmental footprint by repurposing plastic waste. Imagine the satisfaction of harvesting your own homegrown peanuts, knowing you played a part in reducing plastic pollution and enjoying a healthy snack.
Beyond the practical benefits, growing peanuts in plastic bottles is a fantastic educational experience. It teaches valuable lessons about plant biology, sustainable gardening practices, and the importance of resourcefulness. It’s a hands-on way to connect with nature and appreciate the journey of food from seed to table.
Ready to take your peanut growing to the next level? Consider these variations:
* Vertical Peanut Garden: Stack multiple plastic bottle planters vertically to create a space-saving peanut tower. This is perfect for balconies or small patios.
* Companion Planting: Plant herbs like basil or marigolds alongside your peanuts to deter pests and attract beneficial insects.
* Different Peanut Varieties: Experiment with different peanut varieties to discover your favorite flavor and texture. Virginia peanuts, known for their large size, or Spanish peanuts, prized for their sweet flavor, are excellent choices.
* Nutrient Boost: Add a diluted liquid fertilizer specifically formulated for legumes to your watering routine every few weeks to encourage robust growth and abundant peanut production.
Don’t be afraid to experiment and adapt the method to suit your specific environment and preferences. The beauty of DIY gardening is the freedom to customize and learn along the way.
We wholeheartedly encourage you to try growing peanuts in plastic bottles. It’s a fun, educational, and ultimately delicious experience. Once you’ve harvested your first batch of homegrown peanuts, you’ll be hooked!
But the journey doesn’t end there. We want to hear about your experiences! Share your photos, tips, and challenges in the comments section below. Let’s create a community of bottle-peanut-growing enthusiasts and learn from each other. Did you try a different soil mix? Did you encounter any pests? What was your yield like? Your insights can help others succeed and make this DIY trick even better. So, grab some plastic bottles, get your hands dirty, and start growing your own delicious, sustainable peanuts today! Let’s see those peanut bottle gardens flourish!
Frequently Asked Questions (FAQ)
1. What kind of plastic bottles are best for growing peanuts?
The ideal plastic bottles are those that are sturdy and have a wide mouth. Two-liter soda bottles or larger water bottles work well. Ensure the bottles are clean and free of any residue before using them. Clear or translucent bottles are preferable as they allow you to monitor the soil moisture levels. Avoid using bottles that have contained harsh chemicals or pesticides.
2. What type of soil should I use for growing peanuts in plastic bottles?
Peanuts thrive in well-draining, sandy loam soil. A good mix would be equal parts of potting soil, sand, and compost. The sand ensures proper drainage, preventing waterlogging, which can lead to root rot. The compost provides essential nutrients for healthy growth. Avoid using heavy clay soil, as it can compact and hinder the development of peanut pods. You can also add a small amount of perlite to improve drainage and aeration.
3. How many peanut seeds should I plant in each plastic bottle?
Plant 2-3 peanut seeds per plastic bottle. This increases the chances of at least one seed germinating successfully. Once the seedlings emerge, you can thin them out, leaving the strongest and healthiest plant in each bottle. This ensures that the remaining plant has enough space and resources to grow and produce peanuts.
4. How often should I water my peanut plants in plastic bottles?
Water your peanut plants regularly, keeping the soil consistently moist but not waterlogged. The frequency of watering will depend on the weather conditions and the drainage of your soil. Check the soil moisture by inserting your finger about an inch deep. If the soil feels dry, it’s time to water. During hot, dry weather, you may need to water daily. Avoid overwatering, as this can lead to root rot.
5. How much sunlight do peanut plants need when grown in plastic bottles?
Peanut plants need at least 6-8 hours of direct sunlight per day to thrive. Place your plastic bottle planters in a sunny location, such as a south-facing window or a sunny balcony. If you don’t have enough natural sunlight, you can supplement with grow lights. Insufficient sunlight can result in weak, leggy growth and reduced peanut production.
6. How long does it take to grow peanuts in plastic bottles?
Peanuts typically take 120-150 days (4-5 months) to mature from planting to harvest. The exact time will depend on the variety of peanut, the climate, and the growing conditions. Be patient and monitor your plants regularly. You’ll know it’s time to harvest when the leaves start to turn yellow and the plants begin to wilt.
7. How do I know when it’s time to harvest my peanuts?
The best way to determine if your peanuts are ready to harvest is to check the pods. Dig up a few plants and examine the peanut pods. The pods should be plump and full, with a distinct peanut shape. The inner shells should have a dark veining pattern. If the pods are still small and white, they are not yet mature.
8. What are some common pests and diseases that affect peanut plants grown in plastic bottles?
Common pests that can affect peanut plants include aphids, spider mites, and leafhoppers. Diseases include leaf spot and root rot. Regularly inspect your plants for signs of pests or diseases. Treat infestations with insecticidal soap or neem oil. Prevent diseases by ensuring good air circulation and avoiding overwatering.
9. Can I grow peanuts in plastic bottles indoors?
Yes, you can grow peanuts in plastic bottles indoors, but you’ll need to provide adequate sunlight or use grow lights. Ensure that your plants receive at least 6-8 hours of light per day. Indoor growing may require more attention to watering and fertilization, as the plants may not have access to the same nutrients as they would outdoors.
10. How do I cure and store my homegrown peanuts?
After harvesting, gently shake off any excess soil from the peanut plants. Hang the plants upside down in a well-ventilated area for 2-3 weeks to cure. This allows the peanuts to dry and develop their flavor. Once the peanuts are dry, remove them from the plants and store them in an airtight container in a cool, dry place. You can also roast the peanuts for a more intense flavor.
Leave a Comment