
Growing Mustard Greens in Bottles: Sounds unconventional, right? But trust me, it’s a game-changer for anyone craving fresh, peppery greens without a sprawling garden! I’m so excited to share this incredibly simple and rewarding DIY project that will have you harvesting delicious mustard greens in no time, all from the comfort of your home.
Mustard greens have a rich history, dating back thousands of years in Asian and African cuisines. They’re not just tasty; they’re packed with vitamins and nutrients, making them a fantastic addition to your diet. But let’s be honest, sometimes getting to the farmer’s market or grocery store for fresh greens feels like a chore. That’s where this DIY trick comes in!
Imagine having a constant supply of fresh, organic mustard greens right on your windowsill or balcony. No more wilted greens from the store, no more last-minute grocery runs. This method of growing mustard greens in bottles is perfect for apartment dwellers, beginner gardeners, or anyone looking for a fun and sustainable way to add some greenery (and deliciousness!) to their lives. Plus, it’s a fantastic way to recycle those plastic bottles you’ve been meaning to get rid of. So, let’s dive in and discover how easy it is to cultivate your own little mustard green oasis!
“`html
Senfgrün im Upcycling-Stil: Anzucht in Plastikflaschen
Hey Leute! Habt ihr Lust auf frische, würzige Senfgrünblätter direkt aus eurer Küche? Und das Ganze auch noch super nachhaltig? Dann seid ihr hier genau richtig! Ich zeige euch, wie ihr Senfgrün ganz einfach in recycelten Plastikflaschen anbauen könnt. Das ist nicht nur kinderleicht, sondern auch eine tolle Möglichkeit, Plastikmüll zu reduzieren und eurem Essen eine extra Portion Frische zu verleihen. Los geht’s!
Was ihr braucht:
* Plastikflaschen: Am besten eignen sich 1,5-Liter- oder 2-Liter-Flaschen. Achtet darauf, dass sie sauber und leer sind.
* Senfgrünsamen: Die gibt es in jedem Gartencenter oder online. Achtet auf Bio-Qualität, wenn ihr Pestizide vermeiden wollt.
* Erde: Normale Blumenerde oder Anzuchterde funktioniert prima.
* Schere oder Messer: Zum Zuschneiden der Flaschen.
* Bohrer oder Nagel: Um Löcher für die Drainage zu machen.
* Wasser: Zum Gießen, natürlich!
* Optional: Kleine Steine oder Tonscherben für die Drainage.
Schritt-für-Schritt-Anleitung:
1. Die Flaschen vorbereiten
1. Reinigen: Zuerst müsst ihr die Plastikflaschen gründlich reinigen. Entfernt alle Etiketten und spült sie mit warmem Wasser und Spülmittel aus. Achtet darauf, dass keine Spülmittelreste zurückbleiben.
2. Schneiden: Jetzt kommt der spaßige Teil! Nehmt eure Schere oder euer Messer und schneidet die Flasche in der Mitte durch. Ihr könnt die Flasche entweder komplett durchschneiden oder einen kleinen Teil an einer Seite verbunden lassen, um eine Art “Klappdeckel” zu erzeugen. Das ist besonders praktisch, wenn ihr die Flasche später abdecken wollt, um die Keimung zu beschleunigen. Ich persönlich finde die Variante mit dem Klappdeckel super praktisch.
3. Drainagelöcher bohren: Damit das Wasser gut ablaufen kann und eure Senfgrünpflanzen nicht im Wasser stehen, müsst ihr Drainagelöcher in den Boden der Flasche bohren. Nehmt euren Bohrer oder Nagel und macht 4-5 Löcher. Achtet darauf, dass die Löcher nicht zu groß sind, damit die Erde nicht herausfällt.
4. Optional: Drainage hinzufügen: Um die Drainage noch weiter zu verbessern, könnt ihr eine Schicht kleine Steine oder Tonscherben auf den Boden der Flasche legen, bevor ihr die Erde einfüllt. Das hilft, Staunässe zu vermeiden.
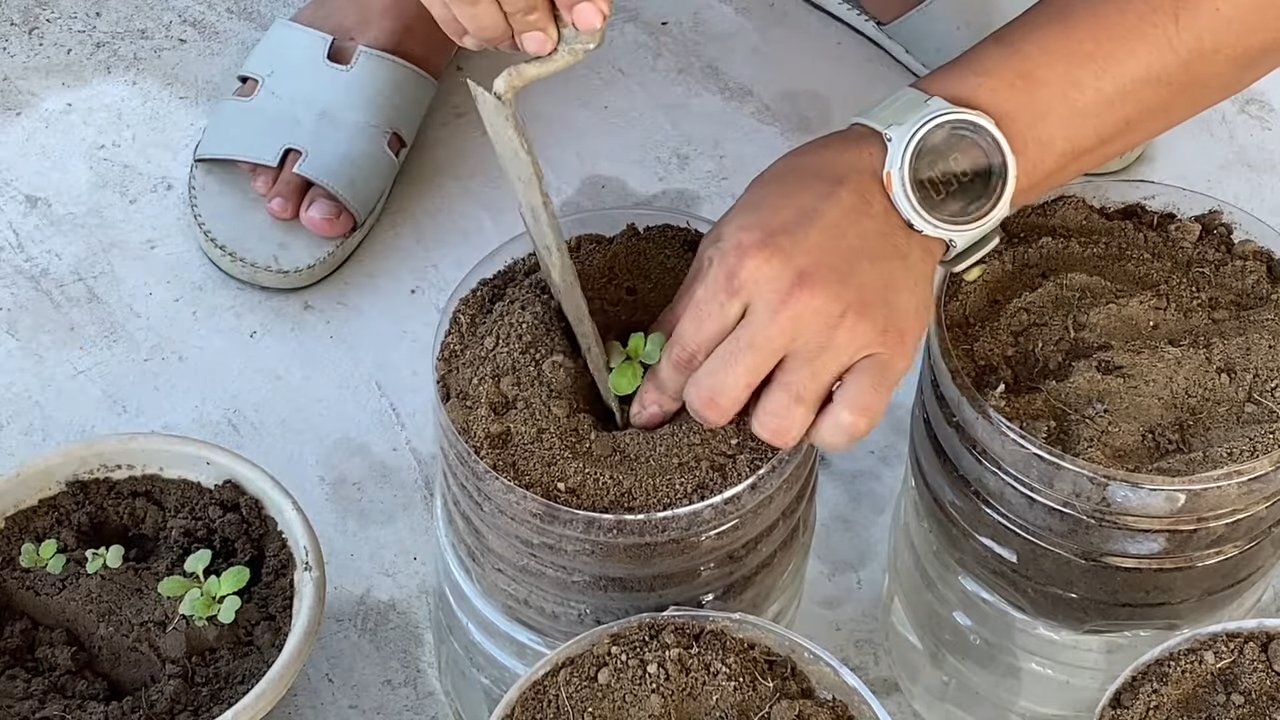
2. Die Erde einfüllen und die Samen säen
1. Erde einfüllen: Füllt die vorbereiteten Flaschen mit Erde. Lasst etwa 2-3 cm Platz bis zum Rand. Drückt die Erde leicht an.
2. Samen säen: Streut die Senfgrünsamen gleichmäßig auf die Erde. Achtet darauf, dass die Samen nicht zu dicht liegen, damit die Pflanzen genügend Platz zum Wachsen haben.
3. Samen bedecken: Bedeckt die Samen mit einer dünnen Schicht Erde (ca. 0,5 cm). Drückt die Erde leicht an.
4. Gießen: Gießt die Erde vorsichtig an, sodass sie gut durchfeuchtet ist. Am besten verwendet ihr dafür eine Sprühflasche, damit die Samen nicht weggespült werden.
3. Die Anzucht
1. Standort wählen: Stellt die bepflanzten Flaschen an einen hellen Ort. Ein Fensterbrett ist ideal. Senfgrün braucht viel Licht, um gut zu wachsen. Direkte Sonneneinstrahlung kann aber zu Verbrennungen der Blätter führen, also achtet darauf, dass es nicht zu heiß wird.
2. Feuchtigkeit halten: Haltet die Erde feucht, aber nicht nass. Gießt regelmäßig, aber vermeidet Staunässe. Die Erde sollte sich immer leicht feucht anfühlen.
3. Optional: Abdecken: Wenn ihr die Flasche mit dem “Klappdeckel” versehen habt, könnt ihr sie in den ersten Tagen abdecken, um die Keimung zu beschleunigen. Dadurch entsteht ein feuchtwarmes Klima, das die Keimung fördert. Lüftet die Flasche aber regelmäßig, um Schimmelbildung zu vermeiden.
4. Beobachten: Beobachtet eure Senfgrünpflanzen genau. Nach wenigen Tagen sollten die ersten Keimlinge zu sehen sein.
4. Die Pflege
1. Gießen: Gießt die Senfgrünpflanzen regelmäßig, aber nicht zu viel. Die Erde sollte immer leicht feucht sein.
2. Düngen: Senfgrün braucht nicht viel Dünger. Wenn ihr möchtet, könnt ihr aber alle paar Wochen einen organischen Flüssigdünger verwenden. Achtet darauf, dass ihr den Dünger verdünnt, um die Pflanzen nicht zu überdüngen.
3. Licht: Stellt sicher, dass eure Senfgrünpflanzen genügend Licht bekommen. Wenn sie zu wenig Licht bekommen, werden sie lang und dünn.
4. Drehen: Dreht die Flaschen regelmäßig, damit die Pflanzen gleichmäßig wachsen und sich nicht zum Licht hin neigen.
5. Die Ernte
1. Erntezeitpunkt: Senfgrün kann schon nach wenigen Wochen geerntet werden. Die Blätter sind dann etwa 5-10 cm groß.
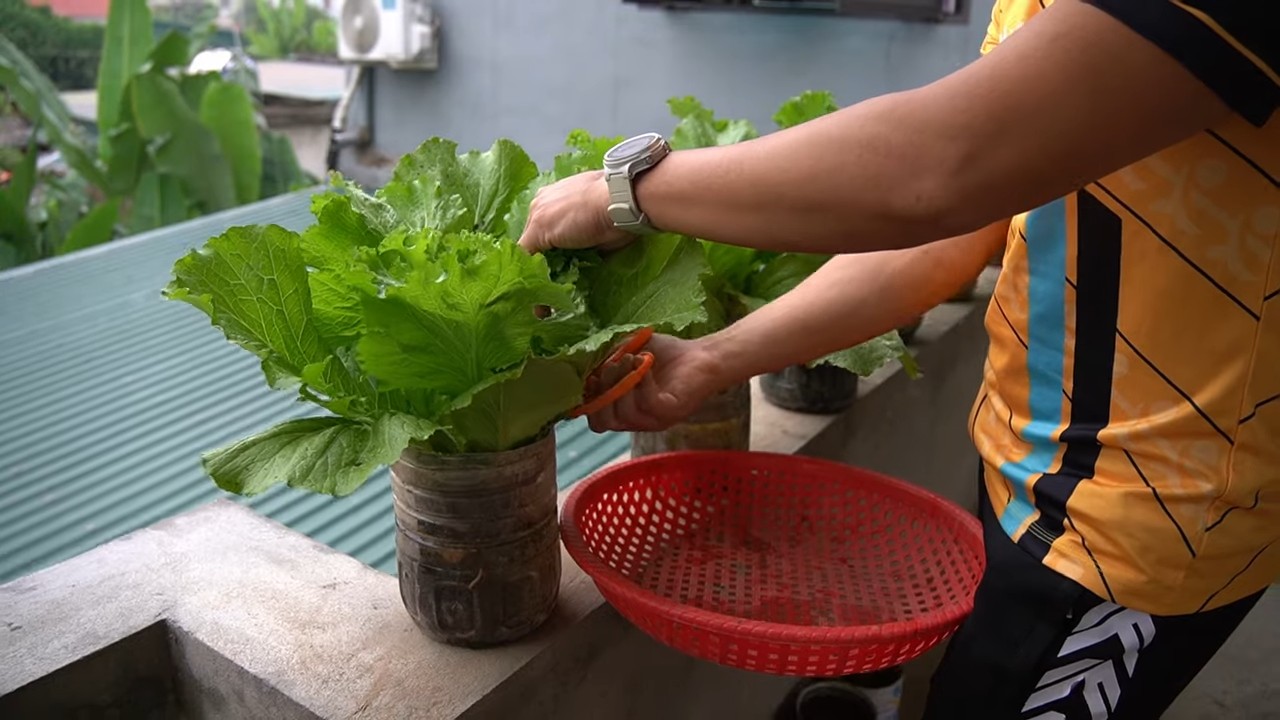
2. Ernten: Schneidet die Blätter mit einer Schere ab. Ihr könnt entweder alle Blätter auf einmal ernten oder nur die äußeren Blätter. Wenn ihr nur die äußeren Blätter erntet, können die inneren Blätter weiterwachsen und ihr habt länger etwas von euren Senfgrünpflanzen.
3. Verwendung: Senfgrün schmeckt würzig und leicht scharf. Es eignet sich hervorragend für Salate, Suppen, Smoothies oder als Garnitur für verschiedene Gerichte. Ihr könnt es auch kurz andünsten oder als Pesto verarbeiten.
Tipps und Tricks:
* Verschiedene Sorten: Es gibt verschiedene Sorten von Senfgrün. Probiert verschiedene Sorten aus, um euren Favoriten zu finden. Es gibt Sorten mit mildem Geschmack und Sorten mit schärferem Geschmack.
* Regelmäßig säen: Um immer frisches Senfgrün zu haben, könnt ihr alle paar Wochen neue Samen säen. So habt ihr einen kontinuierlichen Nachschub.
* Schädlinge: Senfgrün ist relativ resistent gegen Schädlinge. Wenn ihr dennoch Probleme mit Schädlingen habt, könnt ihr natürliche Schädlingsbekämpfungsmittel verwenden.
* Upcycling: Neben Plastikflaschen könnt ihr auch andere Behälter für die Anzucht von Senfgrün verwenden, z.B. Joghurtbecher oder Konservendosen.
* Beschriftung: Beschriftet die Flaschen mit dem Datum der Aussaat, damit ihr den Überblick behaltet.
* Kinder einbeziehen: Die Anzucht von Senfgrün ist eine tolle Aktivität für Kinder. Sie können beim Säen, Gießen und Ernten helfen und lernen dabei etwas über Pflanzen und Nachhaltigkeit.
Warum Senfgrün anbauen?
* Frische: Ihr habt immer frisches Senfgrün zur Hand.
* Gesund: Senfgrün ist reich an Vitaminen und Mineralstoffen.
* Nachhaltig: Ihr reduziert Plastikmüll und spart Transportwege.
* Einfach: Die Anzucht ist kinderleicht und auch für Anfänger geeignet.
* Günstig: Die Kosten für Samen und Erde sind gering.
Ich hoffe, diese Anleitung hat euch gefallen und ihr habt jetzt Lust bekommen, euer eigenes Senfgrün in Plastikflaschen anzubauen. Es ist wirklich eine tolle Möglichkeit, etwas für die Umwelt zu tun und gleichzeitig frische, gesunde Lebensmittel zu genießen. Viel Spaß beim Gärtnern!
“`
Conclusion
So, there you have it! Growing mustard greens in bottles isn’t just a quirky gardening experiment; it’s a genuinely practical and rewarding way to enjoy fresh, peppery greens right at your fingertips. We’ve walked you through the simple steps, from preparing your bottles to harvesting your bounty, and hopefully, you’re now brimming with confidence to give it a try.
Why is this DIY trick a must-try? Because it democratizes gardening. You don’t need acres of land, expensive equipment, or even a green thumb to succeed. It’s perfect for apartment dwellers, urban gardeners, or anyone looking for a low-maintenance, space-saving solution to grow their own food. Plus, it’s incredibly sustainable! Repurposing plastic bottles reduces waste and gives them a new lease on life. And let’s not forget the sheer satisfaction of watching those tiny seeds sprout and flourish into vibrant, edible leaves.
But the beauty of this method lies in its adaptability. Feel free to experiment with different types of bottles. Larger bottles will allow for more root growth and potentially larger harvests. You can also try different varieties of mustard greens. Some are spicier than others, some have frillier leaves, and some mature faster. Explore the options and find your favorite!
Consider adding companion plants to your bottle garden. Herbs like basil or chives can thrive alongside your mustard greens and even deter pests. Just be mindful of spacing and ensure each plant has enough room to grow. You can also get creative with your bottle setup. Hang them from a balcony railing, create a vertical garden on a wall, or simply arrange them on a sunny windowsill. The possibilities are endless!
Don’t be afraid to get your hands dirty and embrace the learning process. Gardening is all about experimentation, and even if you encounter a few hiccups along the way, you’ll gain valuable knowledge and experience. The most important thing is to have fun and enjoy the journey.
We wholeheartedly encourage you to try growing mustard greens in bottles. It’s a simple, sustainable, and incredibly rewarding way to connect with nature and enjoy fresh, homegrown produce. Once you’ve experienced the joy of harvesting your own mustard greens, you’ll be hooked!
And now, we want to hear from you! Share your experiences, tips, and photos with us. What challenges did you face? What successes did you celebrate? What variations did you try? Let’s create a community of bottle gardeners and inspire others to embrace this fantastic DIY trick. Use the hashtag #BottleGreens or tag us in your social media posts. We can’t wait to see your creations! Happy gardening!
Frequently Asked Questions (FAQ)
What kind of bottles are best for growing mustard greens?
Ideally, you should use clear plastic bottles that have been thoroughly cleaned. Two-liter soda bottles or similar sized water bottles work well because they provide enough space for the mustard greens to grow. Make sure the bottles are food-grade plastic to avoid any harmful chemicals leaching into your plants. Avoid using bottles that have contained harsh chemicals or cleaning products, even after cleaning. You can also experiment with different sizes to see what works best for your space and the variety of mustard greens you’re growing. Remember to create adequate drainage holes, regardless of the bottle type.
How often should I water my mustard greens in bottles?
The watering frequency depends on several factors, including the climate, the type of soil you’re using, and the size of the bottle. Generally, you should water your mustard greens when the top inch of soil feels dry to the touch. Overwatering can lead to root rot, so it’s crucial to ensure proper drainage. In hotter weather, you may need to water daily, while in cooler weather, every other day might suffice. A good rule of thumb is to check the soil moisture regularly and adjust your watering schedule accordingly. Consider using a spray bottle for a gentle watering approach, especially when the seedlings are young.
What kind of soil should I use for growing mustard greens in bottles?
A well-draining potting mix is essential for growing healthy mustard greens in bottles. Avoid using garden soil, as it can be too heavy and compact, hindering root growth and drainage. A good potting mix typically contains a blend of peat moss, perlite, and vermiculite. You can also add compost to enrich the soil with nutrients. Ensure the soil is loose and airy to allow for proper root development. You can also create your own potting mix by combining equal parts of peat moss, perlite, and compost.
How much sunlight do mustard greens need when grown in bottles?
Mustard greens thrive in full sun, which means they need at least 6 hours of direct sunlight per day. However, they can also tolerate partial shade, especially in hotter climates. If you’re growing your mustard greens indoors, place them near a sunny window or use grow lights to supplement the natural light. Insufficient sunlight can lead to leggy growth and reduced yields. Rotate the bottles regularly to ensure all sides of the plants receive adequate sunlight.
How long does it take for mustard greens to grow in bottles?
Mustard greens are relatively fast-growing, and you can typically start harvesting them within 3-4 weeks of planting. The exact time will depend on the variety of mustard greens you’re growing and the growing conditions. You can harvest the outer leaves as needed, allowing the inner leaves to continue growing. This cut-and-come-again method allows for a continuous harvest over several weeks.
What are some common problems I might encounter when growing mustard greens in bottles, and how can I fix them?
Some common problems include pests, diseases, and nutrient deficiencies. Pests like aphids and flea beetles can be controlled with insecticidal soap or neem oil. Diseases like fungal infections can be prevented by ensuring good air circulation and avoiding overwatering. Nutrient deficiencies can be addressed by adding a balanced fertilizer to the soil. Regularly inspect your plants for any signs of problems and take action promptly to prevent them from escalating.
Can I grow other vegetables in bottles using the same method?
Yes, you can! This method is suitable for growing a variety of other vegetables and herbs, including lettuce, spinach, kale, chives, and basil. The key is to choose plants that have relatively shallow root systems and don’t require a lot of space. Experiment with different varieties and find what works best for your growing conditions. Remember to adjust the watering and fertilization schedule according to the specific needs of each plant.
How do I harvest mustard greens from bottles?
The best way to harvest mustard greens is using the cut-and-come-again method. This involves snipping off the outer leaves as they mature, leaving the inner leaves to continue growing. Use clean scissors or shears to avoid damaging the plants. Harvest the leaves when they are young and tender for the best flavor. Avoid harvesting more than one-third of the plant at a time to allow it to recover and continue producing.
How do I prevent my mustard greens from bolting (going to seed)?
Bolting is a common problem with mustard greens, especially in hot weather. To prevent bolting, try to grow your mustard greens in a cooler location or provide them with some shade during the hottest part of the day. Ensure they receive adequate water and nutrients. You can also choose bolt-resistant varieties of mustard greens. If your mustard greens do start to bolt, you can still harvest the leaves, but they may become more bitter.
What are some creative ways to display my bottle garden?
There are many creative ways to display your bottle garden! You can hang them from a balcony railing using rope or wire, create a vertical garden on a wall using a pallet or other support structure, or simply arrange them on a sunny windowsill. You can also paint the bottles or decorate them with colorful tape to add a personal touch. Get creative and have fun with it! The possibilities are endless.

Leave a Comment