
Growing Malabar Spinach Faster is something I know we all dream about, right? Imagine plump, vibrant green leaves ready to be harvested just weeks after planting! Forget waiting an eternity for your spinach to mature; with a few clever tricks and DIY hacks, you can be enjoying delicious, homegrown Malabar spinach in no time.
Malabar spinach, also known as Basella alba, isn’t actually a true spinach, but a climbing vine native to tropical Asia and Africa. For centuries, it’s been a staple in various cuisines, prized for its heat tolerance and nutritional value. Think of it as the spinach that thrives when regular spinach throws in the towel! But let’s be honest, sometimes even this resilient plant needs a little boost.
Why bother with these DIY tricks? Well, for starters, who doesn’t want fresh, organic produce readily available in their backyard? More importantly, growing Malabar Spinach Faster means a quicker return on your gardening efforts, allowing you to enjoy more harvests throughout the growing season. Plus, these hacks are often simple, cost-effective, and incredibly satisfying. I’m excited to share these tips with you, so you can enjoy the bountiful harvest of Malabar spinach sooner than you ever thought possible!
Growing Malabar Spinach Faster: My Secret DIY Hack
Okay, so you want to grow Malabar spinach, and you want it *fast*? I get it! This leafy green is delicious and nutritious, but it can be a bit of a slowpoke. I’ve experimented a lot, and I’ve finally cracked the code. This DIY hack will give your Malabar spinach a serious growth boost. Trust me, you’ll be harvesting in no time!
Understanding Malabar Spinach Growth
Before we dive into the hack, let’s quickly understand why Malabar spinach can be slow to grow. It’s a tropical vine, so it loves warmth and humidity. Cool temperatures and dry conditions will definitely stunt its growth. It also needs plenty of sunlight and rich soil. So, our hack focuses on optimizing these factors.
The DIY Hack: My Accelerated Growth System
This hack combines several techniques to create the perfect environment for rapid Malabar spinach growth. We’re talking about a mini-greenhouse effect, nutrient boosting, and strategic pruning. Here’s the breakdown:
* Seed Starting Strategy: We’re not directly sowing into the ground. We’re giving our seedlings a head start indoors.
* Soil Optimization: We’re creating a super-rich, well-draining soil mix.
* Mini-Greenhouse Magic: We’re using a simple DIY structure to trap heat and humidity.
* Nutrient Boost: We’re feeding our plants regularly with a homemade fertilizer.
* Strategic Pruning: We’re encouraging bushier growth and more leaves.
Step-by-Step Instructions: From Seed to Harvest
Alright, let’s get our hands dirty! Here’s how to implement my accelerated growth system:
Phase 1: Seed Starting Indoors
This is crucial for getting a jump start, especially if you live in a cooler climate.
1. Soaking the Seeds: Malabar spinach seeds have a tough outer shell. To help them germinate faster, soak them in warm water for 24-48 hours. I usually put them in a small bowl on a sunny windowsill. You’ll notice they swell up a bit – that’s a good sign!
2. Preparing the Seed Starting Mix: Don’t just use any old soil! We need a mix that’s light, airy, and nutrient-rich. I use a combination of:
* 1 part coconut coir (for moisture retention)
* 1 part perlite (for drainage)
* 1 part compost (for nutrients)
Mix these ingredients thoroughly in a large container.
3. Planting the Seeds: Fill small seedling trays or pots (about 2-3 inches in diameter) with the seed starting mix. Make a small indentation (about 1/2 inch deep) in the center of each pot. Place one or two soaked seeds in each indentation and cover gently with the mix.
4. Watering and Warmth: Water the soil gently until it’s moist but not soggy. I use a spray bottle to avoid disturbing the seeds. Cover the trays or pots with a clear plastic lid or plastic wrap to create a mini-greenhouse effect. Place them in a warm location (around 70-80°F or 21-27°C). A heat mat can be helpful if your house is cool.
5. Germination Watch: Keep the soil consistently moist. Check daily for germination. Malabar spinach seeds usually germinate in 7-14 days. Once the seedlings emerge, remove the plastic cover and place them in a sunny location or under grow lights.
Phase 2: Building the Mini-Greenhouse
This is where the magic happens! The mini-greenhouse will trap heat and humidity, creating the perfect environment for rapid growth.
1. Choosing a Location: Select a sunny spot in your garden that receives at least 6-8 hours of direct sunlight per day. Make sure the soil is well-draining.
2. Preparing the Soil: Even if your garden soil is decent, we’re going to amend it to make it even better. Dig a hole that’s about 1 foot deep and 2 feet wide. Mix the soil you removed with:
* Compost (lots of it!)
* Well-rotted manure (if you have it)
* A handful of bone meal (for phosphorus)
This will create a nutrient-rich foundation for your Malabar spinach.
3. Building the Frame: You can use various materials for the frame, but I prefer using PVC pipes because they’re lightweight, durable, and easy to work with. You’ll need:
* 4 PVC pipes (about 4 feet long)
* 4 PVC elbow connectors
* PVC glue (optional, for a more permanent structure)
Connect the PVC pipes and elbow connectors to form a rectangular frame. You can glue the connections for added stability, but it’s not essential.
4. Covering the Frame: Cover the frame with clear plastic sheeting or greenhouse film. Secure the plastic to the frame using clips, tape, or staples. Make sure the plastic is taut and wrinkle-free to maximize sunlight penetration. Leave a small opening at the top or side for ventilation.
Phase 3: Transplanting and Planting
Now it’s time to move our seedlings into their new home!
1. Hardening Off: Before transplanting, you need to “harden off” the seedlings. This means gradually exposing them to outdoor conditions to acclimate them. Start by placing them outside for a few hours each day, increasing the time each day for about a week.
2. Transplanting: Once the seedlings are hardened off, carefully remove them from their pots. Gently loosen the roots and plant them in the prepared soil within the mini-greenhouse. Space the plants about 1 foot apart.
3. Watering: Water the transplanted seedlings thoroughly. Make sure the soil is moist but not waterlogged.
4. Adding Support: Malabar spinach is a vine, so it needs something to climb on. You can use a trellis, a fence, or even just some sturdy sticks. Provide support as soon as possible to encourage upward growth.
Phase 4: Nutrient Boosting and Maintenance
This is where we keep the growth engine running!
1. Homemade Fertilizer: I swear by this! My secret fertilizer recipe is simple:
* Fish emulsion (follow the instructions on the bottle)
* Seaweed extract (also follow the instructions)
* Epsom salts (1 tablespoon per gallon of water)
Mix these ingredients together and apply the solution to the base of the plants every two weeks.
2. Watering: Water regularly, especially during hot, dry weather. Malabar spinach loves moisture, but avoid overwatering, which can lead to root rot. Check the soil moisture by sticking your finger into the soil. If it feels dry, it’s time to water.
3. Ventilation: On hot days, open the ventilation opening in the mini-greenhouse to prevent overheating.
4. Weeding: Keep the area around the plants free of weeds. Weeds compete for nutrients and water.
Phase 5: Strategic Pruning
This might seem counterintuitive, but pruning actually encourages more growth!
1. Pinching Back: When the plants are about 6 inches tall, pinch back the tips of the main stems. This will encourage branching and bushier growth.
2. Regular Harvesting: Harvest the leaves regularly, starting with the older, larger leaves. This will encourage the plant to produce new leaves. Don’t be afraid to harvest generously! The more you harvest, the more the plant will produce.
3. Removing Flowers: If you want to maximize leaf production, remove the flowers as they appear. Flowering diverts energy away from leaf growth.
Troubleshooting
Even with the best efforts, you might encounter some problems. Here are a few common issues and how to address them:
* Yellowing Leaves: This could be a sign of nutrient deficiency. Try applying the homemade fertilizer more frequently.
* Slow Growth: Make sure the plants are getting enough sunlight and warmth. Check the soil moisture and adjust your watering schedule accordingly.
* Pests: Malabar spinach is relatively pest-resistant, but aphids and spider mites can sometimes be a problem. Spray the plants with insecticidal soap if you notice any pests.
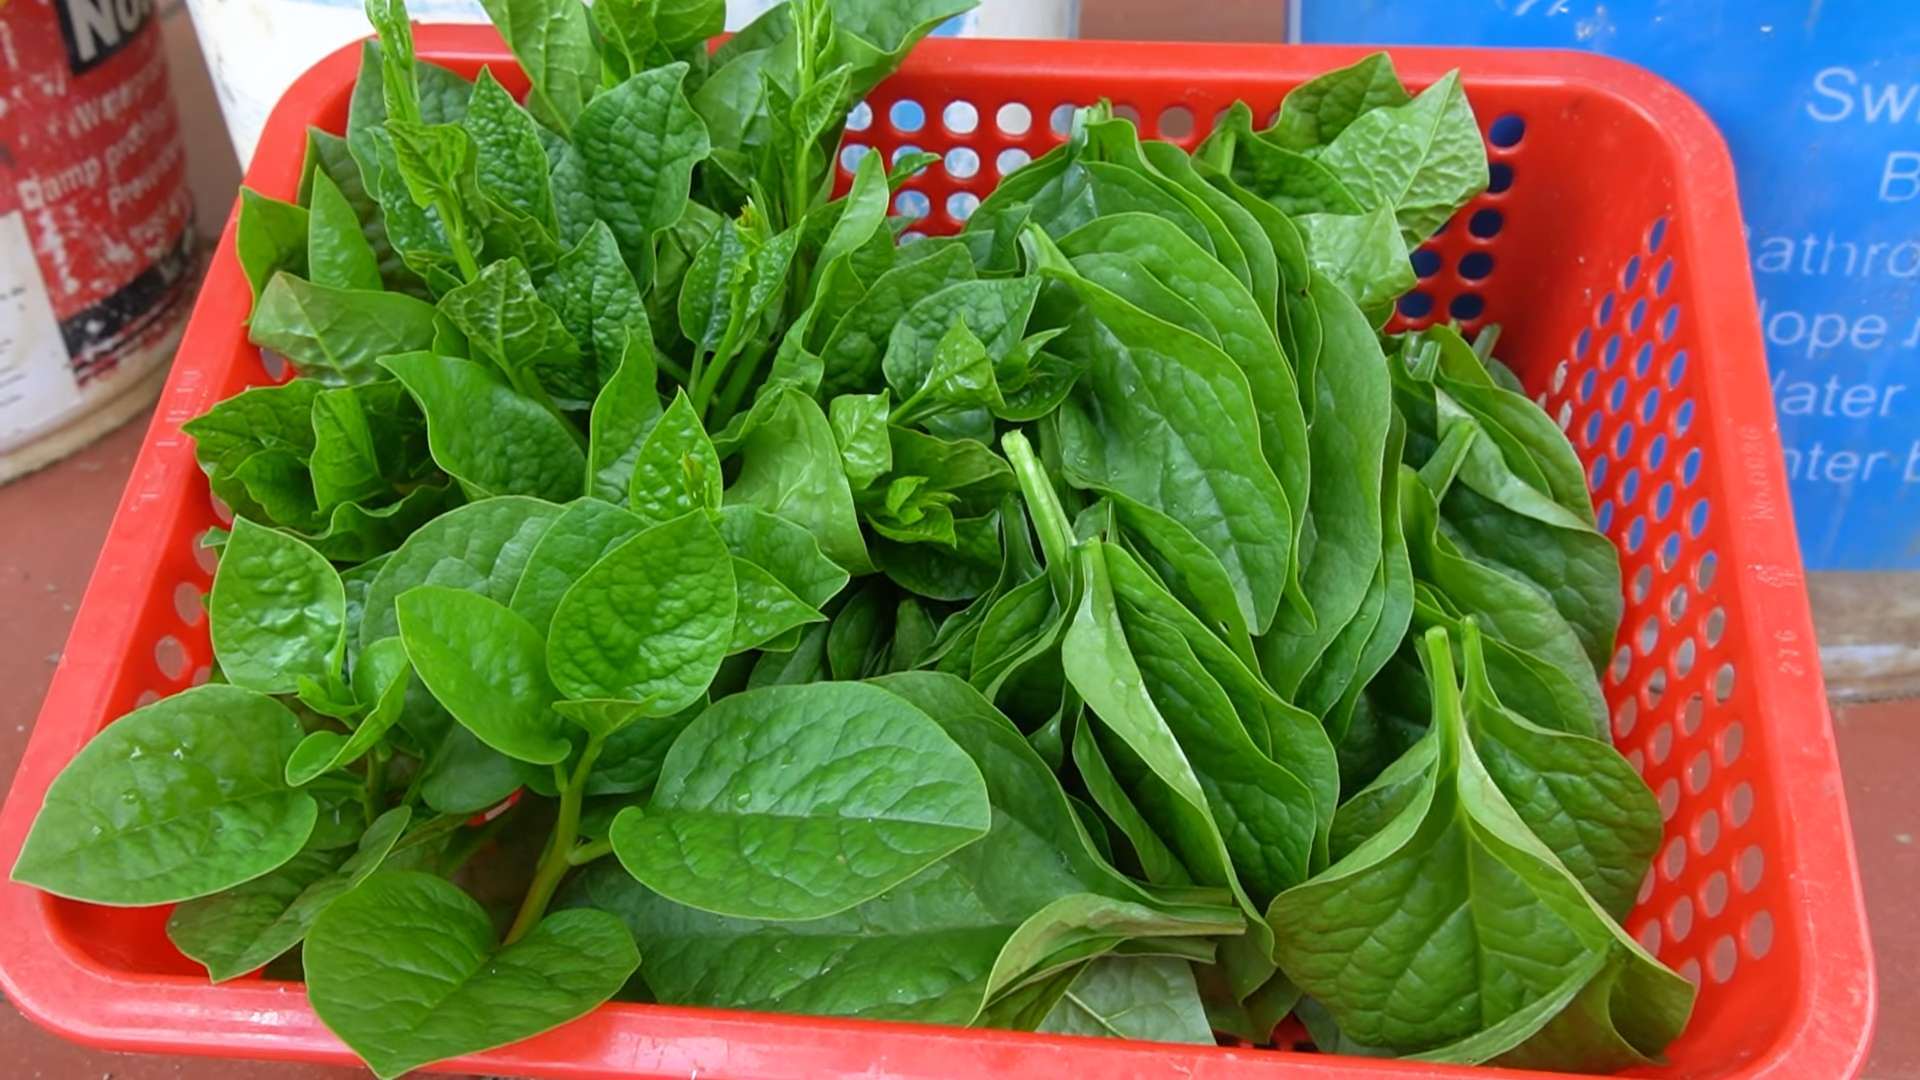
Harvesting and Enjoying Your Bounty
After all your hard work, it’s time to reap the rewards! You can start harvesting Malabar spinach leaves about 6-8 weeks after transplanting. Simply snip off the leaves with scissors or your fingers.
Malabar spinach can be used in a variety of dishes. It’s great in stir-fries, soups, salads, and even smoothies. It has a slightly mucilaginous texture, similar to okra, which some people love and others don’t. Experiment with different recipes to find your favorite way to enjoy this delicious and nutritious green!

Conclusion
So, there you have it! Growing Malabar spinach faster isn’t some gardener’s myth; it’s an achievable reality with a few simple, yet effective, DIY tricks. We’ve explored the power of strategic seed starting, the importance of nutrient-rich soil amendments, and the magic of consistent watering and sunlight. But more than just speed, these techniques contribute to healthier, more vibrant plants, yielding a more abundant and flavorful harvest of this nutritious leafy green.
Why is this a must-try? Because time is precious, and who wouldn’t want to enjoy the fruits (or rather, leaves) of their labor sooner? Imagine harvesting your first batch of tender Malabar spinach just weeks after planting, adding a fresh, homegrown element to your salads, stir-fries, and soups. Beyond the speed, you’ll gain a deeper understanding of your plants’ needs and develop a more intimate connection with your garden. This isn’t just about growing faster; it’s about growing smarter.
Don’t be afraid to experiment with variations! Try different types of organic fertilizers to see which works best for your soil. Consider using a DIY trellis system to maximize vertical growth and air circulation. You could even explore companion planting, pairing your Malabar spinach with plants that naturally deter pests or enhance growth. For example, planting basil nearby can help repel aphids. Another variation is to experiment with different seed starting methods. Some gardeners swear by soaking their seeds overnight before planting to soften the seed coat and speed up germination. Others prefer using a heat mat to provide consistent warmth during the initial stages of growth.
The key is to adapt these techniques to your specific environment and gardening style. What works for one gardener in one climate may not work exactly the same for another. That’s the beauty of gardening – it’s a constant learning process.
We’re confident that by implementing these DIY tricks, you’ll see a significant improvement in the growth rate of your Malabar spinach. But don’t just take our word for it! We encourage you to try these methods yourself and witness the results firsthand.
And most importantly, share your experience! We want to hear about your successes, your challenges, and any variations you discover along the way. Did you find a particular fertilizer that worked wonders? Did you develop a unique watering technique that accelerated growth? Share your tips and tricks in the comments below. Let’s create a community of Malabar spinach enthusiasts, all learning and growing together.
Remember, the journey of a thousand leaves begins with a single seed. So, get planting, get experimenting, and get ready to enjoy a bountiful harvest of delicious, homegrown Malabar spinach sooner than you ever thought possible. Happy gardening!
Frequently Asked Questions (FAQ)
What exactly is Malabar spinach, and why should I grow it?
Malabar spinach (Basella alba or Basella rubra) isn’t actually a true spinach, but a leafy green vine that thrives in warm weather. It’s a fantastic alternative to traditional spinach, especially in hot climates where spinach tends to bolt. It’s packed with vitamins A and C, iron, and calcium, making it a highly nutritious addition to your diet. Plus, it’s incredibly versatile in the kitchen, perfect for salads, stir-fries, soups, and more. Growing your own ensures you have a fresh, organic supply right at your fingertips.
How long does it typically take for Malabar spinach to grow?
Without any special techniques, Malabar spinach can take anywhere from 60 to 90 days to reach maturity. However, by implementing the DIY tricks discussed, you can significantly reduce this timeframe, potentially harvesting your first leaves in as little as 45 to 60 days. The exact time will depend on your local climate, soil conditions, and the specific techniques you use.
What kind of soil is best for growing Malabar spinach faster?
Malabar spinach thrives in well-draining, fertile soil that is rich in organic matter. Aim for a soil pH between 6.5 and 7.0. Before planting, amend your soil with compost, well-rotted manure, or other organic amendments to improve drainage, fertility, and water retention. A good quality potting mix is also suitable if you are growing in containers.
How much sunlight does Malabar spinach need?
Malabar spinach needs at least 6 hours of direct sunlight per day to grow optimally. In hotter climates, providing some afternoon shade can help prevent the leaves from scorching. If you’re growing indoors, supplement with grow lights to ensure adequate light exposure.
How often should I water my Malabar spinach?
Consistent watering is crucial for fast growth. Keep the soil consistently moist, but not waterlogged. Water deeply whenever the top inch of soil feels dry to the touch. During hot, dry weather, you may need to water more frequently. Mulching around the plants can help retain moisture in the soil.
What are some common pests and diseases that affect Malabar spinach, and how can I prevent them?
Malabar spinach is generally resistant to pests and diseases, but it can occasionally be affected by aphids, spider mites, or fungal diseases. To prevent these problems, ensure good air circulation around the plants, avoid overwatering, and inspect your plants regularly for any signs of infestation or disease. If you spot pests, try spraying them off with a strong stream of water or using insecticidal soap. For fungal diseases, apply a fungicide according to the product instructions. Companion planting with basil can also help deter pests.
Can I grow Malabar spinach in containers?
Yes, Malabar spinach grows very well in containers. Choose a large container (at least 12 inches in diameter) with good drainage holes. Use a high-quality potting mix and provide a trellis or other support for the vines to climb. Container-grown plants may need more frequent watering and fertilization than those grown in the ground.
What kind of fertilizer should I use to promote faster growth?
A balanced organic fertilizer with a higher nitrogen content can help promote faster growth. Look for fertilizers specifically formulated for leafy greens. You can also use compost tea or fish emulsion as a natural fertilizer. Apply fertilizer according to the product instructions, being careful not to over-fertilize, which can burn the plants.
How do I harvest Malabar spinach?
You can start harvesting Malabar spinach leaves as soon as the plants are large enough, typically when they are about 6-8 inches tall. Simply snip off the outer leaves, leaving the inner leaves to continue growing. Regular harvesting encourages the plant to produce more leaves. You can also harvest the tender stems and shoots.
Is Malabar spinach a perennial or an annual?
Malabar spinach is a perennial in tropical climates, meaning it can live for multiple years. However, in cooler climates, it is typically grown as an annual, as it cannot tolerate frost. If you live in a colder climate, you can try growing it in a container and bringing it indoors during the winter.
What are some creative ways to use Malabar spinach in cooking?
Malabar spinach is incredibly versatile in the kitchen. You can use it in salads, stir-fries, soups, stews, and curries. It can also be steamed, sautéed, or added to smoothies. Its slightly mucilaginous texture makes it a good thickener for soups and stews. Try experimenting with different recipes and flavor combinations to find your favorites.
How can I save seeds from my Malabar spinach plant?
To save seeds, allow some of the flowers to develop into berries. Once the berries turn dark purple or black and are dry, you can harvest them. Gently crush the berries to release the seeds. Rinse the seeds and allow them to dry completely before storing them in an airtight container in a cool, dark place.
What if my Malabar spinach isn’t growing as fast as I’d like, even after trying these tricks?
Don’t get discouraged! Gardening is a learning process. Double-check that you’re providing adequate sunlight, water, and nutrients. Consider testing your soil pH to ensure it’s within the optimal range. If you’re still having trouble, consult with a local gardening expert or extension office for personalized advice. Remember, patience and persistence are key!

Leave a Comment