
Growing Kohlrabi in Small Spaces can feel like a gardening challenge, but trust me, it’s totally achievable! Have you ever walked through a bustling farmer’s market and been intrigued by that alien-looking vegetable with the funny name? That’s kohlrabi, and it’s surprisingly easy to cultivate, even if you’re short on garden real estate. For centuries, kohlrabi has been a staple in European cuisine, particularly in Germany, where it’s affectionately known as “earth turnip.” Its mild, slightly sweet flavor makes it incredibly versatile – you can eat it raw in salads, roast it, or even add it to soups and stews.
But why bother with growing kohlrabi in small spaces? Well, for starters, it’s packed with nutrients like Vitamin C and fiber, making it a healthy addition to your diet. More importantly, learning how to grow it yourself means you have access to fresh, organic produce right at your fingertips. In today’s world, where access to fresh produce can be limited, and grocery prices are constantly rising, having the ability to grow your own food, even in a small area, is a game-changer. Plus, there’s something incredibly satisfying about nurturing a plant from seed to harvest. So, let’s dive into some simple DIY tricks and hacks that will have you enjoying homegrown kohlrabi in no time, no matter how limited your space may be!
Growing Kohlrabi in Small Spaces: A Beginner’s Guide
Hey there, fellow gardening enthusiasts! So, you’re itching to grow some kohlrabi but think you don’t have the space? Think again! I’m here to tell you that you absolutely can cultivate these quirky, delicious veggies even if you’re working with a tiny balcony, a small patio, or just a few spare containers. Kohlrabi is surprisingly adaptable and perfect for small-space gardening. Let’s dive in!
What You’ll Need
Before we get our hands dirty, let’s gather our supplies. Here’s a checklist of everything you’ll need to successfully grow kohlrabi in a small space:
* Kohlrabi Seeds: Choose a variety that suits your taste. ‘Early White Vienna’ and ‘Purple Vienna’ are popular and reliable choices.
* Containers: Opt for containers that are at least 6-8 inches deep and wide. Fabric pots, plastic pots, or even repurposed buckets work well.
* Potting Mix: Use a high-quality, well-draining potting mix. Avoid using garden soil, as it can compact in containers.
* Watering Can or Hose: For regular watering.
* Fertilizer: A balanced, water-soluble fertilizer or slow-release fertilizer.
* Trowel or Small Shovel: For planting and transplanting.
* Sunlight: A spot that receives at least 6 hours of sunlight per day.
* Optional: Mulch (straw, wood chips, or shredded leaves) to help retain moisture.
Getting Started: Sowing the Seeds
There are two main ways to start your kohlrabi journey: direct sowing or starting seeds indoors. I personally prefer starting seeds indoors because it gives me a head start, especially if I live in an area with a shorter growing season.
Method 1: Starting Seeds Indoors
1. Prepare Your Seed Starting Tray or Pots: Fill your seed starting tray or small pots with a seed starting mix. Gently moisten the mix with water.
2. Sow the Seeds: Sow 2-3 kohlrabi seeds per cell or pot, about ¼ inch deep.
3. Cover and Keep Moist: Lightly cover the seeds with more seed starting mix and gently water again. You can cover the tray with a plastic dome or plastic wrap to create a humid environment, which will help with germination.
4. Provide Light and Warmth: Place the tray in a warm location (around 65-75°F) and under grow lights or near a sunny window. If using a window, rotate the tray regularly to prevent the seedlings from leaning towards the light.
5. Monitor Germination: Kohlrabi seeds typically germinate in 5-10 days. Once the seedlings emerge, remove the plastic dome or wrap.
6. Thin the Seedlings: Once the seedlings have their first true leaves (the second set of leaves), thin them to one strong seedling per cell or pot. Snip off the weaker seedlings at the soil line with scissors.
7. Harden Off the Seedlings: Before transplanting the seedlings outdoors, you’ll need to harden them off. This process gradually acclimates them to outdoor conditions. Start by placing the seedlings outdoors in a sheltered location for an hour or two each day, gradually increasing the time over a week or two.
Method 2: Direct Sowing
1. Prepare Your Container: Fill your container with well-draining potting mix.
2. Sow the Seeds: Sow the kohlrabi seeds directly into the container, about ¼ inch deep and spaced 2-3 inches apart.
3. Water Gently: Gently water the soil to moisten it.
4. Thin the Seedlings: Once the seedlings emerge and have their first true leaves, thin them to one plant every 4-6 inches.
Transplanting and Growing On
Whether you started your seeds indoors or direct sowed, the next step is to ensure your kohlrabi has the space and nutrients it needs to thrive.
1. Choose the Right Container: If you started your seeds indoors, select a container that is at least 6-8 inches deep and wide for each plant.
2. Prepare the Container: Fill the container with a high-quality, well-draining potting mix.
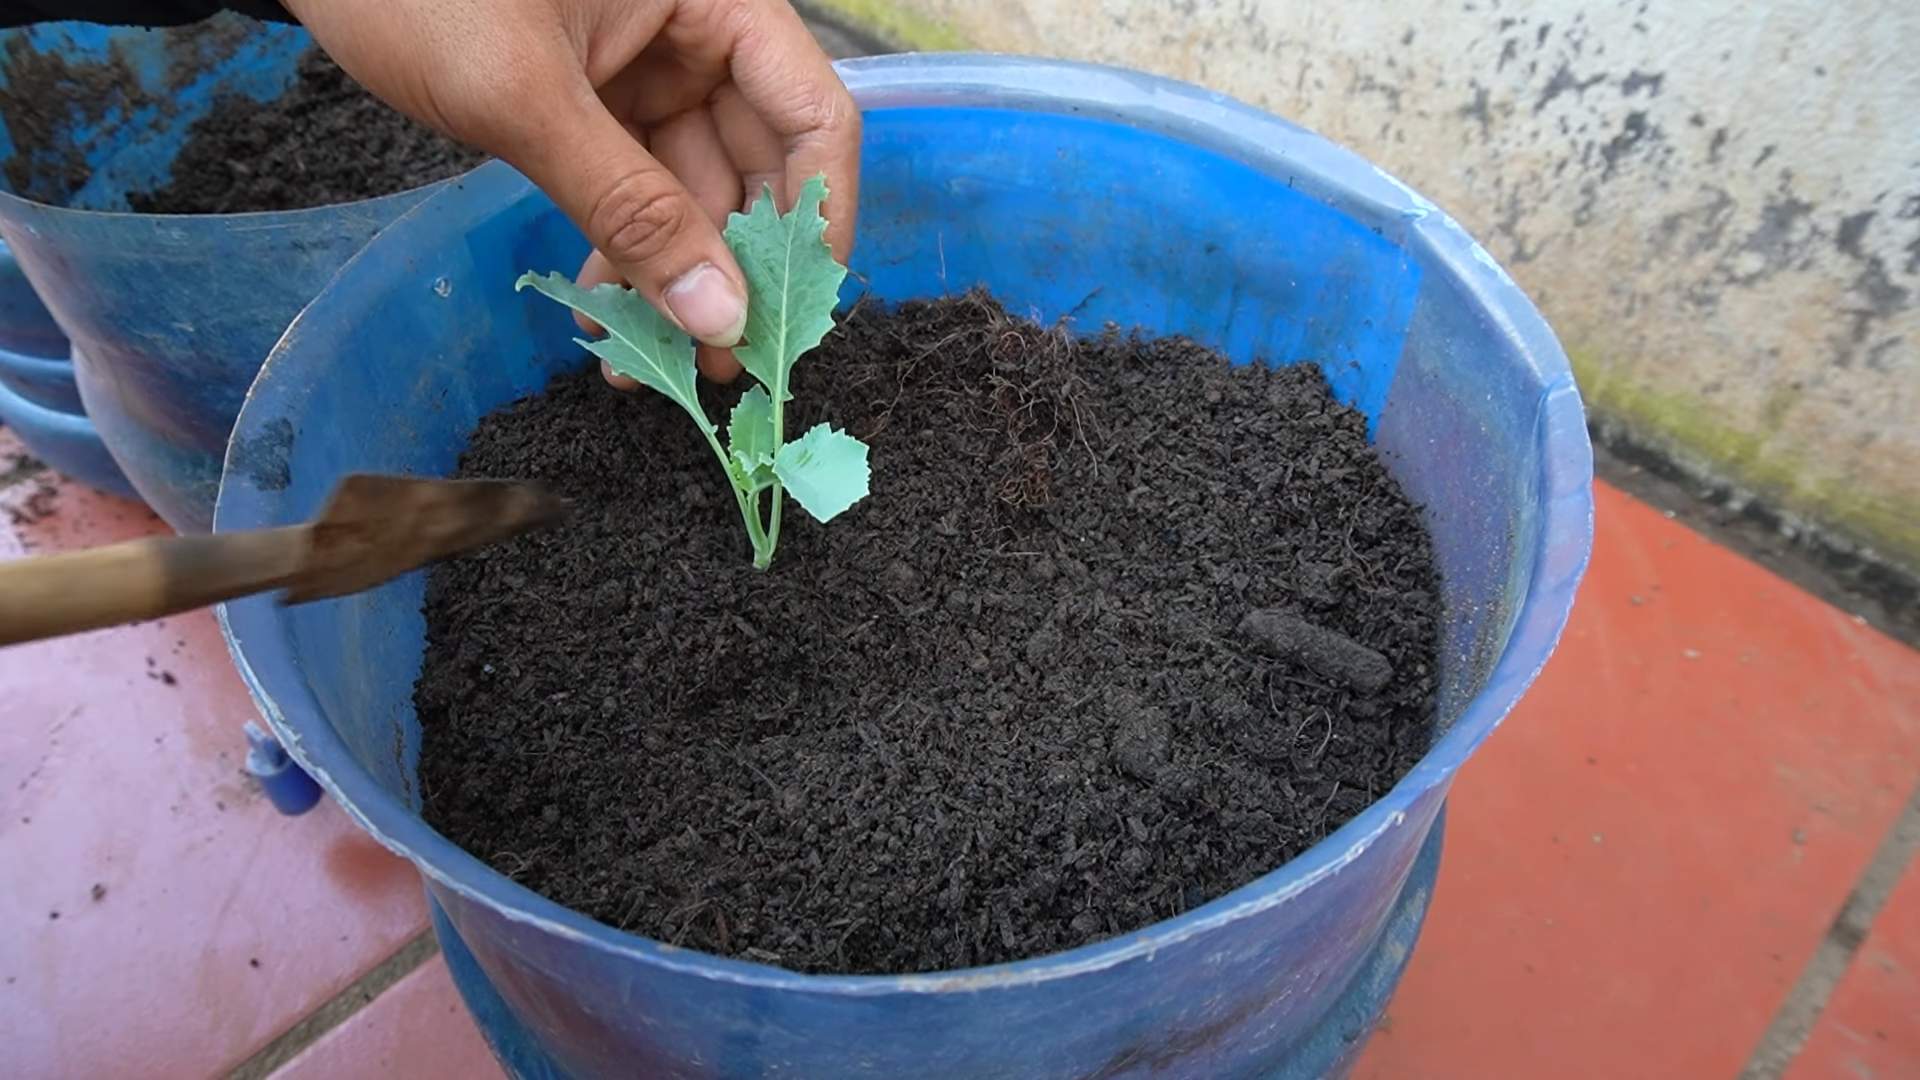
3. Transplant Carefully: Gently remove the kohlrabi seedlings from their starting pots, being careful not to damage the roots. Dig a hole in the potting mix large enough to accommodate the root ball.
4. Plant at the Right Depth: Place the seedling in the hole, ensuring that the top of the root ball is level with the soil surface.
5. Space Properly: Space the kohlrabi plants 4-6 inches apart in the container. If you’re using a larger container, you can plant multiple kohlrabi plants, ensuring they have enough space to grow.
6. Water Thoroughly: Water the newly transplanted seedlings thoroughly.
7. Provide Sunlight: Place the container in a location that receives at least 6 hours of sunlight per day.
8. Fertilize Regularly: Kohlrabi needs consistent nutrients to grow well. Fertilize every 2-3 weeks with a balanced, water-soluble fertilizer, following the instructions on the fertilizer package. Alternatively, you can use a slow-release fertilizer when you transplant the seedlings.
9. Water Consistently: Kohlrabi needs consistent moisture to prevent the bulbs from becoming tough and woody. Water regularly, especially during hot, dry weather. Aim to keep the soil consistently moist but not waterlogged.
10. Mulch (Optional): Apply a layer of mulch around the base of the plants to help retain moisture, suppress weeds, and regulate soil temperature.
11. Monitor for Pests and Diseases: Keep an eye out for common pests like aphids, cabbage worms, and flea beetles. You can control these pests with insecticidal soap or neem oil. Kohlrabi is also susceptible to diseases like clubroot, so make sure to use disease-free potting mix and avoid overwatering.
Harvesting Your Kohlrabi
The best part of growing kohlrabi is, of course, the harvest!
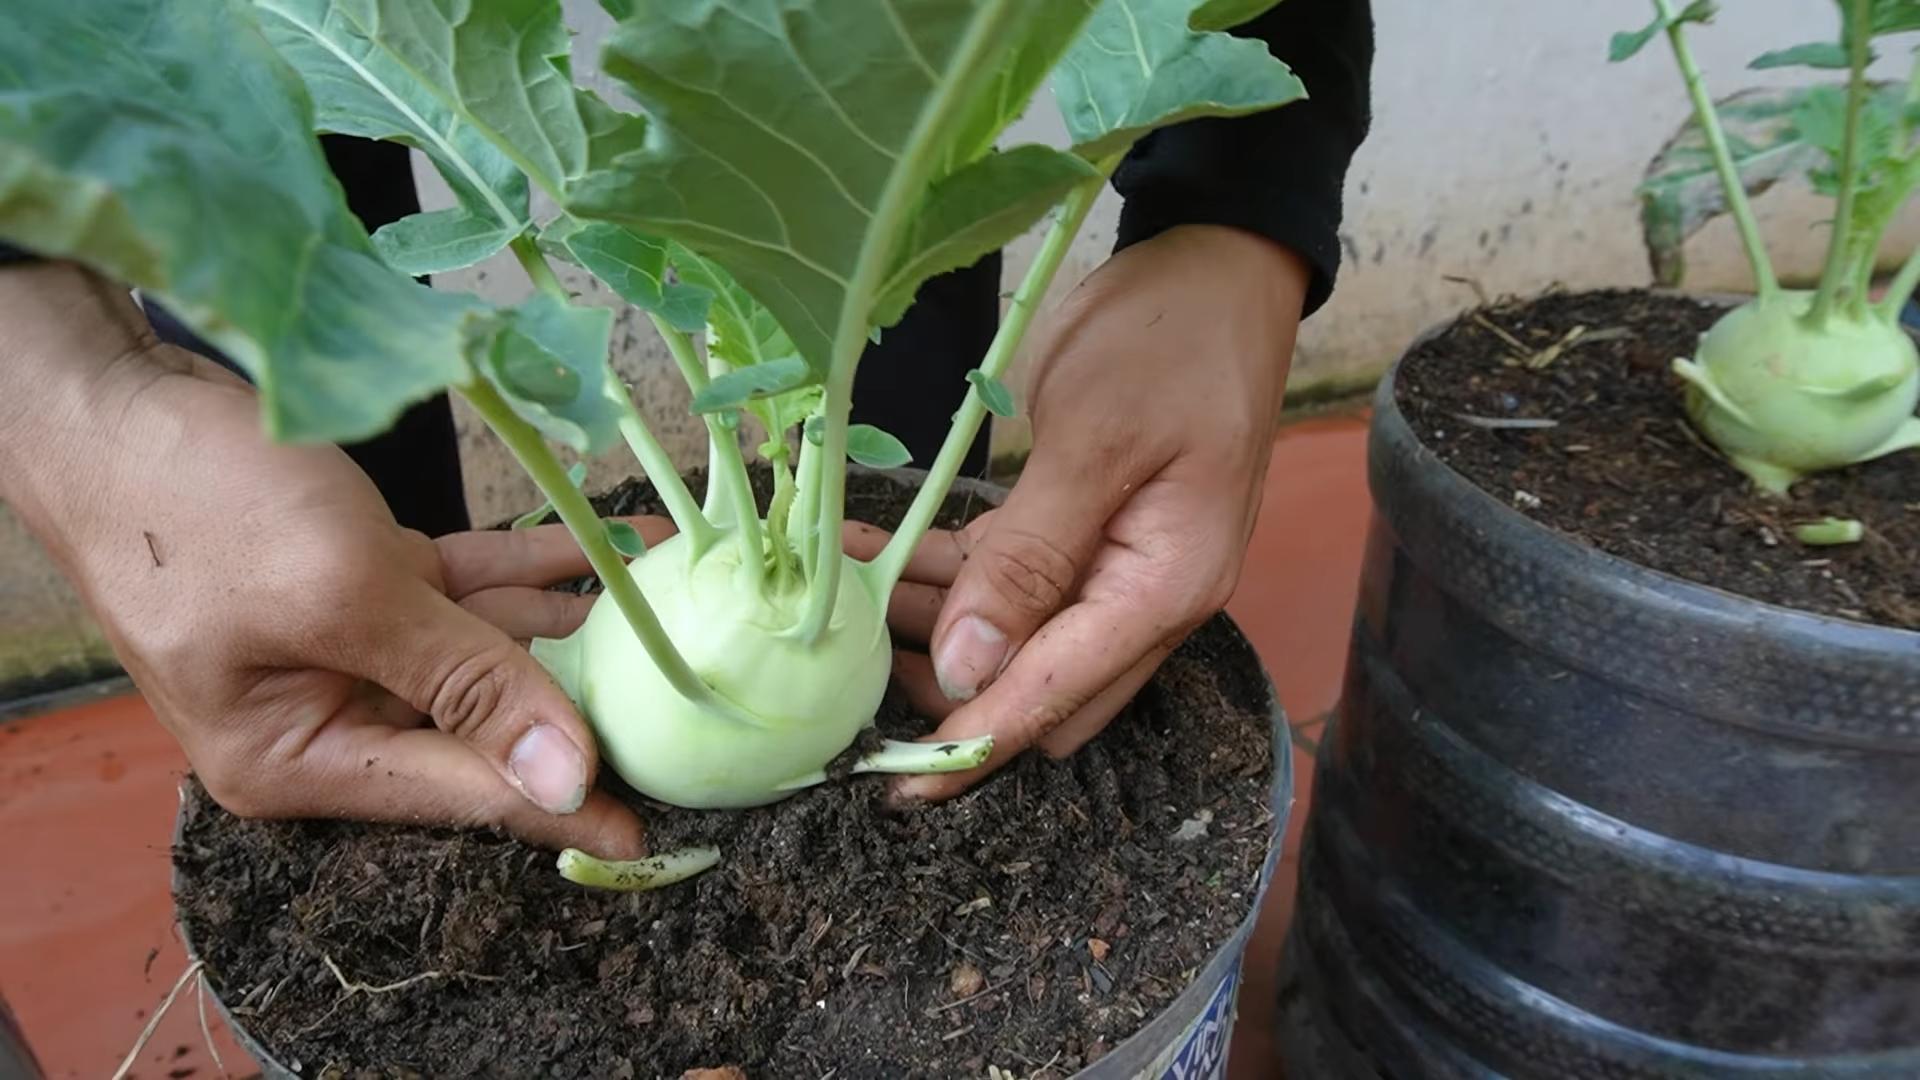
1. Harvest at the Right Size: Kohlrabi is best harvested when the bulbs are about 2-3 inches in diameter. If you let them grow too large, they can become tough and woody.
2. Check for Readiness: Gently feel the bulb. It should be firm and smooth.
3. Harvest Carefully: Use a sharp knife or garden shears to cut the kohlrabi bulb from the stem, just above the soil line.
4. Remove the Leaves: Remove the leaves from the bulb. You can eat the leaves, too! They can be cooked like spinach or kale.
5. Store Properly: Store the kohlrabi bulbs in the refrigerator for up to several weeks.
Troubleshooting Common Problems
Even with the best care, you might encounter a few challenges along the way. Here are some common problems and how to address them:
* Tough or Woody Bulbs: This is usually caused by inconsistent watering or letting the bulbs grow too large. Make sure to water regularly and harvest the bulbs when they are 2-3 inches in diameter.
* Bolting (Premature Flowering): Bolting can occur if the plants are stressed by heat or lack of water. Provide consistent moisture and shade during hot weather.
* Pest Infestations: Aphids, cabbage worms, and flea beetles can damage kohlrabi plants. Use insecticidal soap or neem oil to control these pests.
* Disease Problems: Clubroot is a common disease that affects kohlrabi. Use disease-free potting mix and avoid overwatering to prevent this disease.
Kohlrabi Varieties for Small Spaces
While most kohlrabi varieties will do well in containers, some are particularly well-suited for smaller spaces:
* Early White Vienna: A classic, reliable variety with pale green bulbs.
* Purple Vienna: Similar to Early White Vienna, but with beautiful purple bulbs.
* Kolibri: A compact variety with purple bulbs that mature quickly.
* Superschmelz: A larger variety that can grow up to 10 inches in diameter, but it still does well in containers if given enough space.
Creative Container Ideas
Don’t feel limited to standard pots! Get creative with your container choices:
* Fabric Pots: These are great for drainage and aeration.
* Repurposed Buckets: Clean out old buckets and drill drainage holes in the bottom.
* Grow Bags: These are lightweight and easy to move around.
* Hanging Baskets: While not ideal for large kohlrabi bulbs, you can grow smaller varieties or just harvest the leaves.
Conclusion
So, there you have it! Growing kohlrabi in small spaces isn’t just a possibility; it’s a surprisingly rewarding and accessible gardening adventure. We’ve explored the key steps, from selecting the right varieties and containers to mastering the art of watering and feeding your kohlrabi plants. But why should you actually *do* it?
Because fresh, homegrown kohlrabi is simply incomparable to anything you’ll find at the grocery store. The crisp, slightly sweet, and subtly peppery flavor is intensified when you’ve nurtured it yourself. Plus, you have complete control over the growing process, ensuring your kohlrabi is free from unwanted pesticides and chemicals. Imagine adding freshly harvested kohlrabi to your salads, stir-fries, or enjoying it as a crunchy, healthy snack. The possibilities are endless!
Beyond the delicious flavor, growing kohlrabi in small spaces is a fantastic way to connect with nature, even if you only have a balcony or a sunny windowsill. It’s a therapeutic activity that can reduce stress and boost your mood. And let’s not forget the satisfaction of watching your plants thrive and produce a bountiful harvest.
This DIY kohlrabi growing trick is a game-changer for urban gardeners. It allows you to enjoy the benefits of fresh, homegrown produce without the need for a large garden. It’s also a great way to teach children about where their food comes from and encourage them to eat more vegetables.
Feeling adventurous? Try experimenting with different kohlrabi varieties. ‘Early White Vienna’ is a classic choice, but ‘Purple Vienna’ adds a beautiful splash of color to your garden and your plate. You can also try growing kohlrabi in different types of containers, such as fabric pots or self-watering planters, to see what works best for you. Consider companion planting with herbs like dill or chamomile to deter pests and attract beneficial insects. Another variation is to succession plant, sowing seeds every few weeks to ensure a continuous harvest throughout the growing season. This is especially useful in small spaces where maximizing yield is crucial.
Don’t be afraid to get your hands dirty and embrace the learning process. Gardening is all about experimentation and discovery. Even if you encounter a few challenges along the way, the rewards of growing your own kohlrabi are well worth the effort.
So, what are you waiting for? Grab some seeds, find a sunny spot, and start growing your own kohlrabi today! We’re confident that you’ll be amazed by how easy and rewarding it is. And once you’ve harvested your first crop, we’d love to hear about your experience. Share your photos, tips, and recipes with us in the comments below. Let’s build a community of small-space kohlrabi growers and inspire others to join the fun! We want to know what worked for you, what challenges you faced, and what delicious dishes you created with your homegrown kohlrabi. Your insights can help other aspiring gardeners succeed and enjoy the many benefits of this amazing vegetable. Happy gardening!
Frequently Asked Questions (FAQ)
What is the best time of year to start growing kohlrabi in small spaces?
The ideal time to start growing kohlrabi depends on your climate. Kohlrabi is a cool-season crop, meaning it thrives in temperatures between 60°F and 75°F (15°C and 24°C). In most regions, you can plant kohlrabi in early spring for a summer harvest or in late summer for a fall harvest. If you live in a warmer climate, you may be able to grow kohlrabi throughout the winter. Check your local frost dates and plan accordingly. You can start seeds indoors 4-6 weeks before the last expected frost or direct sow them outdoors once the soil has warmed up to at least 50°F (10°C). For a fall harvest, sow seeds 6-8 weeks before the first expected frost. Remember to provide adequate protection from extreme temperatures, such as frost or heat waves, to ensure optimal growth.
How much sunlight does kohlrabi need when grown in containers?
Kohlrabi requires at least 6 hours of direct sunlight per day to thrive. When growing kohlrabi in containers, choose a location that receives plenty of sunlight. If you don’t have a sunny spot, you can supplement with grow lights. Rotate your containers regularly to ensure that all sides of the plants receive equal exposure to sunlight. Insufficient sunlight can result in leggy growth and reduced bulb size. Observe your plants closely and adjust their position as needed to maximize sunlight exposure.
What type of soil is best for growing kohlrabi in pots?
Kohlrabi prefers well-draining, fertile soil with a pH between 6.0 and 7.5. A good potting mix for kohlrabi should be rich in organic matter and retain moisture without becoming waterlogged. You can create your own potting mix by combining equal parts of compost, peat moss (or coconut coir), and perlite or vermiculite. Avoid using garden soil in containers, as it can become compacted and hinder drainage. Amend your potting mix with slow-release fertilizer or compost to provide essential nutrients for healthy growth. Regularly monitor the soil moisture and adjust your watering schedule as needed to prevent overwatering or underwatering.
How often should I water my kohlrabi plants in containers?
Water kohlrabi plants regularly, especially during hot and dry weather. The soil should be consistently moist but not soggy. Check the soil moisture by sticking your finger about an inch deep into the soil. If the soil feels dry, it’s time to water. Water deeply, allowing the water to drain out of the bottom of the container. Avoid overhead watering, as it can promote fungal diseases. Mulching around the base of the plants can help retain moisture and suppress weeds. Adjust your watering schedule based on the weather conditions and the size of your containers.
What are some common pests and diseases that affect kohlrabi, and how can I prevent them?
Kohlrabi can be susceptible to several pests and diseases, including aphids, cabbage worms, flea beetles, and clubroot. To prevent pest and disease problems, start with healthy plants and provide them with optimal growing conditions. Inspect your plants regularly for signs of infestation or disease. Handpick pests or use insecticidal soap or neem oil to control them. Cover your plants with row covers to prevent pests from reaching them. Practice crop rotation to prevent soilborne diseases. Ensure good air circulation to reduce the risk of fungal diseases. If you suspect clubroot, remove and destroy infected plants and amend the soil with lime to raise the pH.
How do I know when my kohlrabi is ready to harvest?
Kohlrabi is typically ready to harvest when the bulb reaches about 2-3 inches in diameter. The exact size will depend on the variety. The bulb should be firm and smooth. To harvest, cut the stem just above the bulb. You can also harvest the leaves, which are edible and can be used in salads or stir-fries. Harvest kohlrabi before it becomes too large, as it can become tough and woody. Regular harvesting encourages continued production.
Can I grow kohlrabi indoors year-round?
While it’s possible to grow kohlrabi indoors, it can be challenging to provide the optimal growing conditions. Kohlrabi requires plenty of sunlight and cool temperatures to thrive. If you have a sunny windowsill or a grow light, you can try growing kohlrabi indoors. Choose a compact variety and use a large container with well-draining soil. Monitor the temperature and humidity levels and adjust as needed. You may need to hand-pollinate the flowers to ensure fruit set. Even with the best care, indoor-grown kohlrabi may not be as productive as outdoor-grown kohlrabi.
What are some creative ways to use homegrown kohlrabi in recipes?
Homegrown kohlrabi is incredibly versatile and can be used in a variety of dishes. You can eat it raw in salads, slaws, or as a crunchy snack. It can also be cooked in stir-fries, soups, stews, or roasted in the oven. The leaves are also edible and can be used in salads or cooked like spinach. Try grating kohlrabi and adding it to fritters or pancakes. You can also pickle kohlrabi for a tangy condiment. Experiment with different flavors and spices to create your own unique kohlrabi recipes. Don’t be afraid to get creative and explore the many culinary possibilities of this delicious vegetable.

Leave a Comment