
Growing garlic in a plastic bag might sound a little unconventional, right? But trust me, this simple DIY trick can unlock a surprisingly bountiful harvest, even if you’re short on space or gardening experience. For centuries, garlic has been revered not just for its pungent flavor, but also for its medicinal properties and even its supposed ability to ward off evil spirits! From ancient Egypt, where it fueled the pyramid builders, to modern kitchens worldwide, garlic has always held a special place.
Now, you might be thinking, “Why a plastic bag? Why not just plant it in the ground?” Well, that’s where the magic happens! This method is perfect for urban dwellers with limited garden space, or for anyone who wants to get a head start on the growing season. Plus, it’s a fantastic way to recycle those plastic bags you’ve been meaning to get rid of. I’ve found that growing garlic in a plastic bag allows for better control over the soil conditions and moisture levels, leading to healthier, more robust bulbs. So, ditch the traditional garden bed and let’s explore this easy and rewarding way to cultivate your own delicious garlic!
Growing Garlic in a Plastic Bag: A Surprisingly Simple DIY Guide
Hey there, fellow gardening enthusiasts! Ever thought about growing garlic but felt intimidated by the space requirements or the perceived complexity? Well, I’m here to tell you that you can absolutely grow garlic, even if you only have a plastic bag and a sunny spot! This method is perfect for apartment dwellers, balcony gardeners, or anyone who wants to try their hand at growing this flavorful bulb without a traditional garden bed. Let’s dive into this surprisingly simple DIY project!
What You’ll Need
Before we get started, let’s gather our supplies. This is a low-cost project, so you probably have most of these items lying around already.
* Garlic Cloves: Choose organic garlic from your local farmers market or grocery store. Avoid garlic from big box stores, as it may be treated to prevent sprouting. Look for plump, healthy cloves. One head of garlic will give you several plants!
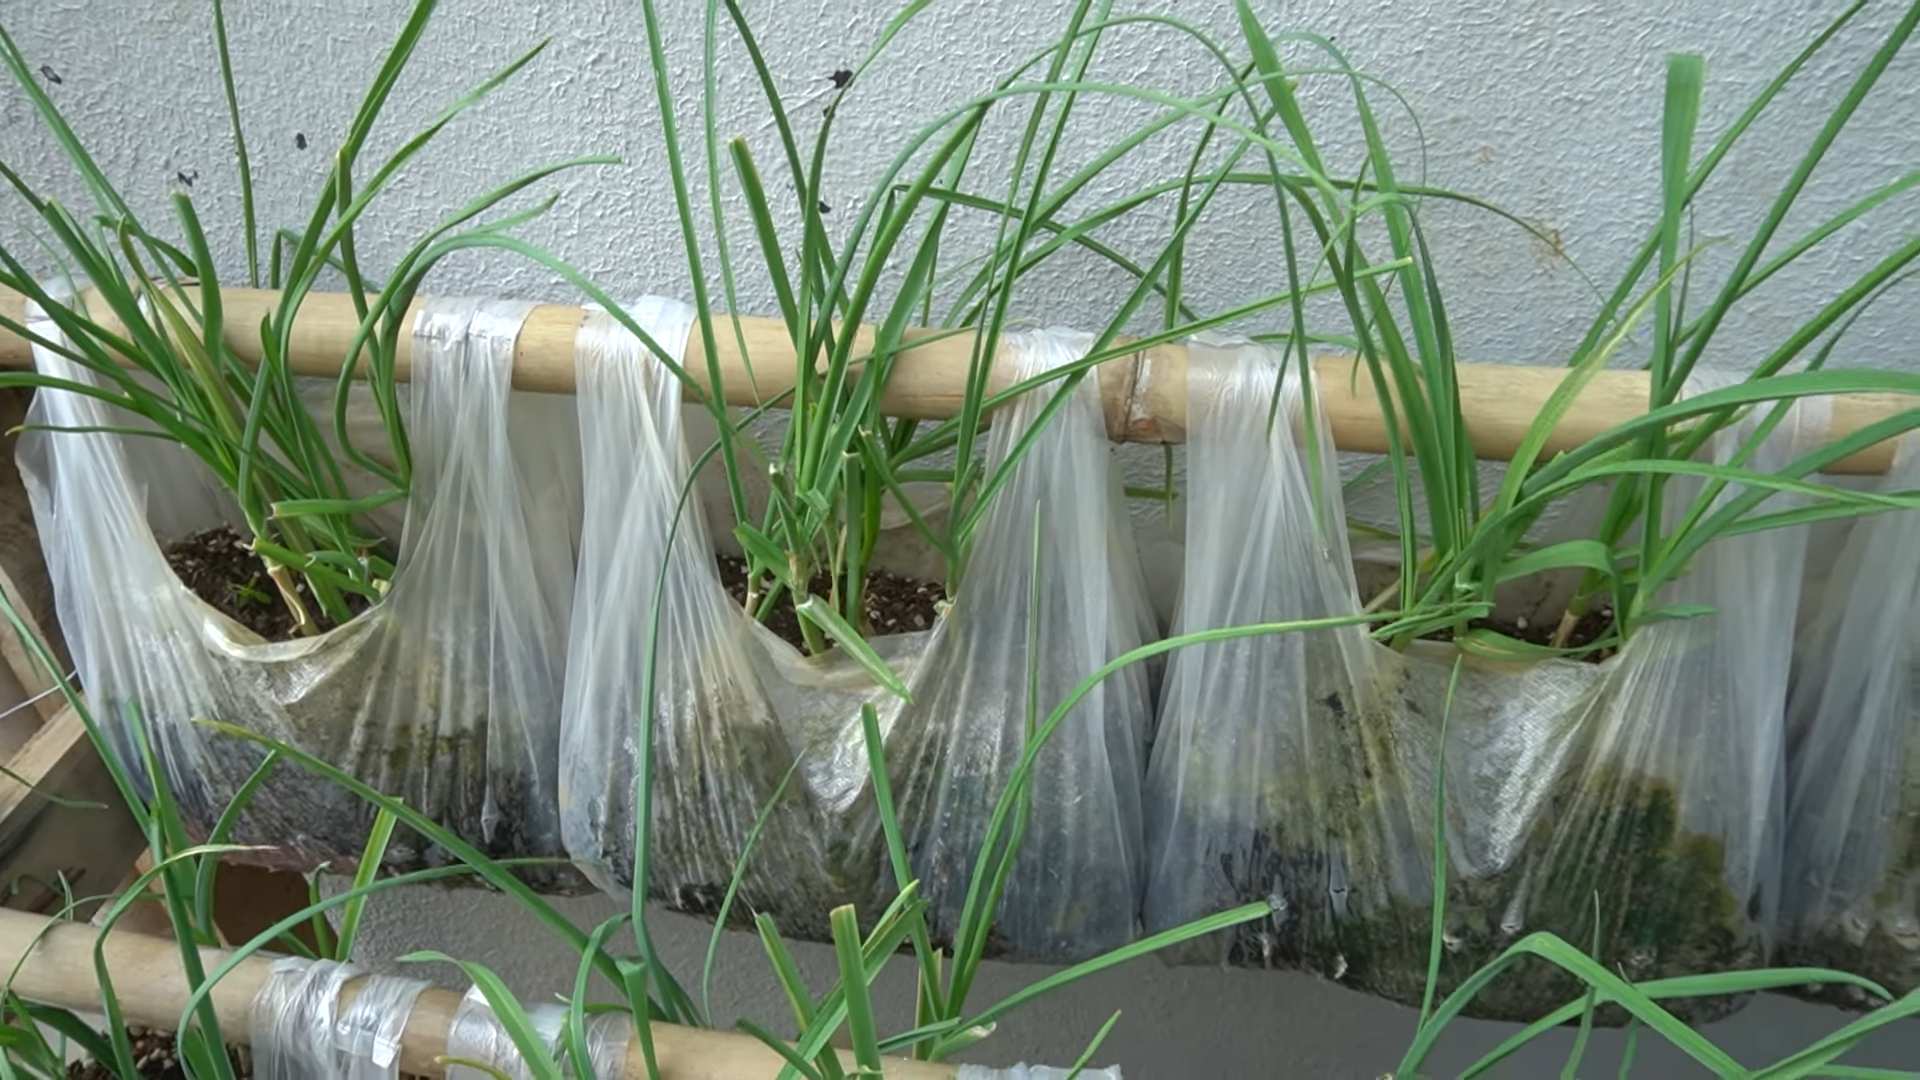
* Plastic Bag: A sturdy, gallon-sized plastic bag works perfectly. You can reuse a grocery bag or even a heavy-duty freezer bag. Just make sure it’s clean and doesn’t have any holes.
* Potting Soil: Use a good quality potting mix that drains well. Avoid using garden soil, as it can compact in the bag and hinder growth.
* Water: You’ll need water to moisten the soil and keep your garlic happy.
* Small Stones or Gravel: These are for drainage at the bottom of the bag.
* Spray Bottle (Optional): For misting the soil.
* Scissors or a Knife: To create drainage holes in the bag.
* Sunny Location: Garlic needs at least 6 hours of sunlight per day.
Preparing the Bag and Soil
This is a crucial step to ensure proper drainage and a healthy growing environment for your garlic.
1. Clean the Bag: If you’re reusing a plastic bag, make sure it’s clean and free of any debris. Wash it with soap and water, and let it dry completely.
2. Create Drainage Holes: This is super important! Use your scissors or knife to carefully poke several drainage holes in the bottom of the bag. I usually make about 6-8 holes, spaced evenly apart. This will prevent the soil from becoming waterlogged, which can lead to rot.
3. Add Drainage Layer: Pour a layer of small stones or gravel into the bottom of the bag, about 1-2 inches deep. This will further improve drainage and prevent the soil from sitting directly in water.
4. Fill with Potting Soil: Now, fill the bag with potting soil, leaving about 2-3 inches of space at the top. Gently pat down the soil to remove any air pockets.
5. Moisten the Soil: Water the soil thoroughly until it’s evenly moist but not soggy. You can use a watering can or a spray bottle. If you’re using a spray bottle, mist the soil until it’s damp throughout.
Planting the Garlic Cloves
Now for the fun part – planting the garlic!
1. Separate the Cloves: Carefully separate the cloves from the garlic head. Leave the papery skin on each clove intact.
2. Select the Best Cloves: Choose the largest, healthiest-looking cloves for planting. These will produce the strongest plants.
3. Plant the Cloves: Make small holes in the soil, about 2-3 inches deep and 4-6 inches apart. Place each clove in a hole, pointy side up. This is important because the green shoots will emerge from the pointy end.
4. Cover with Soil: Gently cover the cloves with soil and pat it down lightly.
5. Water Again: Water the soil again to settle it around the cloves.
Caring for Your Garlic Plants
Consistent care is key to a successful garlic harvest.
1. Sunlight: Place the bag in a sunny location where it will receive at least 6 hours of sunlight per day. A south-facing window or a sunny balcony is ideal.
2. Watering: Water the soil regularly, keeping it consistently moist but not soggy. Check the soil moisture by sticking your finger into the soil. If the top inch feels dry, it’s time to water. Avoid overwatering, as this can lead to rot.
3. Fertilizing (Optional): You can fertilize your garlic plants every few weeks with a balanced liquid fertilizer. Follow the instructions on the fertilizer package. This will provide the plants with the nutrients they need to grow strong and healthy.
4. Weeding: Keep the bag free of weeds. Weeds can compete with the garlic plants for nutrients and water.
5. Mulching (Optional): You can add a layer of mulch to the top of the soil to help retain moisture and suppress weeds. Straw or shredded leaves work well.
6. Monitor for Pests and Diseases: Keep an eye out for any signs of pests or diseases. If you notice any problems, address them promptly.
Harvesting Your Garlic
Harvest time is the most rewarding part!
1. Timing: Garlic is typically ready to harvest in late spring or early summer, about 8-9 months after planting. The leaves will start to turn yellow and brown, and the stalks may begin to fall over.
2. Check for Maturity: To check if your garlic is ready to harvest, gently dig up one bulb and examine it. The bulb should be plump and well-formed, with several layers of papery skin.
3. Harvesting: Carefully dig up the garlic bulbs, being careful not to damage them. Use a trowel or garden fork to loosen the soil around the bulbs.
4. Curing: After harvesting, cure the garlic bulbs in a cool, dry, well-ventilated place for 2-3 weeks. This will allow the bulbs to dry out and develop their flavor. You can hang the bulbs in bunches or spread them out on a screen.
5. Storing: Once the garlic is cured, store it in a cool, dry, dark place. Braiding the garlic is a traditional way to store it, but you can also store it in a mesh bag or a basket.
Troubleshooting
Even with the best care, you might encounter a few challenges. Here are some common issues and how to address them:
* Yellowing Leaves: This could be a sign of overwatering, underwatering, or nutrient deficiency. Adjust your watering schedule and consider fertilizing the plants.
* Rotting Bulbs: This is usually caused by overwatering or poor drainage. Make sure the bag has adequate drainage holes and avoid overwatering.
* Pests: Garlic is generally pest-resistant, but you may encounter aphids or other common garden pests. Treat them with an organic insecticide or insecticidal soap.
* Small Bulbs: This could be due to insufficient sunlight, poor soil, or overcrowding. Make sure the plants are getting enough sunlight and nutrients, and thin them out if they are too close together.
Why Grow Garlic in a Plastic Bag?
You might be wondering, why go through all this trouble to grow garlic in a plastic bag? Here are a few compelling reasons:
* Space-Saving: This method is perfect for small spaces, such as apartments, balconies, or patios.
* Easy to Move: You can easily move the bag to follow the sun or protect it from harsh weather.
* Low-Cost: This is a very affordable way to grow garlic. You probably already have most of the supplies on hand.
* Fun and Educational: Growing your own garlic is a rewarding experience that can teach you about gardening and where your food comes from.
* Fresh, Flavorful Garlic: Homegrown garlic tastes so much better than store-bought garlic!
Tips for Success
Here are a few extra tips to help you succeed with your garlic-growing adventure:
* Choose the Right Garlic: Softneck varieties are generally better suited for warmer climates, while hardneck varieties are more cold-hardy.
* Plant in the Fall: Garlic needs a period of cold weather to develop properly. Plant your cloves in the fall for a summer harvest.
* Don’t Overcrowd: Give the plants enough space to grow. Overcrowding can lead to smaller bulbs.
* Be Patient: Garlic takes time to grow. Don’t get discouraged if you don’t see results right away.
* Enjoy the Process: Gardening should be fun! Relax, enjoy the process, and learn from your mistakes.
Growing garlic in a plastic bag is a surprisingly simple and rewarding DIY project. With a little bit of effort and attention, you can enjoy fresh, flavorful garlic from your own home. So, grab a bag, some soil, and some garlic cloves, and get growing! Happy gardening!

Conclusion
So, there you have it! Growing garlic in a plastic bag might sound unconventional, but it’s a surprisingly effective and space-saving method that opens up a world of possibilities, especially for urban gardeners or those with limited outdoor space. We’ve walked you through the simple steps, highlighting the key advantages of this DIY trick: ease of setup, minimal space requirements, and the potential for a bountiful harvest right on your balcony or windowsill.
Why is this a must-try? Because it democratizes garlic cultivation. No longer do you need acres of land or a meticulously prepared garden bed to enjoy the satisfaction of harvesting your own pungent cloves. This method empowers anyone, regardless of their gardening experience or living situation, to participate in the joy of growing their own food. Plus, it’s incredibly rewarding to witness the entire life cycle of the garlic plant, from a single clove to a thriving, green shoot.
Beyond the basic method, there’s plenty of room for experimentation. Consider using different types of plastic bags – perhaps a heavy-duty reusable shopping bag for added durability, or even a repurposed feed bag. You can also explore different soil mixes. While we recommended a well-draining potting mix, you could try incorporating compost or other organic matter to enrich the soil and boost nutrient availability. Another variation is to experiment with different garlic varieties. Softneck garlic, which is known for its braiding capabilities, might be a fun option to try, allowing you to create beautiful and fragrant garlic braids from your homegrown harvest. You can also try growing elephant garlic in a larger bag for even bigger cloves.
Don’t be afraid to get creative with your setup. You can hang your garlic-filled bags from a balcony railing, place them on a sunny windowsill, or even create a vertical garden using multiple bags. The possibilities are endless!
But the real magic happens when you finally harvest your own garlic. Imagine the aroma filling your kitchen as you peel those freshly dug cloves, ready to add their distinctive flavor to your favorite dishes. From garlic bread to pasta sauces to roasted vegetables, the possibilities are endless. And knowing that you grew that garlic yourself makes it all the more satisfying.
We wholeheartedly encourage you to give this DIY trick a try. It’s a simple, affordable, and incredibly rewarding way to grow your own garlic, regardless of your gardening experience or living situation. And most importantly, have fun with it! Gardening should be an enjoyable and relaxing experience.
Once you’ve tried growing garlic in a plastic bag, we’d love to hear about your experience. Share your photos, tips, and tricks in the comments below. Let’s create a community of garlic growers and inspire others to embrace this simple yet effective method. What variety did you grow? What challenges did you face, and how did you overcome them? Your insights could be invaluable to other aspiring garlic growers. So, get planting, get sharing, and get ready to enjoy the delicious rewards of your homegrown garlic! Let’s all become experts in growing garlic in plastic bags!
Frequently Asked Questions (FAQ)
Q: What kind of plastic bag is best for growing garlic?
A: While almost any plastic bag can work in a pinch, we recommend using a heavy-duty, opaque plastic bag. Opaque bags help to prevent algae growth in the soil. Reusable shopping bags are a great option, as they are durable and environmentally friendly. Avoid using thin, flimsy plastic bags, as they may tear easily. Make sure the bag is clean before using it. You can also use grow bags made of fabric, which offer better drainage and aeration.
Q: How many garlic cloves can I plant in one plastic bag?
A: This depends on the size of the bag. As a general rule, allow at least 4-6 inches of space between each clove. For a standard-sized shopping bag, you can typically plant 3-5 cloves. Overcrowding can lead to smaller bulbs and increased risk of disease. If you’re using a larger bag, you can plant more cloves, but make sure they have enough room to grow.
Q: What kind of soil should I use for growing garlic in a plastic bag?
A: A well-draining potting mix is ideal. You can also amend the soil with compost or other organic matter to improve its fertility. Avoid using garden soil, as it can be too heavy and may not drain well. Good drainage is crucial to prevent the garlic cloves from rotting. You can also add perlite or vermiculite to the soil mix to improve drainage.
Q: How often should I water the garlic in the plastic bag?
A: Water the garlic regularly, keeping the soil consistently moist but not waterlogged. Check the soil moisture by sticking your finger into the soil. If the top inch feels dry, it’s time to water. Avoid overwatering, as this can lead to root rot. The frequency of watering will depend on the weather and the drainage of your bag.
Q: Where should I place the plastic bag with garlic?
A: Garlic needs plenty of sunlight, so place the bag in a location that receives at least 6-8 hours of direct sunlight per day. A sunny windowsill, balcony, or patio is ideal. If you don’t have enough sunlight, you can supplement with grow lights. Rotate the bag regularly to ensure that all sides of the plant receive equal sunlight.
Q: How long does it take to grow garlic in a plastic bag?
A: Garlic typically takes 6-9 months to mature, depending on the variety and growing conditions. You’ll know it’s ready to harvest when the leaves start to turn yellow and brown. Stop watering a few weeks before harvest to allow the bulbs to dry out slightly.
Q: Can I grow garlic in a plastic bag indoors?
A: Yes, you can grow garlic in a plastic bag indoors, but you’ll need to provide adequate sunlight or use grow lights. Indoor garlic may not grow as large as outdoor garlic, but you can still harvest the green shoots for use in cooking. Make sure to provide good ventilation to prevent fungal diseases.
Q: What are some common problems when growing garlic in a plastic bag?
A: Some common problems include root rot (due to overwatering), pests (such as aphids or mites), and fungal diseases (such as rust or mildew). To prevent these problems, use well-draining soil, water carefully, and provide good ventilation. Inspect your plants regularly for signs of pests or diseases and take action promptly.
Q: Can I reuse the plastic bag for growing garlic again?
A: Yes, you can reuse the plastic bag, but make sure to clean it thoroughly before using it again. Wash the bag with soap and water and disinfect it with a bleach solution to kill any lingering pathogens. It’s also a good idea to replace the soil with fresh potting mix.
Q: What can I do with the garlic greens?
A: The garlic greens are edible and can be used in a variety of dishes. They have a mild garlic flavor and can be used in salads, soups, stir-fries, or as a garnish. You can also chop them up and freeze them for later use. Don’t discard the greens – they’re a delicious and nutritious addition to your cooking.
Q: How do I store the harvested garlic?
A: After harvesting, cure the garlic by drying it in a well-ventilated area for 2-3 weeks. Once the outer skin is dry and papery, you can store the garlic in a cool, dry place. Braiding the garlic is a traditional way to store it, but you can also store it in a mesh bag or basket. Properly stored garlic can last for several months.
Q: Can I grow different varieties of garlic in plastic bags?
A: Absolutely! Experimenting with different varieties is part of the fun. Softneck varieties are well-suited for braiding, while hardneck varieties offer a more robust flavor. Elephant garlic, while technically a leek, can also be grown in a larger bag for impressively sized cloves. Research the specific needs of each variety to ensure optimal growth.
Q: What if I don’t have a green thumb? Can I still succeed at growing garlic in a plastic bag?
A: Yes! This method is incredibly forgiving and beginner-friendly. The key is to follow the basic guidelines – well-draining soil, adequate sunlight, and consistent watering. Don’t be afraid to experiment and learn from your mistakes. Even if you don’t get a perfect harvest the first time, you’ll gain valuable experience and be better prepared for the next growing season. The most important thing is to have fun and enjoy the process!
Leave a Comment