
Growing Chili Peppers in Containers: Unleash the fiery flavors of homegrown goodness right on your patio! Have you ever dreamed of adding a dash of spice to your meals with peppers you’ve nurtured yourself? Well, dream no more! This DIY guide is your passport to a vibrant, pepper-packed paradise, even if you only have a small balcony or a sunny windowsill.
Chili peppers have a rich history, dating back thousands of years in the Americas, where they were not only a culinary staple but also held medicinal and even spiritual significance. From the ancient Aztecs to modern-day foodies, the love for chili peppers has only grown stronger. But you don’t need to be an expert gardener to enjoy the fruits (or should I say, peppers!) of your labor.
Many people are intimidated by the thought of growing their own food, especially something as seemingly exotic as chili peppers. But trust me, growing chili peppers in containers is surprisingly easy and incredibly rewarding. It’s a fantastic way to add fresh, organic ingredients to your cooking, save money at the grocery store, and connect with nature, all while adding a splash of color to your outdoor space. Plus, who wouldn’t want to impress their friends with their homegrown hot sauce? Let’s dive in and discover the secrets to a bountiful chili pepper harvest!
Growing Chili Peppers in Containers: A Spicy DIY Guide
Hey there, fellow chili enthusiasts! I’m so excited to share my tried-and-true method for growing vibrant, fiery chili peppers right in containers. Whether you’re a seasoned gardener or just starting out, this guide will walk you through every step, ensuring you have a bountiful harvest of delicious peppers. Let’s get started!
Choosing the Right Chili Pepper Variety
Before we dive into the nitty-gritty, let’s talk about choosing the right chili pepper variety for your container garden. The good news is, most chili peppers thrive in containers, but some are better suited than others. Consider these factors:
* Size: Compact varieties like Thai peppers, Jalapeños, and Scotch Bonnets are excellent choices for smaller containers. If you have more space, you can opt for larger varieties like Anaheim or Poblano peppers.
* Heat Level: Think about your spice tolerance! Do you prefer a mild kick or a scorching inferno? Research the Scoville Heat Units (SHU) of different varieties to find the perfect match.
* Climate: Some chili peppers are more tolerant of cooler climates than others. If you live in a region with short summers, choose varieties that mature quickly.
* Personal Preference: Ultimately, the best chili pepper variety is the one you enjoy eating the most! Experiment with different types to discover your favorites.
Gathering Your Supplies
Okay, now that you’ve chosen your chili pepper variety, it’s time to gather your supplies. Here’s what you’ll need:
* Chili Pepper Seeds or Seedlings: You can start from seeds or purchase seedlings from a local nursery. Seedlings will give you a head start, but starting from seeds is more cost-effective.
* Containers: Choose containers that are at least 12 inches in diameter and depth. Larger containers are generally better, as they provide more room for the roots to grow. Make sure your containers have drainage holes!
* Potting Mix: Use a high-quality potting mix that is well-draining and contains plenty of organic matter. Avoid using garden soil, as it can become compacted in containers.
* Fertilizer: Chili peppers are heavy feeders, so you’ll need to fertilize them regularly. Use a balanced fertilizer (e.g., 10-10-10) or a fertilizer specifically formulated for peppers and tomatoes.
* Watering Can or Hose: You’ll need a way to water your chili peppers regularly.
* Optional:
* Grow Lights: If you’re starting your seeds indoors, you’ll need grow lights to provide adequate light.
* Heat Mat: A heat mat can help speed up germination.
* Plant Markers: Label your plants so you know which variety is which.
* Gloves: Protect your hands from the chili pepper oils.
* Pruning Shears: For trimming and shaping your plants.
* Support Stakes or Cages: For taller varieties that may need support.
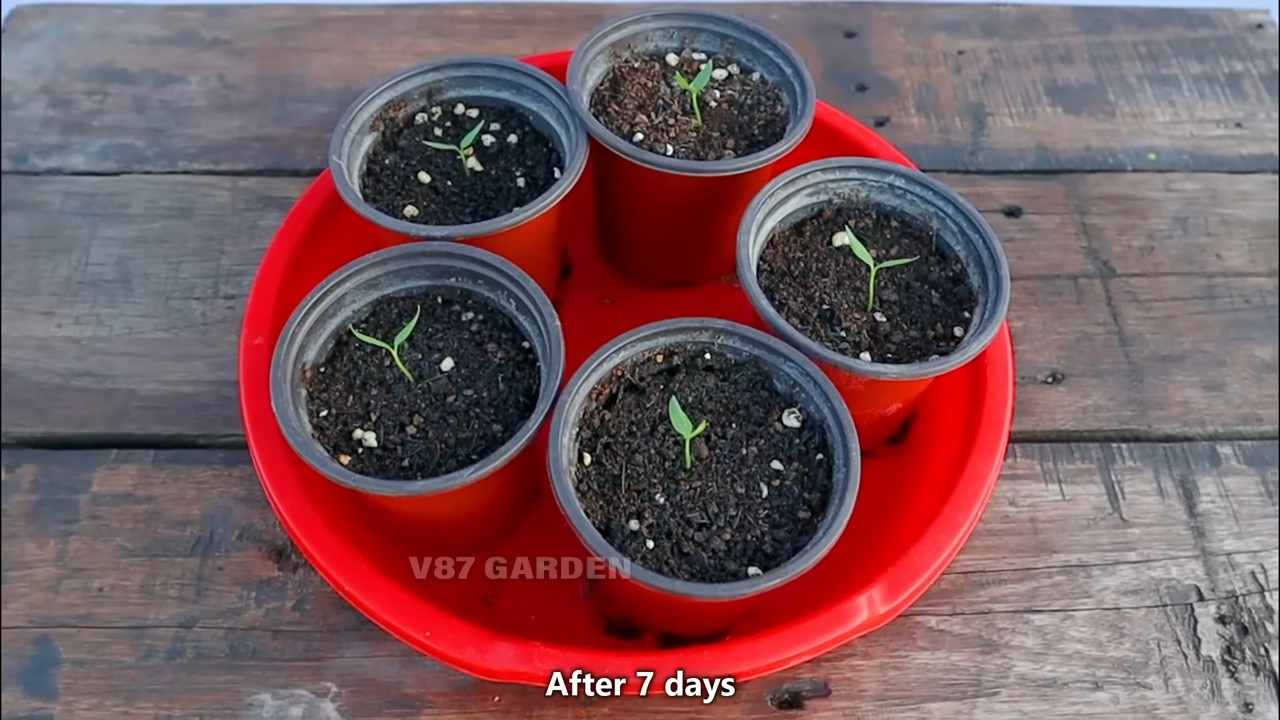
Starting from Seeds (Optional)
If you’re starting from seeds, here’s how to do it:
1. Sow the Seeds: Fill a seed tray or small pots with potting mix. Moisten the soil and sow the seeds about ¼ inch deep.
2. Provide Warmth and Light: Place the seed tray or pots on a heat mat and under grow lights. Maintain a temperature of 70-80°F (21-27°C).
3. Keep the Soil Moist: Water the soil regularly to keep it moist but not soggy.
4. Germination: The seeds should germinate in 7-14 days.
5. Transplant Seedlings: Once the seedlings have developed a few sets of true leaves, transplant them into larger pots.
Planting Your Chili Peppers in Containers
Whether you’re using seedlings or transplanting your own, here’s how to plant your chili peppers in containers:
1. Prepare the Container: Fill the container with potting mix, leaving a few inches of space at the top.
2. Dig a Hole: Dig a hole in the center of the container that is large enough to accommodate the root ball of the seedling.
3. Remove the Seedling: Gently remove the seedling from its pot, being careful not to damage the roots.
4. Place the Seedling: Place the seedling in the hole and backfill with potting mix.
5. Water Thoroughly: Water the plant thoroughly to settle the soil.
6. Add Support (Optional): If you’re growing a taller variety, add a support stake or cage to help the plant stay upright.
Caring for Your Chili Peppers
Now that your chili peppers are planted, it’s time to provide them with the care they need to thrive.
1. Sunlight: Chili peppers need at least 6-8 hours of sunlight per day. Place your containers in a sunny location.
2. Watering: Water your chili peppers regularly, especially during hot, dry weather. Allow the soil to dry out slightly between waterings. Overwatering can lead to root rot.
3. Fertilizing: Fertilize your chili peppers every 2-3 weeks with a balanced fertilizer or a fertilizer specifically formulated for peppers and tomatoes. Follow the instructions on the fertilizer label.
4. Pruning: Pruning can help improve air circulation and encourage bushier growth. Remove any yellowing or dead leaves. You can also pinch off the tips of the branches to encourage more branching.
5. Pest and Disease Control: Keep an eye out for pests and diseases. Common pests include aphids, spider mites, and whiteflies. Common diseases include powdery mildew and blossom end rot. Treat any problems promptly with appropriate organic or chemical controls.
6. Pollination: Chili peppers are self-pollinating, but you can help them along by gently shaking the plants or using a small brush to transfer pollen from one flower to another. This is especially important if you’re growing your chili peppers indoors.
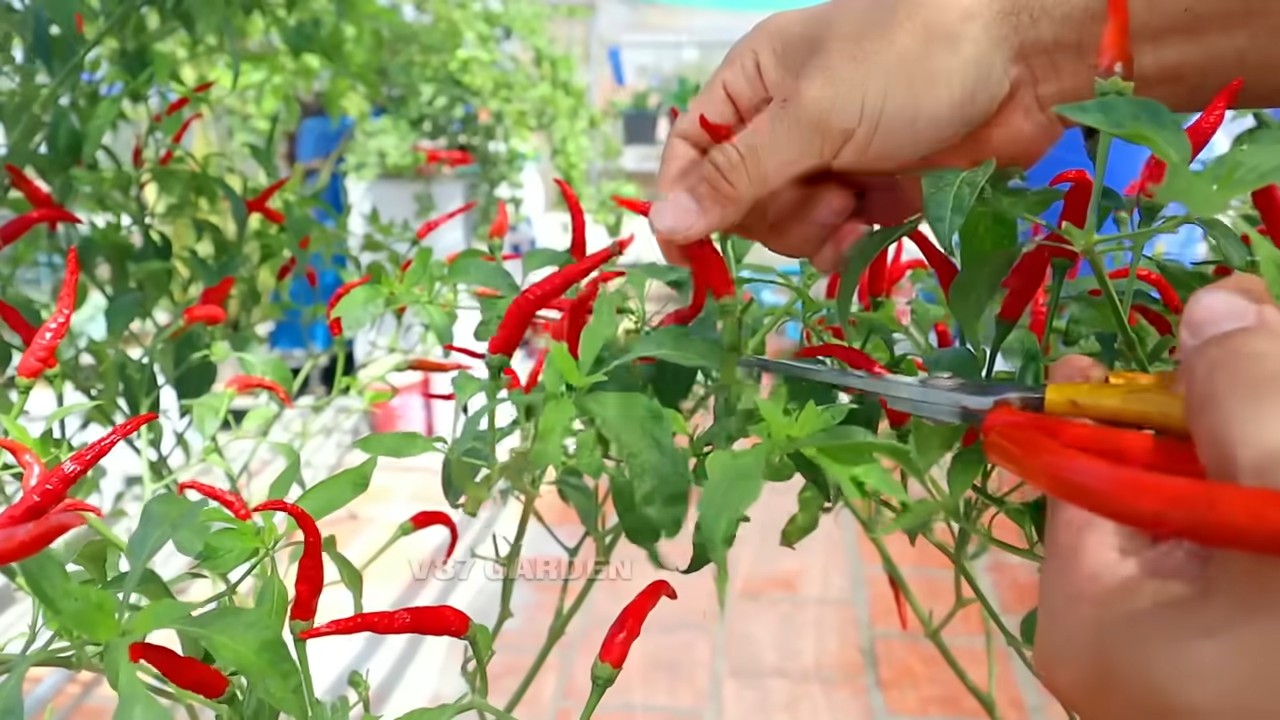
Harvesting Your Chili Peppers
The moment you’ve been waiting for! Harvesting your chili peppers is the most rewarding part of the process.
1. Timing: The time it takes for chili peppers to mature depends on the variety. Generally, they are ready to harvest when they have reached their mature size and color.
2. Harvesting: Use pruning shears or scissors to cut the chili peppers from the plant. Be careful not to damage the plant.
3. Handling: Wear gloves when handling hot chili peppers to protect your skin from the oils.
4. Storage: You can store chili peppers in the refrigerator for several weeks. You can also dry them, freeze them, or pickle them.
Troubleshooting Common Problems
Even with the best care, you may encounter some problems while growing chili peppers. Here are some common issues and how to address them:
* Blossom End Rot: This is caused by a calcium deficiency. Add calcium to the soil or use a calcium-rich fertilizer. Ensure consistent watering.
* Leaf Curl: This can be caused by aphids, spider mites, or viruses. Inspect your plants for pests and treat accordingly.
* Yellowing Leaves: This can be caused by nutrient deficiencies, overwatering, or underwatering. Check the soil moisture and fertilize if necessary.
* Lack of Fruit: This can be caused by lack of pollination, insufficient sunlight, or extreme temperatures. Ensure adequate sunlight and pollinate the flowers manually if necessary.
* Pest Infestations: Regularly inspect your plants for pests and treat them promptly with appropriate organic or chemical controls.
Specific Tips for Hotter Varieties
Growing super-hot peppers like Ghost Peppers, Scotch Bonnets, or Habaneros requires a little extra attention. Here are some tips:
* Start Early: These peppers often take longer to mature, so start your seeds indoors 8-10 weeks before the last expected frost.
* Provide Extra Warmth: They thrive in warmer temperatures, so consider using a heat mat and grow lights to give them a boost.
* Be Patient: Don’t get discouraged if they seem to be growing slowly. They often take their time to develop their intense heat.
* Handle with Care: Always wear gloves when handling these peppers, and avoid touching your eyes or face. The oils can cause severe burning.
* Isolate Plants: If you’re growing multiple varieties, consider isolating the super-hot peppers to prevent cross-pollination, which can affect the heat level of other peppers.
Enjoying Your Harvest
Congratulations! You’ve successfully grown your own chili peppers in containers. Now it’s time to enjoy the fruits (or should I say, peppers?) of your labor. Use your chili peppers in your favorite recipes, make hot sauce, or dry them for later use. The possibilities are
Conclusion
So, there you have it! Mastering the art of growing chili peppers in containers is not only achievable but also incredibly rewarding. We’ve explored the key elements, from selecting the right container size and drainage to choosing the perfect soil mix and providing optimal sunlight and watering. This DIY approach empowers you to cultivate a vibrant chili pepper garden, regardless of your space limitations.
Why is this a must-try? Because it puts you in control. You dictate the environment, the nutrients, and the overall health of your plants. Store-bought chili peppers, while convenient, often lack the intense flavor and satisfying heat that homegrown varieties offer. Plus, there’s an undeniable sense of accomplishment that comes from nurturing a plant from seedling to harvest. Imagine the pride you’ll feel when you’re adding your own freshly grown chili peppers to your favorite dishes!
But the beauty of this DIY project lies in its adaptability. Feel free to experiment with different chili pepper varieties. From the mild poblano to the fiery habanero, the possibilities are endless. Consider adding companion plants like basil or marigolds to your containers. These not only enhance the aesthetic appeal of your garden but also offer natural pest control benefits. You can also adjust the soil mix to suit the specific needs of your chosen chili pepper variety. Some varieties thrive in slightly acidic soil, while others prefer a more neutral pH.
Don’t be afraid to get creative with your container choices. While standard plastic pots are perfectly functional, you can also use repurposed items like old buckets, wooden crates, or even fabric grow bags. Just ensure that your chosen container provides adequate drainage and is large enough to accommodate the mature size of your chili pepper plant.
We strongly encourage you to embark on this exciting journey of growing chili peppers in containers. It’s a fantastic way to connect with nature, enhance your culinary creations, and add a touch of spice to your life. And remember, gardening is a learning process. Don’t be discouraged if you encounter challenges along the way. Embrace the opportunity to learn and adapt, and you’ll be well on your way to becoming a chili pepper growing expert.
Once you’ve harvested your first batch of homegrown chili peppers, we’d love to hear about your experience! Share your tips, tricks, and photos with us in the comments section below. Let’s create a community of passionate chili pepper growers and inspire others to discover the joys of DIY gardening. Happy growing!
Frequently Asked Questions (FAQ)
What is the best size container for growing chili peppers?
The ideal container size depends on the specific chili pepper variety you’re growing. Generally, a container that is at least 5 gallons in size is recommended for most varieties. Larger varieties, such as bell peppers or some of the larger chili pepper types, may require a 10-gallon container or larger. The key is to provide enough space for the roots to develop and support the plant’s growth. A smaller container can restrict root growth, leading to stunted plants and reduced yields. Consider the mature size of the chili pepper plant when selecting your container.
What type of soil is best for chili peppers in containers?
Chili peppers thrive in well-draining soil that is rich in organic matter. A good potting mix for chili peppers should consist of a blend of peat moss, perlite, and vermiculite. You can also add compost or other organic amendments to improve the soil’s fertility and drainage. Avoid using garden soil in containers, as it tends to compact and doesn’t provide adequate drainage. The ideal pH range for chili peppers is between 6.0 and 7.0. You can test the pH of your soil using a soil testing kit and adjust it accordingly.
How often should I water my chili pepper plants in containers?
The frequency of watering depends on several factors, including the weather, the size of the container, and the type of soil. Generally, you should water your chili pepper plants when the top inch of soil feels dry to the touch. Avoid overwatering, as this can lead to root rot. When watering, water deeply until the water drains out of the bottom of the container. This ensures that the roots are thoroughly moistened. During hot, dry weather, you may need to water your plants more frequently.
How much sunlight do chili peppers need?
Chili peppers require at least 6-8 hours of direct sunlight per day to thrive. Choose a location for your containers that receives plenty of sunlight. If you live in a hot climate, you may need to provide some afternoon shade to protect your plants from scorching. If you’re growing chili peppers indoors, you’ll need to supplement with artificial lighting, such as grow lights.
What are some common pests and diseases that affect chili peppers?
Chili peppers can be susceptible to a variety of pests and diseases, including aphids, spider mites, whiteflies, and fungal diseases. Regularly inspect your plants for signs of infestation or disease. If you detect any problems, take action immediately. You can use insecticidal soap or neem oil to control pests. For fungal diseases, you can use a fungicide. Proper watering and ventilation can also help prevent diseases.
How do I fertilize my chili pepper plants?
Chili peppers are heavy feeders and require regular fertilization. Use a balanced fertilizer that is specifically formulated for vegetables. Follow the instructions on the fertilizer label. You can also use organic fertilizers, such as compost tea or fish emulsion. Fertilize your plants every 2-3 weeks during the growing season. Avoid over-fertilizing, as this can lead to excessive foliage growth and reduced fruit production.
When should I harvest my chili peppers?
The timing of harvest depends on the specific chili pepper variety and your personal preference. Generally, chili peppers are ready to harvest when they have reached their mature size and color. Some varieties will turn red, while others will turn yellow, orange, or brown. You can also harvest chili peppers when they are green, but they will not be as flavorful or spicy. Use a sharp knife or scissors to cut the peppers from the plant.
Can I overwinter my chili pepper plants?
Yes, you can overwinter your chili pepper plants indoors. Before the first frost, prune your plants back to about 6 inches tall and transplant them into smaller containers. Bring the containers indoors and place them in a sunny location. Water sparingly during the winter months. In the spring, you can transplant your plants back into larger containers and move them outdoors.
What are some good companion plants for chili peppers?
Companion planting can be beneficial for chili peppers. Some good companion plants include basil, marigolds, onions, garlic, and carrots. Basil helps to repel pests, while marigolds attract beneficial insects. Onions and garlic can help to deter aphids. Carrots can help to improve soil drainage.
How can I increase the heat of my chili peppers?
Several factors can influence the heat of chili peppers, including genetics, growing conditions, and stress. To increase the heat of your chili peppers, you can try the following:
* Provide plenty of sunlight.
* Water sparingly.
* Avoid over-fertilizing.
* Stress the plants by withholding water for a few days before harvesting.
* Choose a hot chili pepper variety.
Remember that the heat of chili peppers can vary depending on the individual pepper.


Leave a Comment