
Growing celery at home might seem like a challenge reserved for seasoned gardeners, but I’m here to tell you it’s totally achievable, even if you’re a beginner! Forget those bland, store-bought stalks – imagine the crisp, fresh flavor of homegrown celery adding a delightful crunch to your salads, soups, and snacks.
Celery has a fascinating history, dating back to ancient times where it was valued more for its medicinal properties than its culinary uses. The ancient Greeks and Romans used it to crown victors in athletic competitions, symbolizing triumph and celebration. While we might not be crowning anyone with celery these days, cultivating it in our own gardens can certainly feel like a victory!
Why should you bother with this DIY project? Well, for starters, growing celery at home allows you to control exactly what goes into your food, avoiding harmful pesticides and ensuring the freshest possible produce. Plus, it’s incredibly rewarding to nurture a plant from start to finish, watching it thrive under your care. In this article, I’ll share some simple yet effective tricks and hacks that will make growing celery at home a breeze, even if you have limited space or experience. Get ready to ditch the grocery store celery and embrace the joy of homegrown goodness!
Growing Celery at Home: From Kitchen Scraps to Crunchy Stalks!
Hey there, fellow gardening enthusiasts! Ever wondered if you could grow your own celery? Well, let me tell you, it’s totally doable, and it’s a super rewarding experience. Plus, it’s a fantastic way to reduce food waste and have fresh celery right at your fingertips. I’m going to walk you through the whole process, from regrowing celery from a store-bought stalk to transplanting it into your garden. Let’s get started!
Regrowing Celery from a Base: The Water Propagation Method
This is the easiest and most common way to start growing celery at home. It’s like magic – you take the base of a celery stalk, give it some water, and watch it sprout!
What you’ll need:
* The base of a celery stalk (about 2 inches from the bottom, with the stalks cut off)
* A shallow dish or glass
* Water
* A sunny windowsill
Step-by-step instructions:
1. Prepare the Celery Base: After you’ve used the celery stalks for cooking or snacking, don’t toss the base! Carefully cut off the stalks, leaving about 2 inches of the base intact. Try to make a clean, even cut.
2. Place in Water: Put the celery base in your shallow dish or glass. Add enough water to cover the bottom inch or so of the base. You don’t want to submerge the entire thing, just the bottom part where the roots will emerge.
3. Find a Sunny Spot: Place the dish on a sunny windowsill. Celery needs plenty of light to grow, so a bright spot is crucial. A south-facing window is ideal, but an east or west-facing window will also work.
4. Change the Water Regularly: This is important! Change the water every 1-2 days to prevent bacteria growth and keep the water fresh. This will help your celery base stay healthy and encourage root development.
5. Observe Root Growth: Within a few days to a week, you should start to see small roots emerging from the bottom of the celery base. You’ll also notice new green shoots sprouting from the top. This is a sign that your celery is thriving!
6. Continue Growing in Water: Keep changing the water regularly and let the roots grow for another week or two. You want the roots to be at least an inch or two long before transplanting. The more established the roots, the better the chances of success when you move it to soil.
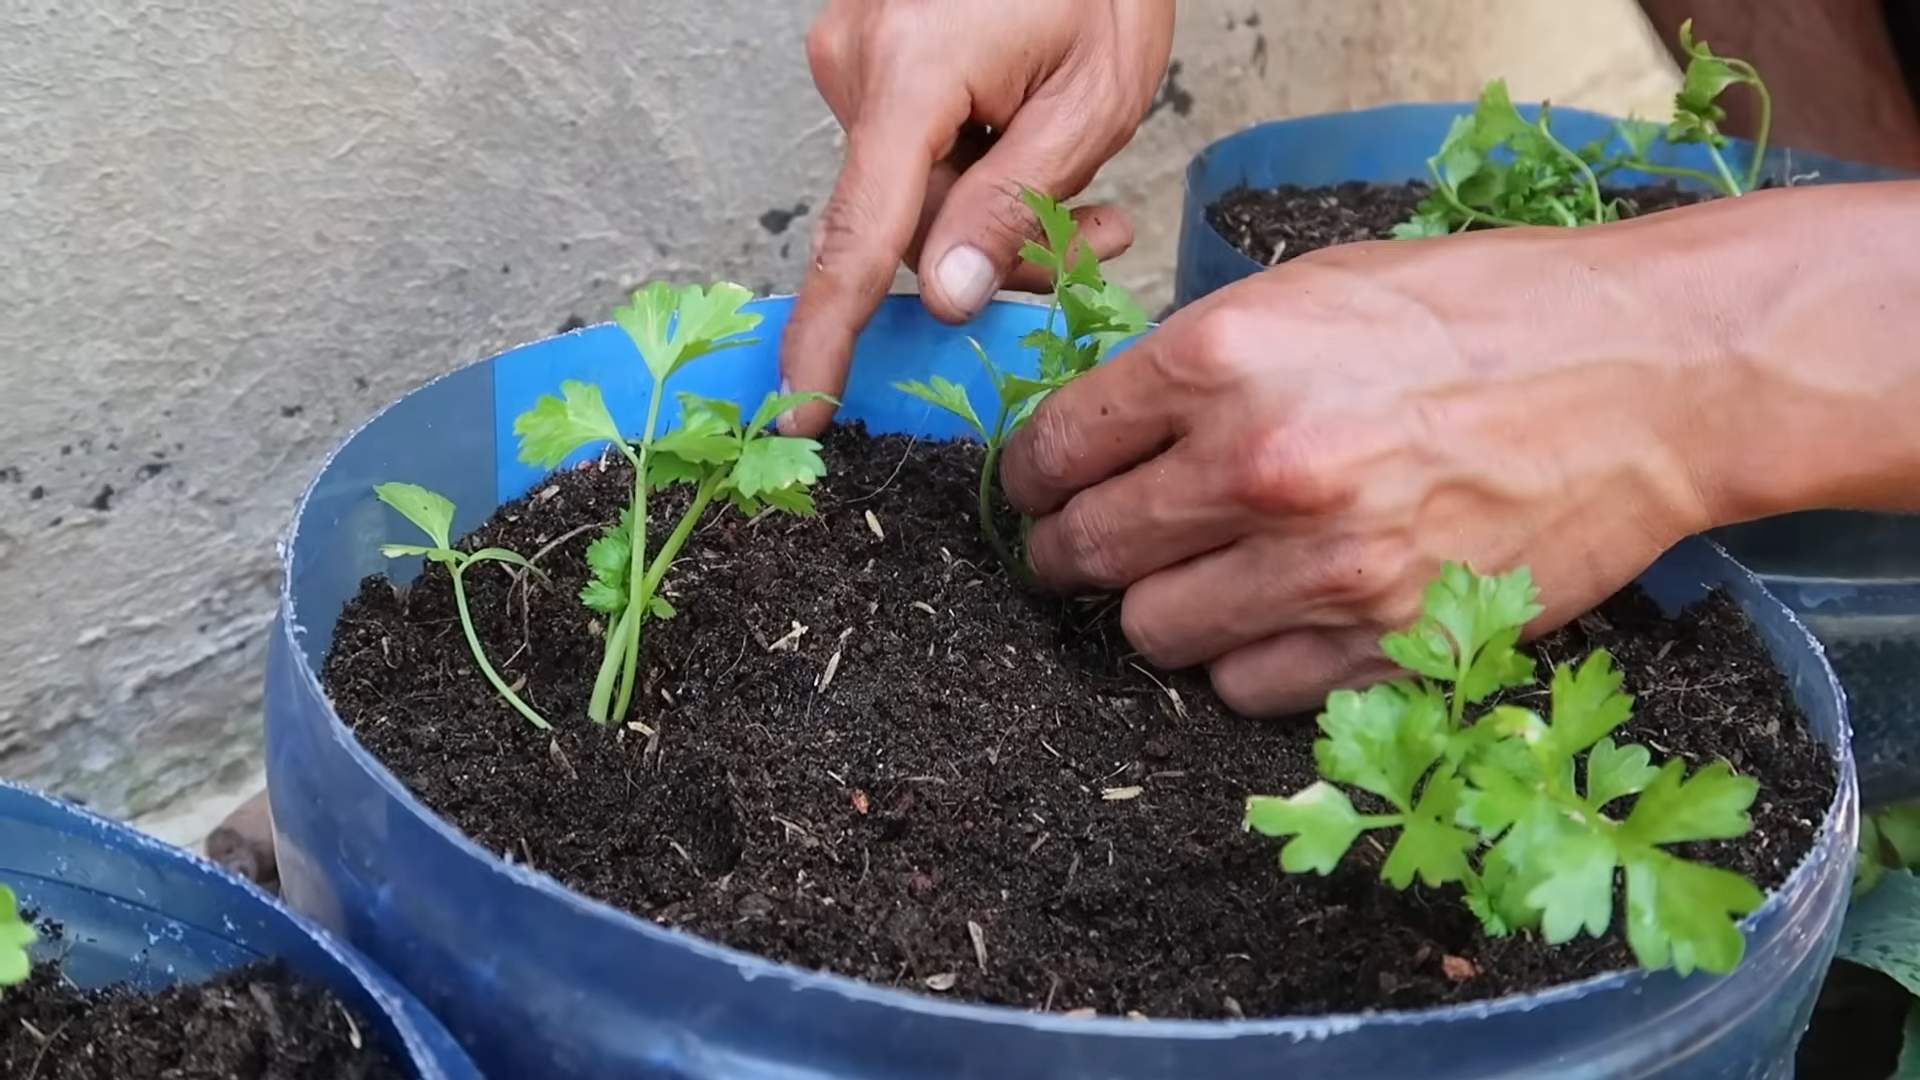
Transplanting Your Celery to Soil: Giving it a Home
Once your celery has developed a good root system, it’s time to move it to soil. This will give it the nutrients it needs to grow into a full-sized plant.
What you’ll need:
* Your rooted celery base
* A small pot (4-6 inches in diameter)
* Potting soil (a well-draining mix is best)
* Water
* A larger pot or garden bed (for eventual transplanting)
Step-by-step instructions:
1. Prepare the Pot: Fill your small pot with potting soil, leaving about an inch of space at the top. Gently pat down the soil to remove any air pockets.
2. Create a Hole: Use your finger or a small tool to create a hole in the center of the pot, large enough to accommodate the celery roots.
3. Carefully Transplant: Gently remove the celery base from the water and carefully place it in the hole. Make sure the roots are spread out and not bunched together.
4. Cover the Roots: Fill the hole with potting soil, gently covering the roots. Don’t bury the base of the celery too deep; you want the top of the base to be just above the soil line.
5. Water Thoroughly: Water the newly transplanted celery thoroughly, until water drains out of the bottom of the pot. This will help settle the soil and ensure the roots are properly hydrated.
6. Place in a Sunny Location: Put the pot in a sunny location, just like before. Celery needs at least 6 hours of sunlight per day to thrive.
7. Keep the Soil Moist: Celery needs consistent moisture, so check the soil regularly and water when the top inch feels dry to the touch. Don’t let the soil dry out completely, but also avoid overwatering, which can lead to root rot.
Caring for Your Growing Celery: Nurturing Your Plant
Now that your celery is in soil, it’s time to provide it with the care it needs to grow big and strong.
What you’ll need:
* Water
* Fertilizer (optional)
* Mulch (optional)
* Patience!
Step-by-step instructions:
1. Watering: As I mentioned before, consistent moisture is key. Water your celery regularly, especially during hot or dry weather. Check the soil moisture daily and water when needed.
2. Fertilizing (Optional): Celery is a heavy feeder, so you can fertilize it every few weeks with a balanced liquid fertilizer. Follow the instructions on the fertilizer package. This will help your celery grow faster and produce larger stalks. However, it’s not absolutely necessary, especially if you’re using a good quality potting soil.
3. Mulching (Optional): Adding a layer of mulch around the base of the celery plant can help retain moisture in the soil, suppress weeds, and regulate soil temperature. Use organic mulch like straw, wood chips, or shredded leaves.
4. Monitoring for Pests and Diseases: Keep an eye out for any signs of pests or diseases. Celery can be susceptible to aphids, slugs, and fungal diseases. If you notice any problems, take action promptly. You can use organic pest control methods like insecticidal soap or neem oil.
5. Blanching (Optional): Blanching is a technique used to make celery stalks whiter and milder in flavor. About two weeks before harvesting, you can blanch your celery by wrapping the stalks with newspaper or cardboard, leaving the top leaves exposed. This will block sunlight from reaching the stalks, resulting in a lighter color and less bitter taste.
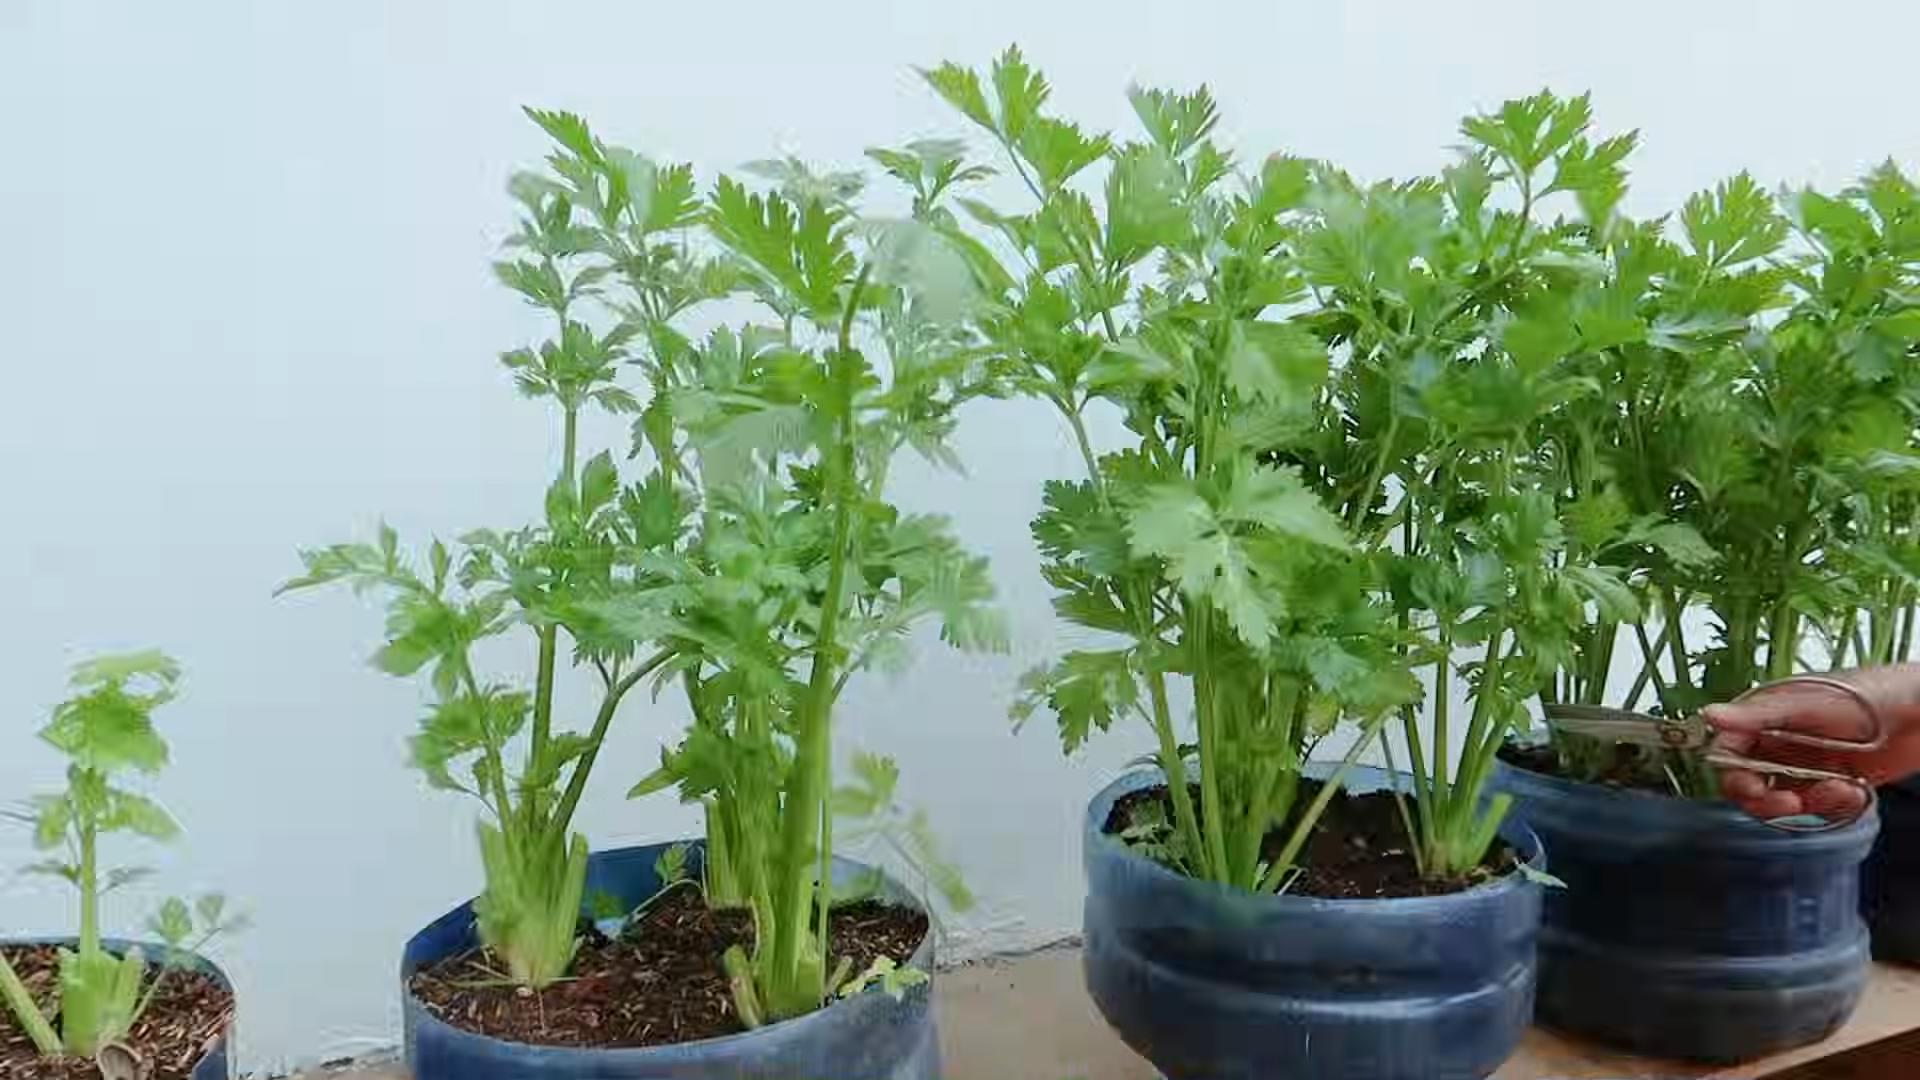
Transplanting to a Larger Container or Garden Bed: Giving it Room to Grow
As your celery plant grows, it will eventually need more space. You can either transplant it to a larger container or directly into your garden bed.
What you’ll need:
* Your celery plant
* A larger pot (at least 12 inches in diameter) or a garden bed
* Potting soil or garden soil
* Water
Step-by-step instructions:
1. Choose a Location: Select a location that receives at least 6 hours of sunlight per day. Celery prefers well-drained soil that is rich in organic matter.
2. Prepare the Soil: If you’re planting in a garden bed, amend the soil with compost or other organic matter to improve drainage and fertility.
3. Dig a Hole: Dig a hole that is slightly larger than the root ball of your celery plant.
4. Carefully Remove the Plant: Gently remove the celery plant from its pot, being careful not to damage the roots.
5. Place in the Hole: Place the celery plant in the hole, making sure the top of the root ball is level with the surrounding soil.
6. Fill the Hole: Fill the hole with soil, gently patting it down around the plant.
7. Water Thoroughly: Water the newly transplanted celery thoroughly, until water drains out of the bottom of the pot or the surrounding soil.
8. Space Multiple Plants: If you’re planting multiple celery plants, space them about 6-8 inches apart. This will give them enough room to grow without crowding each other.
Harvesting Your Celery: Enjoying the Fruits (or Vegetables!) of Your Labor
After about 80-100 days, your celery should be ready to harvest. You can harvest the entire plant at once, or you can harvest individual stalks as needed.
Hey there, fellow gardening enthusiasts! Ever wondered if you could grow your own celery? Well, let me tell you, it’s totally doable, and it’s a super rewarding experience. Plus, it’s a fantastic way to reduce food waste and have fresh celery right at your fingertips. I’m going to walk you through the whole process, from regrowing celery from a store-bought stalk to transplanting it into your garden. Let’s get started!
Regrowing Celery from a Base: The Water Propagation Method
This is the easiest and most common way to start growing celery at home. It’s like magic – you take the base of a celery stalk, give it some water, and watch it sprout!
What you’ll need:
* The base of a celery stalk (about 2 inches from the bottom, with the stalks cut off)
* A shallow dish or glass
* Water
* A sunny windowsill
Step-by-step instructions:
1. Prepare the Celery Base: After you’ve used the celery stalks for cooking or snacking, don’t toss the base! Carefully cut off the stalks, leaving about 2 inches of the base intact. Try to make a clean, even cut.
2. Place in Water: Put the celery base in your shallow dish or glass. Add enough water to cover the bottom inch or so of the base. You don’t want to submerge the entire thing, just the bottom part where the roots will emerge.
3. Find a Sunny Spot: Place the dish on a sunny windowsill. Celery needs plenty of light to grow, so a bright spot is crucial. A south-facing window is ideal, but an east or west-facing window will also work.
4. Change the Water Regularly: This is important! Change the water every 1-2 days to prevent bacteria growth and keep the water fresh. This will help your celery base stay healthy and encourage root development.
5. Observe Root Growth: Within a few days to a week, you should start to see small roots emerging from the bottom of the celery base. You’ll also notice new green shoots sprouting from the top. This is a sign that your celery is thriving!
6. Continue Growing in Water: Keep changing the water regularly and let the roots grow for another week or two. You want the roots to be at least an inch or two long before transplanting. The more established the roots, the better the chances of success when you move it to soil.
Transplanting Your Celery to Soil: Giving it a Home
Once your celery has developed a good root system, it’s time to move it to soil. This will give it the nutrients it needs to grow into a full-sized plant.
What you’ll need:
* Your rooted celery base
* A small pot (4-6 inches in diameter)
* Potting soil (a well-draining mix is best)
* Water
* A larger pot or garden bed (for eventual transplanting)
Step-by-step instructions:
1. Prepare the Pot: Fill your small pot with potting soil, leaving about an inch of space at the top. Gently pat down the soil to remove any air pockets.
2. Create a Hole: Use your finger or a small tool to create a hole in the center of the pot, large enough to accommodate the celery roots.
3. Carefully Transplant: Gently remove the celery base from the water and carefully place it in the hole. Make sure the roots are spread out and not bunched together.
4. Cover the Roots: Fill the hole with potting soil, gently covering the roots. Don’t bury the base of the celery too deep; you want the top of the base to be just above the soil line.
5. Water Thoroughly: Water the newly transplanted celery thoroughly, until water drains out of the bottom of the pot. This will help settle the soil and ensure the roots are properly hydrated.
6. Place in a Sunny Location: Put the pot in a sunny location, just like before. Celery needs at least 6 hours of sunlight per day to thrive.
7. Keep the Soil Moist: Celery needs consistent moisture, so check the soil regularly and water when the top inch feels dry to the touch. Don’t let the soil dry out completely, but also avoid overwatering, which can lead to root rot.
Caring for Your Growing Celery: Nurturing Your Plant
Now that your celery is in soil, it’s time to provide it with the care it needs to grow big and strong.
What you’ll need:
* Water
* Fertilizer (optional)
* Mulch (optional)
* Patience!
Step-by-step instructions:
1. Watering: As I mentioned before, consistent moisture is key. Water your celery regularly, especially during hot or dry weather. Check the soil moisture daily and water when needed.
2. Fertilizing (Optional): Celery is a heavy feeder, so you can fertilize it every few weeks with a balanced liquid fertilizer. Follow the instructions on the fertilizer package. This will help your celery grow faster and produce larger stalks. However, it’s not absolutely necessary, especially if you’re using a good quality potting soil.
3. Mulching (Optional): Adding a layer of mulch around the base of the celery plant can help retain moisture in the soil, suppress weeds, and regulate soil temperature. Use organic mulch like straw, wood chips, or shredded leaves.
4. Monitoring for Pests and Diseases: Keep an eye out for any signs of pests or diseases. Celery can be susceptible to aphids, slugs, and fungal diseases. If you notice any problems, take action promptly. You can use organic pest control methods like insecticidal soap or neem oil.
5. Blanching (Optional): Blanching is a technique used to make celery stalks whiter and milder in flavor. About two weeks before harvesting, you can blanch your celery by wrapping the stalks with newspaper or cardboard, leaving the top leaves exposed. This will block sunlight from reaching the stalks, resulting in a lighter color and less bitter taste.
Transplanting to a Larger Container or Garden Bed: Giving it Room to Grow
As your celery plant grows, it will eventually need more space. You can either transplant it to a larger container or directly into your garden bed.
What you’ll need:
* Your celery plant
* A larger pot (at least 12 inches in diameter) or a garden bed
* Potting soil or garden soil
* Water
Step-by-step instructions:
1. Choose a Location: Select a location that receives at least 6 hours of sunlight per day. Celery prefers well-drained soil that is rich in organic matter.
2. Prepare the Soil: If you’re planting in a garden bed, amend the soil with compost or other organic matter to improve drainage and fertility.
3. Dig a Hole: Dig a hole that is slightly larger than the root ball of your celery plant.
4. Carefully Remove the Plant: Gently remove the celery plant from its pot, being careful not to damage the roots.
5. Place in the Hole: Place the celery plant in the hole, making sure the top of the root ball is level with the surrounding soil.
6. Fill the Hole: Fill the hole with soil, gently patting it down around the plant.
7. Water Thoroughly: Water the newly transplanted celery thoroughly, until water drains out of the bottom of the pot or the surrounding soil.
8. Space Multiple Plants: If you’re planting multiple celery plants, space them about 6-8 inches apart. This will give them enough room to grow without crowding each other.
Harvesting Your Celery: Enjoying the Fruits (or Vegetables!) of Your Labor
After about 80-100 days, your celery should be ready to harvest. You can harvest the entire plant at once, or you can harvest individual stalks as needed.
What you’ll need:
* A sharp knife
Step-by-step instructions:
1. Harvest the Entire Plant: To harvest the entire plant, use a sharp knife to cut the celery at the base, just below the soil line.
2. Harvest Individual Stalks: To harvest individual stalks, simply cut them off at the base of the plant. Start with the outer stalks, as they are usually the largest and most mature.
3. Wash and Store: After harvesting, wash the celery thoroughly and store it in the refrigerator. Celery will stay fresh for up to two weeks if stored properly. Wrap it loosely in plastic wrap or place it in a resealable bag.
And there you have it! You’ve successfully grown your own celery from kitchen scraps. It
Conclusion
So, there you have it! Growing celery at home is not only achievable, but it’s also incredibly rewarding. Forget those limp, flavorless stalks from the grocery store. Imagine crisp, vibrant celery, bursting with freshness, ready to be enjoyed in your salads, soups, or as a healthy snack. This simple DIY trick transforms kitchen scraps into a continuous supply of this versatile vegetable.
Why is this a must-try? Because it’s sustainable, economical, and surprisingly easy. You’re reducing food waste by giving new life to the base of your celery stalks. You’re saving money by avoiding frequent trips to the store for celery. And you’re gaining access to a fresher, more flavorful ingredient than you can typically find commercially. Plus, there’s a certain satisfaction that comes from nurturing something from a discarded piece into a thriving plant.
But don’t stop there! Experiment with different varieties of celery. Try growing Pascal celery for its classic flavor, or venture into the world of celeriac, the root vegetable related to celery, for a unique culinary experience. You can also adjust the growing conditions to influence the flavor and texture of your celery. For a sweeter taste, ensure your celery receives plenty of sunlight. For more tender stalks, provide consistent moisture and partial shade.
Consider companion planting to further enhance your celery growing experience. Marigolds can help deter pests, while onions and garlic can improve the flavor of your celery. You can even grow your celery in containers, making it accessible even if you have limited garden space. Just be sure to choose a pot that’s large enough to accommodate the celery’s root system.
This DIY celery growing method is a game-changer for any home cook or gardener. It’s a simple way to add fresh, flavorful ingredients to your meals while reducing waste and saving money.
We wholeheartedly encourage you to give this DIY trick a try. It’s a fun, educational, and ultimately delicious project. Once you’ve harvested your first batch of homegrown celery, we’d love to hear about your experience! Share your photos, tips, and variations in the comments below. Let’s build a community of home celery growers and inspire others to embrace this sustainable and rewarding practice. What are you waiting for? Get growing!
Frequently Asked Questions (FAQ)
What kind of celery works best for regrowing?
The best celery for regrowing is organic celery purchased from a grocery store or farmer’s market. Organic celery is less likely to be treated with chemicals that can inhibit growth. However, even non-organic celery can be successfully regrown. Look for celery with a firm, healthy base and tightly packed stalks. Avoid celery that is wilted, discolored, or has signs of rot. The fresher the celery base, the better your chances of successful regrowth.
How long does it take to regrow celery from the base?
The initial regrowth phase, where you see new leaves sprouting from the center of the base, typically takes about 1-2 weeks. After that, transplanting the celery to soil and allowing it to mature into a full-sized plant can take anywhere from 2-3 months. The exact timeframe depends on factors like sunlight, water, soil quality, and temperature. Be patient and consistent with your care, and you’ll be rewarded with a bountiful harvest.
What kind of soil is best for growing celery?
Celery thrives in rich, well-draining soil that is high in organic matter. A good soil mix would include compost, peat moss, and perlite or vermiculite. The soil should be able to retain moisture but also drain well to prevent root rot. Aim for a slightly acidic to neutral soil pH, around 6.0 to 7.0. You can amend your garden soil with compost and other organic materials to improve its fertility and drainage.
How much sunlight does celery need?
Celery needs at least 6 hours of sunlight per day to thrive. However, in hotter climates, it can benefit from some afternoon shade to prevent the leaves from scorching. If you’re growing celery indoors, place it near a sunny window or use grow lights to provide adequate light. Insufficient sunlight can result in leggy growth and a less flavorful harvest.
How often should I water my celery?
Celery needs consistent moisture to grow properly. Water deeply whenever the top inch of soil feels dry to the touch. Avoid letting the soil dry out completely, as this can stress the plant and affect its growth. During hot weather, you may need to water more frequently. Mulching around the base of the plant can help retain moisture in the soil.
What are some common problems when growing celery and how can I fix them?
Some common problems include:
* **Bolting (premature flowering):** This can happen if the celery is exposed to temperature fluctuations or stress. Ensure consistent watering and avoid extreme temperature changes.
* **Pests (aphids, celery leaf tiers):** Inspect your plants regularly and treat any infestations with insecticidal soap or neem oil.
* **Diseases (celery blight, pink rot):** Ensure good air circulation and avoid overhead watering. Remove any infected leaves promptly.
* **Yellowing leaves:** This can be caused by nutrient deficiencies, overwatering, or underwatering. Check the soil moisture and consider fertilizing with a balanced fertilizer.
Can I grow celery indoors year-round?
Yes, you can grow celery indoors year-round, provided you can meet its needs for sunlight, water, and nutrients. Use grow lights to supplement natural sunlight, especially during the winter months. Choose a pot that is large enough to accommodate the celery’s root system. Monitor the soil moisture and fertilize regularly.
How do I harvest celery?
You can harvest celery stalks as needed once they reach a desired size. Simply cut the outer stalks near the base of the plant with a sharp knife. The inner stalks will continue to grow. For a full harvest, you can cut the entire plant at the base. Celery is typically ready to harvest when the stalks are about 6-8 inches long.
Can I eat the celery leaves?
Yes, celery leaves are perfectly edible and have a similar flavor to the stalks, although they can be slightly more bitter. Use them in salads, soups, stews, or as a garnish. They can also be dried and used as a seasoning.
What are some creative ways to use homegrown celery?
Beyond the usual salads and soups, try using your homegrown celery in:
* **Celery juice:** A refreshing and healthy beverage.
* **Celery sticks with peanut butter or hummus:** A classic snack.
* **Celery root mash:** A delicious alternative to mashed potatoes.
* **Celery in stir-fries:** Adds a crisp and flavorful element.
* **Celery as a flavoring agent in stocks and broths:** Enhances the savory flavor.
* **Braised celery:** A surprisingly delicious side dish.
Don’t be afraid to experiment and discover new ways to enjoy your homegrown celery!

Leave a Comment