
Growing Celery at Home might seem like a challenge reserved for seasoned gardeners, but I’m here to tell you it’s totally achievable, even if you’re a beginner! Forget those limp, flavorless stalks from the grocery store. Imagine crisp, vibrant celery, bursting with freshness, right from your own backyard (or even your windowsill!).
Celery has a fascinating history, dating back to ancient times where it was valued more for its medicinal properties than its culinary uses. The ancient Greeks and Romans used it to crown victors in athletic games, symbolizing celebration and achievement. While we might not be crowning anyone with celery stalks today, the satisfaction of harvesting your own is definitely a victory in itself!
So, why should you bother with this DIY project? Well, for starters, homegrown celery tastes infinitely better. Plus, you have complete control over the growing process, ensuring it’s free from harmful pesticides. But the real reason I think you’ll love growing celery at home is the sheer joy of nurturing something from seed (or even a leftover stalk!) to a delicious, crunchy snack. In this article, I’m going to share some simple, yet effective tricks and hacks that will make your celery-growing journey a success. Let’s get started!
Self-Sufficiency Made Easy: How to Easily Grow Celery at Home!
Hey folks, have you ever wondered if you can just grow celery yourself? I tried it and I can tell you: it’s easier than you think! And the best part: you’ll always have fresh celery on hand without having to constantly run to the supermarket. In this article, I’ll show you step by step how to grow your own celery at home. Let’s get started!
What you need:
Before we begin, here is a list of the things you’ll need for this DIY project:
- A celery stalk: Preferably a fresh, firm stalk from the supermarket or a market. Make sure it still has an intact base.
- A glass or a bowl: Something to put the celery stalk in.
- Water: Tap water is perfectly fine.
- A sunny spot: A windowsill or another place with lots of light is ideal.
- Potting soil: Regular potting soil is perfect.
- A pot: A pot with enough space for the celery’s roots.
- Optional: Liquid fertilizer: For an extra dose of nutrients.
Phase 1: Restarting the Celery
This phase is all about bringing the celery stalk back to life and allowing it to form new roots.
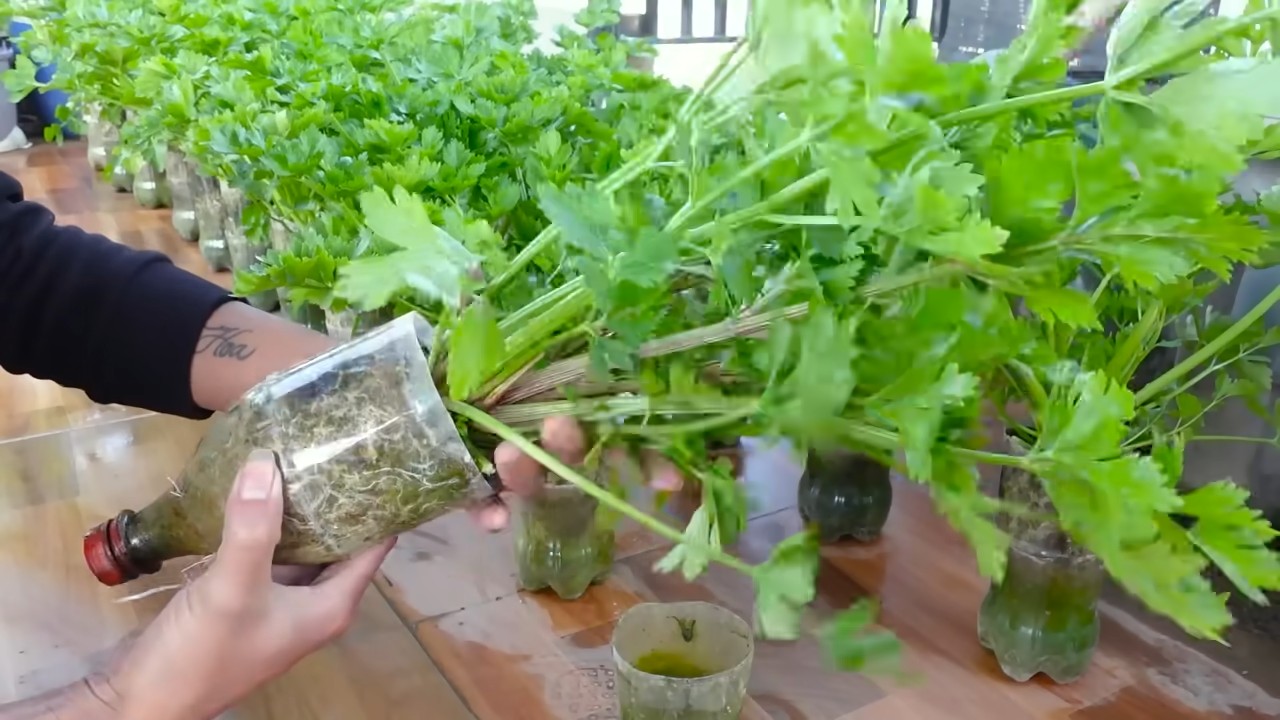
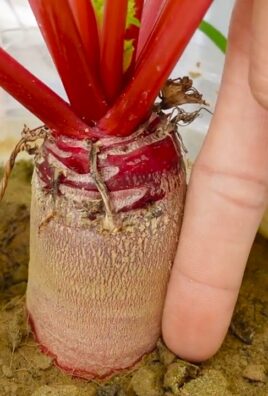
- Prepare the stalk: Cut the stalk about 5 cm from the bottom end. Make sure the base remains intact, as this is where the new roots will grow. You can use the upper stalks and leaves for soups or salads – nothing is wasted!
- Place in water: Place the cut stalk with the cut side down into a glass or bowl of water. The water should be about 2-3 cm high, so the base is covered.
- Sunny location: Place the glass with the celery stalk on a sunny windowsill or in another spot with plenty of light. Celery loves light!
- Change the water: Change the water every one to two days to keep it fresh and prevent the formation of bacteria.
- Be patient: After about 5-7 days, you should see small roots sprouting from the base of the stalk. Additionally, new green leaves will start to grow in the center of the stalk. This is a good sign!
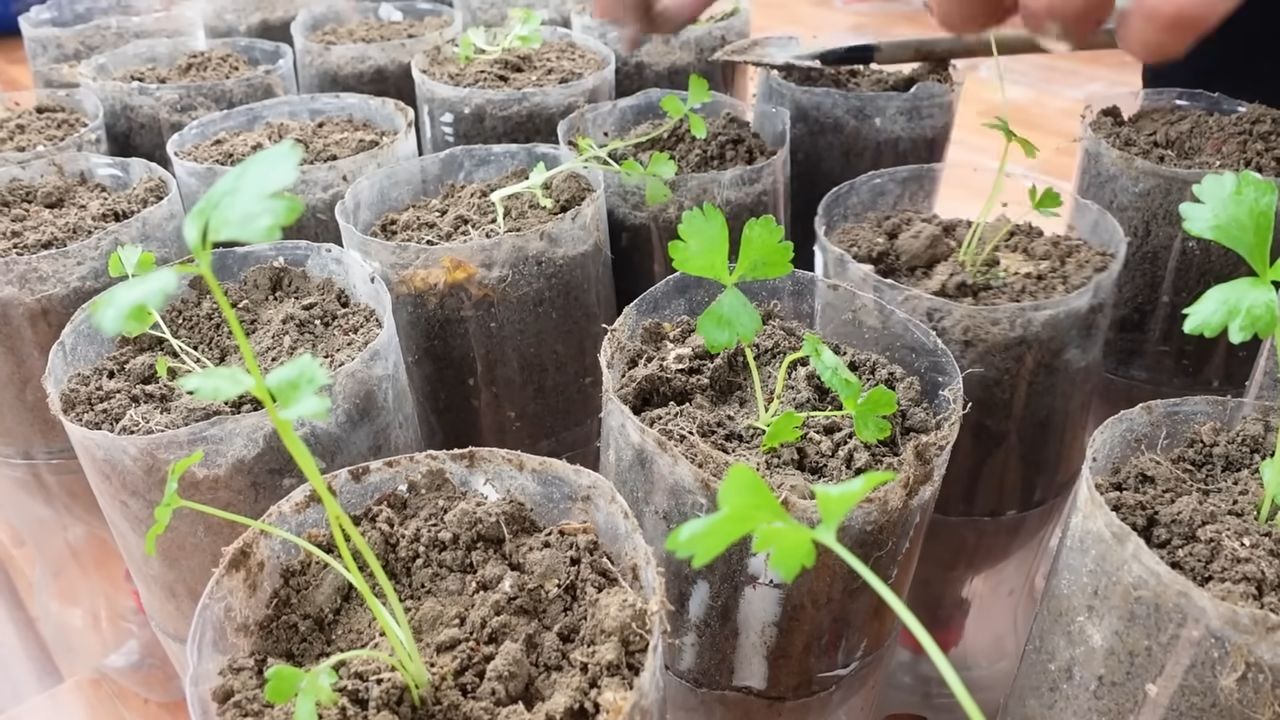
Phase 2: Potting the Celery
Once the celery has developed sufficient roots, it’s time to plant it in a pot with soil.
- Prepare the pot: Fill the pot with potting soil. Make sure the pot is large enough for the roots to have plenty of space. A pot with a diameter of about 15-20 cm is ideal.
- Plant the celery: Dig a small hole in the center of the soil. Carefully take the celery stalk out of the water and place it in the hole. Cover the roots with soil, but make sure the base of the stalk is still slightly above the soil.
- Water it in: Water the celery thoroughly after planting. This helps the soil settle around the roots.
- Place back in a sunny spot: Put the pot with the planted celery back in a sunny location.
Phase 3: Care and Harvest
Now it’s about taking good care of the celery so that it grows splendidly and you can harvest it soon.
- Water regularly: Celery needs a lot of water. Water it regularly, especially on hot days. The soil should always be slightly moist, but not soggy.
- Fertilize (optional): If you wish, you can fertilize the celery every few weeks with liquid fertilizer. This gives it an extra dose of nutrients and promotes growth. Be sure to dilute the fertilizer according to the instructions on the packaging.
- Keep an eye on pests: Regularly check the celery for pests like aphids or slugs. If you discover pests, you can combat them with natural remedies, e.g., with a tea made from nettles or garlic.
- Be patient (again): Celery takes time to grow. It can take several weeks or even months until it is ready for harvest.
- Harvesting: You can harvest the celery as soon as it reaches the desired size. Cut the outer stalks with a sharp knife. The inner stalks will continue to grow, so you can harvest again and again. You can also harvest the whole stalk by gently pulling it out of the soil.
Additional Tips and Tricks:
- Blanching celery: If you prefer lighter, milder celery, you can blanch it. This means covering the stalks with soil or cardboard a few weeks before harvest to protect them from sunlight.
- Overwintering celery: In mild climates, celery can overwinter outdoors. In colder climates, you should transplant it into a pot and overwinter it in a cool, bright place indoors.
- Growing celery from seed: You can also grow celery from seed. This is a bit more complex, but it’s worth it if you want to try different varieties.
- Celery in hydroponics: Another option is growing it in hydroponics. Here, the plants are not grown in soil, but in a nutrient solution.
Why You Should Grow Your Own Celery:
- It doesn’t get any fresher: Homegrown celery simply tastes better than the one from the supermarket.
- You know what’s in it: You have control over the growing methods and can ensure that your celery is free of pesticides.
- Sustainability: You reduce your ecological footprint by consuming local products.
- It’s fun: Growing your own vegetables is a great way to connect with nature and learn something new.
- Always available: You always have fresh celery on hand when you need it.
Common Problems and Solutions:
- Celery isn’t growing: Make sure the celery is getting enough light, water, and nutrients. Also, check if it is infested with pests.
- Celery is turning yellow: Yellow leaves can be a sign of a lack of water or nutrients. Water the celery regularly and fertilize it if necessary.
- Celery is bitter: Bitter celery can be a sign of stress, e.g., from lack of water or too much heat. Make sure the celery gets enough water and is protected from extreme heat.
I hope this guide helps you to grow your own celery at home. It’s a truly rewarding project that will provide you with fresh, healthy celery right from your garden or windowsill. Happy gardening
Conclusion
So, there you have it! Growing celery at home, while it might seem daunting at first, is a surprisingly rewarding experience. It’s not just about saving money at the grocery store; it’s about connecting with your food, understanding the growing process, and enjoying the unparalleled freshness of homegrown produce. Forget the limp, flavorless celery stalks you find in the supermarket – imagine crisp, vibrant celery, bursting with flavor, ready to be enjoyed in your favorite soups, salads, or as a healthy snack.
This DIY trick, using the base of store-bought celery, is a fantastic way to minimize waste and maximize your gardening efforts. It’s a simple, sustainable practice that anyone can implement, regardless of their gardening experience. Even if you only have a small balcony or a sunny windowsill, you can successfully grow your own celery.
But the beauty of this method lies in its adaptability. Feel free to experiment with different varieties of celery. Try growing ‘Utah Tall’ for its classic flavor, or ‘Golden Self-Blanching’ for a milder, sweeter taste. You can also adjust the growing conditions to suit your local climate. If you live in a particularly hot area, provide your celery with some afternoon shade to prevent bolting. If you’re in a cooler region, consider starting your celery indoors to give it a head start.
Don’t be afraid to get creative with your celery harvest. Beyond the usual uses, try juicing it for a refreshing and healthy drink, or using the leaves to add a burst of flavor to your homemade stocks and broths. You can even pickle the stalks for a tangy and unique condiment.
The key to success with this DIY celery growing method is patience and observation. Pay attention to your plants, water them regularly, and provide them with the nutrients they need. You’ll be amazed at how quickly they grow and how much you can harvest from a single celery base.
We wholeheartedly encourage you to try this DIY trick for growing celery at home. It’s a fun, educational, and ultimately delicious way to enhance your gardening skills and enjoy the fruits (or rather, vegetables) of your labor. Once you’ve given it a try, we’d love to hear about your experience! Share your tips, tricks, and photos in the comments below. Let’s build a community of home celery growers and inspire others to embrace the joys of homegrown produce. Let us know what worked for you, what challenges you faced, and any variations you tried. Your feedback will help others succeed and make this DIY trick even more accessible and effective. So, grab a celery stalk, get your hands dirty, and start growing your own delicious, homegrown celery today!
Frequently Asked Questions (FAQ)
1. What kind of celery should I buy to start this DIY trick?
The best type of celery to use for this method is organic celery, as it’s less likely to have been treated with chemicals that could inhibit regrowth. Look for celery with a healthy, firm base and vibrant green stalks. Avoid celery that is wilted, discolored, or has signs of rot. Any variety of celery will work, but some gardeners find that certain varieties, like ‘Utah Tall,’ are more vigorous and easier to regrow.
2. How long does it take to see new growth after planting the celery base?
You should start to see new growth within a week or two of planting the celery base. The exact timeframe will depend on factors such as temperature, sunlight, and the overall health of the celery base. Keep the soil consistently moist, but not waterlogged, and provide plenty of sunlight. If you don’t see any growth after two weeks, it’s possible that the celery base was not viable, or that the growing conditions are not optimal.
3. What kind of soil is best for growing celery?
Celery thrives in rich, well-draining soil that is high in organic matter. Amend your garden soil with compost or well-rotted manure before planting. The ideal soil pH for celery is between 6.0 and 6.8. If your soil is heavy clay, consider growing your celery in raised beds or containers to improve drainage.
4. How much sunlight does celery need?
Celery needs at least six hours of sunlight per day to grow properly. However, in hot climates, it can benefit from some afternoon shade to prevent bolting (premature flowering). If you’re growing celery indoors, place it near a sunny window or use grow lights to provide adequate light.
5. How often should I water celery?
Celery needs consistent moisture to thrive. Water deeply and regularly, especially during hot, dry weather. Aim to keep the soil consistently moist, but not waterlogged. A good rule of thumb is to water when the top inch of soil feels dry to the touch. Mulching around the plants can help to retain moisture and suppress weeds.
6. What are some common problems when growing celery, and how can I prevent them?
Some common problems when growing celery include bolting (premature flowering), celery blight, and pests such as aphids and celery leaf miners. To prevent bolting, provide your celery with consistent moisture and avoid exposing it to extreme temperature fluctuations. Celery blight can be prevented by ensuring good air circulation around the plants and avoiding overhead watering. Control aphids and celery leaf miners with insecticidal soap or neem oil.
7. Can I grow celery in a container?
Yes, you can successfully grow celery in a container. Choose a container that is at least 12 inches deep and wide to allow the celery roots to develop properly. Use a well-draining potting mix and water regularly. Container-grown celery may need to be fertilized more frequently than celery grown in the ground.
8. How do I harvest celery?
You can harvest celery stalks as needed once they reach a desirable size. Simply cut the outer stalks near the base of the plant, leaving the inner stalks to continue growing. You can also harvest the entire plant at once by cutting it off at the base.
9. Can I eat the celery leaves?
Yes, celery leaves are perfectly edible and can be used in a variety of ways. They have a stronger flavor than the stalks and can be used to add a burst of flavor to soups, salads, and stir-fries. You can also dry the leaves and use them as a seasoning.
10. How can I store homegrown celery?
To store homegrown celery, wrap the stalks in a damp paper towel and place them in a plastic bag in the refrigerator. This will help to keep them crisp and fresh for up to two weeks. You can also freeze celery for longer storage. Chop the celery into small pieces and blanch it in boiling water for a few minutes before freezing.


Leave a Comment