
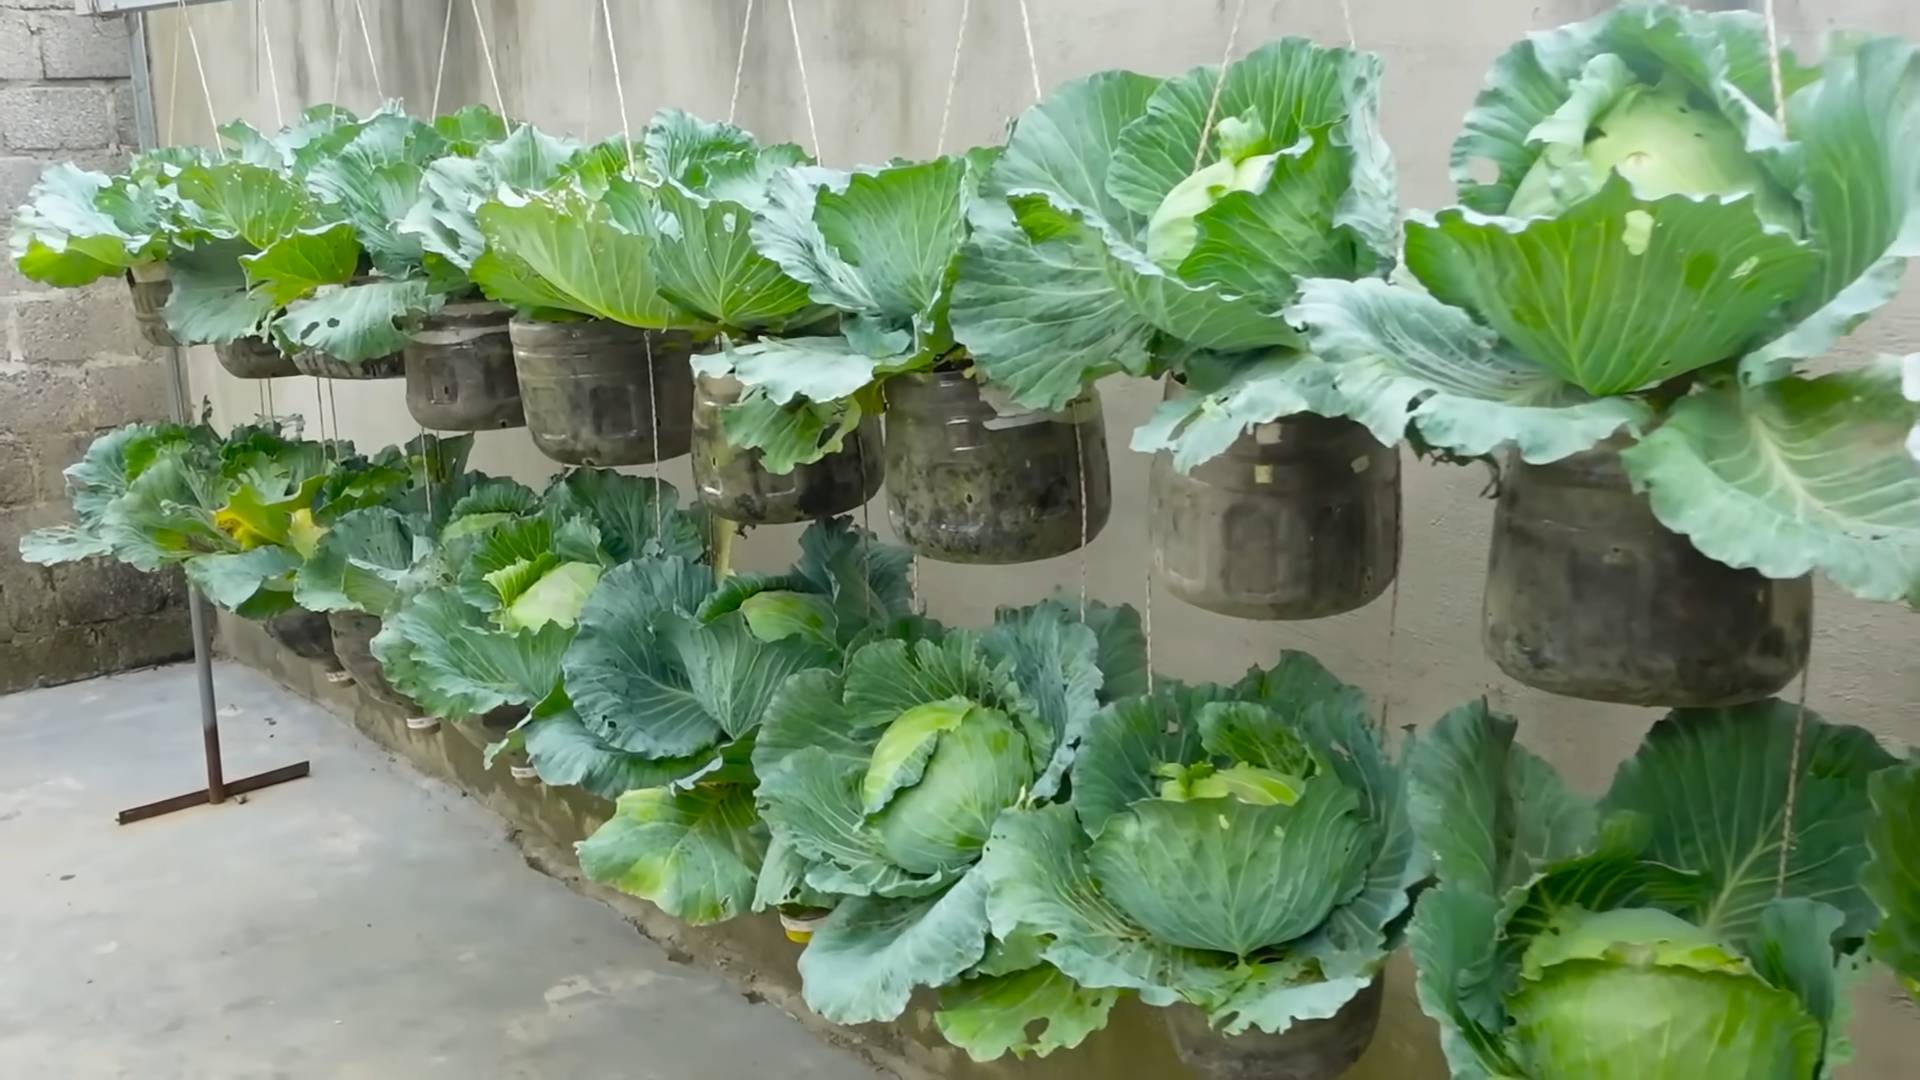
Growing Cabbage in Bottles: Sounds a little crazy, right? But trust me, this quirky DIY project is about to revolutionize your small-space gardening game! Forget sprawling garden beds; we’re taking cabbage cultivation vertical and compact. Have you ever thought about how much space traditional gardening takes up? Well, I’m here to tell you there’s a better way!
While container gardening has been around for centuries, with evidence suggesting its use in ancient Egypt and Rome, the idea of specifically growing cabbage in bottles is a modern twist on resourcefulness. It’s a testament to our ever-growing need to adapt and innovate, especially in urban environments where space is a premium. Think of it as a miniature, edible sculpture gracing your balcony or patio!
Why should you try this? Well, for starters, it’s incredibly space-saving. If you’re living in an apartment or have a tiny backyard, this method allows you to enjoy fresh, homegrown cabbage without sacrificing precious square footage. Plus, it’s a fantastic way to recycle plastic bottles, turning waste into a productive and beautiful garden feature. Beyond the practical benefits, it’s just plain fun! There’s something incredibly satisfying about nurturing a plant from seedling to harvest, especially when it’s thriving in such an unconventional container. So, let’s dive in and discover the secrets to successfully growing cabbage in bottles!
Growing Cabbage in Bottles: A Fun and Space-Saving DIY Project
Hey there, fellow gardening enthusiasts! Are you short on space but still dreaming of fresh, homegrown cabbage? Well, I’ve got a fantastic solution for you: growing cabbage in bottles! It’s a surprisingly effective and visually appealing way to cultivate these leafy greens, even if you only have a balcony or a small patio. I’ve been doing this for a while now, and I’m excited to share my secrets with you. Let’s get started!
What You’ll Need
Before we dive into the nitty-gritty, let’s gather all the necessary materials. Trust me, having everything ready beforehand will make the whole process much smoother.
* Plastic Bottles: The bigger, the better! I usually use 2-liter soda bottles or even larger water bottles. Make sure they’re clean and free of any residue.
* Potting Soil: A good quality potting mix is crucial for healthy cabbage growth. I recommend a mix that’s well-draining and rich in organic matter.
* Cabbage Seeds or Seedlings: You can start from seeds or buy young seedlings from a local nursery. Seedlings will give you a head start, but starting from seeds is more economical.
* Scissors or a Utility Knife: For cutting the bottles. Be careful!
* Drill or Nail: To create drainage holes.
* Watering Can or Spray Bottle: For watering your cabbage plants.
* Fertilizer (Optional): A balanced liquid fertilizer can help boost growth.
* Gloves (Optional): To keep your hands clean.
* Small Stones or Gravel (Optional): For drainage at the bottom of the bottle.
Preparing the Bottles
This is where we transform those ordinary plastic bottles into mini cabbage gardens!
1. Clean the Bottles: Thoroughly wash the bottles with soap and water to remove any dirt or sugary residue. Rinse them well and let them dry completely. This is important to prevent mold growth.
2. Cut the Bottles: There are a couple of ways to do this, depending on the size of your bottle and your preference.
* Method 1 (Horizontal Cut): For larger bottles, I like to cut them horizontally about two-thirds of the way up. This creates a deeper container for the cabbage to grow. You can discard the top portion or use it as a mini greenhouse cover in the early stages.
* Method 2 (Vertical Cut): For smaller bottles, you can cut them vertically down the middle, creating two separate containers. This is a good option if you want to grow multiple cabbage plants.
3. Create Drainage Holes: This is absolutely essential! Cabbage plants don’t like sitting in soggy soil. Use a drill or a heated nail to create several drainage holes at the bottom of each bottle. I usually make about 4-5 holes, spaced evenly apart.
4. Add Drainage Layer (Optional): To further improve drainage, you can add a layer of small stones or gravel at the bottom of the bottle before adding the potting soil. This helps prevent the soil from clogging the drainage holes.
Planting the Cabbage
Now comes the fun part – planting our cabbage!
1. Fill the Bottles with Potting Soil: Carefully fill the prepared bottles with potting soil, leaving about an inch of space at the top. Gently pat down the soil to remove any air pockets.
2. Plant the Seeds or Seedlings:
* From Seeds: Sow the cabbage seeds about half an inch deep in the soil. I usually plant 2-3 seeds per bottle to increase the chances of germination. Once the seedlings emerge, thin them out, leaving only the strongest one.
* From Seedlings: Gently remove the seedlings from their containers and loosen the roots slightly. Dig a small hole in the soil and place the seedling in the hole, making sure the top of the root ball is level with the soil surface. Backfill the hole with soil and gently pat it down.
3. Water Thoroughly: After planting, water the soil thoroughly until water drains out of the drainage holes. This helps settle the soil and ensures the roots are well-hydrated.
4. Label Your Bottles: It’s always a good idea to label your bottles with the type of cabbage you’re growing and the date you planted it. This will help you keep track of your progress.
Caring for Your Cabbage Plants
Proper care is essential for healthy cabbage growth. Here’s what you need to do:
1. Sunlight: Cabbage plants need at least 6 hours of sunlight per day. Place your bottles in a sunny location, such as a balcony, patio, or windowsill. If you don’t have enough natural sunlight, you can supplement with grow lights.
2. Watering: Water your cabbage plants regularly, especially during hot and dry weather. The soil should be consistently moist but not waterlogged. Check the soil moisture by sticking your finger into the soil. If the top inch feels dry, it’s time to water.
3. Fertilizing: Cabbage plants are heavy feeders, so they benefit from regular fertilization. I like to use a balanced liquid fertilizer diluted to half strength. Apply the fertilizer every 2-3 weeks, following the instructions on the label.
4. Pest Control: Keep an eye out for common cabbage pests, such as cabbage worms, aphids, and slugs. You can handpick the pests off the plants or use organic pest control methods, such as insecticidal soap or neem oil.
5. Weed Control: Remove any weeds that may grow in the bottles. Weeds compete with the cabbage plants for nutrients and water.
6. Rotation: Rotate the bottles regularly to ensure even sunlight exposure on all sides of the plants. This will help them grow evenly.
Troubleshooting
Even with the best care, you might encounter some problems along the way. Here are a few common issues and how to address them:
* Yellowing Leaves: This could be a sign of overwatering, underwatering, or nutrient deficiency. Check the soil moisture and adjust your watering accordingly. If the soil is dry, water more frequently. If the soil is waterlogged, allow it to dry out before watering again. You can also try fertilizing the plants with a balanced fertilizer.
* Stunted Growth: This could be caused by insufficient sunlight, poor soil, or pest infestation. Make sure your plants are getting enough sunlight and that the soil is well-draining and rich in nutrients. Check for pests and take appropriate action.
* Bolting: Bolting is when the cabbage plant starts to produce a flower stalk prematurely. This is usually caused by stress, such as extreme temperatures or lack of water. To prevent bolting, keep the plants well-watered and protect them from extreme heat.
* Root Rot: This is caused by overwatering and poor drainage. The roots of the plant will start to rot, and the plant will eventually die. To prevent root rot, make sure the bottles have adequate drainage holes and avoid overwatering.
Harvesting Your Cabbage
The moment you’ve been waiting for! Harvesting your homegrown cabbage is incredibly rewarding.
1. When to Harvest: Cabbage is typically ready to harvest when the head is firm and compact. The size of the head will vary depending on the variety of cabbage you’re growing. Check the seed packet or seedling label for specific harvesting information.
2. How to Harvest: Use a sharp knife to cut the cabbage head from the stem, leaving a few outer leaves attached.
3. Enjoy Your Harvest: Now you can enjoy your fresh, homegrown cabbage in salads, soups, stir-fries, or any other dish you like!
Tips and Tricks for Success
Here are a few extra tips and tricks I’ve learned over the years that can help you maximize your cabbage-growing success:
* Choose the Right Variety: Some cabbage varieties are better suited for container growing than others. Look for compact varieties that don’t get too large.
* Start Early: Start your cabbage seeds indoors 6-8 weeks before the last expected frost. This will give you a head start on the growing season.
* Harden Off Seedlings: Before transplanting your seedlings outdoors, gradually acclimate them to the outdoor conditions by hardening them off. This involves exposing them to increasing amounts of sunlight and wind over a period of 1-2 weeks.
* Use Companion Planting: Plant companion plants, such as marigolds or nasturtiums, near your cabbage plants to deter pests.
* Mulch the Soil: Add a layer of mulch, such as straw or wood chips, to the soil surface to help retain moisture and suppress weeds.
* Monitor for Pests Regularly: The earlier you catch a pest problem, the easier it will be to control. Inspect your plants regularly for signs of pests and take action immediately.
* Don’t Give Up: Gardening can be challenging, but don’

Conclusion
So, there you have it! Growing cabbage in bottles might sound unconventional, but it’s a surprisingly effective and rewarding method, especially for urban gardeners or those with limited space. This DIY trick isn’t just about novelty; it’s about maximizing your yield, protecting your precious plants from pests, and enjoying fresh, homegrown cabbage even if you don’t have a sprawling garden.
The benefits are numerous. You’ll be amazed at how well cabbage thrives in this controlled environment. The bottles provide excellent drainage, preventing root rot, a common problem with traditional gardening. They also offer a barrier against soil-borne pests and diseases, giving your cabbage a healthier start. Plus, the portability of the bottles allows you to easily move your plants to chase the sun or shelter them from harsh weather conditions.
But the real magic lies in the efficiency. You can grow more cabbage in a smaller area, making it perfect for balconies, patios, or even sunny windowsills. Imagine the satisfaction of harvesting crisp, flavorful cabbage heads from your own miniature vertical garden!
Don’t be afraid to experiment with variations. Try using different types of bottles – larger ones for bigger cabbage varieties, or even repurposed plastic containers. You can also adjust the soil mix to suit your specific cabbage type. Some gardeners add a slow-release fertilizer to the soil for an extra boost, while others prefer to use organic compost for a more natural approach. Consider companion planting by adding herbs like dill or rosemary around the base of the bottles to deter pests and enhance the flavor of your cabbage.
This method is particularly beneficial for those who struggle with traditional gardening due to physical limitations. Bending and kneeling can be challenging, but growing cabbage in bottles brings the garden to you, making it accessible and enjoyable for everyone.
We wholeheartedly encourage you to give this DIY trick a try. It’s a fun, educational, and ultimately delicious way to grow your own food. You’ll be surprised at how easy it is to get started, and the rewards are well worth the effort.
Once you’ve harvested your first bottle-grown cabbage, we’d love to hear about your experience! Share your photos, tips, and tricks with us in the comments section below. Let’s build a community of bottle-cabbage enthusiasts and inspire others to embrace this innovative gardening technique.
Remember, growing your own food is not just about saving money; it’s about connecting with nature, nourishing your body, and enjoying the simple pleasures of life. So, grab some bottles, get your hands dirty, and start growing your own delicious cabbage today! This method of growing cabbage in bottles is a game changer for small space gardening.
Frequently Asked Questions (FAQ)
What type of bottles are best for growing cabbage?
The ideal bottle size depends on the variety of cabbage you plan to grow. For smaller varieties like bok choy or baby cabbage, 2-liter soda bottles can work well. However, for larger cabbage heads, you’ll need larger containers, such as 3-5 gallon water bottles or even repurposed buckets. The key is to ensure the bottle is sturdy enough to support the weight of the soil and the growing plant, and that it has adequate drainage holes. Clear or translucent bottles are fine, but consider wrapping them in dark plastic or painting them to prevent algae growth and protect the roots from direct sunlight.
How do I prepare the bottles for planting?
First, thoroughly clean the bottles with soap and water to remove any residue. Then, drill or cut several drainage holes in the bottom of the bottle to prevent waterlogging. The number and size of the holes will depend on the size of the bottle, but aim for at least four holes that are about ¼ inch in diameter. Next, consider cutting off the top of the bottle to create a wider opening for planting and watering. This also improves air circulation around the plant. If you choose to leave the top on, make sure to create adequate ventilation holes.
What type of soil should I use?
A well-draining potting mix is essential for growing cabbage in bottles. Avoid using garden soil, as it can be too heavy and compact, leading to poor drainage and root rot. A good potting mix should contain a blend of peat moss, perlite, and vermiculite. You can also add compost or other organic matter to enrich the soil and provide essential nutrients. Consider using a slightly acidic soil with a pH of around 6.0 to 6.5, which is ideal for cabbage growth.
How often should I water my bottle-grown cabbage?
Watering frequency will depend on the weather conditions, the size of the bottle, and the type of soil you’re using. Generally, you should water your cabbage when the top inch of soil feels dry to the touch. Avoid overwatering, as this can lead to root rot. When watering, make sure to saturate the soil thoroughly, allowing excess water to drain out of the drainage holes. During hot, dry weather, you may need to water your cabbage daily, while during cooler, wetter weather, you may only need to water it every few days.
How much sunlight does cabbage need?
Cabbage requires at least 6 hours of direct sunlight per day to thrive. Choose a sunny location for your bottle-grown cabbage, such as a south-facing balcony or patio. If you don’t have access to enough natural sunlight, you can supplement with grow lights. Rotate the bottles regularly to ensure that all sides of the plant receive adequate sunlight.
How do I fertilize my bottle-grown cabbage?
Cabbage is a heavy feeder, so it’s important to fertilize regularly. You can use a balanced fertilizer, such as 10-10-10, or a fertilizer specifically formulated for vegetables. Follow the instructions on the fertilizer package for application rates. You can also use organic fertilizers, such as compost tea or fish emulsion. Fertilize your cabbage every 2-3 weeks during the growing season.
How do I protect my cabbage from pests and diseases?
Growing cabbage in bottles can help to reduce the risk of pests and diseases, but it’s still important to take precautions. Regularly inspect your plants for signs of pests, such as aphids, cabbage worms, or slugs. If you find any pests, you can remove them by hand or use an insecticidal soap or neem oil. To prevent diseases, ensure good air circulation around the plants and avoid overwatering. You can also use a fungicide if necessary.
When is cabbage ready to harvest?
Cabbage is typically ready to harvest when the head is firm and compact. The size of the head will vary depending on the variety of cabbage you’re growing. To harvest, simply cut the head off at the base of the plant with a sharp knife. Leave the roots in the bottle, as they may produce new shoots.
Can I reuse the bottles for growing other plants?
Yes, you can reuse the bottles for growing other plants, but it’s important to clean them thoroughly first. Remove any remaining soil and debris, and wash the bottles with soap and water. You can also disinfect the bottles with a bleach solution to kill any remaining pathogens. Make sure to rinse the bottles thoroughly before reusing them.
What are some other vegetables I can grow in bottles?
Besides cabbage, many other vegetables can be successfully grown in bottles, including lettuce, spinach, kale, herbs, tomatoes, peppers, and strawberries. The key is to choose varieties that are well-suited to container gardening and to provide them with adequate sunlight, water, and nutrients. Experiment with different vegetables and find what works best for you and your growing conditions.

Leave a Comment