
Growing bottle gourds urban gardens might seem like a distant dream, reserved for sprawling countryside farms, but I’m here to tell you it’s absolutely achievable, even in the heart of the city! Have you ever imagined harvesting your own fresh, homegrown bottle gourds right from your balcony or backyard? This DIY guide will unlock the secrets to successfully cultivating these fascinating vegetables in your urban oasis.
Bottle gourds, also known as calabash, boast a rich history, dating back thousands of years. Evidence suggests they were among the first cultivated plants, predating even pottery! Across cultures, they’ve served as essential tools, containers, and even musical instruments. Imagine, you’re not just growing a vegetable; you’re connecting with a legacy!
But why should you bother with growing bottle gourds urban-style? Well, for starters, store-bought gourds often lack the freshness and flavor of homegrown varieties. Plus, cultivating your own food is incredibly rewarding, offering a sense of accomplishment and a connection to nature. In our increasingly urbanized world, bringing a touch of the countryside to your city dwelling is more important than ever. This DIY guide will provide you with easy-to-follow steps, clever hacks, and essential tips to ensure a bountiful harvest, regardless of your space constraints. Get ready to transform your urban garden into a thriving gourd haven!
Flaschenkürbisse in der Stadt ziehen: Dein DIY-Leitfaden für den urbanen Dschungel
Hey du! Hast du auch genug von langweiligen Balkonen und Terrassen? Ich auch! Deshalb habe ich mich entschieden, Flaschenkürbisse anzubauen – und ich kann dir sagen, es ist ein Riesenspaß! Flaschenkürbisse sind nicht nur super dekorativ, sondern du kannst sie auch noch für coole DIY-Projekte verwenden, wenn sie getrocknet sind. In diesem Artikel zeige ich dir, wie du das auch in deinem urbanen Garten hinbekommst. Keine Angst, es ist einfacher als du denkst!
Was du brauchst: Deine Einkaufsliste für den Flaschenkürbis-Erfolg
Bevor wir loslegen, hier eine Liste mit allem, was du brauchst. Keine Sorge, das meiste davon hast du vielleicht schon zu Hause!
* Flaschenkürbis-Samen: Die gibt’s im Gartencenter oder online. Achte darauf, dass du eine Sorte wählst, die für dein Klima geeignet ist.
* Anzuchttöpfe oder Eierkartons: Für die Voranzucht.
* Anzuchterde: Die ist nährstoffarm und perfekt für junge Pflänzchen.
* Große Pflanzgefäße: Mindestens 30 Liter Volumen pro Pflanze. Flaschenkürbisse brauchen Platz!
* Gute Blumenerde: Am besten mit Kompost angereichert.
* Rankhilfe: Ein Spalier, ein Zaun oder ein stabiles Gerüst. Flaschenkürbisse sind Kletterkünstler!
* Gießkanne oder Gartenschlauch: Zum regelmäßigen Gießen.
* Flüssigdünger: Für die Wachstumsphase.
* Gartenschere: Zum Ausgeizen und Ernten.
* Geduld: Flaschenkürbisse brauchen Zeit zum Wachsen.
Phase 1: Die Voranzucht – Kleine Pflänzchen, großer Traum
Die Voranzucht ist wichtig, besonders wenn du in einer Gegend mit kurzen Sommern wohnst. So gibst du deinen Flaschenkürbissen einen kleinen Vorsprung.
1. Samen vorbereiten: Um die Keimung zu beschleunigen, kannst du die Samen für 24 Stunden in lauwarmem Wasser einweichen. Das macht die Schale weicher.
2. Aussaat: Fülle deine Anzuchttöpfe mit Anzuchterde. Lege pro Topf einen Samen etwa 2 cm tief in die Erde.
3. Gießen: Befeuchte die Erde vorsichtig mit einer Sprühflasche. Sie sollte feucht, aber nicht nass sein.
4. Warm und hell stellen: Stelle die Töpfe an einen warmen und hellen Ort. Eine Fensterbank oder ein Mini-Gewächshaus sind ideal. Die ideale Keimtemperatur liegt bei 20-25°C.
5. Geduld haben: Nach etwa einer Woche sollten die ersten Keimlinge sprießen. Halte die Erde weiterhin feucht.
Phase 2: Umzug ins Freie – Ab in den urbanen Dschungel!
Sobald die Pflänzchen kräftig genug sind (etwa 10-15 cm hoch) und keine Frostgefahr mehr besteht (Mitte Mai), können sie ins Freie umziehen.
1. Pflanzgefäße vorbereiten: Fülle die großen Pflanzgefäße mit guter Blumenerde, angereichert mit Kompost. Das sorgt für eine gute Nährstoffversorgung.
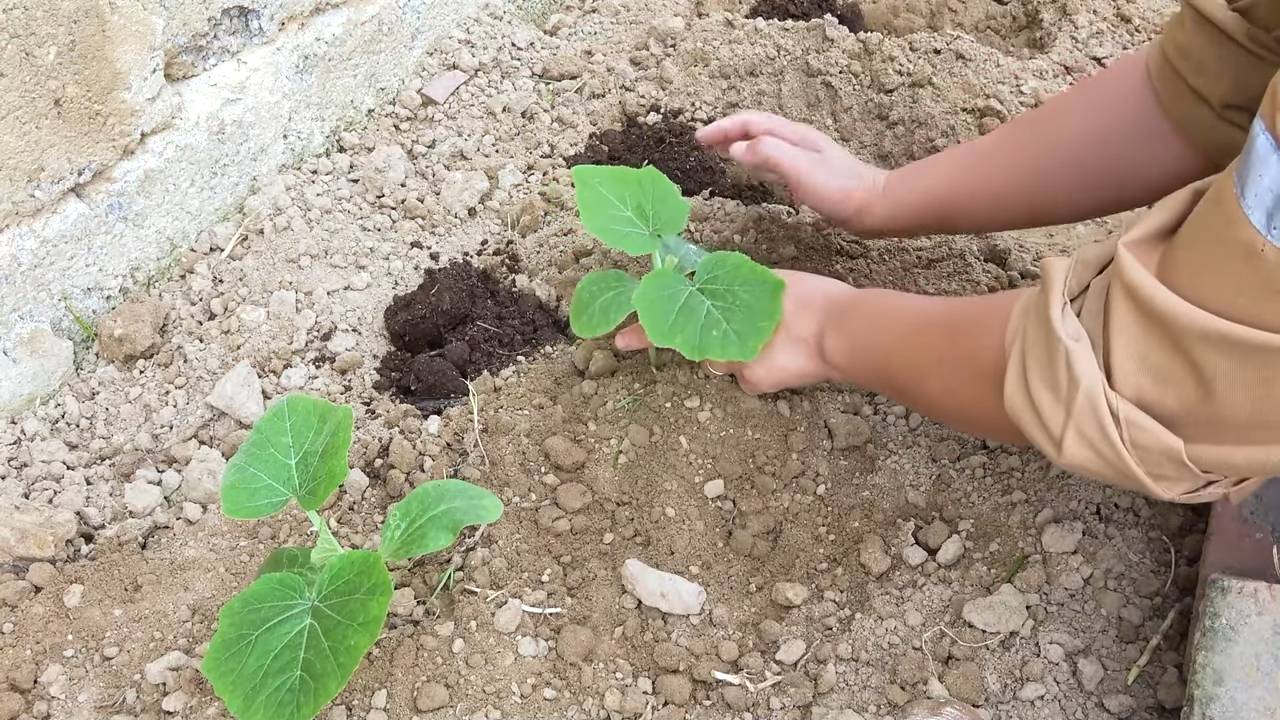
2. Pflanzen aussetzen: Hebe vorsichtig ein Loch in die Erde, das groß genug für den Wurzelballen ist. Setze die Pflänzchen ein und drücke die Erde leicht an.
3. Rankhilfe anbringen: Stelle sicher, dass die Rankhilfe stabil ist und den wachsenden Kürbissen standhalten kann. Leite die jungen Triebe vorsichtig an der Rankhilfe entlang.
4. Gießen: Gieße die Pflanzen gründlich an.
Phase 3: Pflege und Wachstum – Verwöhne deine Kürbisse!
Jetzt beginnt die eigentliche Arbeit: Die Pflege deiner Flaschenkürbisse. Aber keine Sorge, mit ein paar einfachen Tricks werden sie prächtig gedeihen.
1. Gießen: Flaschenkürbisse brauchen viel Wasser, besonders während der Wachstums- und Fruchtbildungsphase. Gieße regelmäßig, am besten morgens oder abends, damit das Wasser nicht so schnell verdunstet. Achte darauf, dass die Erde immer feucht ist, aber vermeide Staunässe.
2. Düngen: Dünge die Pflanzen alle zwei Wochen mit einem Flüssigdünger für Gemüse. Das sorgt für eine gute Nährstoffversorgung und fördert das Wachstum.
3. Ausgeizen: Entferne regelmäßig Seitentriebe, die keine Blüten tragen. Das nennt man Ausgeizen. So konzentriert sich die Pflanze auf die Entwicklung der Früchte.
4. Bestäubung: Flaschenkürbisse sind auf die Bestäubung durch Insekten angewiesen. Wenn du wenig Insekten in deinem Garten hast, kannst du die Blüten auch selbst bestäuben. Trage dazu mit einem Pinsel Pollen von einer männlichen Blüte (mit Stempel) auf eine weibliche Blüte (mit Fruchtansatz) auf.
5. Schutz vor Schädlingen: Kontrolliere die Pflanzen regelmäßig auf Schädlinge wie Blattläuse oder Schnecken. Bei Bedarf kannst du natürliche Schädlingsbekämpfungsmittel einsetzen.
6. Sonnenschein: Flaschenkürbisse lieben die Sonne! Stelle sicher, dass sie m
Hey du! Hast du auch genug von langweiligen Balkonen und Terrassen? Ich auch! Deshalb habe ich mich entschieden, Flaschenkürbisse anzubauen – und ich kann dir sagen, es ist ein Riesenspaß! Flaschenkürbisse sind nicht nur super dekorativ, sondern du kannst sie auch noch für coole DIY-Projekte verwenden, wenn sie getrocknet sind. In diesem Artikel zeige ich dir, wie du das auch in deinem urbanen Garten hinbekommst. Keine Angst, es ist einfacher als du denkst!
Was du brauchst: Deine Einkaufsliste für den Flaschenkürbis-Erfolg
Bevor wir loslegen, hier eine Liste mit allem, was du brauchst. Keine Sorge, das meiste davon hast du vielleicht schon zu Hause!
* Flaschenkürbis-Samen: Die gibt’s im Gartencenter oder online. Achte darauf, dass du eine Sorte wählst, die für dein Klima geeignet ist.
* Anzuchttöpfe oder Eierkartons: Für die Voranzucht.
* Anzuchterde: Die ist nährstoffarm und perfekt für junge Pflänzchen.
* Große Pflanzgefäße: Mindestens 30 Liter Volumen pro Pflanze. Flaschenkürbisse brauchen Platz!
* Gute Blumenerde: Am besten mit Kompost angereichert.
* Rankhilfe: Ein Spalier, ein Zaun oder ein stabiles Gerüst. Flaschenkürbisse sind Kletterkünstler!
* Gießkanne oder Gartenschlauch: Zum regelmäßigen Gießen.
* Flüssigdünger: Für die Wachstumsphase.
* Gartenschere: Zum Ausgeizen und Ernten.
* Geduld: Flaschenkürbisse brauchen Zeit zum Wachsen.
Phase 1: Die Voranzucht – Kleine Pflänzchen, großer Traum
Die Voranzucht ist wichtig, besonders wenn du in einer Gegend mit kurzen Sommern wohnst. So gibst du deinen Flaschenkürbissen einen kleinen Vorsprung.
1. Samen vorbereiten: Um die Keimung zu beschleunigen, kannst du die Samen für 24 Stunden in lauwarmem Wasser einweichen. Das macht die Schale weicher.
2. Aussaat: Fülle deine Anzuchttöpfe mit Anzuchterde. Lege pro Topf einen Samen etwa 2 cm tief in die Erde.
3. Gießen: Befeuchte die Erde vorsichtig mit einer Sprühflasche. Sie sollte feucht, aber nicht nass sein.
4. Warm und hell stellen: Stelle die Töpfe an einen warmen und hellen Ort. Eine Fensterbank oder ein Mini-Gewächshaus sind ideal. Die ideale Keimtemperatur liegt bei 20-25°C.
5. Geduld haben: Nach etwa einer Woche sollten die ersten Keimlinge sprießen. Halte die Erde weiterhin feucht.
Phase 2: Umzug ins Freie – Ab in den urbanen Dschungel!
Sobald die Pflänzchen kräftig genug sind (etwa 10-15 cm hoch) und keine Frostgefahr mehr besteht (Mitte Mai), können sie ins Freie umziehen.
1. Pflanzgefäße vorbereiten: Fülle die großen Pflanzgefäße mit guter Blumenerde, angereichert mit Kompost. Das sorgt für eine gute Nährstoffversorgung.
2. Pflanzen aussetzen: Hebe vorsichtig ein Loch in die Erde, das groß genug für den Wurzelballen ist. Setze die Pflänzchen ein und drücke die Erde leicht an.
3. Rankhilfe anbringen: Stelle sicher, dass die Rankhilfe stabil ist und den wachsenden Kürbissen standhalten kann. Leite die jungen Triebe vorsichtig an der Rankhilfe entlang.
4. Gießen: Gieße die Pflanzen gründlich an.
Phase 3: Pflege und Wachstum – Verwöhne deine Kürbisse!
Jetzt beginnt die eigentliche Arbeit: Die Pflege deiner Flaschenkürbisse. Aber keine Sorge, mit ein paar einfachen Tricks werden sie prächtig gedeihen.
1. Gießen: Flaschenkürbisse brauchen viel Wasser, besonders während der Wachstums- und Fruchtbildungsphase. Gieße regelmäßig, am besten morgens oder abends, damit das Wasser nicht so schnell verdunstet. Achte darauf, dass die Erde immer feucht ist, aber vermeide Staunässe.
2. Düngen: Dünge die Pflanzen alle zwei Wochen mit einem Flüssigdünger für Gemüse. Das sorgt für eine gute Nährstoffversorgung und fördert das Wachstum.
3. Ausgeizen: Entferne regelmäßig Seitentriebe, die keine Blüten tragen. Das nennt man Ausgeizen. So konzentriert sich die Pflanze auf die Entwicklung der Früchte.
4. Bestäubung: Flaschenkürbisse sind auf die Bestäubung durch Insekten angewiesen. Wenn du wenig Insekten in deinem Garten hast, kannst du die Blüten auch selbst bestäuben. Trage dazu mit einem Pinsel Pollen von einer männlichen Blüte (mit Stempel) auf eine weibliche Blüte (mit Fruchtansatz) auf.
5. Schutz vor Schädlingen: Kontrolliere die Pflanzen regelmäßig auf Schädlinge wie Blattläuse oder Schnecken. Bei Bedarf kannst du natürliche Schädlingsbekämpfungsmittel einsetzen.
6. Sonnenschein: Flaschenkürbisse lieben die Sonne! Stelle sicher, dass sie mindestens 6 Stunden Sonne pro Tag bekommen.
Phase 4: Die Ernte – Der Lohn deiner Mühe
Nach etwa 4-6 Monaten sind deine Flaschenkürbisse reif für die Ernte.
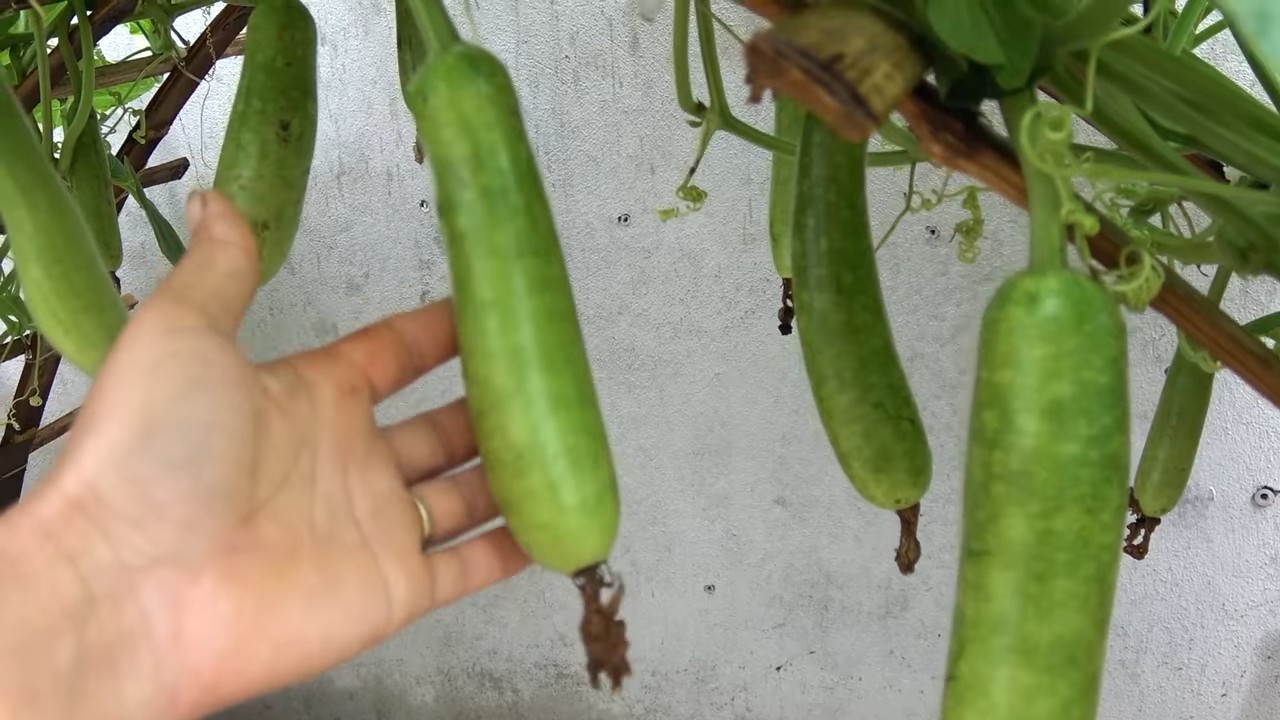
1. Reife erkennen: Die Kürbisse sind reif, wenn die Schale hart und undurchdringlich ist. Du kannst das testen, indem du mit dem Fingernagel darauf klopfst. Wenn es hohl klingt, ist er reif. Die Ranke, die mit dem Kürbis verbunden ist, sollte ebenfalls trocken und braun sein.
2. Ernten: Schneide die Kürbisse mit einer Gartenschere ab, lasse aber einen Stiel von etwa 5-10 cm Länge stehen. Das verhindert, dass Fäulnis eindringt.
3. Trocknen: Das Trocknen ist der wichtigste Schritt, um die Kürbisse haltbar zu machen. Hänge die Kürbisse an einem luftigen, trockenen und dunklen Ort auf. Achte darauf, dass sie sich nicht berühren. Das Trocknen kann mehrere Wochen oder sogar Monate dauern. Du weißt, dass sie trocken sind, wenn sie leicht und hohl klingen, wenn du sie schüttelst.
4. Reinigen: Nach dem Trocknen kannst du die Kürbisse mit einem feuchten Tuch reinigen.
Kreative Ideen für deine Flaschenkürbisse
Jetzt kommt der spaßige Teil! Was kannst du mit deinen getrockneten Flaschenkürbissen alles anstellen? Hier ein paar Ideen:
* Vasen und Schalen: Schneide den Kürbis auf und höhle ihn aus.
* Laternen: Bohre Löcher in den Kürbis und setze eine Kerze oder eine Lichterkette hinein.
* Vogelhäuser: Schneide ein Loch in den Kürbis und hänge ihn im Garten auf.
* Musikinstrumente: Aus Flaschenkürbissen lassen sich tolle Rasseln oder andere Instrumente bauen.
* Dekoration: Bemal oder verziere die Kürbisse nach Lust und Laune.
Häufige Fehler vermeiden: Tipps und Tricks vom Profi (also, von mir!)
* Zu kleine Pflanzgefäße: Flaschenkürbisse brauchen viel Platz für ihre Wurzeln. Wähle lieber zu große als zu kleine Gefäße.
* Zu wenig Wasser: Achte darauf, dass die Erde immer feucht ist, besonders während der heißen Sommermonate.
* Zu wenig Dünger: Flaschenkürbisse sind Starkzehrer. Dünge sie regelmäßig, um ein gesundes Wachstum zu gewährleisten.
* Falscher Standort: Flaschenkürbisse brauchen viel Sonne. Wähle einen sonnigen Standort für deine Pflanzen.
* Ungeduld: Flaschenkürbisse brauchen Zeit zum Wachsen und Trocknen. Sei geduldig und lass dich nicht entmutigen,
Conclusion
So, there you have it! Growing bottle gourds in an urban environment might seem daunting at first, but with a little planning, the right techniques, and a dash of patience, you can successfully cultivate these fascinating vegetables right in your own backyard, balcony, or rooftop garden. This DIY approach not only provides you with fresh, organic produce but also offers a rewarding connection to nature, even amidst the hustle and bustle of city life.
This isn’t just about growing a vegetable; it’s about embracing a sustainable lifestyle, reducing your carbon footprint, and enjoying the satisfaction of nurturing something from seed to harvest. The unique shape and versatility of bottle gourds make them a truly special addition to any garden and kitchen. Imagine the conversations sparked by showcasing your homegrown bottle gourds, or the delicious and healthy meals you can create with them.
Why is this DIY trick a must-try? Because it empowers you to take control of your food source, reduces your reliance on commercially grown produce, and provides a fun and engaging hobby that connects you with the natural world. Plus, the sense of accomplishment you’ll feel when you harvest your first bottle gourd is simply unmatched.
Ready to take your urban gardening to the next level? Consider these variations to personalize your growing experience:
* Vertical Gardening: If space is truly limited, explore vertical gardening techniques. Train your bottle gourd vines to climb trellises, fences, or even repurposed pallets. This maximizes space and adds a beautiful green element to your urban landscape.
* Container Gardening: Experiment with different container sizes and materials. Larger containers generally provide better results, but even smaller containers can work with careful watering and fertilization.
* Grafting: For more advanced gardeners, consider grafting your bottle gourd onto a more vigorous rootstock for increased disease resistance and yield.
* Companion Planting: Research companion plants that can benefit your bottle gourds, such as marigolds to deter pests or beans to fix nitrogen in the soil.
* Seed Saving: Once you’ve successfully grown your bottle gourds, save the seeds for future planting. This ensures a continuous supply of your favorite variety and allows you to adapt your plants to your specific urban environment.
Don’t be afraid to experiment and adapt these techniques to suit your unique circumstances. Urban gardening is all about learning and adapting, and there’s no one-size-fits-all approach. The most important thing is to get started and enjoy the process.
We encourage you to try this DIY trick for growing bottle gourds in your urban space. Share your experiences, successes, and challenges with us in the comments below. We’d love to hear about your journey and learn from your insights. Let’s create a community of urban gardeners who are passionate about growing their own food and connecting with nature. Happy growing!
Frequently Asked Questions (FAQ)
What is the best time of year to plant bottle gourds in an urban environment?
Bottle gourds are warm-season crops, so the best time to plant them is after the last frost, when the soil has warmed up to at least 65°F (18°C). In most urban environments, this typically falls between late spring and early summer. Check your local weather forecasts and planting calendars to determine the optimal planting time for your specific region. Starting seeds indoors 4-6 weeks before the last expected frost can give you a head start.
How much sunlight do bottle gourds need to thrive in an urban garden?
Bottle gourds require at least 6-8 hours of direct sunlight per day to thrive. Choose a location in your urban garden that receives ample sunlight throughout the day. If sunlight is limited, consider using grow lights to supplement natural light, especially during the early stages of growth. Insufficient sunlight can lead to weak growth, reduced flowering, and lower yields.
What type of soil is best for growing bottle gourds in containers?
Bottle gourds prefer well-draining, fertile soil that is rich in organic matter. A good potting mix for container gardening should consist of a combination of garden soil, compost, and perlite or vermiculite. This will provide adequate drainage, aeration, and nutrients for healthy growth. Avoid using heavy clay soils, as they can become waterlogged and inhibit root development.
How often should I water my bottle gourd plants in an urban setting?
Water bottle gourd plants regularly, especially during hot and dry weather. Aim to keep the soil consistently moist but not waterlogged. Water deeply whenever the top inch of soil feels dry to the touch. The frequency of watering will depend on factors such as weather conditions, container size, and soil type. Mulching around the base of the plants can help retain moisture and reduce the need for frequent watering.
What are some common pests and diseases that affect bottle gourds, and how can I manage them organically?
Bottle gourds can be susceptible to various pests and diseases, including aphids, squash bugs, powdery mildew, and downy mildew. To manage these problems organically, consider the following strategies:
* Companion Planting: Plant marigolds or nasturtiums near your bottle gourds to deter pests.
* Neem Oil: Apply neem oil to control aphids and other insect pests.
* Baking Soda Solution: Spray a solution of baking soda and water to prevent powdery mildew.
* Good Air Circulation: Ensure good air circulation around the plants to reduce the risk of fungal diseases.
* Handpicking: Regularly inspect your plants and handpick any pests that you find.
* Crop Rotation: Rotate your crops each year to prevent the buildup of soilborne diseases.
How do I know when my bottle gourds are ready to harvest?
The harvesting time for bottle gourds depends on the intended use. For young, tender gourds used in cooking, harvest them when they are about 6-8 inches long and the skin is still soft and green. For mature gourds used for crafting or storage, allow them to fully mature on the vine until the skin becomes hard and the stem dries out. This can take several months. Handle mature gourds carefully to avoid bruising or damaging the skin.
Can I grow bottle gourds indoors if I don’t have an outdoor space?
While it’s more challenging, growing bottle gourds indoors is possible with the right conditions. You’ll need a large container, a strong trellis or support system, and ample artificial light. Ensure that your indoor space receives at least 12-14 hours of light per day using grow lights. Pollinating the flowers by hand will also be necessary, as there won’t be any natural pollinators indoors. Keep in mind that indoor-grown bottle gourds may not reach the same size or yield as those grown outdoors.
How can I support the heavy vines of bottle gourds in my urban garden?
Bottle gourd vines can become quite heavy, so it’s essential to provide adequate support. Use sturdy trellises, fences, or arbors to support the vines as they grow. Make sure the support structure is strong enough to handle the weight of the mature vines and gourds. You can also use ropes or ties to help train the vines to climb the support structure.
What are some creative ways to use bottle gourds in cooking and crafting?
Bottle gourds are incredibly versatile and can be used in a variety of ways. Young, tender gourds can be used in curries, stews, soups, and stir-fries. Mature gourds can be dried and used for crafting bowls, utensils, musical instruments, and decorative items. The possibilities are endless! Research different recipes and crafting techniques to discover the many uses of bottle gourds.
How can I save seeds from my bottle gourds for future planting?
To save seeds from your bottle gourds, allow the gourds to fully mature on the vine. Once the skin is hard and the stem is dry, harvest the gourds and allow them to dry further for several weeks. Then, cut open the gourds and remove the seeds. Wash the seeds thoroughly and spread them out on a tray to dry completely. Store the dried seeds in an airtight container in a cool, dark, and dry place.
Leave a Comment