
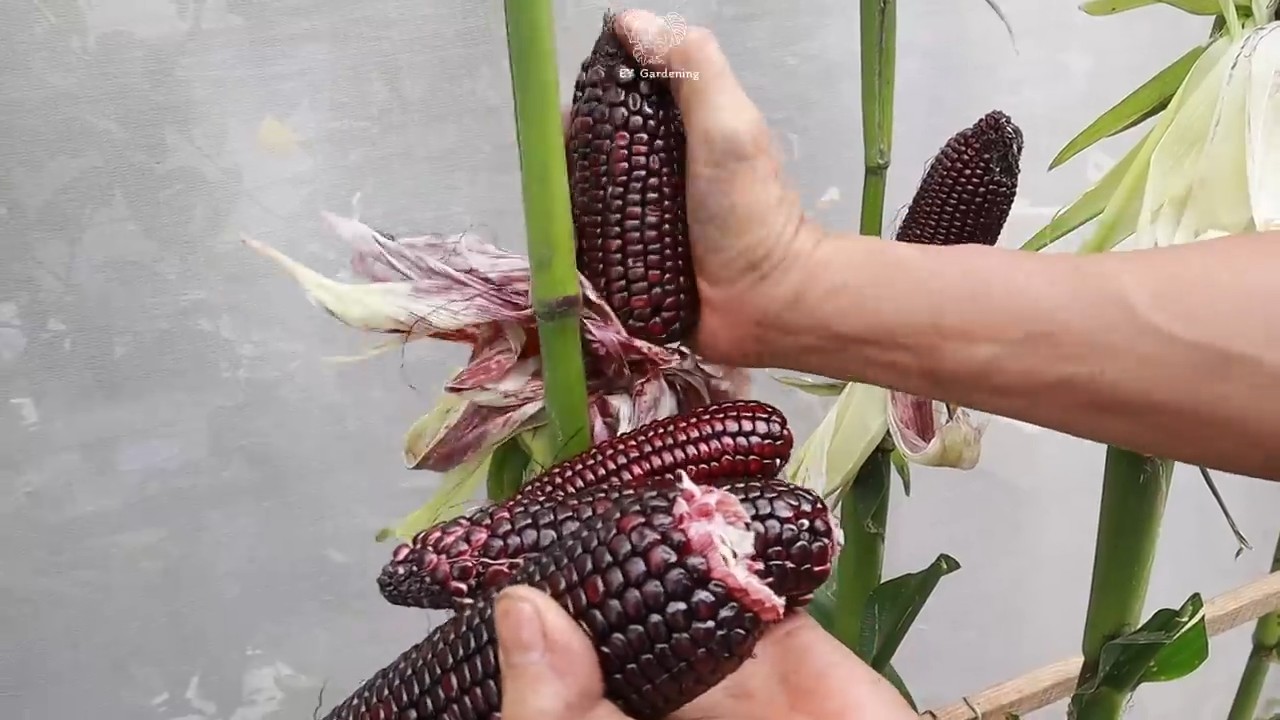
Growing Black Corn might sound like something out of a fantasy novel, but I’m here to tell you it’s a very real, and incredibly rewarding, addition to any home garden! Forget the standard yellow kernels; we’re diving into the world of deep purple, almost black, corn that’s as nutritious as it is visually stunning.
For centuries, indigenous cultures in the Americas have cultivated varieties of dark corn, valuing them not only for their unique color but also for their enhanced nutritional properties and ceremonial significance. Now, you can bring a piece of that history to your own backyard!
Why should you try this DIY gardening adventure? Well, beyond the sheer novelty of harvesting your own black corn, it’s packed with antioxidants, making it a healthier alternative to regular corn. Plus, imagine the look on your friends’ faces when you serve up some homemade black corn tortillas or a vibrant black corn salsa! This DIY project is perfect for gardeners looking to add a touch of the extraordinary to their harvest. I’ll guide you through every step, from selecting the right seeds to ensuring a bountiful, dark-hued crop. Let’s get started and unlock the secrets to successfully growing black corn in your very own garden!
Schwarzer Mais Anbauen: Dein DIY-Leitfaden für eine Außergewöhnliche Ernte
Hey Leute! Habt ihr jemals von schwarzem Mais gehört? Ich war total fasziniert, als ich das erste Mal davon gelesen habe, und musste es einfach selbst ausprobieren. Schwarzer Mais, auch bekannt als “Azteken-Mais”, ist nicht nur optisch ein Hingucker, sondern auch super gesund und vielseitig in der Küche. In diesem Artikel zeige ich euch, wie ihr diesen außergewöhnlichen Mais in eurem eigenen Garten anbauen könnt. Keine Angst, es ist einfacher als ihr denkt!
Was du für den Anbau von schwarzem Mais brauchst:
* Schwarze Maissamen: Besorgt euch hochwertiges Saatgut von einem vertrauenswürdigen Anbieter. Achtet darauf, dass es sich um eine Sorte handelt, die für euer Klima geeignet ist.
* Gartenwerkzeug: Spaten, Harke, eventuell eine Pflanzkelle.
* Gartenhandschuhe: Zum Schutz eurer Hände.
* Kompost oder organischer Dünger: Für einen nährstoffreichen Boden.
* Gießkanne oder Gartenschlauch: Für die Bewässerung.
* Mulchmaterial (optional): Stroh, Holzhackschnitzel oder Grasschnitt, um die Feuchtigkeit im Boden zu halten und Unkraut zu unterdrücken.
* Pflanzstäbe oder Rankgitter (optional): Bei Bedarf zur Unterstützung der Pflanzen.
Die Vorbereitung: Der Schlüssel zum Erfolg
Bevor wir mit dem Pflanzen loslegen, ist eine gute Vorbereitung das A und O. Schwarzer Mais braucht einen sonnigen Standort und einen gut vorbereiteten Boden.
1. Standortwahl:
* Sonne, Sonne, Sonne: Wählt einen Standort, der mindestens 6-8 Stunden direkte Sonneneinstrahlung pro Tag erhält. Mais ist ein Sonnenanbeter!
* Windschutz: Ein windgeschützter Bereich ist ideal, da hohe Maispflanzen bei starkem Wind leicht umknicken können. Eine Hecke oder ein Zaun können hier Abhilfe schaffen.
* Gute Drainage: Der Boden sollte gut drainiert sein, damit sich keine Staunässe bildet. Schwarzer Mais mag keine nassen Füße!
2. Bodenvorbereitung:
* Boden lockern: Lockert den Boden mit einem Spaten oder einer Grabegabel auf eine Tiefe von mindestens 30 cm auf. Das erleichtert den Wurzeln das Wachstum.
* Unkraut entfernen: Entfernt gründlich alle Unkräuter und Steine aus dem Beet. Unkraut konkurriert mit dem Mais um Nährstoffe und Wasser.
* Boden verbessern: Mischt reichlich Kompost oder organischen Dünger in den Boden ein. Das verbessert die Bodenstruktur und versorgt den Mais mit wichtigen Nährstoffen. Ich verwende gerne gut verrotteten Kompost aus meinem eigenen Garten.
* Boden glätten: Harkt den Boden glatt, um eine ebene Oberfläche für die Aussaat zu schaffen.
Die Aussaat: Ab ins Beet!
Jetzt kommt der spannende Teil: die Aussaat! Der richtige Zeitpunkt ist entscheidend für eine erfolgreiche Ernte.
3. Der richtige Zeitpunkt:
* Nach den Eisheiligen: Wartet mit der Aussaat, bis keine Frostgefahr mehr besteht. In den meisten Regionen ist das Mitte Mai der Fall.
* Bodentemperatur: Die Bodentemperatur sollte mindestens 10°C betragen. Das könnt ihr mit einem Bodenthermometer überprüfen.
* Direktsaat oder Vorziehen: Ihr könnt den Mais direkt ins Beet säen oder ihn in Töpfen vorziehen. Das Vorziehen hat den Vorteil, dass die Pflanzen einen Wachstumsvorsprung haben.
4. Die Aussaatmethode:
* Direktsaat:
* Zieht mit einer Harke oder einem Stock Reihen im Abstand von etwa 75 cm.
* Legt die Samen in einem Abstand von etwa 20-25 cm in die Reihen.
* Bedeckt die Samen mit etwa 2-3 cm Erde.
* Gießt die Reihen vorsichtig an.
* Vorziehen:
* Füllt kleine Töpfe mit Anzuchterde.
* Legt in jeden Topf 2-3 Samen.
* Bedeckt die Samen mit einer dünnen Schicht Erde.
* Gießt die Töpfe vorsichtig an und stellt sie an einen hellen, warmen Ort.
* Sobald die Pflanzen etwa 10-15 cm groß sind, könnt ihr sie ins Beet umpflanzen. Achtet darauf, die Wurzeln nicht zu beschädigen.
5. Das Gießen:
* Regelmäßig gießen: Haltet den Boden gleichmäßig feucht, besonders während der Keimung und des Wachstums. Vermeidet Staunässe.
* Morgens gießen: Gießt am besten morgens, damit die Blätter über den Tag abtrocknen können. Das reduziert das Risiko von Pilzkrankheiten.
Die Pflege: Damit der Mais prächtig gedeiht
Nach der Aussaat ist es wichtig, den Mais gut zu pflegen, damit er prächtig gedeiht und eine reiche Ernte bringt.
6. Unkrautbekämpfung:
* Regelmäßig jäten: Entfernt regelmäßig Unkraut aus dem Beet. Unkraut konkurriert mit dem Mais um Nährstoffe und Wasser.
* Mulchen: Tragt eine Schicht Mulchmaterial um die Pflanzen auf. Das unterdrückt das Unkrautwachstum, hält die Feuchtigkeit im Boden und schützt den Boden vor Erosion.
7. Düngung:
* Nachdüngen: Düngt den Mais etwa 4-6 Wochen nach der Aussaat mit einem organischen Dünger oder Kompost. Das versorgt die Pflanzen mit zusätzlichen Nährstoffen.
* Stickstoffbetonter Dünger: Mais benötigt viel Stickstoff, besonders während des Wachstums. Achtet darauf, dass der Dünger einen hohen Stickstoffanteil hat.
8. Schädlingsbekämpfung:
* Maiszünsler: Der Maiszünsler ist ein häufiger Schädling, der sich in den Stängeln und Kolben des Maises einnistet. Kontrolliert die Pflanzen regelmäßig auf Befall und entfernt befallene Pflanzenteile.
* Vögel: Vögel können die jungen Keimlinge fressen. Schützt die Pflanzen mit einem Netz oder Vlies.
* Schnecken: Schnecken können ebenfalls an den jungen Pflanzen fressen. Sammelt die Schnecken ab oder verwendet Schneckenkorn.
9. Stützen:
* Bei Bedarf stützen: Hohe Maispflanzen können bei starkem Wind umknicken. Stützt die Pflanzen bei Bedarf mit Pflanzstäben oder Rankgittern.
Die Ernte: Der Lohn der Mühe
Nach all der Arbeit kommt endlich der schönste Teil: die Ernte!
10. Der richtige Zeitpunkt:
* Reifezeit: Die Reifezeit von schwarzem Mais beträgt etwa 90-120 Tage.
* Anzeichen der Reife: Die Kolben sind reif, wenn die Hüllblätter trocken und braun sind und die Körner hart und prall.
* Test: Stecht mit einem Fingernagel in ein Korn. Wenn es milchig ist, ist der Mais noch nicht reif. Wenn es hart und trocken ist, ist er reif.
11. Die Erntemethode:
* Kolben abbrechen: Brecht die Kolben vorsichtig vom Stängel ab.
* Hüllblätter entfernen: Entfernt die Hüllblätter und die Maisbart.
* Trocknen: Lasst die Kolben an einem trockenen, luftigen Ort trocknen. Das verhindert Schimmelbildung.
Die Verwendung: Vielfalt in der Küche
Schwarzer Mais ist nicht nur schön anzusehen, sondern auch super lecker und vielseitig in der Küche.
* Frisch vom Kolben: Gegrillt oder gekocht ist schwarzer Mais ein echter Genuss.
* Maismehl: Aus getrocknetem und gemahlenem schwarzen Mais kann man Maismehl herstellen, das sich hervorragend für Tortillas, Polenta oder Brot eignet.
* Popcorn: Schwarzer Mais eignet sich auch für die Herstellung von Popcorn.
* Dekoration: Die getrockneten Kolben sind eine tolle Dekoration für den Herbst.
Ich hoffe, dieser Leitfaden hat euch gehol

Conclusion
So, there you have it! Growing black corn isn’t just about adding a unique and visually stunning element to your garden; it’s about embracing a piece of agricultural history, enjoying a delicious and nutritious food source, and experiencing the satisfaction of cultivating something truly special. We’ve walked you through the entire process, from selecting the right seeds and preparing your soil to harvesting those beautiful, dark ears.
Why is this DIY trick a must-try? Because it empowers you to connect with your food on a deeper level. In a world increasingly dominated by mass-produced, often bland, produce, growing black corn allows you to reclaim control over what you eat and appreciate the incredible diversity that nature offers. It’s a conversation starter, a culinary adventure, and a testament to your green thumb. Plus, the vibrant color makes for incredibly striking dishes!
But don’t stop there! Feel free to experiment with different varieties of black corn. Some are sweeter, others are more suited for grinding into flour. Consider companion planting with beans or squash to create a thriving, self-sustaining ecosystem in your garden. You could even try drying the husks and silks for crafting projects. The possibilities are endless!
We encourage you to take the plunge and embark on your own black corn growing journey. It’s a rewarding experience that will not only enrich your garden but also your palate. And most importantly, we want to hear about your successes (and even your challenges!). Share your photos, tips, and stories with us in the comments below. Let’s build a community of black corn enthusiasts and learn from each other. Happy growing!
Frequently Asked Questions (FAQ)
What exactly *is* black corn, and is it different from regular corn?
Black corn, also known as purple corn or blue corn depending on the specific variety, is a type of corn that gets its distinctive color from high levels of anthocyanins. These are the same antioxidants that give blueberries, blackberries, and other dark fruits their vibrant hues. While it’s still corn, and can be used in many of the same ways as yellow or white corn, black corn often has a slightly nuttier, earthier flavor. The texture can also vary depending on the variety, with some being better suited for grinding into flour and others being delicious eaten fresh off the cob. The nutritional profile is also slightly different, with black corn generally boasting higher levels of antioxidants.
Is growing black corn more difficult than growing regular corn?
Generally speaking, growing black corn isn’t significantly more difficult than growing other types of corn. The basic principles of corn cultivation apply: plenty of sunlight, well-drained soil, and consistent watering. However, some varieties of black corn may be more susceptible to certain pests or diseases, so it’s always a good idea to research the specific variety you’re planning to grow and take appropriate preventative measures. Providing adequate nutrients through soil amendments or fertilizer is also crucial for healthy growth and good yields.
How much sunlight does black corn need?
Like all corn varieties, black corn thrives in full sun. Aim for at least 6-8 hours of direct sunlight per day. Insufficient sunlight can lead to stunted growth, poor ear development, and reduced yields. If you’re growing black corn in a container, make sure to place it in a location that receives ample sunlight throughout the day.
What kind of soil is best for growing black corn?
Black corn prefers well-drained soil that is rich in organic matter. A slightly acidic to neutral soil pH (around 6.0 to 7.0) is ideal. Before planting, amend your soil with compost, well-rotted manure, or other organic materials to improve its fertility and drainage. If your soil is heavy clay, consider adding sand or perlite to improve drainage.
How often should I water my black corn plants?
Consistent watering is essential for healthy black corn growth, especially during germination and ear development. Water deeply whenever the top inch of soil feels dry to the touch. Avoid overwatering, as this can lead to root rot. During hot, dry weather, you may need to water more frequently.
When is the best time to harvest black corn?
The harvest time for black corn depends on the specific variety and your intended use. For fresh eating, harvest when the silks have turned brown and dry, and the kernels are plump and milky when pierced. For drying or grinding into flour, allow the ears to dry on the stalk until the husks are completely dry and papery.
Can I grow black corn in containers?
Yes, you can grow black corn in containers, but you’ll need to choose a large container (at least 15-20 gallons) to accommodate the plant’s root system. Make sure the container has drainage holes to prevent waterlogging. Use a high-quality potting mix and provide regular fertilization. Keep in mind that container-grown corn may require more frequent watering than corn grown in the ground.
What are some common pests and diseases that affect black corn?
Some common pests that can affect black corn include corn earworms, aphids, and Japanese beetles. Common diseases include corn smut, rust, and leaf blight. Monitor your plants regularly for signs of pests or diseases and take appropriate action, such as using organic insecticides or fungicides. Crop rotation and good sanitation practices can also help prevent pest and disease problems.
Can I save seeds from my black corn to plant next year?
Yes, you can save seeds from your black corn, but keep in mind that corn is wind-pollinated, so there is a risk of cross-pollination with other corn varieties growing nearby. If you want to save true-to-type seeds, you’ll need to isolate your black corn from other corn varieties by at least a few hundred feet. Allow the ears to dry completely on the stalk, then remove the kernels and store them in a cool, dry place.
What are some creative ways to use black corn in cooking?
Black corn can be used in a variety of dishes, just like regular corn. You can eat it fresh off the cob, grill it, roast it, or use it in salads, soups, and stews. Black corn flour can be used to make tortillas, cornbread, and other baked goods. The vibrant color of black corn makes it a visually appealing addition to any dish. Try making black corn salsa, black corn succotash, or black corn polenta for a unique and flavorful culinary experience.

Leave a Comment