
Growing bitter gourd can seem like a daunting task, right? I know, I’ve been there! You see those gnarly, bumpy gourds at the market and think, “Wow, those are healthy, but how do I even begin to grow them myself?” Well, get ready to ditch the grocery store and embrace the satisfaction of harvesting your own homegrown goodness! This isn’t just about adding a vegetable to your garden; it’s about connecting with a tradition that spans centuries.
Bitter gourd, also known as karela, has a rich history, deeply rooted in Asian and African cultures, where it’s not only a culinary staple but also revered for its medicinal properties. For generations, families have passed down secrets for cultivating this unique vegetable, and now, I’m here to share some of those time-tested tricks with you.
Why do you need these DIY hacks? Because growing bitter gourd doesn’t have to be a struggle! Many gardeners are intimidated by its specific needs, like proper trellising and pollination. But with a few simple DIY solutions and a little know-how, you can create the perfect environment for your bitter gourd to thrive. Imagine the pride of serving a dish made with vegetables you nurtured from seed to table. Plus, you’ll be saving money and enjoying the freshest, most flavorful bitter gourd imaginable. So, let’s dive in and unlock the secrets to a bountiful bitter gourd harvest!
DIY: Growing Bitter Gourd Like a Pro (Even if You’re a Beginner!)
Okay, so you want to grow bitter gourd? Awesome! It might sound intimidating, but trust me, it’s totally doable, even if you’re just starting out with gardening. I’ve grown my fair share of these quirky veggies, and I’m here to share all my secrets. Get ready for a rewarding experience (and a slightly bitter, but oh-so-good, harvest!).
What You’ll Need: The Bitter Gourd Arsenal
Before we dive in, let’s gather our supplies. Having everything ready beforehand will make the whole process smoother.
* Bitter Gourd Seeds: Obviously! Choose a variety that suits your climate and taste. There are long, short, light green, dark green – so many options!
* Seed Starting Trays or Small Pots: For starting the seeds indoors (optional, but recommended).
* Seed Starting Mix: A light, well-draining mix specifically designed for seedlings.
* Larger Pots (if growing in containers) or a Garden Bed: Make sure they’re big enough! Bitter gourd vines get pretty hefty.
* Well-Draining Soil: Bitter gourd loves rich, fertile soil. Amend your garden soil with compost or aged manure.
* Trellis or Support Structure: These vines need something to climb on! A trellis, fence, or even a sturdy bamboo structure will work.
* Gardening Gloves: To keep your hands clean and protected.
* Watering Can or Hose: For regular watering.
* Fertilizer: A balanced fertilizer or one specifically formulated for vegetables.
* Mulch: To help retain moisture and suppress weeds.
* Pruning Shears: For trimming and shaping the vines.
* Patience: This is key! Gardening takes time and effort.
Phase 1: Seed Starting (Getting a Head Start)
Starting seeds indoors gives you a jump on the growing season, especially if you live in a cooler climate. It’s not mandatory, but I highly recommend it.
1. Soaking the Seeds (Optional but Recommended): Before planting, soak the bitter gourd seeds in lukewarm water for 24 hours. This helps soften the hard outer shell and encourages germination. I usually put them in a small bowl and leave them on the counter.
2. Preparing the Seed Starting Trays: Fill your seed starting trays or small pots with seed starting mix. Gently tap the trays to settle the mix.
3. Planting the Seeds: Make a small hole (about ½ inch deep) in the center of each cell or pot. Place one or two seeds in each hole and cover them with soil. Gently pat the soil down.
4. Watering the Seeds: Water the seeds gently using a watering can or spray bottle. Make sure the soil is moist but not soggy.
5. Providing Warmth and Light: Place the seed starting trays in a warm location (around 70-80°F or 21-27°C). A heat mat can be helpful. Provide plenty of light, either from a sunny windowsill or a grow light. I usually use a grow light because it gives me more control over the light intensity and duration.
6. Maintaining Moisture: Keep the soil consistently moist by watering regularly. Don’t let it dry out completely.
7. Waiting for Germination: Bitter gourd seeds typically germinate in 7-14 days. Be patient!
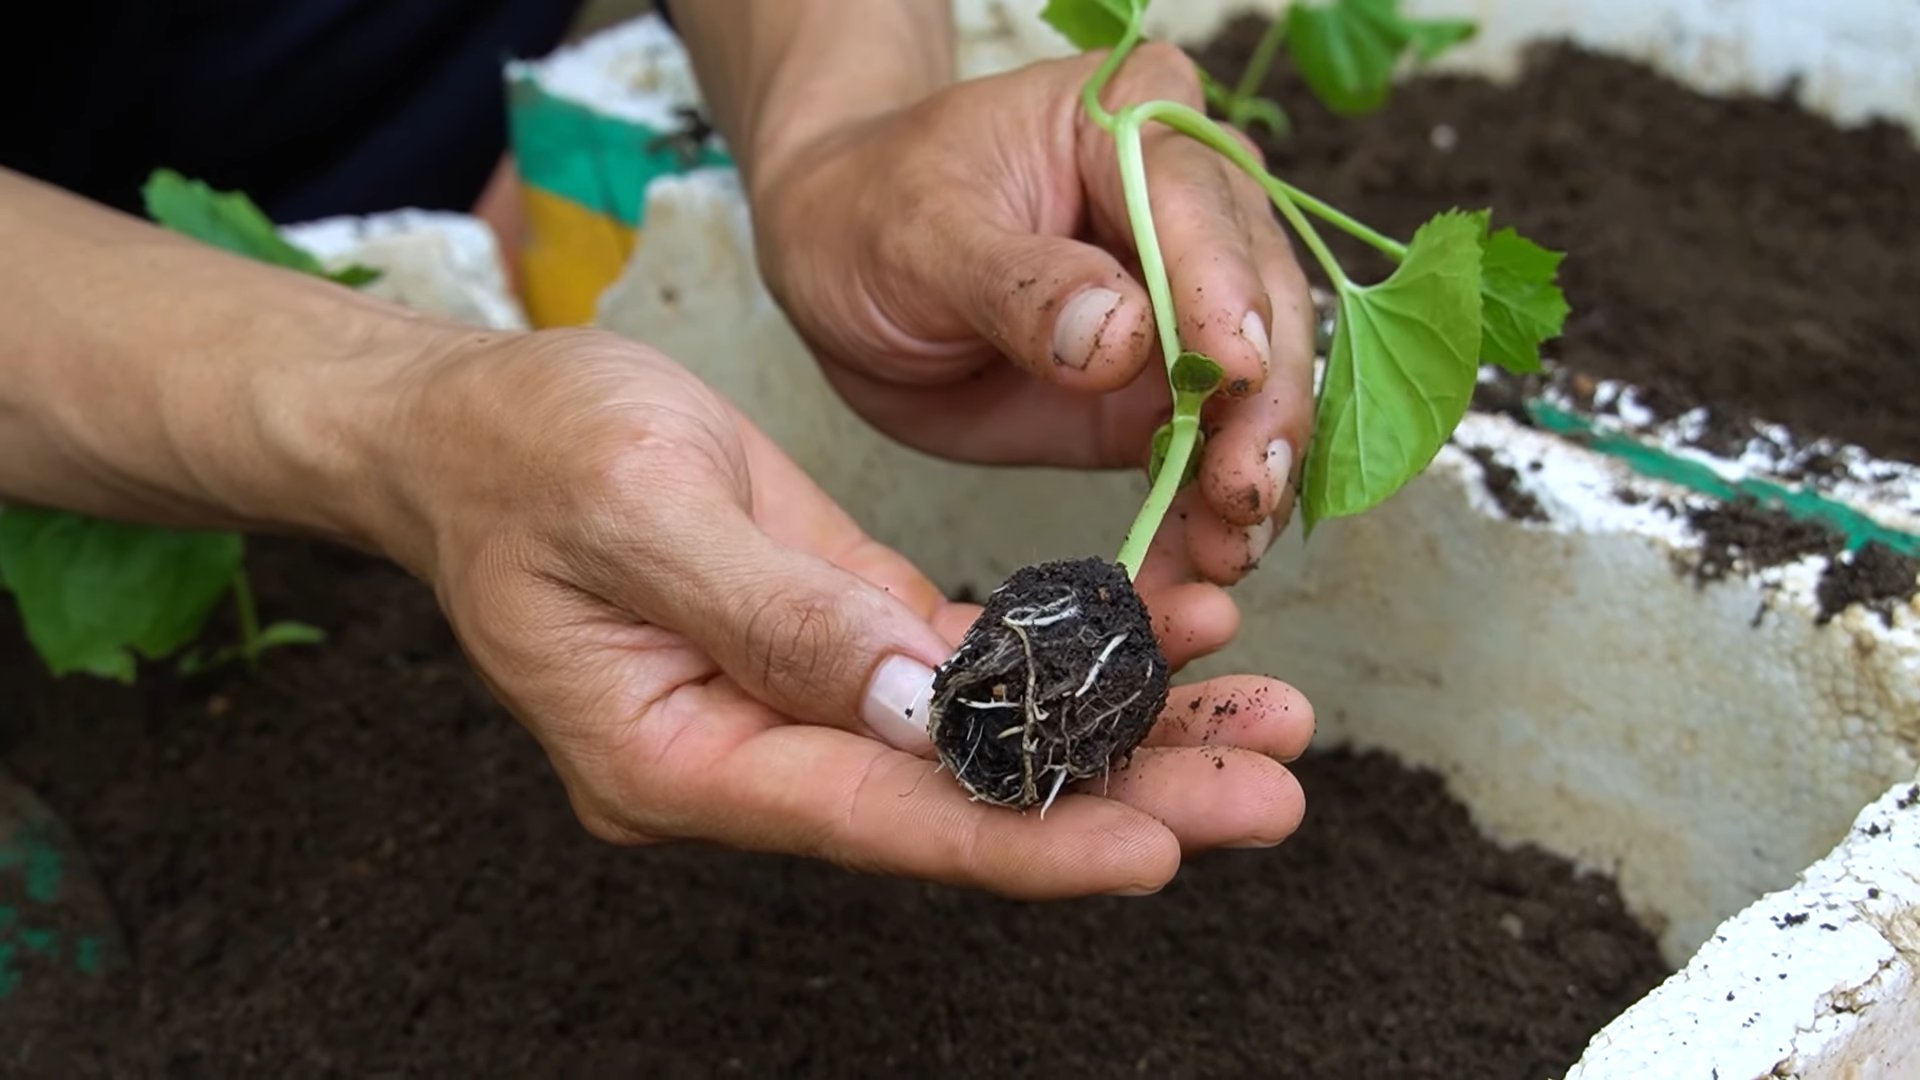
Phase 2: Transplanting (Moving to Their New Home)
Once your seedlings have developed a few true leaves (the leaves that look like miniature versions of the adult leaves), they’re ready to be transplanted.
1. Hardening Off the Seedlings: Before transplanting, you need to “harden off” the seedlings. This means gradually exposing them to outdoor conditions to help them adjust. Start by placing them outside for an hour or two each day, gradually increasing the time over a week or so. Protect them from direct sunlight and strong winds.
2. Preparing the Planting Site: Choose a sunny location with well-draining soil. If you’re growing in containers, make sure they’re large enough (at least 10-15 gallons). Amend the soil with compost or aged manure to improve fertility.
3. Digging the Holes: Dig holes that are slightly larger than the root balls of the seedlings. Space the holes about 2-3 feet apart.
4. Transplanting the Seedlings: Gently remove the seedlings from their trays or pots. Be careful not to damage the roots. Place each seedling in a hole and backfill with soil. Gently pat the soil down.
5. Watering Thoroughly: Water the transplanted seedlings thoroughly.
6. Adding Mulch: Apply a layer of mulch around the base of the plants to help retain moisture and suppress weeds.
Phase 3: Training and Support (Helping Them Climb)
Bitter gourd vines are climbers, so they need a trellis or other support structure to grow on.
1. Installing the Trellis: Install your trellis or support structure near the plants. Make sure it’s sturdy enough to support the weight of the mature vines and fruits. I’ve used everything from simple bamboo stakes to elaborate wooden trellises.
2. Training the Vines: As the vines grow, gently guide them towards the trellis. You can use plant ties or twine to secure them to the structure.
3. Pruning (Optional): Pruning can help encourage branching and fruit production. Remove any dead or yellowing leaves. You can also pinch off the tips of the vines to encourage side shoots. I usually prune mine lightly to keep them manageable.
Phase 4: Watering and Fertilizing (Keeping Them Happy)
Bitter gourd needs consistent watering and fertilization to thrive.
1. Watering Regularly: Water the plants regularly, especially during hot, dry weather. Aim to keep the soil consistently moist but not soggy. Water deeply, allowing the water to soak into the soil.
2. Fertilizing: Fertilize the plants every 2-3 weeks with a balanced fertilizer or one specifically formulated for vegetables. Follow the instructions on the fertilizer package. I like to use a liquid fertilizer because it’s easy to apply and the plants absorb it quickly.
Phase 5: Pest and Disease Control (Protecting Your Crop)
Bitter gourd can be susceptible to certain pests and diseases.
1. Common Pests: Watch out for pests like aphids, spider mites, and squash bugs. Inspect your plants regularly and take action if you see any signs of infestation. You can use insecticidal soap, neem oil, or other organic pest control methods.
2. Common Diseases: Bitter gourd can also be affected by diseases like powdery mildew and downy mildew. To prevent these diseases, provide good air circulation and avoid overhead watering. If you see signs of disease, treat the plants with a fungicide.
3. Prevention is Key: The best way to control pests and diseases is to prevent them in the first place. Choose disease-resistant varieties, provide good air circulation, and keep your garden clean.
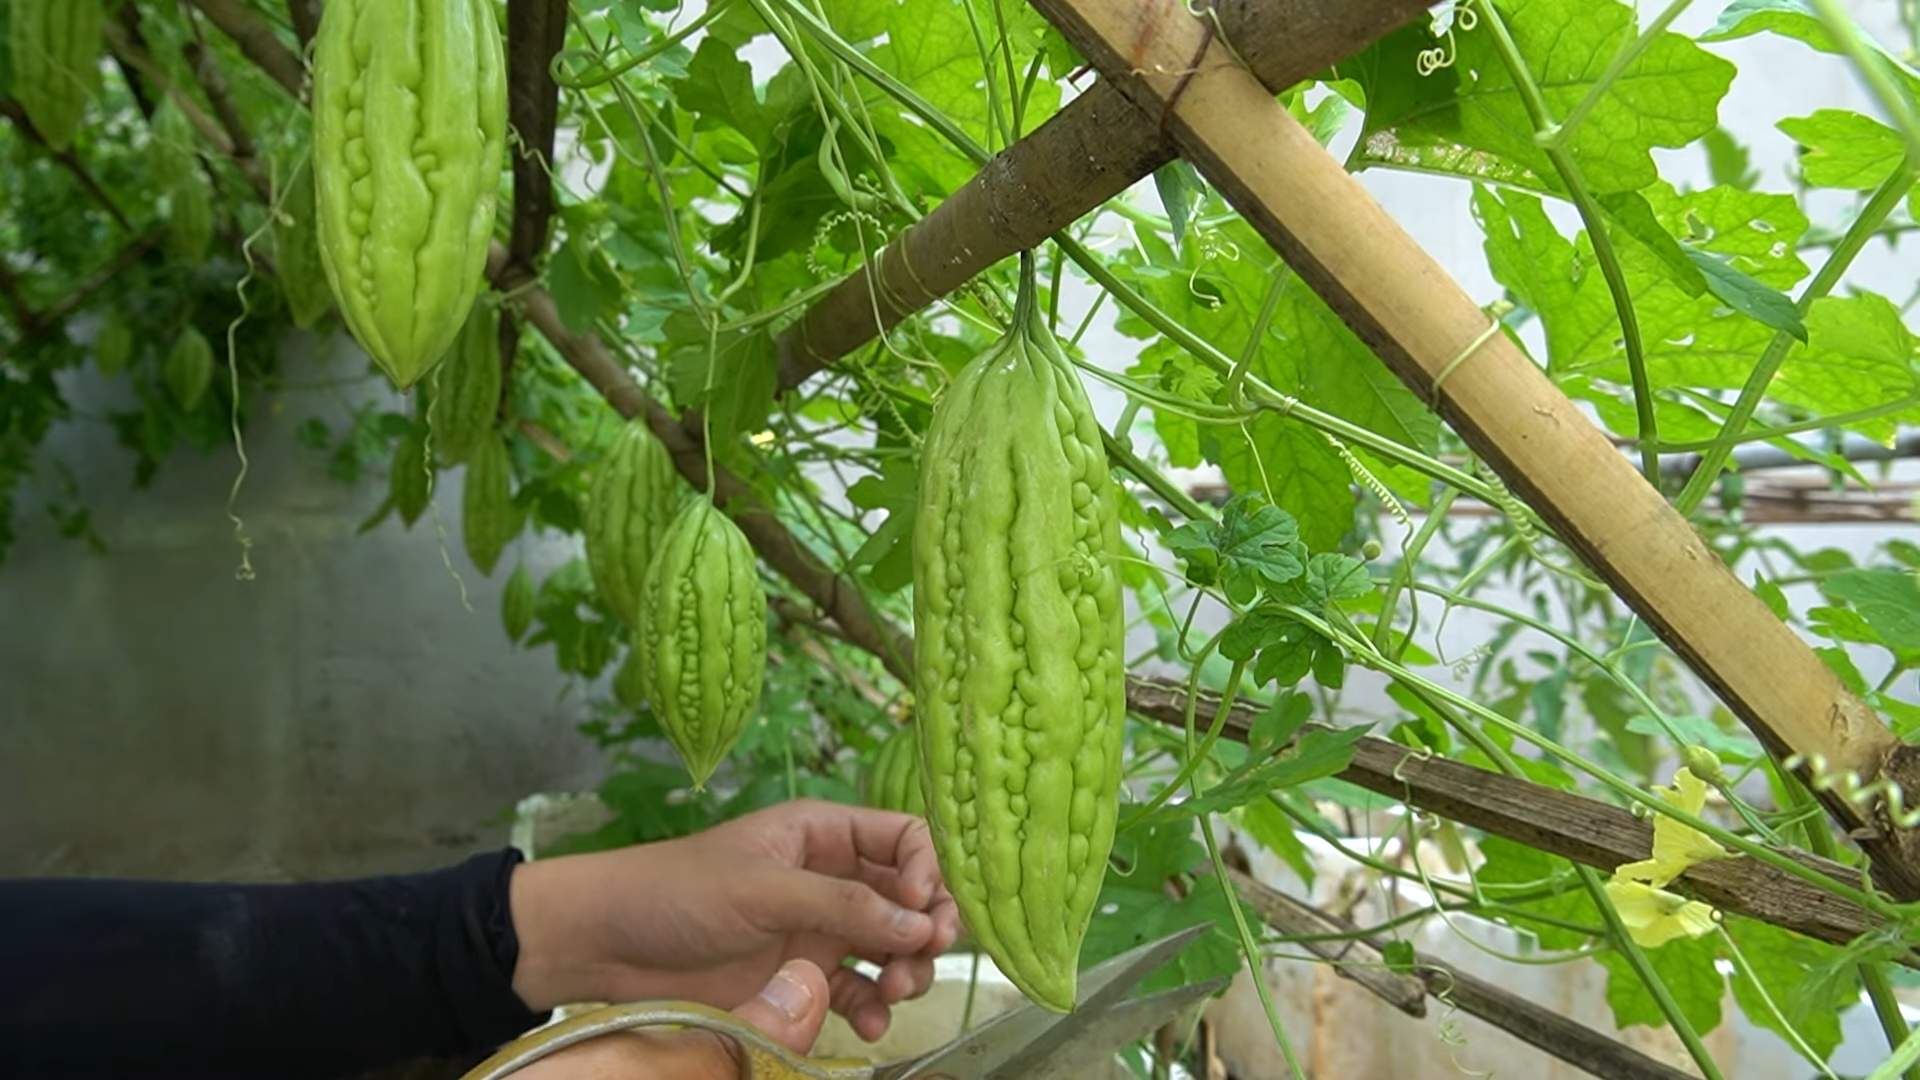
Phase 6: Harvesting (The Sweet Reward!)
The moment you’ve been waiting for!
1. Knowing When to Harvest: Bitter gourd is typically ready to harvest about 2-3 months after planting. The fruits should be firm and green. The size will vary depending on the variety.
2. Harvesting the Fruits: Use a sharp knife or pruning shears to cut the fruits from the vine. Be careful not to damage the vine.
3. Enjoying Your Harvest: Bitter gourd can be used in a variety of dishes. It’s often stir-fried, stuffed, or used in soups and stews. Remember, it’s bitter, so you might want to blanch it before cooking to reduce the bitterness.
Extra Tips and Tricks for Bitter Gourd Success:
* Pollination: Bitter gourd flowers are usually pollinated by insects. If you’re not seeing many fruits, you can try hand-pollinating the flowers. Use a small brush to transfer pollen from the male flowers to the female flowers.
* Succession Planting: To extend your harvest, plant new seeds every few weeks.
* Soil Testing: Before planting, it’s a good idea to test your soil to determine its pH and nutrient levels. This will help you amend the soil properly.
* Companion Planting: Plant bitter gourd with companion plants like basil, marigolds, and nasturtiums to help deter pests.
* Record Keeping: Keep a gardening journal to track your progress and learn from your mistakes.
Growing bitter gourd can be a challenging but rewarding experience. With a little patience and effort, you can enjoy a bountiful harvest of this unique and nutritious vegetable. Happy gardening!
Conclusion
So, there you have it! Growing your own bitter gourd doesn’t have to be a daunting task. With a little patience, the right techniques, and this simple DIY trick, you can transform your garden into a thriving source of fresh, healthy, and, yes, even delicious bitter gourd. This method, focusing on [mention the specific DIY trick from the article, e.g., “creating a nutrient-rich soil mix with compost and bone meal”], is a game-changer because it addresses the specific needs of bitter gourd plants, leading to stronger vines, more abundant yields, and a significantly reduced risk of common problems like blossom end rot and nutrient deficiencies.
Why is this a must-try? Because store-bought bitter gourd simply can’t compare to the flavor and freshness of homegrown. Plus, you have complete control over the growing process, ensuring that your bitter gourd is free from harmful pesticides and chemicals. You’re not just growing a vegetable; you’re cultivating a healthier lifestyle.
But don’t stop there! Feel free to experiment with variations. Try adding different types of organic matter to your soil mix, such as aged manure or worm castings. Consider using companion planting techniques, such as planting basil or marigolds near your bitter gourd to deter pests. You could also explore different trellising methods to maximize space and sunlight exposure. Some gardeners even swear by foliar feeding with diluted seaweed extract to boost growth and fruit production.
Ultimately, the best way to discover what works best for you is to get your hands dirty and give it a try. We’re confident that you’ll be amazed by the results. Imagine the satisfaction of harvesting your own bitter gourd, knowing that you nurtured it from seed to table. Think of the delicious and healthy meals you can create, from stir-fries and curries to juices and teas.
We encourage you to embrace this DIY approach to growing bitter gourd and share your experiences with us. Let us know what worked well for you, what challenges you faced, and any tips or tricks you discovered along the way. Your feedback will not only help us improve this guide but also inspire other gardeners to embark on their own bitter gourd growing adventures. Share your photos and stories on our social media channels using #HomegrownBitterGourd. Let’s build a community of passionate gardeners who are dedicated to growing their own food and living a healthier, more sustainable lifestyle. So, grab your seeds, prepare your soil, and get ready to experience the joy of growing your own bitter gourd! You won’t regret it.
Frequently Asked Questions (FAQ)
What exactly is bitter gourd, and why should I grow it?
Bitter gourd, also known as bitter melon or karela, is a unique vegetable prized for its distinctively bitter flavor and numerous health benefits. It’s a good source of vitamins A and C, as well as iron and fiber. Many cultures use it in traditional medicine to help manage blood sugar levels and boost immunity. Growing your own allows you to enjoy fresh, organic bitter gourd and control the growing process, ensuring it’s free from harmful chemicals. Plus, the taste of homegrown bitter gourd is often superior to store-bought varieties.
What are the ideal growing conditions for bitter gourd?
Bitter gourd thrives in warm, sunny locations with well-drained soil. It needs at least 6-8 hours of direct sunlight per day. The ideal soil pH is between 6.0 and 7.0. It’s also a climbing vine, so it requires a sturdy trellis or support structure to grow on. Consistent watering is essential, especially during hot weather, but avoid overwatering, which can lead to root rot.
How do I start bitter gourd seeds?
Bitter gourd seeds have a hard outer shell, so it’s best to scarify them before planting to improve germination rates. You can gently nick the seed coat with a knife or rub it with sandpaper. Soaking the seeds in warm water for 24 hours before planting can also help. You can start seeds indoors 4-6 weeks before the last expected frost or direct sow them in the garden once the soil has warmed up to at least 70°F (21°C).
What kind of soil is best for growing bitter gourd?
Bitter gourd prefers well-drained, fertile soil that is rich in organic matter. Amend your soil with compost, aged manure, or other organic materials before planting. A slightly acidic to neutral soil pH (6.0-7.0) is ideal. Avoid heavy clay soils, as they can retain too much moisture and lead to root rot.
How often should I water my bitter gourd plants?
Water your bitter gourd plants regularly, especially during hot, dry weather. Aim to keep the soil consistently moist but not waterlogged. Water deeply at the base of the plants, avoiding wetting the foliage, which can increase the risk of fungal diseases. Mulching around the plants can help retain moisture and suppress weeds.
What are some common pests and diseases that affect bitter gourd, and how can I prevent them?
Common pests that can affect bitter gourd include aphids, spider mites, and squash bugs. You can control these pests with insecticidal soap, neem oil, or by handpicking them off the plants. Common diseases include powdery mildew and downy mildew. To prevent these diseases, ensure good air circulation around the plants, avoid overhead watering, and apply a fungicide if necessary.
How do I know when my bitter gourd is ready to harvest?
Bitter gourd is typically ready to harvest about 2-3 months after planting. The fruits should be firm and green, with a slightly waxy coating. The size of the fruit will vary depending on the variety. Harvest the fruits before they turn yellow or orange, as they will become more bitter as they ripen. Use a sharp knife or pruners to cut the fruits from the vine, leaving a short stem attached.
Can I grow bitter gourd in containers?
Yes, you can grow bitter gourd in containers, but you’ll need a large container (at least 15-20 gallons) with good drainage. Use a well-draining potting mix and provide a sturdy trellis or support structure for the vine to climb on. Water and fertilize regularly, as container-grown plants tend to dry out and deplete nutrients more quickly than those grown in the ground.
What are some ways to use bitter gourd in cooking?
Bitter gourd can be used in a variety of dishes, including stir-fries, curries, soups, and juices. To reduce the bitterness, you can soak the sliced bitter gourd in salted water for about 30 minutes before cooking. You can also blanch it in boiling water for a few minutes. Some popular bitter gourd recipes include karela fry, bitter gourd curry, and bitter gourd juice.
How can I save seeds from my bitter gourd plants for next year?
To save seeds from your bitter gourd plants, allow a few fruits to fully ripen on the vine until they turn yellow or orange. Once the fruits are ripe, cut them open and scoop out the seeds. Wash the seeds thoroughly and spread them out on a paper towel to dry completely. Store the dried seeds in an airtight container in a cool, dark, and dry place.

Leave a Comment