
Growing Basil Kitchen Garden dreams can easily become a reality, even if you think you don’t have a green thumb! Have you ever imagined stepping into your kitchen and snipping fresh, fragrant basil leaves to elevate your pasta sauce or brighten up a summer salad? It’s not just a dream; it’s an achievable goal with a few simple DIY tricks. For centuries, basil has been revered not only for its culinary uses but also for its medicinal properties and symbolic significance in various cultures. From ancient Rome, where it was associated with love and fertility, to India, where it’s considered a sacred herb, basil has a rich and fascinating history.
But beyond the historical charm, why should *you* embark on this growing basil kitchen garden adventure? Well, store-bought basil often lacks the vibrant flavor and freshness of homegrown herbs. Plus, let’s be honest, those little plastic containers can be quite expensive! By cultivating your own basil, you’ll not only save money but also enjoy a constant supply of this delicious herb, free from pesticides and full of flavor. This DIY guide will provide you with easy-to-follow tips and tricks to successfully grow basil right in your kitchen, regardless of your gardening experience. Get ready to transform your kitchen into a fragrant oasis and impress your friends and family with your culinary creations!
Your Own Basil Kitchen Garden: It’s This Easy!
Hey everyone! I love fresh basil. Whether in pesto, on pizza, or just as a garnish – the scent and taste are simply unbeatable. And you know what? You don’t even have to run to the supermarket for it anymore! I’ll show you how you can easily set up your own basil kitchen garden. It’s super easy and a lot of fun!
What You’ll Need: The Materials List
Before we get started, here is a list of all the things you’ll need for your basil kitchen garden:
- Basil seeds or a basil plant: You can either start with seeds (takes a bit longer) or buy a small plant from a garden center. I personally find it exciting to watch the plant grow from the very beginning, so I prefer seeds.
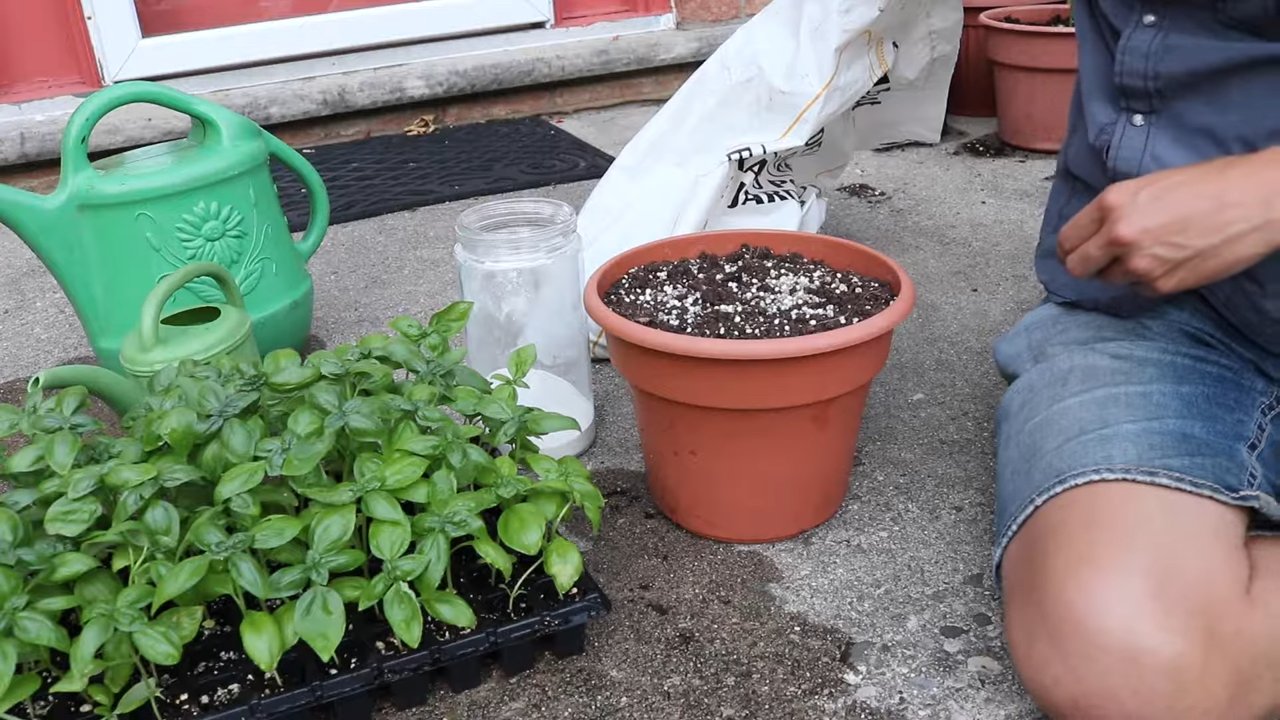
- Starter pots or a planter: Small pots made of peat or coconut fiber are ideal for starting seeds. Later, you can transplant the seedlings into larger pots.
- Seed-starting mix or high-quality potting soil: Seed-starting mix is lower in nutrients and is perfect for the germination of seeds. Potting soil is great for the further development of the plant.
- A spray bottle: For moistening the soil.
- A sunny location: Basil loves the sun! A windowsill or a balcony with plenty of sun is ideal.
- Optional: A small trowel or a spoon: For filling the pots.
- Optional: A clear plastic wrap or a mini-greenhouse: To increase humidity during germination.
- Optional: Plant labels: To keep track if you are planting different herbs.
Growing Basil from Seed: Step by Step
Okay, let’s get started! Here is a detailed guide on how to grow basil from seed:
- Prepare the pots: Fill the starter pots with seed-starting mix. Press the soil down lightly, but not too firmly. It should remain loose and airy.
- Sow the seeds: Sprinkle the basil seeds evenly over the soil. Basil seeds are light germinators, which means they need light to sprout. So, cover them only very lightly with soil or just press them in gently.
- Moisten: Carefully spray the soil with the spray bottle. The soil should be damp, but not wet. Avoid washing the seeds away.
- Provide warmth and moisture: Place the pots in a warm, bright location. Temperatures between 20 and 25 degrees Celsius (68-77°F) are ideal. To increase humidity, you can cover the pots with clear plastic wrap or place them in a mini-greenhouse. Make sure the wrap is not directly on the seeds. Ventilate regularly to prevent mold.
- Be patient: Now it’s time to wait! Germination usually takes 1-2 weeks. Keep the soil moist but not wet during this time.
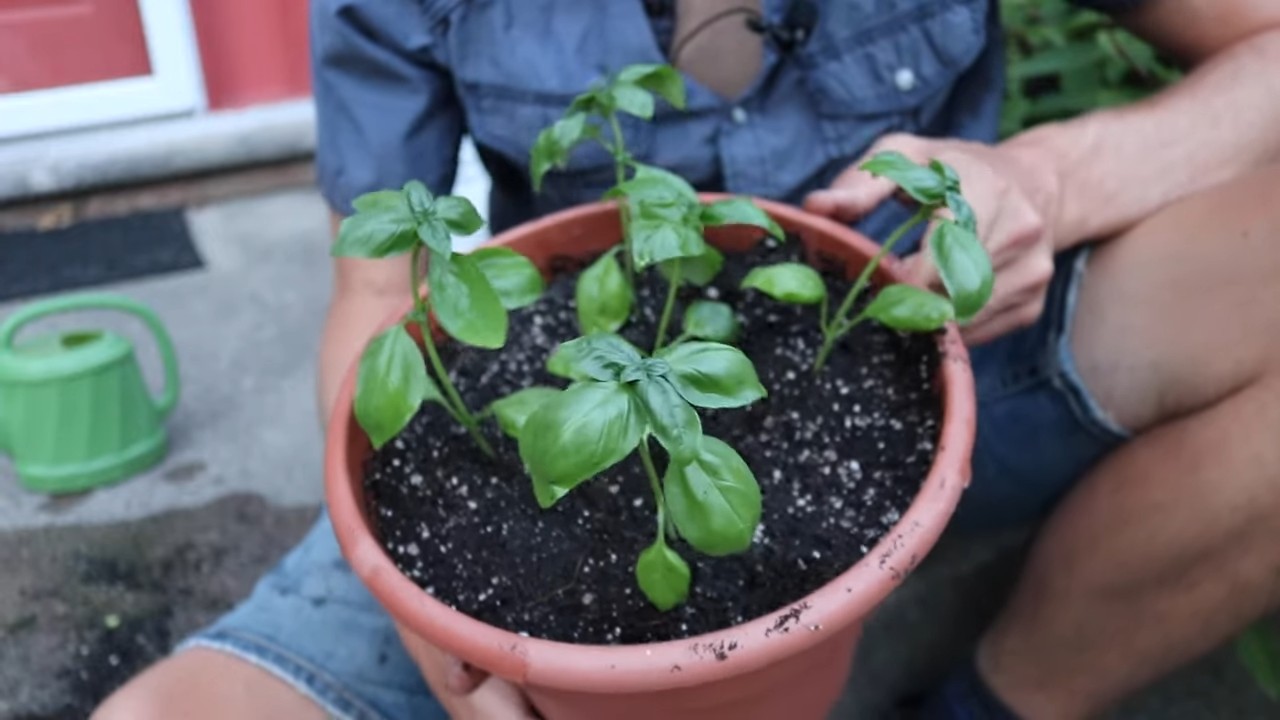
- Pricking out: As soon as the small basil seedlings have developed their first true leaves (after the initial seed leaves), it’s time to prick them out. This means you transplant them into larger pots so they have more room to grow. Fill the larger pots with potting soil. Carefully lift the small seedlings out of the starter pots and place them in the new pots. Be careful not to damage the roots. Gently water the seedlings after transplanting.
Growing Basil from a Plant: The Quick Way
If you’re in a bit of a hurry, you can also buy a small basil plant at the garden center and transplant it into a larger pot.
- Prepare the pot: Choose a pot that is slightly larger than the plant’s current pot. Fill the pot with potting soil.
- Transplant the plant: Carefully remove the basil plant from the old pot. Loosen the roots a bit before placing the plant in the new pot.
- Fill with soil: Fill the pot with soil and press it down lightly.
- Water: Water the plant thoroughly after transplanting.
The Right Care: How to Keep Your Basil Happy
For your basil to thrive, proper care is crucial. Here are a few tips:
- Location: Basil loves the sun! Place your basil kitchen garden in a sunny location. At least 6 hours of sun per day is ideal.
- Watering: Water your basil regularly, but avoid waterlogging. The soil should always be slightly moist. I usually water my basil plants every 2-3 days, depending on the weather. Check the soil before you water. If it feels dry, it’s time to water.
- Fertilizing: Basil is a heavy feeder and needs regular nutrients. I fertilize my plants every 2-3 weeks with an organic liquid fertilizer for herbs.
- Harvesting: Regular harvesting promotes growth! Cut off the shoot tips to make the plant bushier. It’s best to harvest the leaves in the morning, as they are particularly aromatic then.
- Remove flowers: If your basil flowers, it loses its aroma. Remove the flower stalks to promote leaf growth.
- Pests: Watch out for pests like aphids or spider mites. In case of an infestation, you can treat the plant with a natural insecticide.
Overwintering Basil: Here’s How!
Unfortunately, basil is not winter-hardy. But don’t worry, you can still overwinter it!
- Bring it indoors before the frost: Before the first frost arrives, you should bring your basil kitchen garden inside.
- Bright location: Place the basil in a bright location, for example, on a windowsill.
- Water less: In winter, basil needs less water. Only water it when the soil is dry.
- Do not fertilize: You should not fertilize basil in the winter.
- Check regularly: Check the basil regularly for pests.
Common Problems and Solutions
Problems can also arise when growing basil. Here are a few common problems and how you can solve them:
- Yellow leaves: Yellow leaves can be a sign of too much or too little water. Check the soil moisture and adjust your watering accordingly.
- Limp leaves: Limp leaves can be a sign of a lack of water or too little light. Water the plant and move it to a brighter location.
- Aphids: Aphids are small, green or black insects that settle on the leaves and stems. You can rinse them off with a jet of water or treat them with a natural insecticide.
- Mold: Mold can occur if the humidity is too high. Ventilate regularly and avoid waterlogging.
Basil Varieties: Which is the Right One for You?
There are countless basil varieties, each with its own taste and appearance. Here are a few popular types:
Thai Basil: With an anise-like flavor. Perfect for Thai curries and soups.
Genovese Basil: The classic! Perfect for pesto and Italian dishes.
Lemon Basil: With a refreshing lemon aroma. Ideal for salads and Asian dishes.
Conclusion
So, there you have it! Transforming your kitchen into a fragrant, verdant oasis with your own basil kitchen garden is not only achievable but also incredibly rewarding. We’ve walked you through the simple steps, from selecting the right container and soil to nurturing your basil plants for optimal growth. But why is this DIY trick a must-try?
Firstly, the sheer convenience of having fresh basil at your fingertips is unparalleled. No more last-minute trips to the grocery store or settling for dried herbs when a recipe calls for that vibrant, peppery flavor. Imagine the joy of snipping off a few leaves to garnish your pasta, infuse your olive oil, or create a refreshing pesto, all from your own indoor garden.
Secondly, growing your own basil is significantly more cost-effective in the long run. Those small packets of fresh basil from the supermarket can be surprisingly expensive, especially if you use basil frequently. With a one-time investment in a pot, soil, and seeds (or a starter plant), you can enjoy a continuous supply of fresh basil for months, even years, to come.
Thirdly, and perhaps most importantly, cultivating a basil kitchen garden connects you to the natural world in a meaningful way. It’s a therapeutic activity that allows you to slow down, appreciate the beauty of nature, and nurture something with your own hands. Watching your basil plants thrive is incredibly satisfying, and the aroma they release will fill your kitchen with a delightful fragrance.
But the possibilities don’t end there! Feel free to experiment with different varieties of basil. Try growing Genovese basil for classic Italian dishes, Thai basil for Asian-inspired cuisine, or lemon basil for a citrusy twist. You can also explore different container options, from terracotta pots to repurposed jars, to create a unique and visually appealing display. Consider adding companion plants like tomatoes or peppers to your indoor garden for an even more diverse and productive ecosystem.
Don’t be afraid to get creative and personalize your basil kitchen garden to suit your own preferences and needs. The key is to provide your plants with plenty of sunlight, well-draining soil, and regular watering. With a little bit of care and attention, you’ll be amazed at how quickly your basil plants will flourish.
We wholeheartedly encourage you to embark on this rewarding DIY project. It’s a simple, affordable, and incredibly satisfying way to bring the flavors and aromas of summer into your kitchen all year round. So, grab a pot, some soil, and a few basil seeds, and get ready to experience the joy of growing your own fresh herbs.
And most importantly, we want to hear about your experiences! Share your photos, tips, and stories with us in the comments below. Let us know what varieties of basil you’re growing, what challenges you’ve encountered, and what delicious dishes you’ve created with your homegrown herbs. Together, we can create a community of passionate gardeners and inspire others to embrace the joys of growing their own food. Let’s cultivate a world where fresh, flavorful basil is always within reach! Remember, the secret to a thriving basil kitchen garden lies in consistent care and a genuine love for the process. Happy gardening!
Frequently Asked Questions (FAQ)
What is the best type of basil to grow indoors?
The best type of basil to grow indoors depends on your culinary preferences and the amount of space you have. Genovese basil is a classic choice for Italian dishes and pesto, and it’s relatively easy to grow. Thai basil is another popular option, known for its anise-like flavor and suitability for Asian cuisine. Lemon basil offers a citrusy twist and is great for salads and teas. Dwarf basil varieties, like Spicy Globe basil, are also excellent choices for small spaces, as they stay compact and bushy. Experiment with different varieties to find your favorites!
How much sunlight does my indoor basil plant need?
Basil plants thrive in bright, direct sunlight. Ideally, they need at least 6-8 hours of sunlight per day. If you don’t have a sunny windowsill, you can supplement with a grow light. Place the grow light about 6-12 inches above the plants and keep it on for 12-14 hours per day. Rotate your basil plant regularly to ensure that all sides receive adequate sunlight. Signs of insufficient sunlight include leggy growth (long stems with few leaves) and pale leaves.
What type of soil is best for growing basil indoors?
Basil prefers well-draining soil that is rich in organic matter. A good potting mix for basil should contain a blend of peat moss, perlite, and vermiculite. You can also add compost or other organic amendments to improve the soil’s fertility and drainage. Avoid using garden soil, as it can be too heavy and may contain pests or diseases. Ensure that your pot has drainage holes to prevent waterlogging, which can lead to root rot.
How often should I water my indoor basil plant?
Water your basil plant when the top inch of soil feels dry to the touch. Avoid overwatering, as this can lead to root rot. When you water, water thoroughly until water drains out of the drainage holes. Allow the excess water to drain away completely. During the warmer months, you may need to water your basil plant more frequently. Check the soil moisture regularly and adjust your watering schedule accordingly.
How do I fertilize my indoor basil plant?
Basil plants benefit from regular fertilization, especially during the growing season (spring and summer). Use a balanced liquid fertilizer diluted to half strength every 2-4 weeks. Alternatively, you can use a slow-release fertilizer at the beginning of the growing season. Avoid over-fertilizing, as this can lead to leggy growth and a buildup of salts in the soil. Look for fertilizers specifically formulated for herbs or vegetables.
How do I prune my basil plant to encourage growth?
Pruning is essential for encouraging bushy growth and preventing your basil plant from becoming leggy. Pinch off the top set of leaves just above a leaf node (the point where leaves emerge from the stem). This will encourage the plant to produce two new stems from the leaf node. Regularly harvest leaves by snipping them off just above a leaf node. Remove any flowers that appear, as flowering will signal to the plant that it’s time to stop producing leaves.
What are some common pests and diseases that affect basil plants?
Common pests that can affect basil plants include aphids, spider mites, and whiteflies. Check your plants regularly for signs of infestation, such as small insects on the leaves or sticky residue. Treat infestations with insecticidal soap or neem oil. Basil plants can also be susceptible to fungal diseases, such as powdery mildew and downy mildew. Ensure good air circulation around your plants and avoid overwatering to prevent these diseases. If you notice signs of disease, remove the affected leaves and treat the plant with a fungicide.
Can I propagate basil from cuttings?
Yes, basil is very easy to propagate from cuttings. Simply take a 4-6 inch cutting from a healthy basil plant, removing the lower leaves. Place the cutting in a glass of water, making sure that the leaves are above the water line. Change the water every few days. Within a week or two, roots will begin to form. Once the roots are about an inch long, you can plant the cutting in a pot filled with well-draining soil.
How long will my indoor basil plant last?
With proper care, your indoor basil plant can last for several months, even a year or more. However, basil is an annual plant, which means that it will eventually complete its life cycle and die. To prolong the life of your basil plant, provide it with plenty of sunlight, water, and fertilizer. Regularly prune the plant to encourage bushy growth and prevent flowering. You can also propagate new plants from cuttings to ensure a continuous supply of fresh basil.
What if my basil leaves are turning yellow?
Yellowing basil leaves can indicate several problems. Overwatering is a common cause, leading to root rot. Ensure your pot has good drainage and allow the soil to dry slightly between waterings. Nutrient deficiencies can also cause yellowing. Fertilize your plant regularly with a balanced liquid fertilizer. Pests, such as spider mites, can also cause yellowing leaves. Inspect your plant for pests and treat accordingly. Finally, old age can also cause leaves to yellow. If the plant is nearing the end of its life cycle, it may naturally start to decline.
Leave a Comment