
Growing Arugula at Home can seem daunting, but trust me, it’s easier than you think! Have you ever craved that peppery, slightly spicy bite of fresh arugula in your salad, only to find the store-bought version wilted and sad-looking? I have! That’s why I dove headfirst into the world of home gardening, and arugula was one of my first successes.
Arugula, also known as rocket, has a rich history dating back to Roman times, where it was prized for its flavor and even believed to be an aphrodisiac! While I can’t promise any romantic miracles, I can guarantee that growing arugula at home will add a delicious and nutritious boost to your meals.
In today’s busy world, knowing exactly where your food comes from is more important than ever. Plus, let’s be honest, fresh produce from the grocery store can be expensive. This DIY guide will give you simple, effective tricks and hacks to cultivate your own thriving arugula patch, even if you have limited space or gardening experience. I’ll show you how to avoid common pitfalls and enjoy a continuous harvest of this delightful leafy green. Get ready to ditch the store-bought stuff and embrace the joy of homegrown arugula!
Growing Arugula at Home: A DIY Guide for a Peppery Harvest
Hey there, fellow garden enthusiasts! I’m so excited to share my foolproof method for growing arugula at home. It’s surprisingly easy, even if you’re a complete beginner. Arugula, also known as rocket, adds a fantastic peppery kick to salads, pizzas, and so much more. Plus, it grows super fast, giving you a quick and rewarding harvest. Let’s dive in!
Choosing Your Growing Method
Before we get our hands dirty, let’s decide how you want to grow your arugula. You have a few options:
* **In-Ground Gardening:** This is the classic method, perfect if you have a garden bed or a dedicated space in your yard.
* **Container Gardening:** Ideal for balconies, patios, or small spaces. You can use pots, planters, or even repurposed containers.
* **Indoor Growing:** With the right setup (grow lights are your friend!), you can enjoy fresh arugula year-round, regardless of the weather outside.
I personally love container gardening because it gives me the flexibility to move my plants around and protect them from extreme weather. But feel free to choose the method that best suits your space and lifestyle.
Materials You’ll Need
Okay, let’s gather our supplies. Here’s what you’ll need to grow your own delicious arugula:
* **Arugula Seeds:** You can find these at most garden centers or online. Look for varieties like ‘Astro’ or ‘Sylvetta’ for slightly different flavors.
* **Soil:** Use a well-draining potting mix for containers or amend your garden soil with compost for in-ground planting. Arugula isn’t too picky, but good drainage is key to prevent root rot.
* **Container (if applicable):** Choose a pot or planter that’s at least 6 inches deep. Make sure it has drainage holes!
* **Watering Can or Hose:** For keeping your arugula happy and hydrated.
* **Optional: Fertilizer:** A balanced liquid fertilizer can give your arugula a boost, but it’s not strictly necessary.
* **Optional: Grow Lights (for indoor growing):** LED grow lights are energy-efficient and provide the light spectrum arugula needs to thrive.
* **Optional: Seed Starting Tray (for starting seeds indoors):** This is helpful if you want to get a head start on the growing season.
Planting Your Arugula Seeds
Now for the fun part – planting! Here’s how to get your arugula seeds started:
1. **Prepare Your Soil:** If you’re using a container, fill it with your chosen potting mix, leaving about an inch of space at the top. For in-ground planting, loosen the soil and mix in some compost.
2. **Sow the Seeds:** Arugula seeds are tiny, so be careful not to plant them too deep. Sprinkle the seeds evenly over the surface of the soil. Aim for about 1/4 inch spacing between seeds.
3. **Cover the Seeds:** Gently cover the seeds with a thin layer of soil (about 1/4 inch).
4. **Water Thoroughly:** Use a watering can or hose with a gentle spray to moisten the soil. Be careful not to wash the seeds away.
5. **Keep the Soil Moist:** Arugula needs consistent moisture to germinate. Check the soil daily and water as needed to keep it damp but not soggy.
6. **Provide Light:** If you’re growing indoors, place your container under grow lights. If you’re growing outdoors, choose a spot that gets at least 6 hours of sunlight per day. Arugula can tolerate some shade, especially in hot climates.
Caring for Your Arugula Plants
Once your arugula seeds have sprouted (usually within a week), it’s time to provide some TLC. Here’s what you need to do:
1. **Thin the Seedlings:** Once the seedlings have their first true leaves (the second set of leaves that appear after the initial seed leaves), thin them out to about 2-3 inches apart. This will give them enough space to grow and prevent overcrowding.
2. **Water Regularly:** Arugula needs consistent moisture, especially during hot weather. Water deeply whenever the top inch of soil feels dry.
3. **Fertilize (Optional):** If you want to give your arugula a boost, you can fertilize it every 2-3 weeks with a balanced liquid fertilizer. Follow the instructions on the fertilizer label.
4. **Weed Regularly:** Keep your arugula patch free of weeds, which can compete for nutrients and water.
5. **Protect from Pests:** Arugula is generally pest-resistant, but it can sometimes be bothered by flea beetles or aphids. If you notice any pests, you can try spraying them with insecticidal soap or neem oil.
Harvesting Your Arugula
The best part of growing arugula is, of course, harvesting it! Here’s how to get the most out of your harvest:
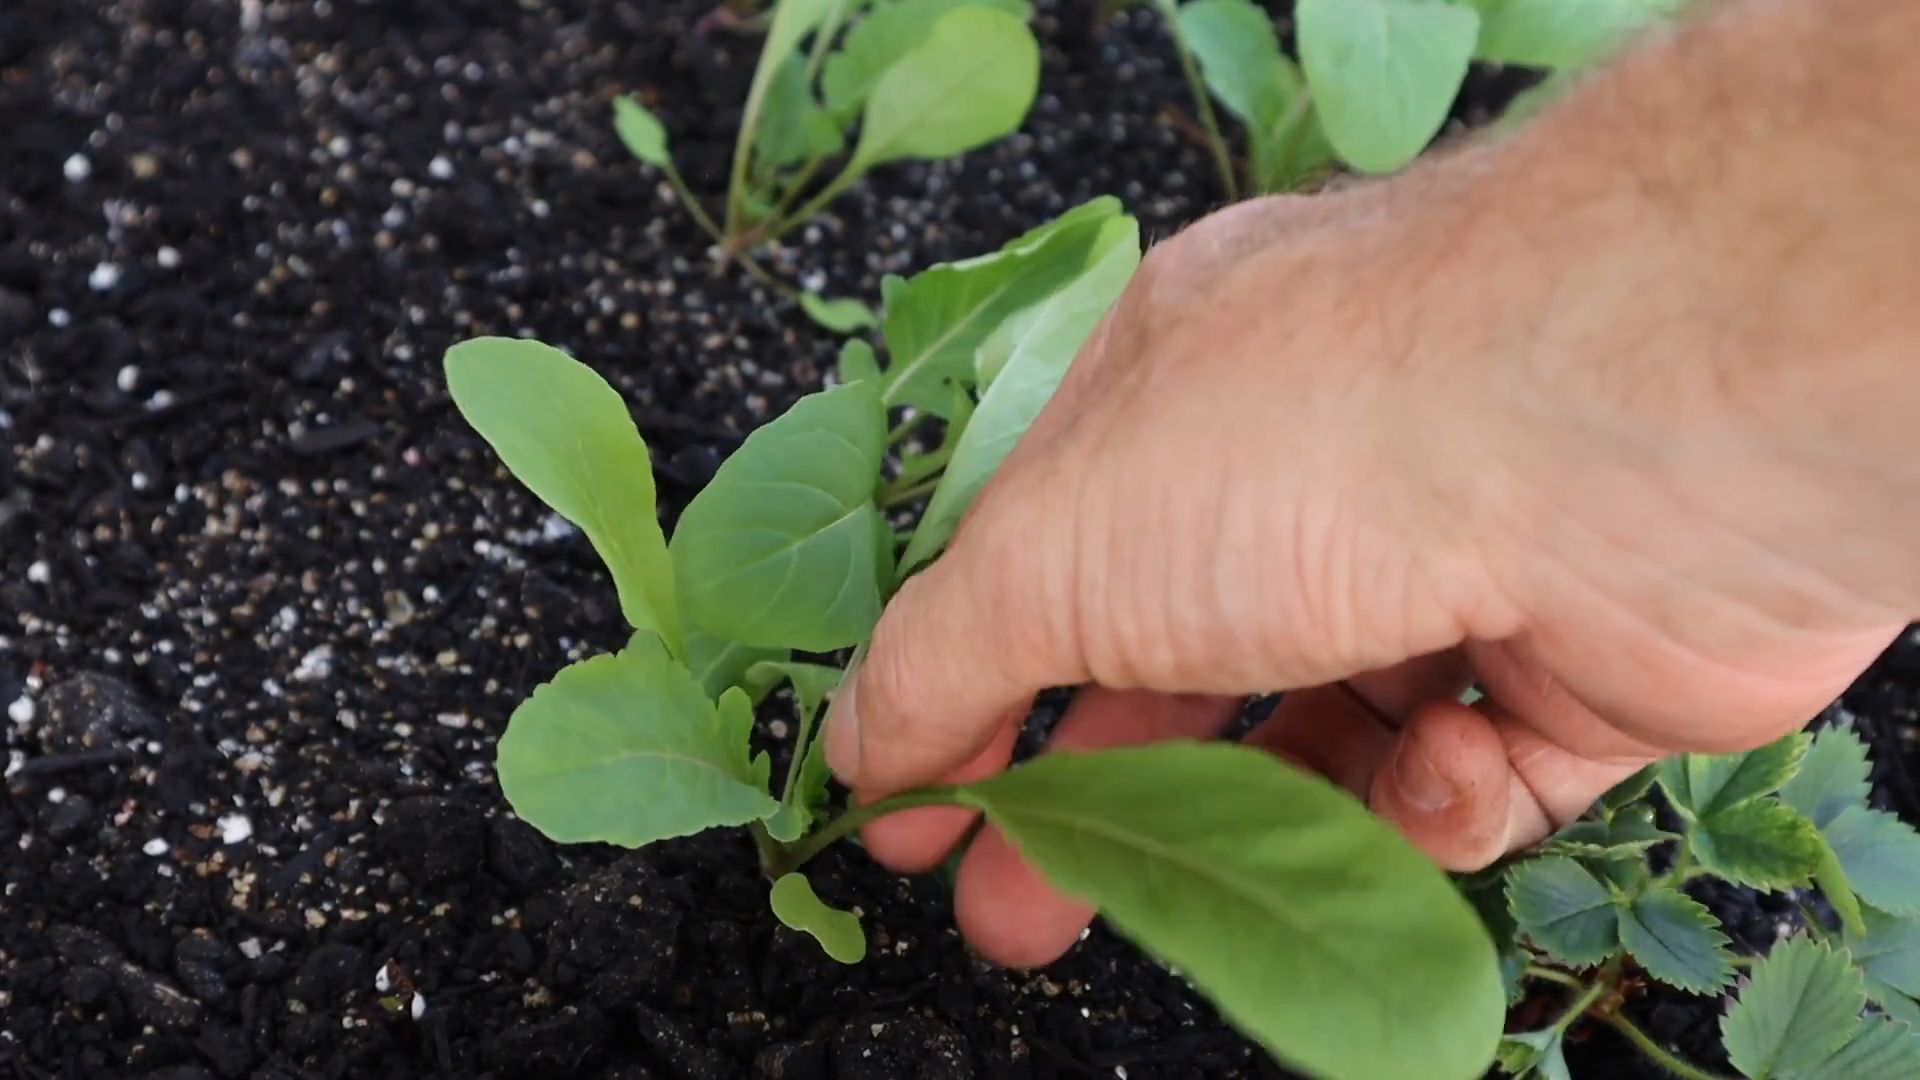
1. **Harvest When Young:** Arugula is most flavorful when the leaves are young and tender. You can start harvesting when the leaves are about 2-3 inches long.
2. **Cut the Leaves:** Use scissors or a sharp knife to cut the leaves about an inch above the soil. This will allow the plant to regrow and produce more leaves.
3. **Harvest Regularly:** The more you harvest, the more your arugula will produce. Aim to harvest every few days to keep the plant producing new leaves.
4. **Succession Planting:** To ensure a continuous supply of arugula, sow new seeds every 2-3 weeks. This is called succession planting.
5. **Wash and Store:** After harvesting, wash the arugula leaves thoroughly and store them in a plastic bag in the refrigerator. They should last for about a week.
Troubleshooting Common Problems
Even with the best care, you might encounter a few problems while growing arugula. Here are some common issues and how to fix them:
* **Yellowing Leaves:** This could be a sign of overwatering, underwatering, or nutrient deficiency. Check the soil moisture and adjust your watering schedule accordingly. You can also try fertilizing with a balanced fertilizer.
* **Leggy Growth:** This means your arugula isn’t getting enough light. Move it to a sunnier location or provide supplemental light with grow lights.
* **Bitter Taste:** Arugula can become bitter if it’s grown in hot weather or if it’s allowed to bolt (go to seed). To prevent this, provide some shade during the hottest part of the day and harvest regularly.
* **Pest Infestation:** As mentioned earlier, arugula can sometimes be bothered by flea beetles or aphids. Spray them with insecticidal soap or neem oil.
Arugula Varieties to Consider
While the standard arugula is fantastic, exploring different varieties can add exciting nuances to your salads and dishes. Here are a few of my favorites:
* **Astro:** This is a classic variety, known for its mild peppery flavor and fast growth. It’s a great choice for beginners.
* **Sylvetta:** Also known as wild arugula, Sylvetta has a more intense, nutty flavor than standard arugula. It’s also more heat-tolerant.
* **Wasabi Arugula:** As the name suggests, this variety has a distinct wasabi-like flavor that adds a unique kick to your dishes.
* **Italian Cress:** While technically not arugula, Italian cress has a similar peppery flavor and is often used as a substitute.
Creative Ways to Use Your Homegrown Arugula
Now that you have a bountiful harvest of fresh arugula, let’s talk about how to use it! Here are some of my favorite ways to enjoy this peppery green:
* **Salads:** Arugula is a classic salad ingredient. It pairs well with other greens, tomatoes, cucumbers, and a variety of dressings.
* **Pizzas:** Sprinkle fresh arugula on top of your pizza after it comes out of the oven for a burst of flavor and freshness.
* **Pesto:** Arugula pesto is a delicious alternative to traditional basil pesto. It has a bolder, more peppery flavor.
* **Sandwiches and Wraps:** Add arugula to your sandwiches and wraps for a peppery kick.
* **Soups:** Stir arugula into soups just before serving for a fresh, peppery flavor.
* **Pasta Dishes:** Toss arugula with pasta and olive oil for a simple and flavorful dish.
* **Smoothies:** Add a handful of arugula to your smoothies for a boost of nutrients and a slightly peppery flavor. Don’t worry, you won’t really taste it!
Extending Your Arugula Season
Want to enjoy fresh arugula for as long as possible? Here are a few tips for extending your growing season:
* **Succession Planting:** As mentioned earlier, sow new seeds every 2-3 weeks to ensure a continuous supply of arugula.
* **Cold Frames or Row Covers:** Use cold frames or row covers to protect your arugula from frost and extend the growing season into the fall and winter.
* **Indoor Growing:** If you have grow lights, you can grow arugula indoors year-round.
* **

Conclusion
So, there you have it! Growing arugula at home is not only achievable, but it’s also incredibly rewarding. Forget those wilted, overpriced bags of greens from the grocery store. Imagine stepping out to your balcony, patio, or even a sunny windowsill and harvesting a handful of fresh, peppery arugula whenever you need it. The flavor is simply unmatched – a vibrant, intense taste that elevates any salad, pizza, or sandwich.
This DIY trick is a must-try for several reasons. First and foremost, it puts you in control of your food. You know exactly what’s going into your arugula – no pesticides, no mystery ingredients, just pure, unadulterated goodness. Secondly, it’s incredibly cost-effective. A single packet of arugula seeds can yield multiple harvests, saving you money in the long run. Thirdly, it’s a fantastic way to connect with nature, even in the heart of the city. There’s something deeply satisfying about nurturing a plant from seed to harvest. Finally, fresh arugula is a nutritional powerhouse, packed with vitamins, minerals, and antioxidants.
But the beauty of growing arugula at home lies in its versatility. Feel free to experiment with different varieties. Try ‘Rocket’ for a classic peppery flavor, or ‘Sylvetta’ for a milder, more delicate taste. You can also adjust the growing conditions to influence the flavor. For a spicier arugula, provide more sunlight and less water. For a milder flavor, offer partial shade and consistent moisture. Consider companion planting with herbs like basil or chives to deter pests and enhance the flavor of your arugula. You can even succession plant, sowing new seeds every few weeks, to ensure a continuous supply of fresh greens throughout the growing season.
Don’t be intimidated if you’re a beginner gardener. Growing arugula is surprisingly easy, even for those without a green thumb. Just remember to provide well-draining soil, adequate sunlight, and consistent moisture. Keep an eye out for pests like aphids or flea beetles, and take action promptly if you spot any. With a little bit of care and attention, you’ll be enjoying homegrown arugula in no time.
We wholeheartedly encourage you to give this DIY trick a try. It’s a simple, affordable, and rewarding way to add fresh, flavorful greens to your diet. And most importantly, don’t forget to share your experience with us! We’d love to hear about your successes, your challenges, and any tips or tricks you’ve discovered along the way. Post pictures of your homegrown arugula on social media using #HomegrownArugula and tag us so we can celebrate your gardening journey with you. Let’s spread the word about the joys of growing your own food and inspire others to embrace the deliciousness of fresh, homegrown arugula!
Frequently Asked Questions (FAQ)
1. What is the best time of year to plant arugula?
Arugula is a cool-season crop, which means it thrives in cooler temperatures. The best time to plant arugula is in early spring or late summer/early fall. In spring, sow seeds as soon as the soil can be worked, typically 2-4 weeks before the last expected frost. For a fall harvest, plant seeds about 6-8 weeks before the first expected frost. Avoid planting arugula during the hottest months of summer, as high temperatures can cause the leaves to become bitter and bolt (go to seed). If you live in a region with mild winters, you may be able to grow arugula year-round.
2. What kind of soil does arugula need?
Arugula prefers well-draining soil that is rich in organic matter. The ideal soil pH is between 6.0 and 7.0. Before planting, amend the soil with compost or other organic matter to improve drainage and fertility. If you’re growing arugula in containers, use a high-quality potting mix. Avoid heavy clay soils, as they can retain too much moisture and lead to root rot.
3. How much sunlight does arugula need?
Arugula needs at least 6 hours of sunlight per day to thrive. However, in hot climates, it can benefit from some afternoon shade. If you’re growing arugula indoors, place it near a sunny window or use grow lights to provide adequate light. Insufficient sunlight can result in leggy growth and reduced flavor.
4. How often should I water arugula?
Arugula needs consistent moisture to grow well. Water regularly, especially during dry periods, to keep the soil evenly moist but not waterlogged. Avoid overhead watering, as this can promote fungal diseases. Instead, water at the base of the plant. A good rule of thumb is to water when the top inch of soil feels dry to the touch.
5. How long does it take for arugula to germinate?
Arugula seeds typically germinate within 5-7 days, depending on soil temperature and moisture levels. To speed up germination, you can soak the seeds in water for 24 hours before planting. Keep the soil consistently moist during the germination period.
6. When can I harvest arugula?
Arugula can be harvested as soon as the leaves are large enough to eat, typically about 3-4 weeks after planting. Harvest the outer leaves first, leaving the inner leaves to continue growing. You can also harvest the entire plant at once. For the best flavor, harvest arugula in the morning, before the sun gets too hot.
7. How do I prevent arugula from bolting?
Bolting is when a plant prematurely flowers and goes to seed. Arugula is prone to bolting in hot weather. To prevent bolting, plant arugula in early spring or late summer/early fall, provide afternoon shade, and water regularly. You can also choose bolt-resistant varieties of arugula. If your arugula does start to bolt, you can still harvest the leaves, but they may have a more bitter flavor.
8. What are some common pests and diseases that affect arugula?
Common pests that affect arugula include aphids, flea beetles, and slugs. Aphids can be controlled with insecticidal soap or neem oil. Flea beetles can be deterred by covering the plants with row covers. Slugs can be controlled with slug bait or by handpicking them off the plants. Common diseases that affect arugula include downy mildew and powdery mildew. These diseases can be prevented by providing good air circulation and avoiding overhead watering. If your arugula does develop a disease, remove the affected leaves and treat the plants with a fungicide.
9. Can I grow arugula in containers?
Yes, arugula grows well in containers. Choose a container that is at least 6 inches deep and has drainage holes. Use a high-quality potting mix and water regularly. Place the container in a sunny location.
10. How do I store harvested arugula?
To store harvested arugula, wash the leaves and dry them thoroughly. Wrap the leaves in a paper towel and store them in a plastic bag in the refrigerator. Arugula will typically last for about 5-7 days in the refrigerator. You can also freeze arugula, but it will lose some of its flavor and texture. To freeze arugula, blanch the leaves in boiling water for 2 minutes, then plunge them into ice water. Drain the leaves and squeeze out any excess water. Place the leaves in a freezer bag and freeze for up to 6 months.
Leave a Comment