
Grow Watermelons Small Garden: Dreaming of juicy, homegrown watermelons but think you don’t have the space? Think again! I’m here to tell you that even with a tiny garden, balcony, or patio, you can absolutely cultivate these summertime delights. For centuries, watermelons have been a symbol of abundance and refreshment, gracing tables from ancient Egypt to modern-day picnics. But you don’t need acres of farmland to partake in this delicious tradition.
Many people believe that growing watermelons requires vast amounts of space, leading them to miss out on the joy of harvesting their own sweet, vine-ripened fruit. That’s where these DIY tricks and hacks come in! I’m going to share some clever techniques to maximize your limited space and ensure a bountiful watermelon harvest. From vertical gardening solutions to selecting the right varieties, I’ll guide you through every step of the process.
Imagine biting into a perfectly ripe watermelon that you nurtured from seed to fruit, all within the confines of your small garden. It’s not just about the taste; it’s about the satisfaction of creating something amazing with your own hands. So, let’s dive in and discover how you can grow watermelons small garden and enjoy the sweet taste of success!
Wassermelonen-Anbau im Kleingarten: So klappt’s!
Hey Leute! Ihr träumt von saftigen, selbstgezogenen Wassermelonen, habt aber nur einen kleinen Garten? Kein Problem! Ich zeige euch, wie ihr auch auf begrenztem Raum erfolgreich Wassermelonen anbauen könnt. Es ist einfacher als ihr denkt, versprochen!
Warum Wassermelonen im Kleingarten?
Wassermelonen brauchen Platz, das stimmt. Aber mit ein paar Tricks und Kniffen könnt ihr auch in einem kleinen Garten eine reiche Ernte erzielen. Der Geschmack einer selbstgezogenen Wassermelone ist einfach unschlagbar, und es ist ein tolles Gefühl, zu sehen, wie die Frucht wächst und gedeiht. Außerdem gibt es mittlerweile viele kleinfrüchtige Sorten, die sich perfekt für den Anbau im Kleingarten eignen.
Die richtige Sorte wählen
Das A und O für den erfolgreichen Anbau im Kleingarten ist die Wahl der richtigen Sorte. Achtet auf Sorten, die:
* Kompakt wachsen: Vermeidet riesige Sorten, die den ganzen Garten überwuchern.
* Früh reifen: Kurze Vegetationsperioden sind ideal, besonders in kühleren Regionen.
* Kleinfrüchtige Sorten sind: Diese nehmen weniger Platz ein und sind oft robuster.
Einige empfehlenswerte Sorten für den Kleingarten sind:
* Sugar Baby: Eine klassische, kleinfrüchtige Sorte mit süßem, rotem Fruchtfleisch.
* Golden Midget: Eine gelbfleischige Sorte, die sehr früh reift und eine goldgelbe Schale hat.
* Bush Sugar Baby: Eine buschförmig wachsende Sorte, die sich gut für Kübel eignet.
* Tiger Baby: Eine gestreifte Sorte mit süßem, rotem Fruchtfleisch und guter Lagerfähigkeit.
Vorbereitung ist alles: Der richtige Standort und Boden
Wassermelonen sind Sonnenanbeter! Sie brauchen mindestens 6-8 Stunden direkte Sonneneinstrahlung pro Tag. Sucht also den sonnigsten Platz in eurem Garten aus.
Der Boden sollte:
* Gut durchlässig sein: Staunässe vertragen Wassermelonen überhaupt nicht.
* Nährstoffreich sein: Wassermelonen sind Starkzehrer und brauchen viele Nährstoffe.
* Warm sein: Der Boden sollte sich gut erwärmen, idealerweise über 18°C.
So bereitet ihr den Boden vor:
1. Boden lockern: Grabt den Boden gründlich um und entfernt Steine und Unkraut.
2. Kompost einarbeiten: Mischt reichlich Kompost unter den Boden, um ihn mit Nährstoffen anzureichern und die Wasserspeicherfähigkeit zu verbessern.
3. Langzeitdünger hinzufügen: Ein organischer Langzeitdünger sorgt für eine kontinuierliche Nährstoffversorgung. Hornspäne oder Guano sind gute Optionen.
4. Boden erwärmen: Um den Boden schneller zu erwärmen, könnt ihr ihn mit schwarzer Mulchfolie abdecken. Das hilft auch, Unkraut zu unterdrücken und die Feuchtigkeit im Boden zu halten.
Aussaat und Anzucht
Ich empfehle, Wassermelonen vorzuziehen, besonders in Regionen mit kurzen Sommern. Das gibt den Pflanzen einen Vorsprung und verlängert die Reifezeit.
1. Aussaatzeitpunkt: Beginnt mit der Aussaat etwa 4-6 Wochen vor dem letzten erwarteten Frost.
2. Aussaatgefäße: Verwendet kleine Töpfe oder Anzuchtschalen.
3. Aussaaterde: Füllt die Gefäße mit Anzuchterde.
4. Aussaat: Legt 1-2 Samen pro Topf etwa 2 cm tief in die Erde.
5. Gießen: Gießt die Erde vorsichtig an.
6. Standort: Stellt die Gefäße an einen warmen, hellen Ort. Eine Temperatur von 22-25°C ist ideal.
7. Feuchtigkeit: Haltet die Erde feucht, aber nicht nass.
8. Keimung: Die Keimung dauert in der Regel 7-14 Tage.
9. Pikieren: Wenn die Sämlinge 2-3 echte Blätter haben, könnt ihr sie in größere Töpfe pikieren.
Auspflanzen ins Freie
Sobald keine Frostgefahr mehr besteht und der Boden sich ausreichend erwärmt hat, können die Jungpflanzen ins Freie gepflanzt werden.
1. Abhärten: Bevor ihr die Pflanzen auspflanzt, solltet ihr sie einige Tage lang abhärten. Stellt sie tagsüber ins Freie und holt sie nachts wieder rein.
2. Pflanzabstand: Haltet einen Pflanzabstand von etwa 60-80 cm zwischen den Pflanzen ein. Bei buschförmigen Sorten kann der Abstand etwas geringer sein.
3. Pflanzloch: Grabt ein Pflanzloch, das etwas größer ist als der Wurzelballen.
4. Pflanzen: Setzt die Pflanzen vorsichtig in die Pflanzlöcher und füllt sie mit Erde auf.
5. Angießen: Gießt die Pflanzen gründlich an.
6. Mulchen: Mulcht den Boden um die Pflanzen herum mit Stroh oder Holzhackschnitzeln. Das hilft, die Feuchtigkeit im Boden zu halten und Unkraut zu unterdrücken.
Pflege während der Wachstumsphase
Wassermelonen brauchen regelmäßige Pflege, um gut zu wachsen und viele Früchte zu tragen.
1. Gießen: Gießt die Pflanzen regelmäßig, besonders während trockener Perioden. Achtet darauf, dass der Boden immer feucht ist, aber nicht nass.
2. Düngen: Düngt die Pflanzen alle 2-3 Wochen mit einem organischen Flüssigdünger.
3. Ausgeizen: Entfernt Seitentriebe, um die Kraft der Pflanze auf die Haupttriebe und die Fruchtbildung zu konzentrieren.
4. Fruchtansatz fördern: Um den Fruchtansatz zu fördern, könnt ihr die Blüten von Hand bestäuben. Nehmt dazu einen Pinsel und übertragt den Pollen von den männlichen auf die weiblichen Blüten. Die weiblichen Blüten erkennt ihr an dem kleinen Fruchtknoten unterhalb der Blüte.
5. Fruchtunterlage: Legt unter die wachsenden Früchte eine Unterlage aus Stroh oder Holz, um sie vor Fäulnis zu schützen.
6. Schutz vor Schädlingen und Krankheiten: Achtet auf Schädlinge wie Blattläuse oder Schnecken und bekämpft sie bei Bedarf mit natürlichen Mitteln. Auch Pilzkrankheiten können auftreten. Sorgt für eine gute Belüftung und entfernt befallene Blätter.
Wassermelonen im Kübel anbauen
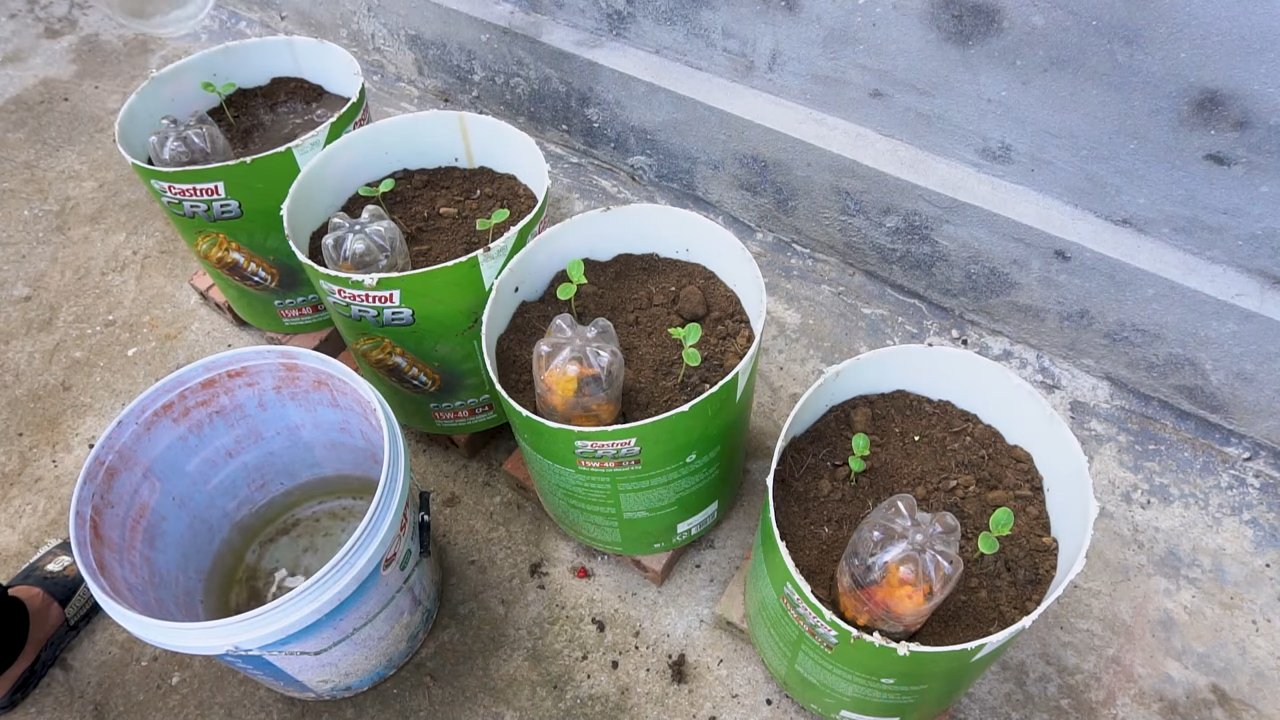
Wenn ihr keinen Garten habt, könnt ihr Wassermelonen auch im Kübel anbauen.
1. Kübelgröße: Wählt einen Kübel mit einem Volumen von mindestens 30 Litern.
2. Erde: Verwendet eine hochwertige Kübelpflanzenerde.
3. Drainage: Sorgt für eine gute Drainage, indem ihr eine Schicht Kies oder Blähton auf den Boden des Kübels legt.
4. Standort: Stellt den Kübel an einen sonnigen, warmen Ort.
5. Pflege: Die Pflege im Kübel ist ähnlich wie im Garten. Achtet auf regelmäßiges Gießen und Düngen.
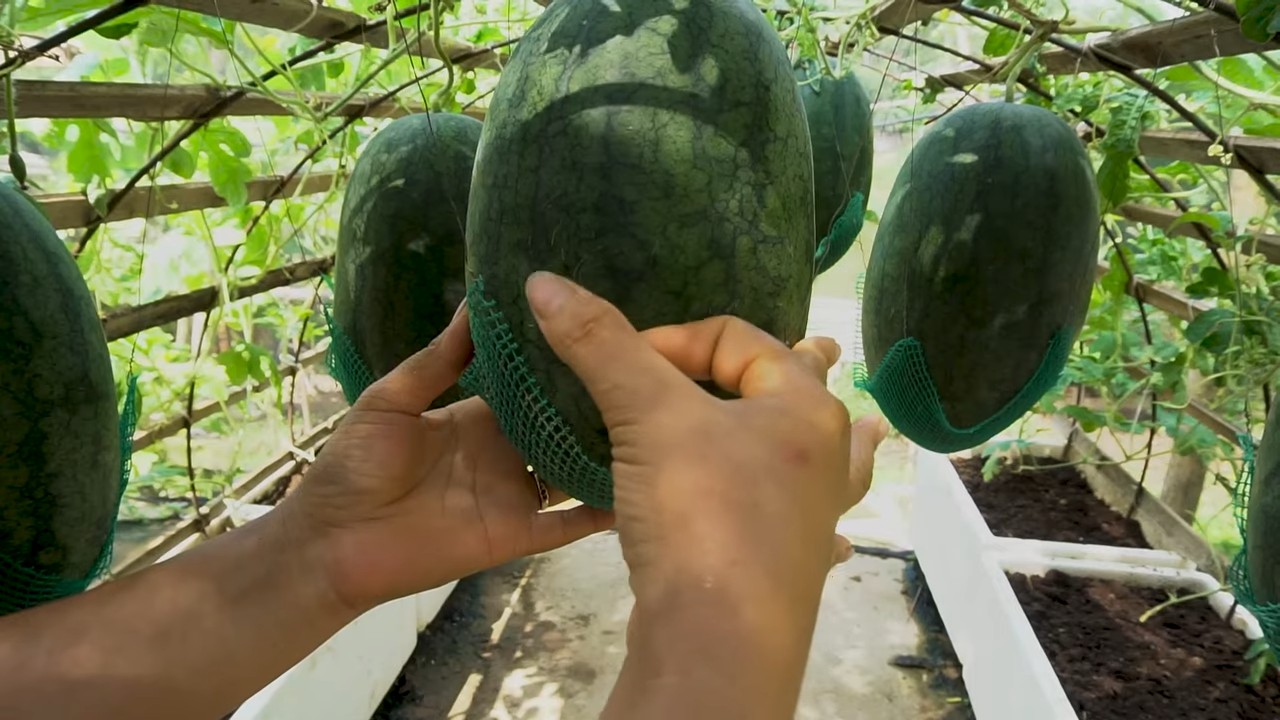
6. Rankhilfe: Da Wassermelonen im Kübel oft nicht so stabil sind, kann eine Rankhilfe sinnvoll sein.
Erntezeit und Lagerung
Die Erntezeit hängt von der Sorte und den Witterungsbedingungen ab. In der Regel sind Wassermelonen etwa 80-100 Tage nach der Aussaat reif.
So erkennt ihr, ob eine Wassermelone reif ist:
* Der Klang: Klopft auf die Wassermelone. Wenn sie hohl klingt, ist sie reif.
* Die Unterseite: Die Stelle, an der die Wassermelone auf dem Boden lag, sollte gelblich verfärbt sein.
* Der Stiel: Der Stiel sollte trocken und leicht eingerollt sein.
Schneidet die Wassermelone vorsichtig vom Stiel ab.
W
Conclusion
So, there you have it! Growing watermelons in a small garden isn’t just a whimsical dream; it’s an achievable reality with a little planning and these simple DIY tricks. We’ve walked you through selecting the right varieties, optimizing your space with vertical gardening techniques, hand-pollinating for guaranteed fruit, and nurturing your precious melons to juicy perfection.
Why is this a must-try? Because the taste of a homegrown watermelon, bursting with sweetness and sunshine, is simply unparalleled. It’s a reward for your efforts, a testament to your green thumb, and a conversation starter that will impress your friends and family. Plus, think of the satisfaction of knowing exactly where your food comes from and the joy of sharing the fruits (literally!) of your labor.
But the journey doesn’t end here. Feel free to experiment with different watermelon varieties. Perhaps try a yellow watermelon for a unique twist, or a seedless variety for ultimate convenience. Consider companion planting with basil or marigolds to deter pests and attract pollinators. You could even explore different trellising methods to find what works best for your space and aesthetic.
Don’t be afraid to get creative and adapt these techniques to your specific garden conditions. Remember, gardening is a learning process, and every season brings new opportunities to refine your skills. The key is to start, observe, and adjust as needed.
We’re confident that with these DIY tricks, you’ll be enjoying delicious, homegrown watermelons even in the smallest of gardens. So, grab your seeds, prepare your soil, and get ready to embark on this rewarding gardening adventure.
We can’t wait to hear about your experiences! Share your photos, tips, and challenges in the comments below. Let’s build a community of small-space watermelon growers and inspire others to cultivate their own little slice of paradise. Let us know what worked for you, what didn’t, and any innovative solutions you discovered along the way. Together, we can unlock the secrets to successful small-garden watermelon cultivation and spread the joy of homegrown goodness. Remember, even a tiny patch of land can yield a bountiful harvest with the right knowledge and a little bit of love. So, go ahead, give it a try, and prepare to be amazed by the magic of growing your own watermelons!
Frequently Asked Questions (FAQ)
Q: What is the best watermelon variety to grow in a small garden?
A: Choosing the right variety is crucial for success in a limited space. Bush or dwarf watermelon varieties are specifically bred to be compact and manageable. Some excellent options include ‘Sugar Baby,’ ‘Bush Sugar Baby,’ ‘Golden Midget,’ and ‘Tiger Baby.’ These varieties produce smaller melons and have shorter vines, making them ideal for containers or small garden beds. They also tend to mature faster, which is beneficial in shorter growing seasons. Consider your local climate and growing conditions when making your selection. Look for varieties that are disease-resistant and well-suited to your region.
Q: How much sunlight do watermelons need?
A: Watermelons are sun-loving plants and require at least 6-8 hours of direct sunlight per day to thrive. Insufficient sunlight can lead to poor fruit development, smaller melons, and reduced sweetness. Choose a location in your garden that receives ample sunlight throughout the day. If you’re growing watermelons in containers, make sure to position them in a sunny spot or use grow lights to supplement natural sunlight.
Q: How often should I water my watermelons?
A: Watermelons need consistent moisture, especially during fruit development. Water deeply and regularly, aiming for about 1-2 inches of water per week. Check the soil moisture regularly and water when the top inch feels dry to the touch. Avoid overwatering, as this can lead to root rot and other fungal diseases. Drip irrigation or soaker hoses are excellent options for delivering water directly to the roots and minimizing water loss through evaporation. Reduce watering as the fruits ripen to concentrate the sugars and enhance their sweetness.
Q: How do I hand-pollinate watermelons?
A: Hand-pollination is essential for ensuring fruit set, especially if you have limited pollinator activity in your garden. Watermelons have separate male and female flowers. The female flowers have a small, immature fruit at the base of the flower. To hand-pollinate, use a small paintbrush or cotton swab to collect pollen from the male flower and gently transfer it to the stigma of the female flower. The best time to hand-pollinate is in the morning, when the flowers are fully open and the pollen is most viable. Repeat the process for several days to increase the chances of successful pollination.
Q: How do I know when my watermelon is ripe?
A: Determining when a watermelon is ripe can be tricky, but there are several indicators to look for. The tendril closest to the fruit should be brown and dry. The underside of the watermelon, where it rests on the ground (the “ground spot”), should turn from white to a creamy yellow. When you thump the watermelon, it should sound hollow and deep. These are all good signs that your watermelon is ready to be harvested.
Q: Can I grow watermelons in containers?
A: Yes, you can absolutely grow watermelons in containers, especially the bush or dwarf varieties. Choose a large container, at least 20 gallons in size, to provide enough room for the roots to grow. Use a well-draining potting mix and ensure the container has drainage holes to prevent waterlogging. Provide a trellis or support structure for the vines to climb. Water regularly and fertilize with a balanced fertilizer to promote healthy growth and fruit development.
Q: What are some common pests and diseases that affect watermelons?
A: Watermelons can be susceptible to various pests and diseases, including aphids, squash bugs, cucumber beetles, powdery mildew, and fusarium wilt. Regularly inspect your plants for signs of infestation or disease. Use organic pest control methods, such as insecticidal soap or neem oil, to control pests. Ensure good air circulation and avoid overhead watering to prevent fungal diseases. Choose disease-resistant varieties whenever possible.
Q: How can I improve the sweetness of my watermelons?
A: Several factors contribute to the sweetness of watermelons. Ensure your plants receive ample sunlight and water. Fertilize with a balanced fertilizer during the growing season. Reduce watering as the fruits ripen to concentrate the sugars. Avoid over-fertilizing with nitrogen, as this can promote leafy growth at the expense of fruit development. Choose varieties known for their sweetness.
Q: What is companion planting, and how can it benefit my watermelons?
A: Companion planting involves growing different plants together to benefit each other. Some excellent companion plants for watermelons include basil, marigolds, nasturtiums, and radishes. Basil repels pests like aphids and whiteflies. Marigolds deter nematodes and other soil-borne pests. Nasturtiums attract beneficial insects like pollinators and predatory wasps. Radishes can help break up the soil and improve drainage.
Q: How do I store my harvested watermelons?
A: Store harvested watermelons in a cool, dry place. Whole watermelons can be stored at room temperature for about a week. For longer storage, refrigerate them. Cut watermelons should be wrapped tightly in plastic wrap and stored in the refrigerator. They will last for about 3-5 days.

Leave a Comment