
Grow Rosemary Indoors Easily and transform your home into a fragrant, thriving oasis! Have you ever dreamed of snipping fresh rosemary sprigs right from your kitchen windowsill to elevate your culinary creations? I know I have! But the thought of keeping this Mediterranean herb happy indoors can seem daunting. Fear not, fellow plant enthusiasts, because this guide is packed with simple, effective DIY tricks and hacks to help you cultivate a flourishing rosemary plant inside, regardless of your green thumb level.
Rosemary, with its pine-like aroma and delicate blue flowers, boasts a rich history. Ancient civilizations revered it for its medicinal properties and symbolic association with remembrance. From warding off evil spirits to enhancing memory, rosemary has played a significant role in various cultures for centuries. Now, you can bring this historical herb into your home and enjoy its many benefits.
Why is learning to grow rosemary indoors easily so important? Well, access to fresh herbs shouldn’t be limited by the seasons! Plus, store-bought rosemary can be expensive and often lacks the vibrant flavor of homegrown. With a few simple adjustments to your indoor environment and some clever DIY techniques, you can enjoy a constant supply of fresh rosemary, adding a touch of gourmet to your meals and a refreshing scent to your home. Let’s dive in and unlock the secrets to successful indoor rosemary cultivation!
Growing Rosemary Indoors: A Simple Guide for Herb Lovers
Hey there, fellow plant enthusiasts! Ever dreamed of having fresh rosemary right at your fingertips, no matter the season? Well, you’re in luck! Growing rosemary indoors is totally achievable, and I’m here to walk you through every step. It’s easier than you might think, and the aroma alone is worth the effort. Let’s get started!
Choosing the Right Rosemary Variety
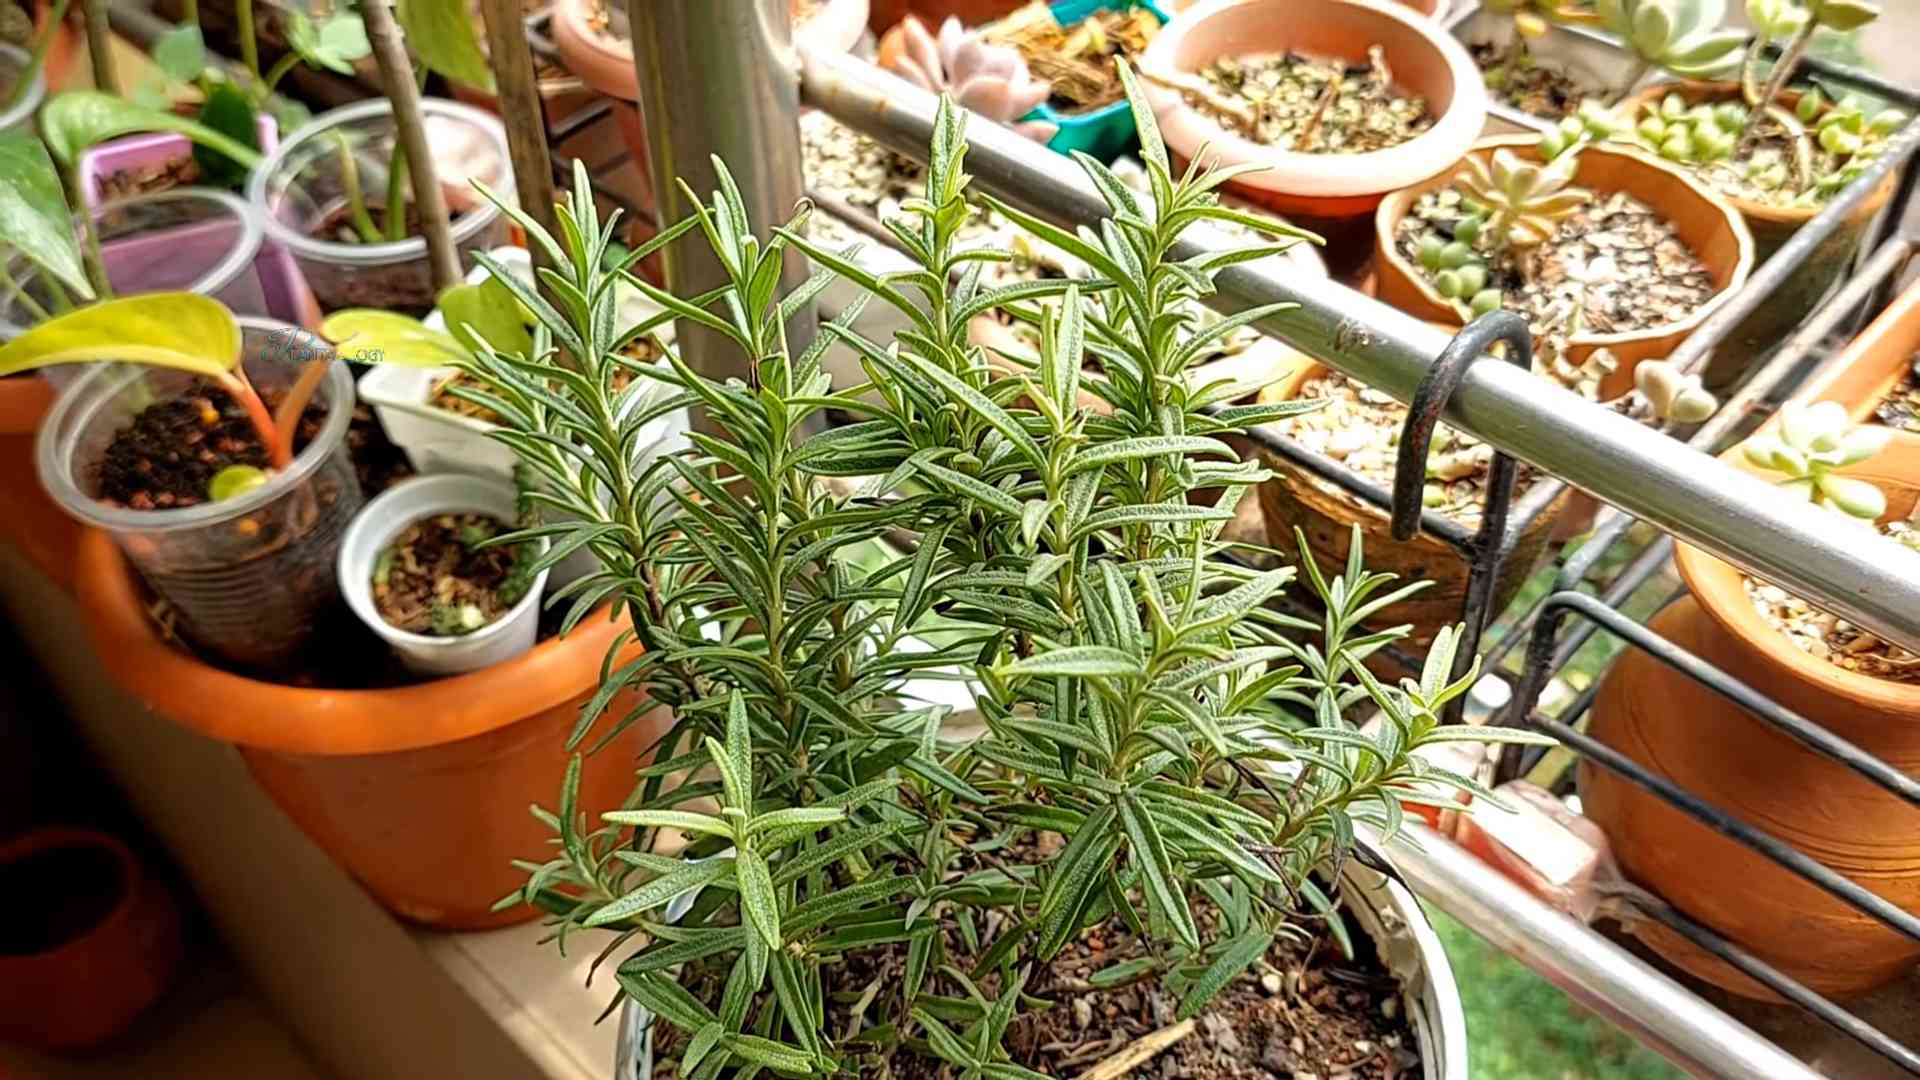
Not all rosemary varieties are created equal, especially when it comes to indoor growing. Some are more compact and better suited for containers than others. Here are a few of my favorites:
* ‘Blue Boy’: This is a classic choice, known for its compact size and lovely blue flowers. It’s a reliable grower indoors.
* ‘Roman Beauty’: Another great option for containers, ‘Roman Beauty’ has a trailing habit, making it perfect for hanging baskets or letting it cascade over the edge of a pot.
* ‘Arp’: This variety is particularly cold-hardy, which can be beneficial if your indoor space tends to get a bit chilly. It also has a wonderful fragrance.
Gathering Your Supplies
Before we dive into the planting process, let’s make sure you have everything you need. Trust me, having all your supplies ready will make the whole experience much smoother.
* Rosemary Plant or Cuttings: You can either buy a small rosemary plant from a nursery or propagate your own from cuttings. I’ll cover both methods in detail later.
* Pot with Drainage Holes: Drainage is crucial for rosemary. Choose a pot that’s at least 6 inches in diameter and has plenty of drainage holes. Terra cotta pots are excellent because they allow the soil to breathe.
* Well-Draining Potting Mix: Rosemary hates soggy soil, so use a well-draining potting mix specifically formulated for herbs or cacti. You can also amend regular potting mix with perlite or sand to improve drainage.
* Grow Light (Optional but Recommended): Rosemary needs a lot of sunlight, and sometimes indoor light just isn’t enough. A grow light can supplement natural light and ensure your rosemary thrives.
* Watering Can or Spray Bottle: For watering your rosemary.
* Pruning Shears or Scissors: For trimming and harvesting.
* Rooting Hormone (If Propagating from Cuttings): This will help your cuttings develop roots more quickly.
Planting Your Rosemary
Okay, now for the fun part! Let’s get your rosemary planted.
Planting a Rosemary Plant
1. Prepare the Pot: Fill your pot with the well-draining potting mix, leaving about an inch of space at the top.
2. Remove the Rosemary from its Container: Gently remove the rosemary plant from its nursery container. If the roots are tightly bound, gently loosen them with your fingers.
3. Plant the Rosemary: Place the rosemary plant in the center of the pot, making sure the top of the root ball is level with the soil surface.
4. Fill in with Soil: Fill in the remaining space around the root ball with potting mix, gently pressing down to secure the plant.
5. Water Thoroughly: Water the rosemary plant thoroughly until water drains out of the drainage holes. This will help settle the soil and hydrate the roots.
Propagating Rosemary from Cuttings
This is a great way to expand your rosemary collection without spending extra money!
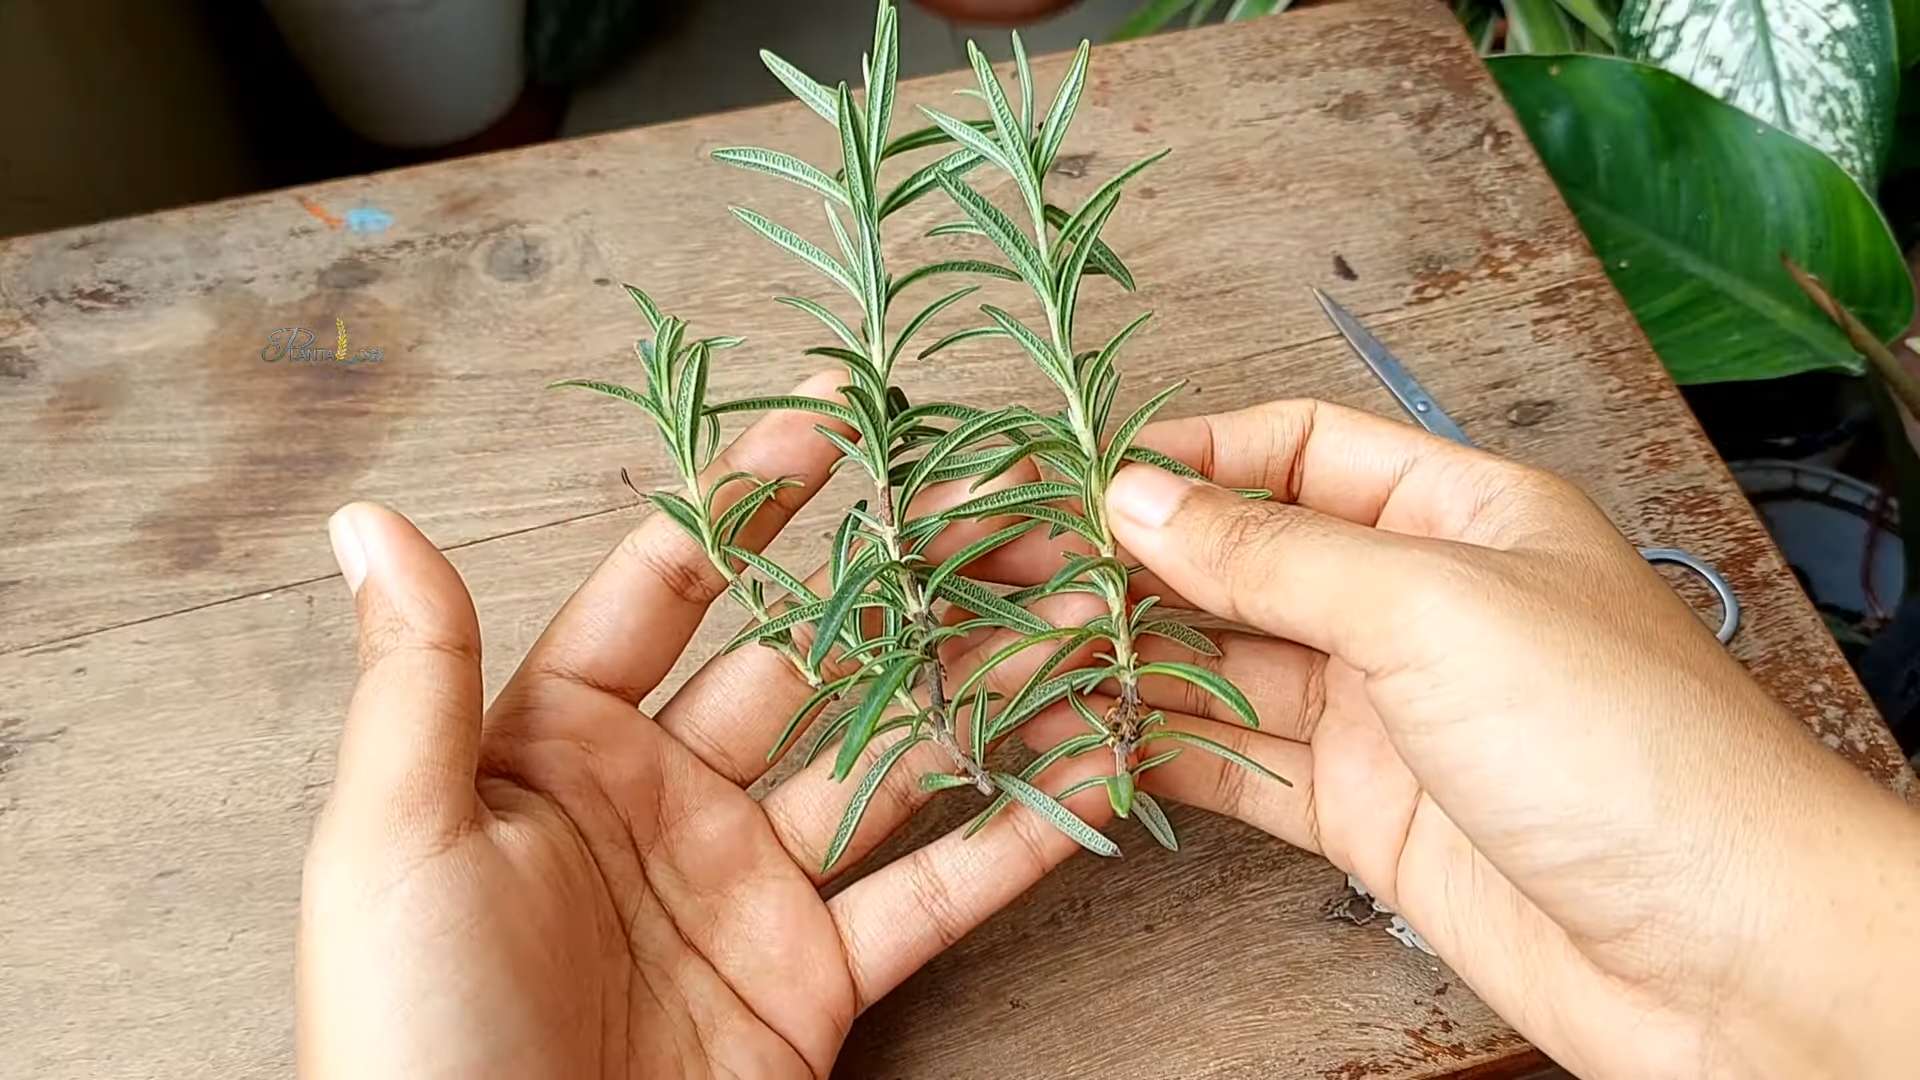
1. Take Cuttings: Using clean pruning shears or scissors, take 4-6 inch cuttings from the tips of healthy rosemary stems. Remove the leaves from the bottom inch or two of each cutting.
2. Apply Rooting Hormone (Optional): Dip the cut ends of the cuttings in rooting hormone powder or liquid. This will encourage root development.
3. Plant the Cuttings: Fill a small pot with well-draining potting mix. Make small holes in the soil and insert the cuttings, spacing them about an inch apart.
4. Water and Cover: Water the cuttings gently and then cover the pot with a plastic bag or humidity dome to create a humid environment.
5. Provide Light and Warmth: Place the pot in a warm, bright location, but avoid direct sunlight.
6. Wait for Roots to Develop: Keep the soil consistently moist but not soggy. After a few weeks, gently tug on the cuttings to see if they have developed roots. If they resist, they’re rooted!
7. Transplant (If Needed): Once the cuttings have developed a good root system, you can transplant them into individual pots.
Caring for Your Indoor Rosemary
Now that your rosemary is planted, it’s time to learn how to keep it happy and healthy.
Light
Rosemary needs at least 6-8 hours of sunlight per day. If you don’t have a sunny window, supplement with a grow light. Place the grow light about 6-12 inches above the plant. I’ve found that using a timer for the grow light helps me maintain a consistent light schedule.
Watering
Water rosemary thoroughly when the top inch of soil feels dry to the touch. Avoid overwatering, as this can lead to root rot. Make sure the pot has good drainage to prevent water from sitting at the bottom. During the winter months, you’ll likely need to water less frequently.
Humidity
Rosemary prefers relatively low humidity. Avoid placing it in a humid bathroom or kitchen. If your indoor air is very dry, you can increase humidity by placing the pot on a tray filled with pebbles and water, or by using a humidifier.
Temperature
Rosemary prefers temperatures between 60-70°F (15-21°C). Avoid placing it near drafts or heat sources.
Fertilizing
Feed your rosemary plant with a balanced liquid fertilizer every 2-4 weeks during the growing season (spring and summer). Dilute the fertilizer to half strength to avoid burning the roots. I like to use an organic fertilizer for my herbs.
Pruning
Pruning is essential for keeping your rosemary plant healthy and productive. Prune regularly to encourage bushier growth and prevent the plant from becoming leggy. You can also prune to harvest rosemary for cooking. Simply snip off stems as needed.
Troubleshooting Common Problems
Even with the best care, you might encounter some problems with your indoor rosemary. Here are a few common issues and how to address them:
* Yellowing Leaves: This can be caused by overwatering, underwatering, or nutrient deficiencies. Check the soil moisture and adjust your watering schedule accordingly. If the soil is consistently dry, water more frequently. If it’s consistently wet, water less frequently. You can also try fertilizing with a balanced fertilizer.
* Brown Leaves: This can be caused by dry air, lack of sunlight, or pests. Increase humidity by misting the plant or using a humidifier. Make sure the plant is getting enough sunlight. Check for pests and treat accordingly.
* Leggy Growth: This is usually caused by insufficient light. Move the plant to a sunnier location or supplement with a grow light. Prune the plant to encourage bushier growth.
* Pests: Rosemary can be susceptible to pests like spider mites, aphids, and mealybugs. Inspect your plant regularly for signs of infestation. If you find pests, treat them with insecticidal soap or neem oil.
Harvesting Your Rosemary
One of the best parts of growing your own rosemary is being able to harvest it whenever you need it!
* When to Harvest: You can harvest rosemary at any time of year, but the flavor is most intense during the growing season.
* How to Harvest: Use pruning shears or scissors to snip off stems as needed. Avoid removing more than one-third of the plant at a time.
* How to Store: Fresh rosemary can be stored in the refrigerator for up to a week. Wrap the stems in a damp paper towel and place them in a plastic bag. You can also dry rosemary by hanging the stems upside down in a cool, dry place. Once dried, store the rosemary in an airtight container.
Enjoying Your Homegrown Rosemary
Now that you have a thriving rosemary plant, it’s time to put it to good use! Rosemary is a versatile herb that can be used in a variety of dishes. Here are a few ideas:
* Roasted Meats: Rosemary is a classic pairing for roasted chicken, lamb, and pork.
* Vegetables: Add rosemary to roasted vegetables like potatoes, carrots, and Brussels sprouts.
* Soups and Stews: Rosemary adds a warm, earthy flavor to soups and stews.
* Bread and Baked Goods: Rosemary is a delicious addition to bread, biscuits, and scones.
* Infused Oils and Vinegars: Infuse olive oil or vinegar with rosemary for a flavorful condiment.
Growing rosemary indoors is a rewarding experience that allows you to enjoy fresh herbs year-round. With a little bit of care and attention, you can have a thriving rosemary plant
Conclusion
So, there you have it! Growing rosemary indoors doesn’t have to be a daunting task. With a little attention to detail and the right conditions, you can enjoy the fresh, aromatic flavor of homegrown rosemary year-round, right from your kitchen windowsill. This DIY trick is a must-try for several compelling reasons. First and foremost, it provides you with a constant supply of fresh rosemary, eliminating those last-minute grocery store runs when you need just a sprig or two for your favorite recipe. Secondly, it’s incredibly cost-effective. A single rosemary plant can provide you with months, even years, of fresh herbs, far outweighing the cost of buying pre-packaged rosemary repeatedly. Finally, and perhaps most importantly, it’s incredibly rewarding to nurture a plant from a small seedling or cutting to a thriving herb that enhances your culinary creations.
But the benefits don’t stop there. Growing your own rosemary allows you to control the growing environment, ensuring that your herbs are free from harmful pesticides and chemicals. You know exactly what’s going into your food, providing you with peace of mind and a healthier, more sustainable way to enjoy fresh herbs.
Looking for variations? Consider experimenting with different rosemary varieties. ‘Blue Boy’ rosemary is known for its compact size and intense flavor, making it ideal for smaller spaces. ‘Trailing’ rosemary is perfect for hanging baskets, adding a touch of greenery to your indoor garden. You can also try propagating rosemary from cuttings taken from established plants, expanding your rosemary collection without spending any extra money. Another variation is to use different types of pots. Terracotta pots are excellent for drainage, while self-watering pots can be helpful if you tend to forget to water your plants regularly.
Don’t be afraid to experiment with different lighting conditions and watering schedules to find what works best for your specific environment. Remember, every home is different, and what works for one person may not work for another. The key is to observe your rosemary plant closely and adjust your care accordingly. Look for signs of overwatering, underwatering, or nutrient deficiencies, and address them promptly.
We wholeheartedly encourage you to give this DIY trick a try. It’s a simple, affordable, and rewarding way to enhance your cooking and bring a touch of nature into your home. Once you’ve successfully grown your own rosemary indoors, we’d love to hear about your experience! Share your tips, tricks, and photos in the comments below. Let’s create a community of indoor rosemary growers and inspire others to embrace the joy of homegrown herbs. Tell us what challenges you faced and how you overcame them. What recipes have you enhanced with your fresh rosemary? Your insights could be invaluable to other readers who are just starting out. So, grab a pot, some soil, and a rosemary plant, and get ready to enjoy the fresh, aromatic flavor of homegrown rosemary year-round! Let’s all learn how to grow rosemary indoors easily!
Frequently Asked Questions (FAQ)
1. What kind of soil is best for growing rosemary indoors?
Rosemary thrives in well-draining soil. A mixture of potting soil, perlite, and sand is ideal. This combination ensures that the soil retains enough moisture to nourish the plant but also allows excess water to drain away, preventing root rot. Avoid using heavy, clay-based soils, as they tend to retain too much water and can suffocate the roots. You can also purchase specialized herb potting mixes, which are formulated to provide the optimal nutrients and drainage for herbs like rosemary.
2. How much sunlight does indoor rosemary need?
Rosemary needs at least 6-8 hours of direct sunlight per day to thrive indoors. Place your rosemary plant near a south-facing window, where it will receive the most sunlight. If you don’t have a south-facing window, a west-facing window can also work. If you’re not getting enough natural light, consider supplementing with a grow light. LED grow lights are energy-efficient and can provide the necessary light spectrum for healthy rosemary growth. Position the grow light a few inches above the plant and keep it on for 12-14 hours per day.
3. How often should I water my indoor rosemary plant?
Water your rosemary plant when the top inch of soil feels dry to the touch. Avoid overwatering, as this can lead to root rot. When you do water, water thoroughly, allowing the excess water to drain out of the bottom of the pot. During the winter months, when the plant is not actively growing, you may need to water less frequently. Check the soil moisture regularly and adjust your watering schedule accordingly.
4. What are the signs of overwatering or underwatering rosemary?
Signs of overwatering include yellowing leaves, wilting, and a musty smell coming from the soil. If you suspect overwatering, allow the soil to dry out completely before watering again. You may also need to repot the plant into fresh, well-draining soil. Signs of underwatering include dry, brittle leaves and stunted growth. If you suspect underwatering, water the plant thoroughly and check the soil moisture regularly to ensure that it doesn’t dry out completely again.
5. Does rosemary need fertilizer?
Rosemary benefits from occasional fertilization, especially during the growing season (spring and summer). Use a balanced liquid fertilizer diluted to half strength. Fertilize every 2-4 weeks, following the instructions on the fertilizer label. Avoid over-fertilizing, as this can burn the roots. You can also use organic fertilizers, such as compost tea or fish emulsion, to provide nutrients to your rosemary plant.
6. How do I prune my indoor rosemary plant?
Pruning is essential for maintaining the shape and health of your rosemary plant. Prune regularly to encourage bushier growth and prevent the plant from becoming leggy. Use sharp, clean pruning shears to trim the stems, cutting just above a leaf node. You can also harvest sprigs of rosemary for culinary use, which will also help to prune the plant. Avoid removing more than one-third of the plant at a time.
7. Can I propagate rosemary from cuttings?
Yes, propagating rosemary from cuttings is a simple and effective way to expand your rosemary collection. Take cuttings from healthy, non-flowering stems, about 4-6 inches long. Remove the lower leaves and dip the cut end in rooting hormone. Plant the cuttings in a well-draining potting mix and keep the soil moist. Place the cuttings in a warm, bright location, but out of direct sunlight. Roots should develop in a few weeks. Once the cuttings have rooted, you can transplant them into individual pots.
8. What pests and diseases affect indoor rosemary?
Rosemary is generally pest-resistant, but it can be susceptible to spider mites, aphids, and whiteflies. Inspect your plant regularly for signs of infestation and treat promptly with insecticidal soap or neem oil. Overwatering can lead to root rot, so ensure that your rosemary plant is planted in well-draining soil and that you are not overwatering. Good air circulation can also help to prevent fungal diseases.
9. My rosemary plant is turning brown. What’s wrong?
Brown leaves on rosemary can indicate several problems, including underwatering, overwatering, nutrient deficiencies, or pest infestations. Check the soil moisture to determine if you are watering correctly. If the soil is dry, water thoroughly. If the soil is wet, allow it to dry out before watering again. Check the plant for signs of pests and treat accordingly. You may also need to fertilize the plant if it is nutrient deficient.
10. Can I move my indoor rosemary plant outdoors during the summer?
Yes, you can move your indoor rosemary plant outdoors during the summer months, but it’s important to acclimate it gradually to the outdoor conditions. Start by placing the plant in a shaded location for a few hours each day, gradually increasing the amount of sunlight it receives over a week or two. Bring the plant back indoors before the first frost. This allows the plant to benefit from the increased sunlight and fresh air during the summer months, promoting healthy growth.


Leave a Comment