
Grow Rosemary Indoors Easily and transform your living space into a fragrant, herb-filled haven! Have you ever dreamed of snipping fresh rosemary sprigs right from your kitchen windowsill to season your favorite dishes? I know I have! This DIY guide will unlock the secrets to cultivating this aromatic herb indoors, regardless of your gardening experience.
Rosemary, with its needle-like leaves and distinctive scent, has a rich history. In ancient Greece and Rome, it was revered as a symbol of remembrance and fidelity. Sprigs were woven into wedding crowns and funeral wreaths, believed to enhance memory and protect against evil spirits. Even today, rosemary continues to hold cultural significance, often associated with love, remembrance, and good health.
But why should you learn to grow rosemary indoors easily? Well, access to fresh herbs elevates any meal, adding a burst of flavor that dried herbs simply can’t match. Plus, growing your own rosemary is incredibly rewarding! It’s a sustainable way to enjoy this versatile herb year-round, saving you money and reducing your reliance on store-bought options. More importantly, it brings a touch of nature indoors, creating a calming and refreshing atmosphere. So, let’s dive in and discover the simple steps to successfully growing rosemary indoors!
Growing Rosemary Indoors: How You Can Succeed Super Easily!
Hey, you! Have you always dreamed of having fresh rosemary on hand in your kitchen? Me too! And the best part: it’s super easy to grow rosemary indoors. I’ll show you how you can do it really easily, whether you have a green thumb or are more of a plant newbie. Let’s get started!
What you need:
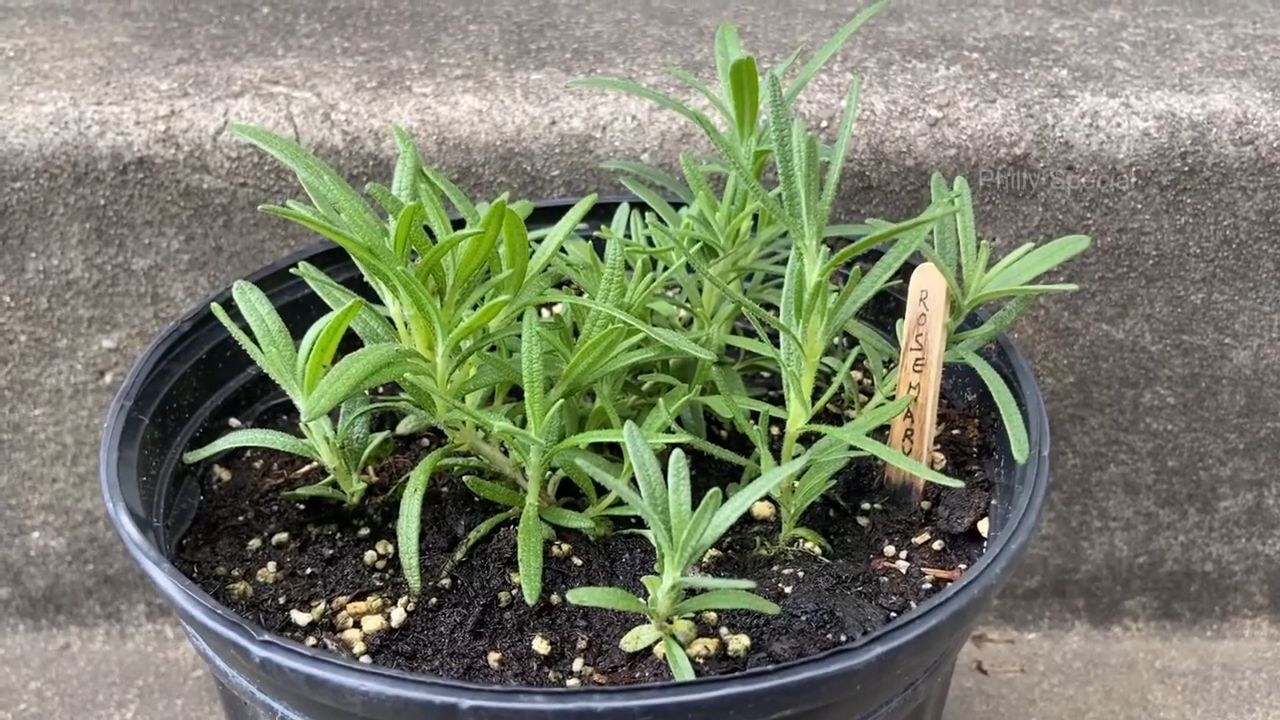
- Rosemary sprigs: Preferably from a healthy, established rosemary plant. You can either get them from friends or buy them at a garden center. Make sure they are not too thin and have several leaves.
- A glass of water: A regular drinking glass is perfectly fine.
- A planter: Choose a pot with good drainage. Rosemary does not like waterlogging!
- High-quality potting soil: A mixture specifically for herbs or Mediterranean plants is best.
- Optional: Rooting hormone: This is not a must, but it can speed up the rooting process.
- A spray bottle: For moistening the leaves.
- A sunny spot: Rosemary loves the sun!
Propagating Rosemary: How to Grow New Plants from Cuttings
Propagating rosemary from cuttings is a great way to expand your rosemary collection or simply to grow a new plant. Here’s how I do it:
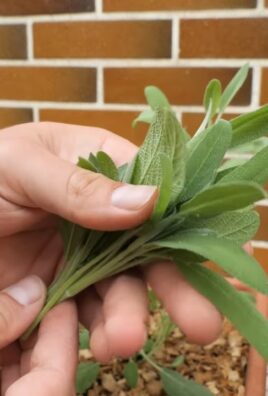
1. Prepare the cuttings:
- Cut 10-15 cm (4-6 inch) long rosemary sprigs from the mother plant with clean scissors or a sharp knife. It’s best to cut directly below a leaf node.
- Remove the lower leaves for about 5 cm (2 inches). This prevents these leaves from rotting in the water.
- Optional: Dip the bottom end of the cutting in rooting hormone. As I said, this is not a must, but it can speed up rooting.
2. Root the cuttings:
- Fill the glass with water.
- Place the prepared rosemary sprigs in the water. Make sure the leaves are not in the water.
- Place the glass in a bright, warm place, but not in direct sun.
- Change the water every few days to prevent the formation of bacteria.
- After about 2-4 weeks, roots should form. You will see small, white roots growing from the bottom end of the cutting.
3. Plant the rooted cuttings:
- Once the roots are about 2-3 cm (1 inch) long, you can plant the cuttings in pots.
- Fill the pots with high-quality potting soil.
- Make a small hole in the soil and carefully place the rooted cutting inside.
- Press the soil down lightly.
- Water the plant gently.
Caring for Rosemary: How to Keep Your Rosemary Happy and Healthy
Okay, now you have your rosemary plant. Great! But for it to live long and thrive, it naturally needs the right care. Here are my tips:
1. The right location:
- Rosemary loves the sun! Place your plant in the sunniest possible location. A south-facing window is ideal.
- If you don’t have enough sunlight, you can also use a grow light.
2. The right watering:
- Rosemary does not like waterlogging! Only water your plant when the soil feels dry.
- Make sure the water can drain well.
- In winter, rosemary needs less water than in summer.
3. The right soil:
- Rosemary prefers well-draining, alkaline soil.
- You can use special herb soil or Mediterranean soil.
- You can also mix regular potting soil with some sand and lime.
4. The right fertilizing:
- Rosemary doesn’t need much fertilizer.
- You can feed your plant once a month in the spring and summer with a liquid fertilizer for herbs.
- In winter, rosemary does not need fertilizer.
5. The right pruning:
- Prune your rosemary plant regularly to make it bushier and to encourage flowering.
- It’s best to cut back the sprigs after flowering.
- You can use the cut sprigs for cooking or dry them.
6. Protection from pests:
- Rosemary is relatively resistant to pests.
- Occasionally, spider mites or aphids may appear.
- You can combat these with a natural insecticide.
7. Overwintering:
- Rosemary is not winter-hardy.
- If you have it in a pot, you can move it to a cool, bright place in the winter.
- Water it only sparingly.
- If you have it in the garden, you should cover it with brushwood or fleece.
Common Problems and Solutions
Even though rosemary is relatively low-maintenance, problems can sometimes occur. Here are a few common problems and how you can solve them:
- Yellow leaves: This can be a sign of too much water. Reduce watering and make sure the water can drain well. It can also be a sign of a nutrient deficiency. Fertilize your plant with an herb fertilizer.
- Brown leaves: This can be a sign of too little water or too much sun. Water your plant regularly and move it to a slightly shadier spot.
- Spider mites: Spider mites are small, spider-like pests that settle on the leaves. You can recognize them by fine webbing. Spray your plant with a natural insecticide or wipe the leaves with a damp cloth.
- Aphids: Aphids are small, green or black insects that settle on the shoot tips. You can combat them with a natural insecticide or cut off the infested shoot tips.
Harvesting Rosemary: How to Always Have Fresh Rosemary on Hand
Harvesting rosemary is super easy and fun! You can simply cut the sprigs with scissors or a knife. It’s best to harvest the sprigs in the morning when the essential oils are most concentrated. You can use the harvested sprigs fresh or dry them. To dry them, simply hang the sprigs upside down in a dry, dark place.
Using Rosemary: More Than Just a Kitchen Herb
Rosemary is not only a great kitchen herb but also has many other uses:
- In the kitchen: Rosemary pairs excellently with meat, fish, vegetables, and potatoes. You can use it fresh or dried.
- As a tea: Rosemary tea is said to have calming and anti-inflammatory effects.
- As a bath additive: Rosemary oil in the bathwater is said to promote circulation and relax muscles.
- As a fragrance: Rosemary oil can be used as a fragrance in oil burners or potpourris.
- In cosmetics: Rosemary oil is used in many cosmetic products, as it is said to tighten the skin and strengthen the hair.
I hope this guide helps you grow your own rosemary indoors! It’s really not difficult, and it’s definitely worth it. Have fun gardening

Conclusion
So, there you have it! Growing rosemary indoors easily is not just a possibility; it’s an achievable reality with a few simple steps and a little bit of love. Forget those expensive, often underwhelming, supermarket sprigs. Imagine having fresh, fragrant rosemary readily available whenever you need it to elevate your culinary creations, infuse your oils, or simply enjoy its invigorating aroma.
This DIY trick is a must-try for several compelling reasons. First and foremost, it empowers you to control the quality and freshness of your rosemary. You know exactly where it’s coming from and how it’s been cared for, ensuring it’s free from harmful pesticides and packed with flavor. Secondly, it’s incredibly cost-effective. Starting from seeds or cuttings is significantly cheaper than constantly buying rosemary from the store. Over time, the savings will add up, making it a smart and sustainable choice. Thirdly, and perhaps most importantly, it’s incredibly rewarding. There’s something deeply satisfying about nurturing a plant from a tiny seed or cutting to a thriving herb that you can use in your cooking. It connects you to nature and provides a sense of accomplishment.
But the benefits don’t stop there. Growing rosemary indoors also adds a touch of greenery and life to your home. Its beautiful, needle-like leaves and delicate flowers can brighten up any space, creating a more inviting and relaxing atmosphere. Plus, rosemary is known for its air-purifying properties, helping to improve the overall air quality in your home.
Now, let’s talk about variations and suggestions. While the basic method outlined in this article is a great starting point, there are plenty of ways to customize it to suit your specific needs and preferences. For example, you can experiment with different types of rosemary, such as creeping rosemary for hanging baskets or upright varieties for containers. You can also try different potting mixes to see which one works best for your rosemary. Some gardeners prefer a mix of potting soil, perlite, and vermiculite, while others opt for a more organic blend.
Consider using grow lights if you live in an area with limited sunlight. Grow lights can provide your rosemary with the supplemental light it needs to thrive, especially during the winter months. You can also experiment with different fertilizers to see which one promotes the most vigorous growth. A balanced liquid fertilizer diluted to half strength is generally a good option.
Don’t be afraid to get creative with your rosemary! Use it to make infused oils, vinegars, or even homemade soaps and lotions. The possibilities are endless. And remember, regular pruning is essential for keeping your rosemary healthy and productive. Prune it regularly to encourage bushier growth and prevent it from becoming leggy.
So, what are you waiting for? Give this DIY trick a try and experience the joy of growing your own rosemary indoors. We’re confident that you’ll be amazed at how easy and rewarding it is. And don’t forget to share your experiences with us! We’d love to hear about your successes, challenges, and any tips or tricks you’ve discovered along the way. Share your photos and stories on social media using [Your Hashtag] and let’s inspire others to embrace the wonderful world of indoor gardening. Happy growing!
Frequently Asked Questions (FAQ)
1. What is the best type of rosemary to grow indoors?
While most rosemary varieties can be grown indoors, some are better suited than others. Upright varieties like ‘Blue Spires’ or ‘Tuscan Blue’ tend to do well in containers. Creeping rosemary, such as ‘Prostratus,’ is also a good option, especially for hanging baskets. Consider the size and shape of your growing space when choosing a variety. Ultimately, the “best” type depends on your personal preference and the space you have available. Experimenting with different varieties can be a fun way to discover which one thrives best in your indoor environment.
2. How much sunlight does indoor rosemary need?
Rosemary thrives in bright, sunny conditions. Ideally, it needs at least six to eight hours of direct sunlight per day. Place your rosemary plant near a south-facing window if possible. If you don’t have access to enough natural light, consider using grow lights to supplement. LED grow lights are a great option as they are energy-efficient and provide the full spectrum of light that rosemary needs to grow. Rotate your plant regularly to ensure that all sides receive adequate sunlight.
3. What kind of soil is best for growing rosemary indoors?
Rosemary prefers well-draining soil. A mix of potting soil, perlite, and vermiculite is a good option. This combination provides good drainage and aeration, which are essential for healthy root growth. Avoid using heavy, clay-based soils, as they can retain too much moisture and lead to root rot. You can also add some compost to the soil to provide extra nutrients. Ensure the pot you use has drainage holes to prevent waterlogging.
4. How often should I water my indoor rosemary plant?
Water your rosemary plant when the top inch of soil feels dry to the touch. Avoid overwatering, as this can lead to root rot. Rosemary prefers to be slightly dry rather than constantly wet. When you do water, water thoroughly until water drains out of the drainage holes. Reduce watering frequency during the winter months when the plant is not actively growing.
5. Does rosemary need fertilizer?
Rosemary benefits from regular fertilization, especially during the growing season (spring and summer). Use a balanced liquid fertilizer diluted to half strength every two to four weeks. Avoid over-fertilizing, as this can damage the plant. Look for a fertilizer that is specifically formulated for herbs or vegetables. Organic fertilizers are also a good option.
6. How do I prune my indoor rosemary plant?
Pruning is essential for keeping your rosemary plant healthy and productive. Prune regularly to encourage bushier growth and prevent it from becoming leggy. Use sharp, clean pruning shears to trim the stems. You can prune up to one-third of the plant at a time. Prune after flowering to encourage new growth. You can also use the pruned stems for cooking or other purposes.
7. How do I propagate rosemary from cuttings?
Propagating rosemary from cuttings is a great way to expand your rosemary collection. Take cuttings from healthy, non-flowering stems. Remove the lower leaves and dip the cut end in rooting hormone. Plant the cuttings in a well-draining potting mix and keep them moist. Place the cuttings in a warm, bright location, but out of direct sunlight. Roots should develop in a few weeks.
8. What are some common problems with indoor rosemary plants?
Some common problems with indoor rosemary plants include root rot, spider mites, and powdery mildew. Root rot is caused by overwatering. Spider mites are tiny pests that can suck the sap from the leaves. Powdery mildew is a fungal disease that can cause a white, powdery coating on the leaves. To prevent these problems, avoid overwatering, provide good air circulation, and inspect your plants regularly for pests and diseases.
9. Can I move my outdoor rosemary plant indoors for the winter?
Yes, you can move your outdoor rosemary plant indoors for the winter. Before bringing it inside, inspect it carefully for pests and diseases. Prune it back to remove any dead or damaged growth. Gradually acclimate the plant to indoor conditions by placing it in a shady location for a few days before moving it to its final location. Provide it with plenty of sunlight and water it as needed.
10. How can I use my homegrown rosemary?
The possibilities are endless! Use fresh rosemary to flavor meats, poultry, fish, and vegetables. Add it to soups, stews, and sauces. Infuse it in oils and vinegars. Use it to make homemade soaps and lotions. Dry it for later use. Rosemary also makes a beautiful and fragrant addition to potpourri. Experiment and discover your favorite ways to use this versatile herb.

Leave a Comment