
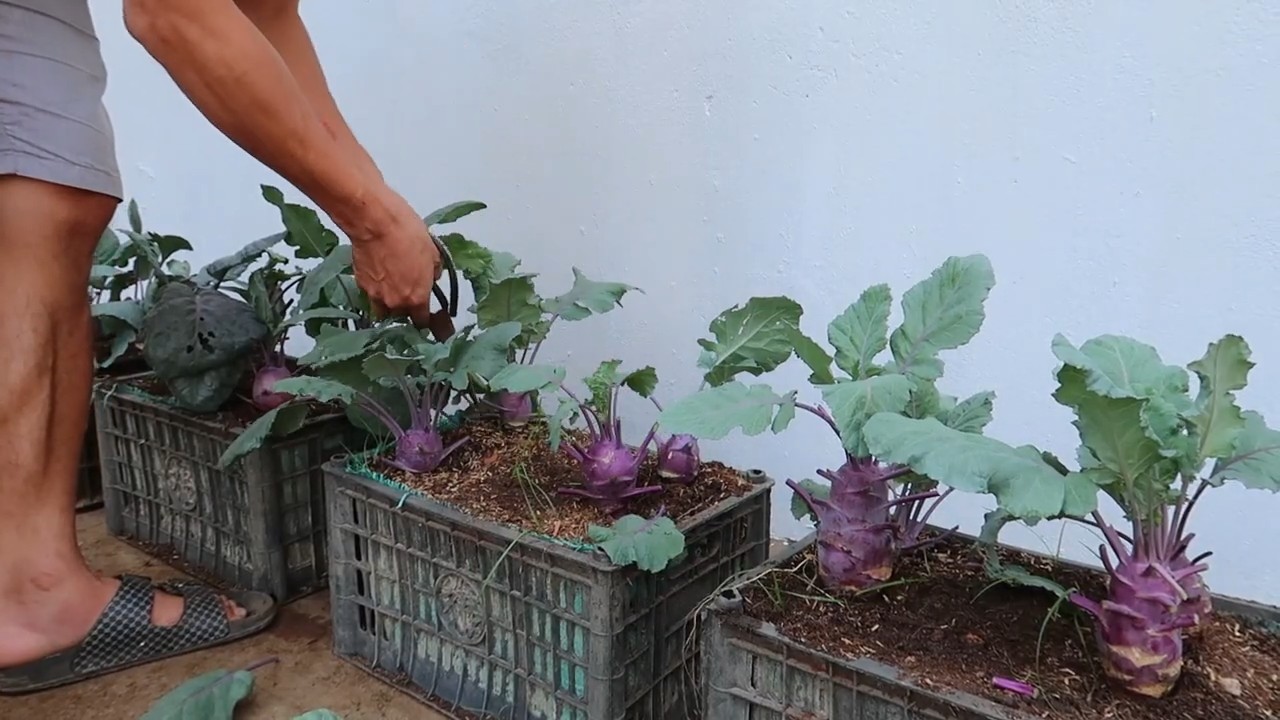
Grow Purple Kohlrabi and unlock a vibrant splash of color and nutrition right in your backyard! Have you ever dreamed of harvesting your own unique, eye-catching vegetables? This DIY guide will take you from seed to table, revealing simple yet effective tricks to cultivate these fascinating purple globes. Forget bland salads – imagine the stunning visual appeal of purple kohlrabi in your dishes!
Kohlrabi, sometimes called a German turnip, has a history rooted in European cuisine, dating back to the Roman Empire. While green varieties are more common, the purple kohlrabi offers a delightful twist, both in appearance and flavor. It’s slightly sweeter and milder than its green counterpart, making it a versatile addition to your culinary repertoire.
Why should you learn to grow purple kohlrabi? Well, beyond the sheer joy of gardening, it’s incredibly rewarding to nurture your own food. Plus, store-bought kohlrabi can sometimes be hard to find, and growing your own ensures you have a fresh, readily available supply. This DIY project is perfect for beginner gardeners and seasoned pros alike. I’ll share my favorite tips and tricks to help you avoid common pitfalls and maximize your harvest. Get ready to impress your friends and family with your homegrown purple kohlrabi!
Lila Kohlrabi selbst anbauen: Ein umfassender DIY-Leitfaden
Hallo Gartenfreunde! Ich freue mich riesig, euch heute zu zeigen, wie ihr diesen wunderschönen, lilafarbenen Kohlrabi in eurem eigenen Garten anbauen könnt. Es ist einfacher als ihr denkt und das Ergebnis ist nicht nur lecker, sondern auch ein echter Hingucker!
Warum Lila Kohlrabi?
Lila Kohlrabi ist nicht nur optisch ansprechend, sondern auch reich an Vitaminen und Mineralstoffen. Er ist eine tolle Ergänzung zu Salaten, kann gedünstet, gebraten oder sogar roh gegessen werden. Außerdem ist er relativ pflegeleicht, was ihn zu einer idealen Pflanze für Anfänger macht.
Was du brauchst:
* Kohlrabisamen (lila Sorte): Achte darauf, dass du qualitativ hochwertige Samen von einer vertrauenswürdigen Quelle beziehst. Sorten wie ‘Purple Vienna’ oder ‘Azur Star’ sind sehr beliebt.
* Anzuchterde: Für die Voranzucht im Haus.
* Töpfe oder Anzuchtschalen: Zum Vorziehen der Samen.
* Gartenerde: Gut durchlässige, nährstoffreiche Erde für das Beet.
* Kompost oder organischer Dünger: Zur Verbesserung der Bodenqualität.
* Gießkanne oder Gartenschlauch: Zum Bewässern der Pflanzen.
* Gartenwerkzeug: Spaten, Harke, Pflanzkelle.
* Pflanzstäbe (optional): Zur Unterstützung der Pflanzen, falls nötig.
* Schneckenkorn (optional): Zum Schutz vor Schnecken.
Der Anbau: Schritt für Schritt
Der Anbau von lila Kohlrabi lässt sich in drei Hauptphasen unterteilen: Voranzucht, Auspflanzen und Pflege.
Phase 1: Die Voranzucht (ca. 4-6 Wochen vor dem letzten Frost)
Die Voranzucht im Haus gibt den kleinen Kohlrabipflanzen einen Vorsprung, bevor sie ins Freie kommen.
1. Vorbereitung der Anzuchtschalen: Fülle die Anzuchtschalen oder Töpfe mit Anzuchterde. Drücke die Erde leicht an.
2. Aussaat der Samen: Lege in jede Schale oder jeden Topf 1-2 Samen. Bedecke die Samen mit einer dünnen Schicht Erde (ca. 0,5 cm).
3. Bewässerung: Befeuchte die Erde vorsichtig mit einer Sprühflasche oder einer Gießkanne mit feinem Strahl. Die Erde sollte feucht, aber nicht nass sein.
4. Standort: Stelle die Anzuchtschalen an einen hellen, warmen Ort (ca. 18-20°C). Ein Fensterbrett oder ein Gewächshaus sind ideal.
5. Keimung: Die Samen keimen in der Regel innerhalb von 5-10 Tagen. Halte die Erde während der Keimung feucht.
6. Vereinzeln: Sobald die Keimlinge ihre ersten richtigen Blätter (nach den Keimblättern) entwickelt haben, solltest du sie vereinzeln. Das bedeutet, dass du in jedem Topf oder jeder Schale nur die stärkste Pflanze lässt. Die schwächeren Pflanzen kannst du vorsichtig ausziehen oder abschneiden.
7. Pflege: Gieße die Jungpflanzen regelmäßig, aber vermeide Staunässe. Drehe die Töpfe regelmäßig, damit die Pflanzen gleichmäßig wachsen und sich nicht zum Licht hinbiegen.
Phase 2: Das Auspflanzen ins Freie (nach dem letzten Frost)
Sobald keine Frostgefahr mehr besteht, können die Jungpflanzen ins Freie umziehen.
1. Vorbereitung des Beetes: Wähle einen sonnigen Standort für dein Kohlrabibeet. Der Boden sollte gut durchlässig und nährstoffreich sein. Lockere die Erde mit einem Spaten auf und entferne Unkraut und Steine.
2. Bodenverbesserung: Arbeite Kompost oder organischen Dünger in den Boden ein, um die Nährstoffversorgung zu verbessern. Kohlrabi ist ein Starkzehrer und benötigt ausreichend Nährstoffe für ein gesundes Wachstum.
3. Pflanzabstand: Pflanze die Jungpflanzen im Abstand von ca. 20-30 cm in das Beet. Zwischen den Reihen solltest du einen Abstand von ca. 30-40 cm einhalten.
4. Pflanzen: Hebe mit einer Pflanzkelle kleine Löcher aus, die groß genug sind, um die Wurzelballen der Jungpflanzen aufzunehmen. Setze die Pflanzen vorsichtig in die Löcher und fülle sie mit Erde auf. Drücke die Erde leicht an.
5. Bewässerung: Gieße die frisch gepflanzten Kohlrabipflanzen gründlich an.
Phase 3: Die Pflege (während der Wachstumsperiode)
Die richtige Pflege ist entscheidend für eine reiche Ernte.
1. Bewässerung: Kohlrabi benötigt regelmäßig Wasser, besonders während trockener Perioden. Achte darauf, dass die Erde immer leicht feucht ist, aber vermeide Staunässe. Gieße am besten früh morgens oder spät abends, um Verdunstungsverluste zu minimieren.
2. Unkrautbekämpfung: Halte das Beet unkrautfrei, indem du regelmäßig Unkraut jätest. Unkraut konkurriert mit dem Kohlrabi um Nährstoffe und Wasser.
3. Düngung: Dünge den Kohlrabi während der Wachstumsperiode regelmäßig mit einem organischen Dünger oder Kompost. Eine zusätzliche Düngung mit Brennnesseljauche ist ebenfalls sehr empfehlenswert.
4. Schutz vor Schädlingen: Kohlrabi kann von verschiedenen Schädlingen befallen werden, wie z.B. Kohlweißlingen, Erdflöhen oder Schnecken. Kontrolliere die Pflanzen regelmäßig auf Schädlinge und ergreife gegebenenfalls Maßnahmen. Gegen Kohlweißlinge kannst du ein Kulturnetz verwenden. Erdflöhe lassen sich durch regelmäßiges Gießen und Mulchen in Schach halten. Gegen Schnecken hilft Schneckenkorn oder das Aufstellen von Schneckenzäunen.
5. Mulchen: Mulche das Beet mit Stroh, Rasenschnitt oder anderem organischen Material. Mulchen hilft, die Feuchtigkeit im Boden zu halten, Unkrautwachstum zu unterdrücken und den Boden zu düngen.
6. Kontrolle: Beobachte deine Pflanzen regelmäßig. Achte auf Anzeichen von Krankheiten oder Schädlingsbefall. Je früher du Probleme erkennst, desto besser kannst du sie bekämpfen.
Die Ernte
Der Zeitpunkt der Ernte hängt von der Sorte und den Wachstumsbedingungen ab. In der Regel ist Kohlrabi erntereif, wenn die Knollen einen Durchmesser von ca. 8-10 cm haben.
1. Erntezeitpunkt: Die Knollen sollten prall und fest sein. Wenn sie zu groß werden, können sie holzig und faserig werden.
2. Erntemethode: Schneide die Knollen mit einem scharfen Messer oder einer Gartenschere knapp über dem Boden ab.
3. Lagerung: Kohlrabi lässt sich im Kühlschrank einige Tage lagern. Wickle die Knollen in ein feuchtes Tuch, um sie frisch zu halten. Du kannst Kohlrabi auch einfrieren. Blanchiere die Knollen dazu kurz in kochendem Wasser und friere sie dann ein.
Zusätzliche Tipps für den erfolgreichen Anbau von lila Kohlrabi:
* Fruchtfolge beachten: Baue Kohlrabi nicht jedes Jahr am selben Standort an. Wechsle die Anbaufläche, um Krankheiten und Schädlingen vorzubeugen.
* Mischkultur: Pflanze Kohlrabi in Mischkultur mit anderen Pflanzen, die sich gegenseitig fördern. Gute Nachbarn für Kohlrabi sind z.B. Salat, Spinat, Radieschen oder Ringelblumen.
* Bodenanalyse: Wenn du unsicher bist, ob dein Boden für den Anbau von Kohlrabi geeignet ist, kannst du eine Bodenanalyse durchführen lassen. So erfährst du, welche Nährstoffe deinem Boden fehlen und wie du ihn verbessern kannst.
* Sonnenschutz: In sehr heißen Sommern kann es sinnvoll sein, den Kohlrabi vor direkter Sonneneinstrahlung zu schützen. Verwende dazu ein Schattiernetz oder pflanze den Kohlrabi an einem halbschattigen Standort.
* Sortenwahl: Es gibt verschiedene Sorten von lila Kohl

Conclusion
So, there you have it! Growing purple kohlrabi isn’t just about adding another vegetable to your garden; it’s about adding a vibrant splash of color, a unique flavor profile, and a conversation starter to your dinner table. This DIY trick, focusing on soil preparation, strategic planting, and consistent care, unlocks the full potential of this often-overlooked vegetable.
Why is this a must-try? Because store-bought kohlrabi, even when available, rarely matches the freshness and flavor intensity of homegrown. Plus, the satisfaction of nurturing a plant from seed to harvest, especially one as visually stunning as purple kohlrabi, is an experience that’s hard to beat. Imagine the pride you’ll feel serving a dish featuring kohlrabi you grew yourself!
But the benefits extend beyond personal satisfaction. Growing your own produce allows you to control the growing environment, ensuring your kohlrabi is free from harmful pesticides and herbicides. You’ll also be contributing to a more sustainable food system by reducing your reliance on commercially grown produce that often travels long distances.
Don’t be afraid to experiment! While we’ve focused on the core principles, there’s plenty of room for variation. Try different companion plants to see which ones work best in your garden. Consider succession planting to extend your harvest season. And explore different varieties of purple kohlrabi to discover your favorite flavor profile. Some gardeners have found that adding a touch of compost tea every few weeks gives their kohlrabi an extra boost. Others swear by using row covers to protect their plants from pests and extreme weather.
Ready to embark on your purple kohlrabi growing adventure? We encourage you to give this DIY trick a try. It’s easier than you might think, and the rewards are well worth the effort. Remember to document your progress, take photos, and share your experiences with fellow gardeners. Your insights could help others discover the joy of growing this amazing vegetable.
And most importantly, don’t be discouraged if you encounter challenges along the way. Gardening is a learning process, and every season brings new opportunities to improve your skills. With a little patience and persistence, you’ll be harvesting beautiful, delicious purple kohlrabi in no time. So grab your seeds, prepare your soil, and get ready to experience the magic of homegrown kohlrabi! We are confident that you will enjoy the process of growing purple kohlrabi.
Frequently Asked Questions (FAQ)
What exactly is kohlrabi, and what does it taste like?
Kohlrabi, often called a “German turnip,” is a cruciferous vegetable related to cabbage, broccoli, and cauliflower. It’s characterized by its bulbous stem that grows above ground. The taste is often described as a mild, sweet, and slightly peppery flavor, similar to a cross between a turnip and a cabbage. The texture is crisp and juicy, making it a versatile ingredient for salads, slaws, stir-fries, and even roasting. Purple kohlrabi tends to have a slightly milder flavor than the green varieties.
When is the best time to plant purple kohlrabi?
The timing depends on your climate. Kohlrabi thrives in cool weather, so it’s best planted in early spring or late summer for a fall harvest. For a spring crop, start seeds indoors 4-6 weeks before the last expected frost. Transplant seedlings outdoors once the soil has warmed up and the risk of frost has passed. For a fall crop, sow seeds directly into the garden in late summer, about 6-8 weeks before the first expected frost. In warmer climates, you can grow kohlrabi throughout the winter.
What kind of soil is best for growing purple kohlrabi?
Kohlrabi prefers well-drained, fertile soil that is rich in organic matter. Amend your soil with compost or well-rotted manure before planting to improve drainage and fertility. A slightly acidic to neutral soil pH of 6.0 to 7.5 is ideal. Consider getting a soil test to determine your soil’s pH and nutrient levels. If your soil is heavy clay, add sand or other amendments to improve drainage.
How much sunlight does purple kohlrabi need?
Kohlrabi needs at least 6 hours of sunlight per day to thrive. Choose a planting location that receives full sun for the best results. If you live in a hot climate, some afternoon shade can be beneficial to prevent the plants from bolting (going to seed prematurely).
How often should I water my purple kohlrabi plants?
Kohlrabi needs consistent moisture to grow properly. Water deeply and regularly, especially during dry periods. Aim to keep the soil consistently moist but not waterlogged. Mulching around the plants can help retain moisture and suppress weeds. A good rule of thumb is to water when the top inch of soil feels dry to the touch.
What are some common pests and diseases that affect purple kohlrabi?
Common pests that can affect kohlrabi include cabbage worms, aphids, flea beetles, and cabbage root maggots. Diseases include clubroot, black rot, and downy mildew. To prevent pest and disease problems, practice crop rotation, keep your garden clean, and use organic pest control methods such as insecticidal soap or neem oil. Row covers can also help protect your plants from pests.
How do I know when my purple kohlrabi is ready to harvest?
Kohlrabi is typically ready to harvest when the bulb is about 2-3 inches in diameter. The exact size will depend on the variety. The key is to harvest before the bulb becomes too large and tough. Gently loosen the soil around the base of the plant and pull it up. Cut off the leaves, leaving about an inch of stem attached to the bulb.
Can I eat the leaves of purple kohlrabi?
Yes, the leaves of kohlrabi are edible and nutritious. They can be cooked like spinach or kale. Choose young, tender leaves for the best flavor and texture. Older leaves may be tougher and more bitter.
How do I store purple kohlrabi?
Store kohlrabi bulbs in the refrigerator for up to several weeks. Remove the leaves before storing, as they can draw moisture from the bulb. Wrap the bulbs in a plastic bag or container to prevent them from drying out.
What are some ways to use purple kohlrabi in cooking?
Purple kohlrabi can be eaten raw or cooked. It can be sliced and added to salads, slaws, or crudités platters. It can also be stir-fried, roasted, steamed, or added to soups and stews. The bulb can be peeled and grated, chopped, or cubed. The leaves can be sautéed, steamed, or added to soups.
Can I grow purple kohlrabi in containers?
Yes, kohlrabi can be grown in containers, but you’ll need a large enough container to accommodate the plant’s root system. Choose a container that is at least 12 inches in diameter and depth. Use a well-draining potting mix and provide regular watering and fertilization.
What are some good companion plants for purple kohlrabi?
Good companion plants for kohlrabi include herbs like dill, rosemary, and thyme, as well as vegetables like beets, onions, and lettuce. Avoid planting kohlrabi near other members of the brassica family, such as cabbage, broccoli, and cauliflower, as they can attract the same pests and diseases.
Is purple kohlrabi more nutritious than green kohlrabi?
Both purple and green kohlrabi are nutritious, but purple kohlrabi contains anthocyanins, which are antioxidants that give it its purple color. Antioxidants help protect the body against cell damage. Both varieties are good sources of vitamin C, potassium, and fiber.
What if my kohlrabi bolts (goes to seed) prematurely?
Bolting can be caused by stress, such as extreme temperatures or lack of water. Once a plant bolts, the bulb becomes tough and bitter. To prevent bolting, choose bolt-resistant varieties, provide consistent watering, and protect your plants from extreme weather. If your kohlrabi bolts, you can still harvest the leaves for cooking.

Leave a Comment