
Grow Peanuts at Home: Ever dreamt of harvesting your own crunchy, delicious peanuts right from your backyard? It sounds like a far-fetched idea, doesn’t it? But trust me, it’s totally achievable, and this DIY guide will show you exactly how! Forget those store-bought peanuts – imagine the satisfaction of snacking on peanuts you nurtured from seed to harvest.
Peanuts, also known as groundnuts, have a fascinating history, dating back thousands of years to South America. They weren’t just a snack; they were a vital food source and even held cultural significance in some societies. Now, you can bring that history to your own garden!
Why should you learn to grow peanuts at home? Well, for starters, it’s incredibly rewarding. Plus, you’ll know exactly what went into growing them – no mystery chemicals or questionable farming practices. More importantly, growing your own food, even something as small as peanuts, connects you to nature and provides a sense of accomplishment. This DIY project is perfect for anyone looking to add a unique and fun element to their garden. So, let’s dive in and discover the secrets to cultivating your very own peanut patch!
Grow Your Own Peanuts: A Beginner’s Guide
Hey there, fellow gardening enthusiasts! Ever thought about growing your own peanuts? It’s surprisingly easy and incredibly rewarding. Imagine the satisfaction of harvesting your own homegrown peanuts, roasting them up, and enjoying a delicious, healthy snack. I’m here to guide you through the entire process, from choosing the right peanuts to enjoying your bountiful harvest. Let’s get started!
Choosing Your Peanut Variety
Before we dive into the planting process, it’s important to choose the right peanut variety for your climate and growing conditions. There are four main types of peanuts:
* Runner Peanuts: These are the most common type, known for their uniform size and excellent roasting qualities. They’re a great choice if you’re looking for that classic peanut flavor.
* Virginia Peanuts: These are the largest type of peanut, often used for gourmet snacks and in-shell roasting. If you want big, impressive peanuts, Virginia peanuts are the way to go.
* Spanish Peanuts: These have a reddish-brown skin and a slightly sweeter flavor than other varieties. They’re often used in candies and peanut butter.
* Valencia Peanuts: These peanuts typically have three or more small kernels per shell and are known for their sweet flavor. They’re great for boiling or roasting.
Consider your local climate and growing season when making your choice. Runner and Virginia peanuts generally require a longer growing season, while Spanish and Valencia peanuts are better suited for shorter seasons.
Preparing Your Peanut Planting Site
Peanuts need plenty of sunshine and well-drained soil to thrive. Here’s how to prepare your planting site:
* Sunlight: Choose a location that receives at least 6-8 hours of direct sunlight per day.
* Soil: Peanuts prefer loose, sandy loam soil with a pH between 6.0 and 6.5. If your soil is heavy clay, amend it with compost, peat moss, or sand to improve drainage.
* Drainage: Good drainage is crucial to prevent root rot. Avoid planting peanuts in areas where water tends to pool.
* Nutrients: Peanuts are legumes, which means they can fix nitrogen from the air. However, they still benefit from a balanced fertilizer. Before planting, amend the soil with compost or a slow-release fertilizer that’s low in nitrogen but higher in phosphorus and potassium.
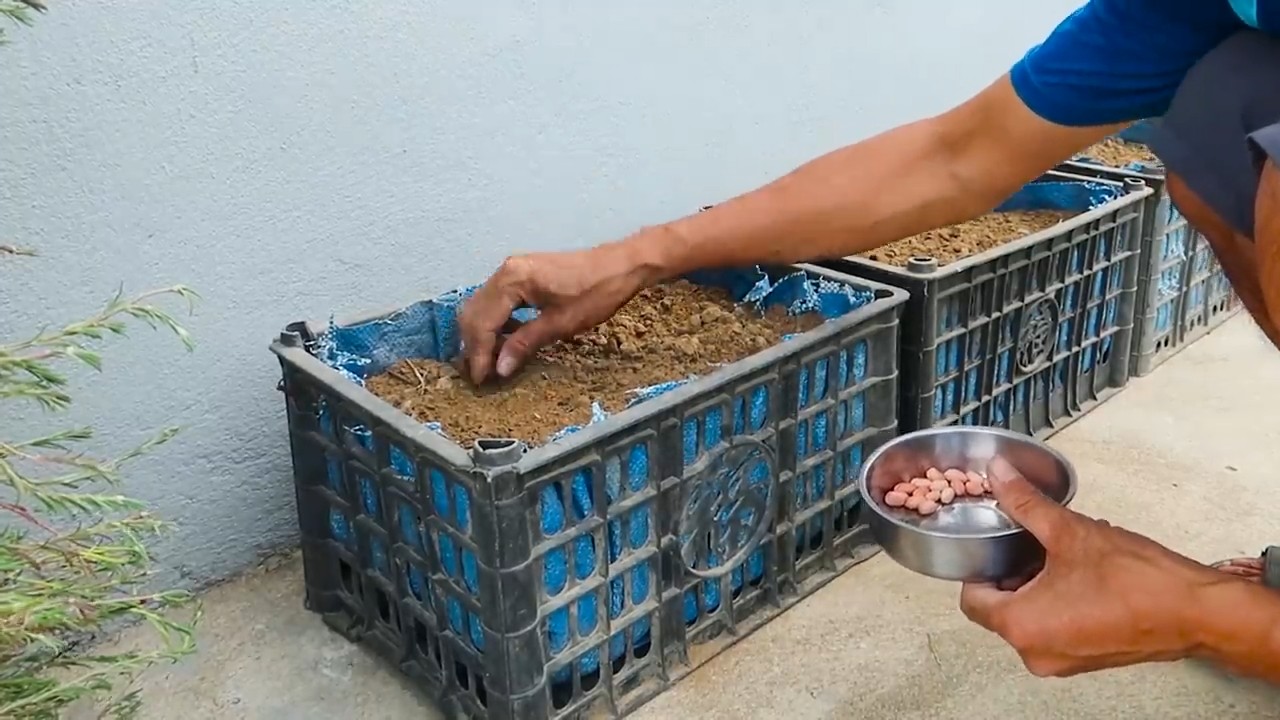
Planting Your Peanuts
Now for the fun part – planting your peanuts! You can start peanuts from raw, unsalted peanuts that you buy at the grocery store or from seed peanuts purchased from a garden center. Make sure they are raw, not roasted.
1. Soaking the Peanuts (Optional): Soaking the peanuts in water for a few hours before planting can help speed up germination. I usually soak mine overnight.
2. Planting Time: The best time to plant peanuts is after the last frost, when the soil temperature has warmed to at least 65°F (18°C).
3. Planting Depth: Plant the peanuts about 1-2 inches deep and 6-8 inches apart in rows that are 2-3 feet apart.
4. Watering: Water the planting area thoroughly after planting. Keep the soil consistently moist but not waterlogged until the seedlings emerge.
5. Marking Rows: It’s a good idea to mark your rows clearly so you don’t accidentally disturb the seedlings while weeding.
Caring for Your Peanut Plants
Once your peanut plants have emerged, it’s important to provide them with the care they need to thrive.
1. Watering: Water your peanut plants regularly, especially during dry periods. Aim to keep the soil consistently moist but not waterlogged.
2. Weeding: Keep the planting area free of weeds, which can compete with your peanut plants for nutrients and water. Hand-weeding is the best option to avoid damaging the peanut plants.
3. Fertilizing: Peanuts don’t require a lot of fertilizer, but a side dressing of compost or a low-nitrogen fertilizer a few weeks after planting can help boost growth.
4. Hilling: As the peanut plants grow, they will produce “pegs” that grow downwards from the plant into the soil. These pegs are where the peanuts will develop. To encourage peanut production, gently hill the soil around the base of the plants, covering the pegs with soil. This helps protect the developing peanuts and provides them with a dark, moist environment.
5. Pest Control: Peanuts are relatively pest-resistant, but they can be susceptible to aphids, spider mites, and other common garden pests. Inspect your plants regularly and treat any infestations promptly with insecticidal soap or neem oil.
6. Disease Prevention: Good air circulation and well-drained soil can help prevent fungal diseases. Avoid overhead watering, which can create a humid environment that encourages disease development.
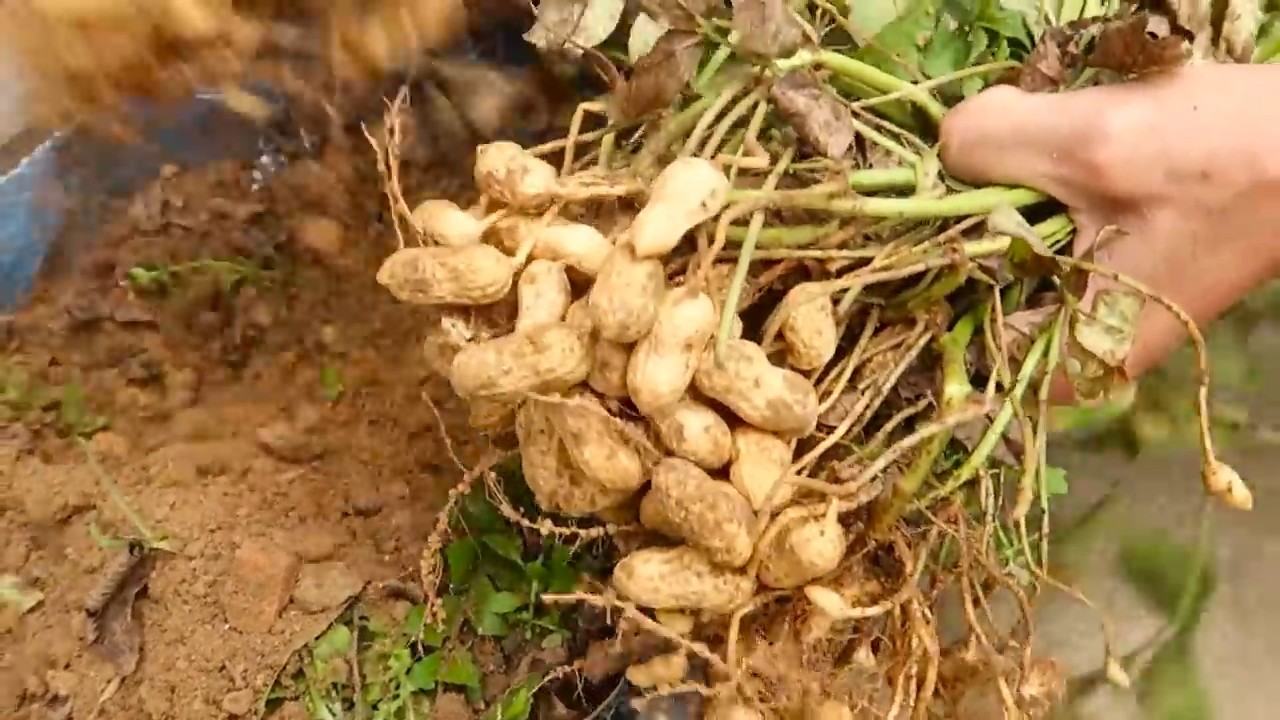
Harvesting Your Peanuts
Harvesting is the most exciting part of growing peanuts! Here’s how to know when it’s time to harvest and how to do it properly:
1. Harvest Time: Peanuts are typically ready to harvest about 120-150 days after planting, depending on the variety. A good indicator is when the leaves start to turn yellow and the plant begins to decline.
2. Digging Up the Plants: Use a garden fork or shovel to carefully dig up the entire plant, being careful not to damage the peanuts.
3. Shaking Off the Soil: Gently shake off any excess soil from the roots and peanuts.
4. Curing the Peanuts: The next step is to cure the peanuts. This involves drying them to reduce their moisture content and improve their flavor and storage life. There are two main methods for curing peanuts:
* Air Drying: Hang the entire plant upside down in a well-ventilated area, such as a garage or shed, for 2-4 weeks. Make sure the peanuts are not exposed to direct sunlight, which can cause them to dry out too quickly.
* Oven Drying: If you don’t have a suitable place to air dry your peanuts, you can dry them in the oven. Spread the peanuts in a single layer on a baking sheet and bake them at a low temperature (around 100-120°F or 38-49°C) for several hours, or until they are dry and brittle.
5. Separating the Peanuts: Once the peanuts are cured, you can separate them from the plant. Simply pull them off the roots and discard the plant material.
6. Storing Your Peanuts: Store your cured peanuts in a cool, dry place in an airtight container. They can be stored in the shell for several months or shelled and stored in the freezer for longer storage.
Roasting Your Homegrown Peanuts
Now for the best part – roasting your homegrown peanuts! Roasting enhances their flavor and makes them even more delicious. Here’s how to roast peanuts in the oven:
1. Preheat the Oven: Preheat your oven to 350°F (175°C).
2. Prepare the Peanuts: Spread the peanuts in a single layer on a baking sheet.
3. Roast the Peanuts: Roast the peanuts for 15-20 minutes, or until they are golden brown and fragrant. Stir them occasionally to ensure even roasting.
4. Cool the Peanuts: Remove the peanuts from the oven and let them cool completely on the baking sheet.
5. Enjoy! Once the peanuts are cool, you can enjoy them as is or add salt or other seasonings to taste.
Troubleshooting Common Peanut Growing Problems
Even with the best care, you may encounter some problems while growing peanuts. Here are some common issues and how to address them:
* Poor Germination: If your peanuts aren’t germinating, make sure the soil temperature is warm enough and that the soil is consistently moist. You can also try soaking the peanuts before planting to speed up germination.
* Yellowing Leaves: Yellowing leaves can be a sign of nutrient deficiency. Try side-dressing your plants with compost or a balanced fertilizer.
* Root Rot: Root rot is caused by overwatering and poor drainage. Make sure your soil is well-drained and avoid overwatering your plants.
* Pest Infestations: Inspect your plants regularly for pests and treat any infestations promptly with insecticidal soap or neem oil.
* Disease Problems: Good air circulation and well-drained soil can help prevent fungal diseases. Avoid overhead watering and remove any infected leaves or plants.
Peanut Butter Time!
Once you’ve got a good harvest, why not try making your own peanut butter? It’s surprisingly easy and tastes so much better than store-bought.
1. Roast your peanuts: Follow the roasting instructions above.
2. Remove the skins: Rub the roasted peanuts between your hands or in a clean kitchen towel to
Conclusion
So, there you have it! Growing peanuts at home is not only achievable, but it’s also a deeply rewarding experience that connects you to the source of your food in a tangible way. Forget the store-bought, often bland, peanuts – imagine the burst of fresh, nutty flavor from peanuts you’ve nurtured from seed to harvest. This DIY project is more than just a gardening endeavor; it’s an opportunity to learn, experiment, and enjoy the fruits (or rather, nuts!) of your labor.
Why is this a must-try? Because it’s surprisingly simple, even for novice gardeners. Peanuts are relatively low-maintenance, and the process of watching them grow underground is fascinating. Plus, the taste of homegrown peanuts is simply unparalleled. You’ll be amazed at the difference in flavor and texture compared to commercially grown varieties.
Looking for variations? Consider experimenting with different peanut varieties. There are Virginia peanuts, known for their large size and often used for roasting; Spanish peanuts, which are smaller and have a reddish skin, perfect for candies; and Runner peanuts, commonly used for peanut butter. Each variety offers a unique flavor profile, so find the one that suits your taste. You can also try growing peanuts in containers if you have limited garden space. Just ensure the container is large enough to accommodate the root system and developing peanuts.
Another fun variation is to experiment with different soil amendments. While peanuts thrive in well-drained soil, adding compost or other organic matter can further enhance their growth and yield. You can also try inoculating the seeds with a nitrogen-fixing bacteria, which can help them absorb more nutrients from the soil.
But the real magic lies in the harvest. Digging up your peanut plants and discovering the treasures hidden beneath the soil is an incredibly satisfying moment. It’s a testament to your hard work and dedication, and it’s a reminder of the power of nature.
We wholeheartedly encourage you to try growing peanuts at home. It’s a fun, educational, and delicious project that the whole family can enjoy. Don’t be intimidated by the thought of growing something underground – with a little patience and care, you’ll be rewarded with a bountiful harvest of fresh, flavorful peanuts.
Once you’ve tried it, we’d love to hear about your experience! Share your tips, tricks, and photos with us in the comments below. Let’s build a community of home peanut growers and learn from each other. Happy growing!
Frequently Asked Questions (FAQ)
What kind of climate is best for growing peanuts?
Peanuts thrive in warm climates with a growing season of at least 120 frost-free days. They need plenty of sunshine and warm temperatures to germinate and develop properly. Ideally, the soil temperature should be consistently above 65°F (18°C) for optimal growth. If you live in a cooler climate, you can start your peanut seeds indoors a few weeks before the last expected frost and then transplant them outdoors once the weather warms up. You can also use row covers or other protective measures to extend the growing season.
How much space do peanut plants need?
Peanut plants typically need about 6-12 inches of space between each plant. This allows them to spread out and develop properly. If you’re planting in rows, space the rows about 2-3 feet apart. This will give you enough room to walk between the rows and tend to your plants. If you’re growing peanuts in containers, choose a pot that is at least 12 inches in diameter and 12 inches deep. This will provide enough space for the roots to grow and the peanuts to develop.
What type of soil is best for growing peanuts?
Peanuts prefer well-drained, sandy loam soil with a slightly acidic pH (around 6.0 to 6.5). Good drainage is crucial, as peanuts don’t like to sit in waterlogged soil. If your soil is heavy clay, you can amend it with compost, sand, or other organic matter to improve drainage. Avoid soils that are too rich in nitrogen, as this can promote excessive foliage growth at the expense of peanut production.
How often should I water my peanut plants?
Peanut plants need consistent moisture, especially during flowering and pod development. Water deeply and regularly, especially during dry spells. However, avoid overwatering, as this can lead to root rot and other problems. A good rule of thumb is to water when the top inch of soil feels dry to the touch. You can also use a moisture meter to check the soil moisture levels.
When and how do I harvest my peanuts?
Peanuts are typically ready to harvest in the fall, about 120-150 days after planting. A good indicator of maturity is when the foliage starts to turn yellow or brown. To harvest, carefully dig up the entire plant, being careful not to damage the peanuts. Gently shake off any excess soil and then hang the plants upside down in a well-ventilated area to dry for several weeks. Once the peanuts are dry, you can remove them from the plants and store them in a cool, dry place.
What are some common pests and diseases that affect peanut plants?
Some common pests that can affect peanut plants include aphids, spider mites, and leafhoppers. These pests can be controlled with insecticidal soap or other organic pesticides. Common diseases that can affect peanut plants include leaf spot, rust, and white mold. These diseases can be prevented by practicing good sanitation, such as removing infected leaves and avoiding overhead watering. You can also use fungicides to control these diseases.
Can I grow peanuts indoors?
While it’s possible to grow peanuts indoors, it can be challenging. Peanuts need a lot of sunlight and warm temperatures to thrive, which can be difficult to provide indoors. If you want to try growing peanuts indoors, choose a sunny location and use grow lights to supplement the natural light. You’ll also need to provide adequate ventilation and humidity.
How do I roast my homegrown peanuts?
Roasting your homegrown peanuts is easy! Simply preheat your oven to 350°F (175°C). Spread the peanuts in a single layer on a baking sheet and roast for 15-20 minutes, or until they are golden brown and fragrant. Be sure to stir them occasionally to ensure even roasting. Once they are roasted, let them cool completely before storing them in an airtight container. You can also add salt or other seasonings to the peanuts before roasting for extra flavor.
What are some creative ways to use my homegrown peanuts?
Besides roasting and eating them as a snack, there are many other creative ways to use your homegrown peanuts. You can make your own peanut butter, add them to salads or stir-fries, use them in baking, or even make peanut brittle. The possibilities are endless! Experiment with different recipes and find your favorite ways to enjoy your homegrown peanuts.
Leave a Comment