
Grow Onions Easily at Home – imagine stepping into your garden and plucking fresh, flavorful onions whenever you need them! No more last-minute grocery runs or settling for bland, store-bought produce. This isn’t just a dream; it’s an achievable reality with a few simple DIY tricks. For centuries, onions have been a staple in cuisines worldwide, dating back to ancient civilizations where they were valued not only for their taste but also for their medicinal properties. From the Egyptians who revered them to the Romans who carried them on their conquests, onions have a rich and fascinating history.
But let’s be honest, sometimes growing onions can feel a bit daunting. That’s where these DIY hacks come in! I’m going to share some of my favorite, tried-and-true methods to help you grow onions easily at home, even if you have limited space or a less-than-green thumb. These aren’t just random tips; they’re practical solutions to common gardening challenges. Think of it as unlocking the secrets to a bountiful onion harvest, right in your own backyard.
Why do you need these tricks? Because growing your own onions is not only incredibly rewarding, but it also allows you to control the quality and freshness of your food. Plus, it’s a fantastic way to connect with nature and enjoy the satisfaction of nurturing something from seed to table. So, get ready to roll up your sleeves and discover how easy and fun it can be to cultivate your own delicious onions!
Zwiebeln einfach zu Hause ziehen: Dein DIY-Leitfaden
Hallo Gartenfreunde! Ich zeige euch heute, wie ihr ganz einfach eure eigenen Zwiebeln zu Hause ziehen könnt. Es ist einfacher als ihr denkt und das Ergebnis ist unglaublich befriedigend. Frische, aromatische Zwiebeln direkt aus dem eigenen Garten oder sogar vom Balkon – klingt das nicht toll? Los geht’s!
Was du brauchst: Die Zutaten für deinen Zwiebel-Erfolg
Bevor wir loslegen, hier eine Liste mit allem, was du benötigst:
* Zwiebeln: Am besten eignen sich Bio-Zwiebeln, da diese nicht mit Wachstumsinhibitoren behandelt wurden. Du kannst entweder ganze Zwiebeln verwenden, die bereits ausgetrieben haben, oder Zwiebelsets (kleine, getrocknete Zwiebeln).
* Pflanzgefäße: Töpfe, Balkonkästen oder sogar alte Eimer – alles ist möglich, solange es Abzugslöcher hat.
* Erde: Eine gute, nährstoffreiche Blumenerde ist ideal. Du kannst auch Kompost untermischen, um die Erde noch weiter anzureichern.
* Wasser: Klares Wasser zum Gießen.
* Optional: Dünger (organisch oder mineralisch) für eine noch bessere Ernte.
* Werkzeug: Eine kleine Schaufel oder Kelle zum Befüllen der Töpfe.
Die Vorbereitung: Der Schlüssel zum Erfolg
Bevor wir mit dem Pflanzen beginnen, ist es wichtig, alles vorzubereiten. Eine gute Vorbereitung ist die halbe Miete!
1. Die Zwiebeln auswählen: Wenn du ganze Zwiebeln verwendest, achte darauf, dass sie bereits grüne Triebe haben. Diese Triebe sind ein Zeichen dafür, dass die Zwiebel bereit ist, neue Wurzeln zu bilden. Zwiebelsets sollten fest und trocken sein. Vermeide weiche oder schimmelige Zwiebeln.
2. Die Pflanzgefäße vorbereiten: Stelle sicher, dass deine Pflanzgefäße sauber sind und Abzugslöcher haben. Diese Löcher sind wichtig, damit überschüssiges Wasser ablaufen kann und die Zwiebeln nicht faulen.
3. Die Erde vorbereiten: Fülle die Pflanzgefäße mit Erde. Lass oben etwa 2-3 cm Platz. Wenn du Kompost untermischen möchtest, vermische ihn gut mit der Erde.
Das Pflanzen: Schritt für Schritt zur eigenen Zwiebelernte
Jetzt kommt der spannende Teil: das Pflanzen der Zwiebeln!
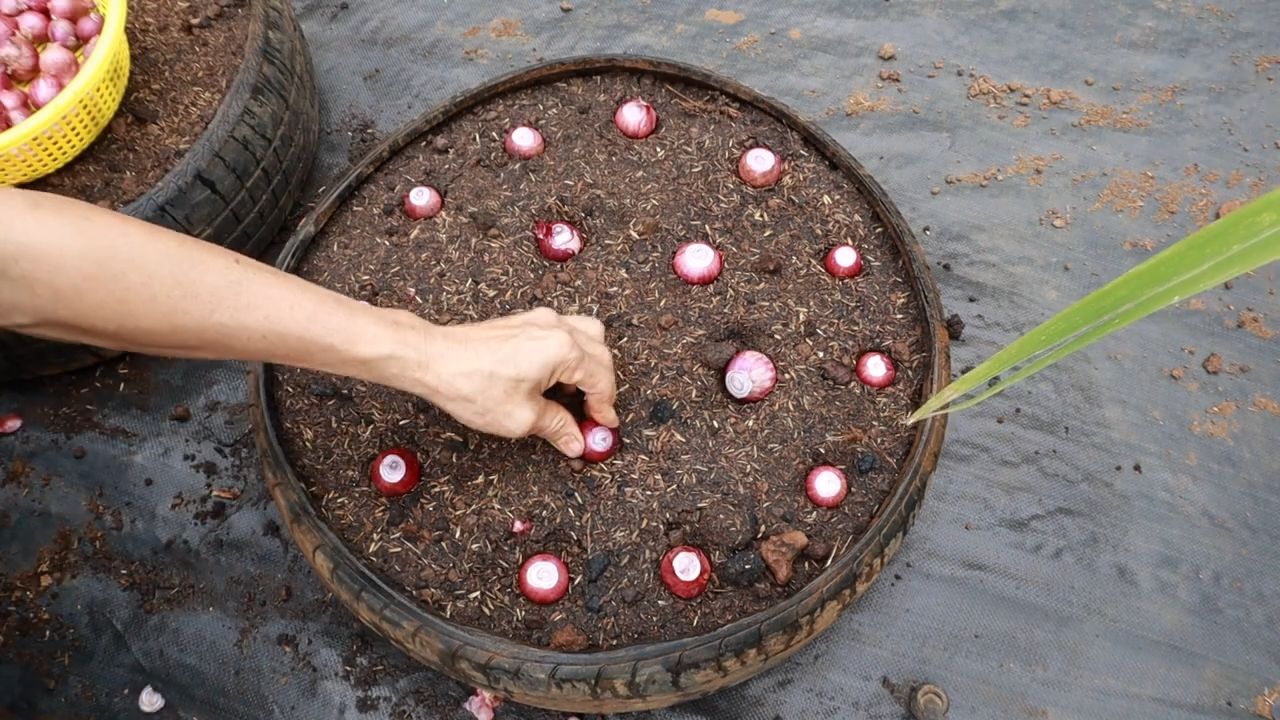
1. Die Zwiebeln einsetzen:
* Bei ganzen Zwiebeln: Setze die Zwiebeln so in die Erde, dass die Wurzeln nach unten zeigen und die grüne Triebspitze aus der Erde herausschaut. Bedecke die Zwiebel etwa zur Hälfte mit Erde.
* Bei Zwiebelsets: Setze die Zwiebelsets etwa 2-3 cm tief in die Erde. Der Abstand zwischen den Zwiebeln sollte etwa 5-10 cm betragen.
2. Angießen: Gieße die Zwiebeln nach dem Pflanzen gründlich an. Achte darauf, dass die Erde gut durchfeuchtet ist, aber nicht im Wasser steht.
3. Der Standort: Stelle die Pflanzgefäße an einen sonnigen Standort. Zwiebeln lieben die Sonne! Ein Platz auf dem Balkon, der Terrasse oder im Garten ist ideal.
Die Pflege: So bleiben deine Zwiebeln glücklich
Die Pflege ist entscheidend, damit deine Zwiebeln gut wachsen und eine reiche Ernte bringen.
1. Gießen: Gieße die Zwiebeln regelmäßig, aber vermeide Staunässe. Die Erde sollte immer leicht feucht sein. An heißen Tagen musst du möglicherweise öfter gießen.
2. Düngen: Dünge die Zwiebeln etwa alle zwei Wochen mit einem organischen oder mineralischen Dünger. Befolge dabei die Anweisungen auf der Verpackung. Ein guter Dünger versorgt die Zwiebeln mit den notwendigen Nährstoffen für ein gesundes Wachstum.
3. Unkraut entfernen: Entferne regelmäßig Unkraut aus den Pflanzgefäßen. Unkraut kann den Zwiebeln Nährstoffe und Licht wegnehmen.
4. Schädlinge und Krankheiten: Achte auf Schädlinge und Krankheiten. Zwiebeln können von Zwiebelfliegen oder Pilzkrankheiten befallen werden. Bei Bedarf kannst du biologische Schädlingsbekämpfungsmittel einsetzen.
Die Ernte: Der Lohn deiner Mühe
Nach einigen Monaten ist es endlich soweit: Du kannst deine eigenen Zwiebeln ernten!
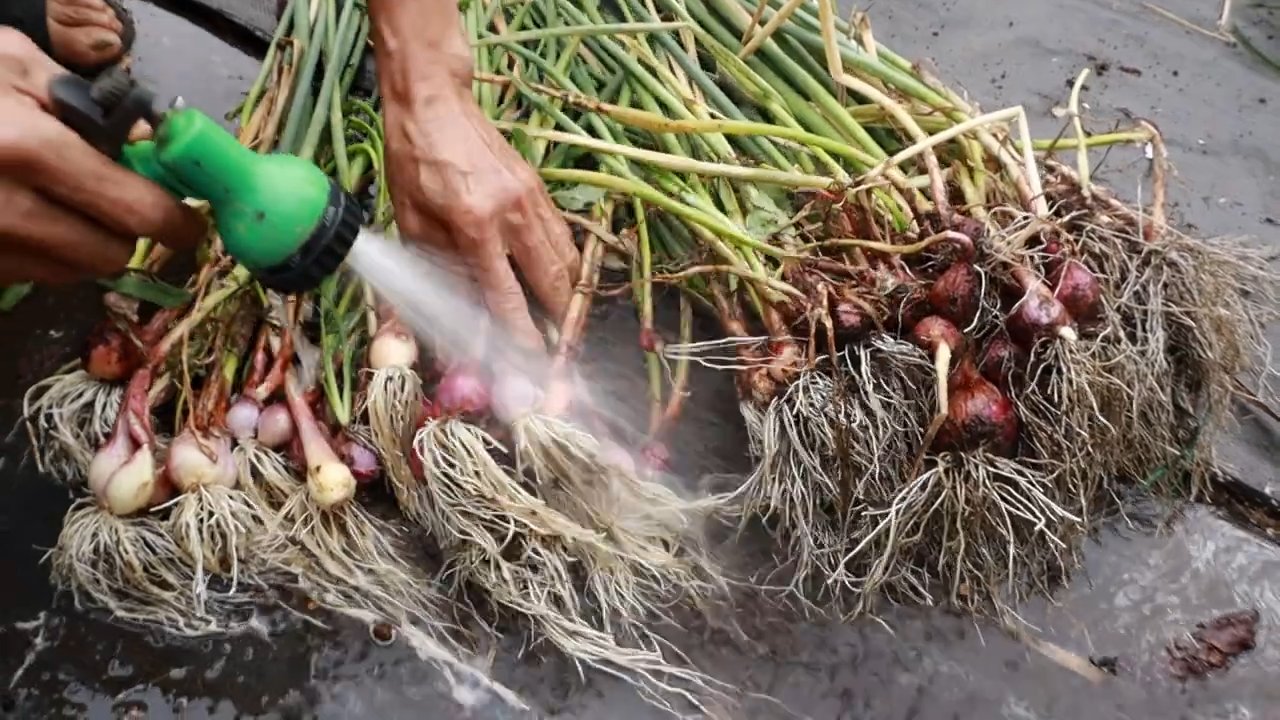
1. Der richtige Zeitpunkt: Der richtige Zeitpunkt für die Ernte ist, wenn das Laub der Zwiebeln gelb wird und umknickt. Das ist ein Zeichen dafür, dass die Zwiebeln reif sind.
2. Die Ernte: Ziehe die Zwiebeln vorsichtig aus der Erde. Schüttle die Erde ab und lasse die Zwiebeln an einem trockenen, luftigen Ort trocknen.
3. Die Lagerung: Lagere die getrockneten Zwiebeln an einem kühlen, trockenen und dunklen Ort. So halten sie sich mehrere Monate.
Extra-Tipps für noch mehr Erfolg
Hier sind noch ein paar zusätzliche Tipps, die dir helfen können, noch erfolgreichere Zwiebeln zu ziehen:
* Fruchtfolge beachten: Pflanze Zwiebeln nicht jedes Jahr am selben Standort. Eine Fruchtfolge hilft, Krankheiten und Schädlinge zu vermeiden.
* Begleitpflanzen: Pflanze Begleitpflanzen wie Karotten oder Kamille neben die Zwiebeln. Diese Pflanzen können Schädlinge abwehren und das Wachstum der Zwiebeln fördern.
* Zwiebellauch: Du kannst auch den grünen Zwiebellauch ernten, bevor die Zwiebeln reif sind. Schneide einfach die grünen Blätter ab. Sie wachsen wieder nach.
* Verschiedene Sorten: Probiere verschiedene Zwiebelsorten aus. Es gibt gelbe, rote und weiße Zwiebeln mit unterschiedlichen Geschmacksrichtungen.
Häufige Probleme und Lösungen
Auch beim Zwiebelanbau können Probleme auftreten. Hier sind einige häufige Probleme und wie du sie lösen kannst:
* Zwiebeln faulen: Das kann an Staunässe liegen. Achte darauf, dass die Erde gut durchlässig ist und die Pflanzgefäße Abzugslöcher haben.
* Zwiebeln wachsen nicht: Das kann an Nährstoffmangel liegen. Dünge die Zwiebeln regelmäßig mit einem guten Dünger.
* Schädlinge: Bei Schädlingsbefall kannst du biologische Schädlingsbekämpfungsmittel einsetzen.
Zwiebeln aus Küchenabfällen ziehen: Ein nachhaltiger Ansatz
Wusstest du, dass du Zwiebeln auch aus Küchenabfällen ziehen kannst? Das ist eine tolle Möglichkeit, Lebensmittelverschwendung zu reduzieren und gleichzeitig frische Zwiebeln zu ernten.
1. Die Zwiebelreste vorbereiten: Schneide das untere Ende einer Zwiebel ab, etwa 2-3 cm vom Wurzelansatz entfernt. Achte darauf, dass die Wurzeln noch vorhanden sind.
2. Anwurzeln im Wasser: Stelle das Zwiebelende in ein Glas mit Wasser, so dass die Wurzeln im Wasser stehen. Wechsle das Wasser regelmäßig.
3. Einpflanzen: Sobald die Wurzeln gut entwickelt sind, kannst du die Zwiebel in einen Topf mit Erde pflanzen.
4. Pflege: Pflege die Zwiebel wie oben beschrieben.
Zusammenfassung: Dein Weg zur eigenen Zwiebelernte
Zwiebeln zu Hause zu ziehen ist wirklich einfach und macht Spaß. Mit den richtigen Zutaten, einer guten Vorbereitung und etwas Geduld kannst du schon bald deine eigenen frischen Zwiebeln ernten. Probiere es aus und lass dich von dem Ergebnis überraschen! Ich hoffe, dieser Leitfaden hat dir geholfen und inspiriert. Viel Erfolg beim Gärtnern!
Conclusion
So, there you have it! Growing onions at home, especially using this simple DIY trick, is not just a gardening project; it’s an investment in flavor, freshness, and a more sustainable lifestyle. Forget those bland, store-bought onions that have traveled miles to reach your plate. Imagine the satisfaction of harvesting your own plump, flavorful onions, knowing exactly where they came from and how they were grown. This method simplifies the process, making it accessible even to those with limited space or gardening experience.
Why is this DIY trick a must-try? Because it’s efficient, cost-effective, and incredibly rewarding. You’re reducing food waste by utilizing onion scraps that would otherwise be discarded. You’re saving money by growing your own produce. And you’re enhancing your culinary creations with onions that boast a superior taste and aroma. Plus, it’s a fantastic way to connect with nature and experience the joy of nurturing something from start to finish.
But the fun doesn’t stop there! Feel free to experiment with different varieties of onions. Try growing red onions for a vibrant addition to salads, or shallots for a more delicate flavor in sauces. You can also adjust the size of your containers to accommodate different quantities of onions. Consider companion planting – basil, carrots, and chamomile are known to be beneficial companions for onions, helping to deter pests and improve growth.
Don’t be afraid to get creative with your setup. If you don’t have a traditional garden, you can easily grow onions in pots on your balcony, patio, or even indoors with sufficient sunlight. The key is to provide well-draining soil, adequate sunlight, and consistent watering.
We’re confident that once you try this DIY method for growing onions, you’ll be hooked. It’s a simple, satisfying, and sustainable way to enjoy fresh, flavorful onions year-round. So, grab your onion scraps, prepare your soil, and get ready to embark on a rewarding gardening adventure.
We encourage you to try this DIY trick and share your experience with us! Let us know how it goes, what challenges you faced, and what successes you celebrated. Share your photos and tips in the comments below. We’re eager to learn from your experiences and build a community of home gardeners who are passionate about growing their own food. Happy gardening!
Frequently Asked Questions (FAQs)
What kind of onions work best for this DIY trick?
Almost any type of onion can be regrown using this method, but some varieties tend to be more successful than others. Yellow onions, white onions, and red onions are all good choices. Shallots and scallions also work well. The key is to choose onions that are healthy and firm, without any signs of rot or mold. Avoid using onions that have been treated with anti-sprouting agents, as these may inhibit regrowth. Experiment with different varieties to see which ones thrive best in your specific environment.
How long does it take to grow a full-sized onion using this method?
The time it takes to grow a full-sized onion from scraps can vary depending on several factors, including the variety of onion, the growing conditions, and the climate. Generally, it takes about 90 to 120 days from planting the scraps to harvesting mature onions. However, you can start harvesting green onions much sooner, usually within a few weeks of planting. Be patient and provide your onions with the care they need, and you’ll be rewarded with a bountiful harvest.
What kind of soil is best for growing onions?
Onions prefer well-draining soil that is rich in organic matter. A loamy soil is ideal, as it provides a good balance of drainage and moisture retention. Before planting, amend your soil with compost or well-rotted manure to improve its fertility and drainage. Avoid heavy clay soils, as they can become waterlogged and inhibit onion growth. If you’re growing onions in containers, use a high-quality potting mix that is specifically formulated for vegetables.
How much sunlight do onions need?
Onions require at least 6 to 8 hours of direct sunlight per day to thrive. Choose a location in your garden or on your balcony that receives plenty of sunlight throughout the day. If you’re growing onions indoors, place them near a sunny window or supplement with grow lights. Insufficient sunlight can result in stunted growth and smaller bulbs.
How often should I water my onions?
Onions need consistent moisture to grow properly, but they don’t like to be waterlogged. Water your onions deeply whenever the top inch of soil feels dry to the touch. Avoid overwatering, as this can lead to root rot. During hot, dry weather, you may need to water more frequently. Mulching around your onions can help to retain moisture in the soil and reduce the need for frequent watering.
What are some common pests and diseases that affect onions?
Onions can be susceptible to various pests and diseases, including onion maggots, thrips, and fungal diseases like downy mildew and onion rot. To prevent pest and disease problems, practice good garden hygiene, such as removing weeds and debris from around your onions. Use organic pest control methods, such as insecticidal soap or neem oil, to control pests. Ensure good air circulation around your onions to prevent fungal diseases. If you notice any signs of disease, remove the affected plants immediately to prevent the spread of infection.
Can I grow onions indoors using this method?
Yes, you can absolutely grow onions indoors using this method, especially for green onions. Ensure you have a sunny windowsill or supplement with grow lights to provide adequate light. Use a well-draining potting mix and water regularly, allowing the soil to dry slightly between waterings. While you might not get the same bulb size as outdoor-grown onions, you can still enjoy a continuous supply of fresh green onions.
How do I know when my onions are ready to harvest?
Onions are typically ready to harvest when the tops start to fall over and turn yellow or brown. This indicates that the bulb has reached its full size and is starting to mature. You can also gently dig around the base of the plant to check the size of the bulb. If the bulb is large and firm, it’s likely ready to harvest. Once harvested, cure your onions by allowing them to dry in a well-ventilated area for a week or two before storing them.
Can I use this method to grow other vegetables?
While this specific method is tailored for growing onions from scraps, the general principle of regrowing vegetables from scraps can be applied to other vegetables as well. For example, you can regrow lettuce, celery, and garlic from their base. Research the specific requirements for each vegetable to ensure success.
What if my onion scraps don’t sprout?
Sometimes, onion scraps may not sprout due to various reasons, such as poor quality scraps, unfavorable growing conditions, or lack of sunlight. Don’t be discouraged! Try again with fresh onion scraps and ensure that you provide them with adequate sunlight, moisture, and well-draining soil. You can also try soaking the onion scraps in water for a few hours before planting to encourage sprouting.
Leave a Comment