
Grow Napa Cabbage Backyard: Ever dream of strolling into your backyard and harvesting fresh, crisp Napa cabbage for a delicious stir-fry or kimchi? I know I have! It’s more achievable than you might think, and this DIY guide is your ticket to homegrown goodness. Forget those wilted, overpriced heads at the grocery store; with a few simple tricks, you can cultivate your own thriving Napa cabbage patch right outside your door.
Napa cabbage, also known as Chinese cabbage, has a rich history deeply rooted in Asian cuisine. Cultivated for centuries, it’s a staple ingredient in countless dishes, prized for its mild flavor and satisfying crunch. But beyond its culinary appeal, growing your own Napa cabbage offers a unique connection to this heritage, allowing you to participate in a tradition that spans generations.
Why bother with this DIY project? Well, for starters, you’ll have access to fresher, healthier produce, free from the pesticides and preservatives often found in commercially grown vegetables. Plus, growing Napa Cabbage Backyard is incredibly rewarding! There’s nothing quite like the satisfaction of nurturing a plant from seed to harvest. This guide will provide you with easy-to-follow steps and insider tips to ensure your Napa cabbage thrives, even if you’re a complete beginner. Let’s get started and transform your backyard into a Napa cabbage haven!
Napa Kohl im eigenen Garten anbauen: Eine Schritt-für-Schritt-Anleitung
Hey Gartenfreunde! Habt ihr Lust, euren eigenen Napa Kohl anzubauen? Es ist einfacher, als ihr denkt, und das Ergebnis ist super lecker und frisch. Ich zeige euch, wie es geht!
Was du brauchst:
* Napa Kohl Samen (am besten Bio!)
* Anzuchterde
* Anzuchttöpfe oder Eierkartons
* Gartenerde (angereichert mit Kompost)
* Gartenwerkzeug (Schaufel, Harke, etc.)
* Gießkanne oder Gartenschlauch
* Mulch (Stroh, Holzhackschnitzel, etc.)
* (Optional) Pflanzenschutznetz gegen Schädlinge
Die Vorbereitung: Der Schlüssel zum Erfolg
Bevor wir loslegen, ist eine gute Vorbereitung das A und O. Napa Kohl braucht einen sonnigen Standort mit gut durchlässigem Boden.
* Standortwahl: Sucht euch einen Platz in eurem Garten aus, der mindestens 6 Stunden Sonne am Tag bekommt.
* Boden vorbereiten: Napa Kohl mag es nährstoffreich. Lockert den Boden gründlich auf und mischt reichlich Kompost unter. Das sorgt für eine gute Drainage und versorgt die Pflanzen mit wichtigen Nährstoffen.
* Boden-pH-Wert: Napa Kohl bevorzugt einen leicht sauren bis neutralen pH-Wert (6,0-7,5). Ihr könnt den pH-Wert mit einem Bodentest überprüfen und gegebenenfalls anpassen.
Aussaat: Der Start ins Kohl-Abenteuer
Es gibt zwei Möglichkeiten: Direktsaat im Garten oder Vorziehen im Haus. Ich empfehle das Vorziehen, da es die Keimung und das Wachstum der jungen Pflanzen fördert.
Vorziehen im Haus:
1. Anzuchttöpfe vorbereiten: Füllt eure Anzuchttöpfe oder Eierkartons mit Anzuchterde.
2. Samen aussäen: Legt 2-3 Samen pro Topf etwa 1 cm tief in die Erde.
3. Angießen: Gießt die Erde vorsichtig an, sodass sie feucht, aber nicht nass ist.
4. Warm und hell stellen: Stellt die Töpfe an einen warmen und hellen Ort. Eine Fensterbank oder ein Gewächshaus sind ideal.
5. Feucht halten: Haltet die Erde gleichmäßig feucht. Vermeidet Staunässe.
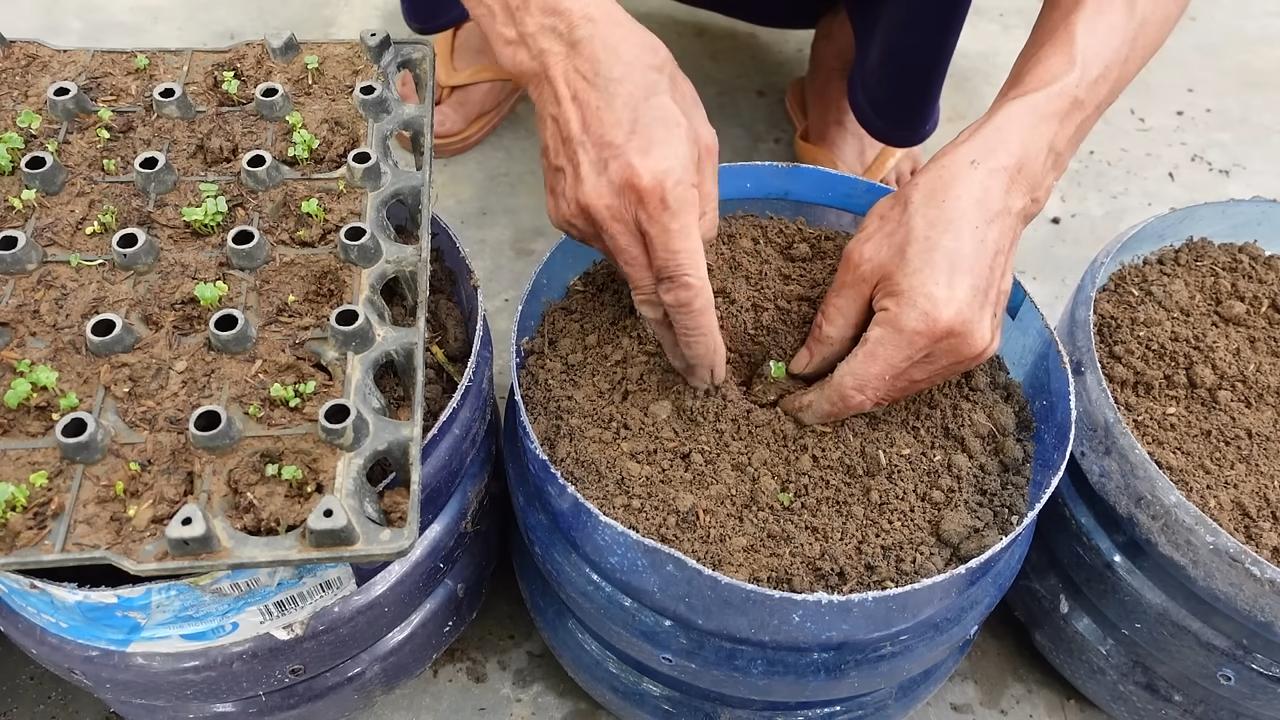
6. Pikieren: Sobald die Sämlinge 2-3 echte Blätter haben (nicht nur die Keimblätter), könnt ihr sie pikieren. Das bedeutet, dass ihr die stärksten Sämlinge in größere Töpfe umpflanzt, damit sie mehr Platz zum Wachsen haben.
Direktsaat im Garten (weniger empfohlen):
1. Boden vorbereiten: Wie oben beschrieben.
2. Saatrillen ziehen: Zieht flache Saatrillen im Abstand von etwa 45 cm.
3. Samen aussäen: Säet die Samen in die Rillen und bedeckt sie leicht mit Erde.
4. Angießen: Gießt die Erde vorsichtig an.
5. Ausdünnen: Sobald die Sämlinge aufgegangen sind, müsst ihr sie ausdünnen, sodass die Pflanzen genügend Platz zum Wachsen haben (etwa 45 cm Abstand).
Umpflanzen: Ab ins Beet!
Sobald die Sämlinge kräftig genug sind (etwa 10-15 cm hoch), können sie ins Beet umgepflanzt werden. Das ist normalerweise nach 4-6 Wochen der Fall.
1. Abhärten: Bevor ihr die Pflanzen ins Beet setzt, solltet ihr sie abhärten. Das bedeutet, dass ihr sie für ein paar Tage stundenweise ins Freie stellt, damit sie sich an die Bedingungen gewöhnen können.
2. Pflanzlöcher graben: Grabt Pflanzlöcher im Abstand von etwa 45 cm.
3. Pflanzen einsetzen: Setzt die Pflanzen vorsichtig in die Löcher und füllt sie mit Erde auf.
4. Angießen: Gießt die Pflanzen gründlich an.
5. Mulchen: Mulcht den Boden um die Pflanzen herum mit Stroh oder Holzhackschnitzeln. Das hilft, die Feuchtigkeit im Boden zu halten und Unkraut zu unterdrücken.
Pflege: Damit der Kohl prächtig gedeiht
Napa Kohl ist relativ pflegeleicht, aber ein paar Dinge solltet ihr beachten:
* Gießen: Gießt die Pflanzen regelmäßig, besonders bei trockenem Wetter. Der Boden sollte immer leicht feucht sein.
* Düngen: Düngt die Pflanzen alle paar Wochen mit einem organischen Dünger.
* Unkraut jäten: Haltet das Beet unkrautfrei.
* Schutz vor Schädlingen: Napa Kohl ist anfällig für Schädlinge wie Kohlweißlinge, Erdflöhe und Schnecken. Ein Pflanzenschutznetz kann helfen, die Pflanzen zu schützen. Alternativ könnt ihr auch natürliche Schädlingsbekämpfungsmittel verwenden.
* Kopfbildung fördern: Um die Kopfbildung zu fördern, könnt ihr die äußeren Blätter entfernen, sobald der Kopf anfängt, sich zu bilden.
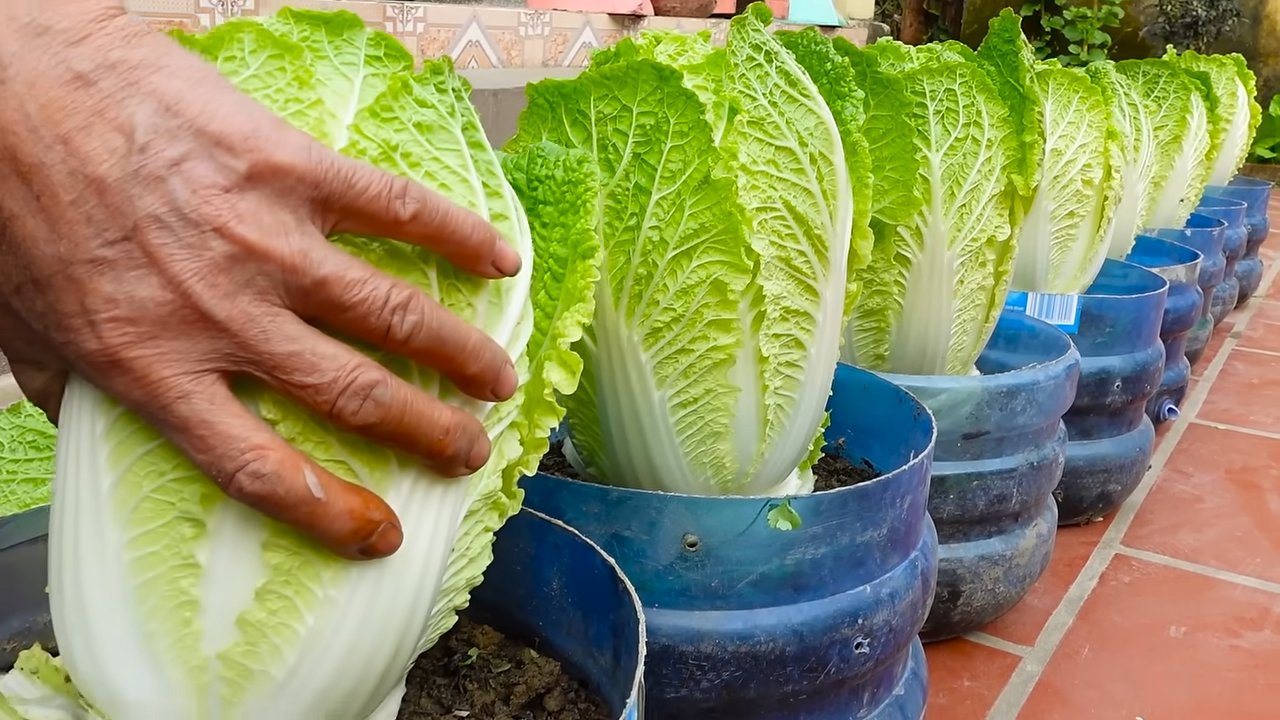
Ernte: Die Belohnung für eure Mühe
Napa Kohl ist erntereif, wenn der Kopf fest und geschlossen ist. Das ist normalerweise nach 70-80 Tagen der Fall.
1. Kopf abschneiden: Sch
Hey Gartenfreunde! Habt ihr Lust, euren eigenen Napa Kohl anzubauen? Es ist einfacher, als ihr denkt, und das Ergebnis ist super lecker und frisch. Ich zeige euch, wie es geht!
Was du brauchst:
* Napa Kohl Samen (am besten Bio!)
* Anzuchterde
* Anzuchttöpfe oder Eierkartons
* Gartenerde (angereichert mit Kompost)
* Gartenwerkzeug (Schaufel, Harke, etc.)
* Gießkanne oder Gartenschlauch
* Mulch (Stroh, Holzhackschnitzel, etc.)
* (Optional) Pflanzenschutznetz gegen Schädlinge
Die Vorbereitung: Der Schlüssel zum Erfolg
Bevor wir loslegen, ist eine gute Vorbereitung das A und O. Napa Kohl braucht einen sonnigen Standort mit gut durchlässigem Boden.
* Standortwahl: Sucht euch einen Platz in eurem Garten aus, der mindestens 6 Stunden Sonne am Tag bekommt.
* Boden vorbereiten: Napa Kohl mag es nährstoffreich. Lockert den Boden gründlich auf und mischt reichlich Kompost unter. Das sorgt für eine gute Drainage und versorgt die Pflanzen mit wichtigen Nährstoffen.
* Boden-pH-Wert: Napa Kohl bevorzugt einen leicht sauren bis neutralen pH-Wert (6,0-7,5). Ihr könnt den pH-Wert mit einem Bodentest überprüfen und gegebenenfalls anpassen.
Aussaat: Der Start ins Kohl-Abenteuer
Es gibt zwei Möglichkeiten: Direktsaat im Garten oder Vorziehen im Haus. Ich empfehle das Vorziehen, da es die Keimung und das Wachstum der jungen Pflanzen fördert.
Vorziehen im Haus:
1. Anzuchttöpfe vorbereiten: Füllt eure Anzuchttöpfe oder Eierkartons mit Anzuchterde.
2. Samen aussäen: Legt 2-3 Samen pro Topf etwa 1 cm tief in die Erde.
3. Angießen: Gießt die Erde vorsichtig an, sodass sie feucht, aber nicht nass ist.
4. Warm und hell stellen: Stellt die Töpfe an einen warmen und hellen Ort. Eine Fensterbank oder ein Gewächshaus sind ideal.
5. Feucht halten: Haltet die Erde gleichmäßig feucht. Vermeidet Staunässe.
6. Pikieren: Sobald die Sämlinge 2-3 echte Blätter haben (nicht nur die Keimblätter), könnt ihr sie pikieren. Das bedeutet, dass ihr die stärksten Sämlinge in größere Töpfe umpflanzt, damit sie mehr Platz zum Wachsen haben.
Direktsaat im Garten (weniger empfohlen):
1. Boden vorbereiten: Wie oben beschrieben.
2. Saatrillen ziehen: Zieht flache Saatrillen im Abstand von etwa 45 cm.
3. Samen aussäen: Säet die Samen in die Rillen und bedeckt sie leicht mit Erde.
4. Angießen: Gießt die Erde vorsichtig an.
5. Ausdünnen: Sobald die Sämlinge aufgegangen sind, müsst ihr sie ausdünnen, sodass die Pflanzen genügend Platz zum Wachsen haben (etwa 45 cm Abstand).
Umpflanzen: Ab ins Beet!
Sobald die Sämlinge kräftig genug sind (etwa 10-15 cm hoch), können sie ins Beet umgepflanzt werden. Das ist normalerweise nach 4-6 Wochen der Fall.
1. Abhärten: Bevor ihr die Pflanzen ins Beet setzt, solltet ihr sie abhärten. Das bedeutet, dass ihr sie für ein paar Tage stundenweise ins Freie stellt, damit sie sich an die Bedingungen gewöhnen können.
2. Pflanzlöcher graben: Grabt Pflanzlöcher im Abstand von etwa 45 cm.
3. Pflanzen einsetzen: Setzt die Pflanzen vorsichtig in die Löcher und füllt sie mit Erde auf.
4. Angießen: Gießt die Pflanzen gründlich an.
5. Mulchen: Mulcht den Boden um die Pflanzen herum mit Stroh oder Holzhackschnitzeln. Das hilft, die Feuchtigkeit im Boden zu halten und Unkraut zu unterdrücken.
Pflege: Damit der Kohl prächtig gedeiht
Napa Kohl ist relativ pflegeleicht, aber ein paar Dinge solltet ihr beachten:
* Gießen: Gießt die Pflanzen regelmäßig, besonders bei trockenem Wetter. Der Boden sollte immer leicht feucht sein.
* Düngen: Düngt die Pflanzen alle paar Wochen mit einem organischen Dünger.
* Unkraut jäten: Haltet das Beet unkrautfrei.
* Schutz vor Schädlingen: Napa Kohl ist anfällig für Schädlinge wie Kohlweißlinge, Erdflöhe und Schnecken. Ein Pflanzenschutznetz kann helfen, die Pflanzen zu schützen. Alternativ könnt ihr auch natürliche Schädlingsbekämpfungsmittel verwenden.
* Kopfbildung fördern: Um die Kopfbildung zu fördern, könnt ihr die äußeren Blätter entfernen, sobald der Kopf anfängt, sich zu bilden.
Ernte: Die Belohnung für eure Mühe
Napa Kohl ist erntereif, wenn der Kopf fest und geschlossen ist. Das ist normalerweise nach 70-80 Tagen der Fall.
1. Kopf abschneiden: Schneidet den Kopf mit einem scharfen Messer ab.
2. Äußere Blätter entfernen: Entfernt die äußeren Blätter, die möglicherweise beschädigt sind.
3. Lagern: Napa Kohl kann im Kühlschrank für einige Wochen gelagert werden.
Häufige Probleme und Lösungen:
* Kohlweißlinge: Diese Schmetterlinge legen ihre Eier auf die Kohlblätter, und die Raupen fressen dann die Blätter.
* Lösung: Pflanzenschutznetz verwenden, Raupen absammeln, Bacillus thuringiensis (ein biologisches Insektizid) sprühen.
* Erdflöhe: Diese kleinen Käfer fressen Löcher in die Blätter.
* Lösung: Boden feucht halten, Pflanzenschutznetz verwenden, Kieselgur ausstreuen.
* Schnecken: Schnecken lieben Kohl!
* Lösung: Schneckenkorn ausstreuen, Bierfallen aufstellen, Schnecken absammeln.
* Kopffäule: Diese Krankheit führt dazu, dass der Kopf fault.
* Lösung: Gute Drainage gewährleisten, Pflanzen nicht zu dicht pflanzen, befallene Pflanzen entfernen.
Zusätzliche Tipps:
* Fruchtfolge beachten: Baut Napa Kohl nicht jedes Jahr am selben Standort an. Wechselt die Kulturen, um Krankheiten und Schädlingen vorzubeugen.
* Begleitpflanzung: Pflanzt Kräuter wie Dill oder Salbei in der Nähe des Napa Kohls. Sie können Schädlinge abwehren.
* Samen selbst gewinnen: Wenn ihr Samen für das nächste Jahr gewinnen möchtet, lasst einige Pflanzen blühen und Samen bilden.
Ich hoffe, diese Anleitung hilft euch dabei, euren eigenen Napa Kohl anzubauen. Es ist ein tolles Gefühl, frisches Gemüse aus dem eigenen Garten zu ernten! Viel Erfolg und guten Appetit!
Conclusion
Growing your own Napa cabbage in your backyard isn’t just a gardening project; it’s an investment in fresh, flavorful, and healthy eating. This DIY trick, while requiring a bit of patience and attention, offers rewards far beyond what you’ll find at the grocery store. Imagine the crisp, slightly sweet taste of freshly harvested Napa cabbage, transformed into vibrant slaws, savory stir-fries, or comforting kimchi. The difference in flavor and texture compared to store-bought varieties is truly remarkable.
But the benefits extend beyond taste. By growing your own Napa cabbage, you control the entire process, ensuring that your produce is free from harmful pesticides and herbicides. You also reduce your carbon footprint by eliminating the transportation and packaging associated with commercially grown vegetables. Plus, there’s a unique satisfaction that comes from nurturing a plant from seed to harvest, a connection to nature that’s both grounding and rewarding.
This DIY approach to growing Napa cabbage is a must-try because it empowers you to take control of your food source, enhance your culinary creations, and connect with the natural world. It’s a sustainable and fulfilling way to add fresh, healthy ingredients to your diet.
Ready to take your Napa cabbage cultivation to the next level? Consider these variations and suggestions:
* Succession Planting: Plant seeds every few weeks to ensure a continuous harvest throughout the growing season. This way, you’ll always have fresh Napa cabbage on hand.
* Companion Planting: Plant Napa cabbage alongside herbs like dill or chamomile, which can help deter pests and attract beneficial insects. Marigolds are also excellent companions for pest control.
* Soil Enrichment: Amend your soil with compost and well-rotted manure before planting to provide essential nutrients for healthy growth. A soil test can help you determine any specific nutrient deficiencies.
* Climate Considerations: If you live in a particularly hot climate, consider providing shade for your Napa cabbage during the hottest part of the day to prevent bolting (premature flowering).
* Pest Control: Regularly inspect your plants for pests like cabbage worms and aphids. Handpicking them off or using organic pest control methods like neem oil can help keep your plants healthy.
* Variety Selection: Experiment with different varieties of Napa cabbage to find the ones that grow best in your region and suit your taste preferences. Some popular varieties include ‘Blues’, ‘China Express’, and ‘Optiko’.
Don’t be intimidated if you’re new to gardening. Growing Napa cabbage is a relatively straightforward process, and the rewards are well worth the effort. Start small, learn as you go, and don’t be afraid to experiment.
We encourage you to try this DIY trick for growing Napa cabbage in your backyard. Once you’ve harvested your first crop, we’d love to hear about your experience! Share your tips, successes, and challenges in the comments below. Let’s build a community of Napa cabbage enthusiasts and learn from each other. Happy gardening!
Frequently Asked Questions (FAQ)
What is Napa cabbage, and why should I grow it?
Napa cabbage (Brassica rapa subsp. pekinensis) is a type of Chinese cabbage characterized by its oblong shape, tightly packed leaves, and mild, slightly sweet flavor. It’s a versatile vegetable used in various cuisines, including Asian stir-fries, salads, and kimchi. Growing your own Napa cabbage allows you to enjoy fresher, more flavorful produce, control the growing conditions (avoiding pesticides), and reduce your environmental impact. Plus, it’s a rewarding gardening experience!
When is the best time to plant Napa cabbage?
Napa cabbage is a cool-season crop, meaning it thrives in cooler temperatures. The best time to plant it depends on your climate. In general, you should plant Napa cabbage in early spring or late summer/early fall. For a spring crop, start seeds indoors 6-8 weeks before the last expected frost. For a fall crop, direct sow seeds in the garden 6-8 weeks before the first expected frost. Avoid planting during the hottest months of summer, as high temperatures can cause the plants to bolt (go to seed prematurely).
What kind of soil does Napa cabbage need?
Napa cabbage prefers well-drained, fertile soil that is rich in organic matter. The ideal soil pH is between 6.0 and 7.5. Before planting, amend your soil with compost, well-rotted manure, or other organic materials to improve drainage, fertility, and water retention. A soil test can help you determine if your soil is lacking any essential nutrients.
How much sunlight does Napa cabbage need?
Napa cabbage needs at least 6 hours of sunlight per day to grow properly. Choose a planting location that receives full sun for most of the day. If you live in a particularly hot climate, providing some afternoon shade can help prevent bolting.
How often should I water Napa cabbage?
Napa cabbage needs consistent moisture to thrive. Water deeply and regularly, especially during dry periods. Aim to keep the soil consistently moist but not waterlogged. Mulching around the plants can help retain moisture and suppress weeds.
What are some common pests and diseases that affect Napa cabbage?
Napa cabbage can be susceptible to various pests and diseases, including cabbage worms, aphids, flea beetles, clubroot, and downy mildew. Regularly inspect your plants for signs of infestation or disease. Handpicking pests, using organic pest control methods like neem oil or insecticidal soap, and practicing crop rotation can help prevent and control these problems. Ensure good air circulation to minimize fungal diseases.
How do I harvest Napa cabbage?
Napa cabbage is ready to harvest when the head is firm and tightly packed. The size of the head will vary depending on the variety, but generally, it will be about 12-18 inches tall. To harvest, use a sharp knife to cut the head at the base of the plant.
How do I store Napa cabbage?
Store unwashed Napa cabbage in a plastic bag in the refrigerator. It can last for several weeks if stored properly.
Can I grow Napa cabbage in containers?
Yes, you can grow Napa cabbage in containers, but you’ll need a large container (at least 12 inches in diameter) to accommodate the plant’s root system. Use a well-draining potting mix and water regularly. Container-grown Napa cabbage may require more frequent fertilization than plants grown in the ground.
How can I prevent Napa cabbage from bolting?
Bolting (premature flowering) is a common problem with Napa cabbage, especially in hot weather. To prevent bolting, plant at the right time of year (early spring or late summer/early fall), choose bolt-resistant varieties, provide shade during the hottest part of the day, and ensure consistent watering.
What are some ways to use Napa cabbage in cooking?
Napa cabbage is a versatile vegetable that can be used in a variety of dishes. It’s commonly used in stir-fries, salads, slaws, soups, and kimchi. It can also be steamed, braised, or grilled. Its mild flavor makes it a great addition to many recipes.
Is Napa cabbage nutritious?
Yes, Napa cabbage is a nutritious vegetable. It’s a good source of vitamins A, C, and K, as well as folate, calcium, and potassium. It’s also low in calories and high in fiber.
Where can I find Napa cabbage seeds or seedlings?
Napa cabbage seeds and seedlings are available at most garden centers and online retailers. Choose reputable suppliers to ensure you’re getting high-quality seeds or healthy seedlings.

Leave a Comment