
Grow mushrooms at home and unlock a world of culinary possibilities right in your own kitchen! Have you ever dreamt of harvesting fresh, flavorful mushrooms without a trip to the grocery store? Well, dream no more! This DIY guide will empower you to cultivate these fascinating fungi with simple techniques and readily available materials.
Mushroom cultivation has a rich history, dating back centuries in various cultures. From ancient China, where mushrooms were revered for their medicinal properties, to European traditions of foraging for wild varieties, these fungi have always held a special place in human history. Now, you can participate in this legacy by bringing the magic of mushroom growing into your own home.
Why should you embark on this exciting journey? Because grow mushrooms at home is not only a rewarding hobby but also a sustainable way to access fresh, organic food. Imagine adding earthy shiitakes to your stir-fries, creamy oyster mushrooms to your pasta dishes, or hearty portobellos to your grilled creations – all grown with your own two hands! Plus, it’s a fantastic way to reduce your carbon footprint and connect with nature, even in an urban environment. This DIY project is perfect for beginners and experienced gardeners alike, offering a fun and educational experience for the whole family. So, let’s dive in and discover the secrets to successful home mushroom cultivation!
Pilze zu Hause züchten: Dein umfassender DIY-Leitfaden
Hallo Pilzliebhaber! Hast du dich jemals gefragt, wie es wäre, deine eigenen köstlichen Pilze zu Hause anzubauen? Es ist einfacher als du denkst und unglaublich befriedigend! In diesem umfassenden Leitfaden zeige ich dir Schritt für Schritt, wie du das machst. Keine Angst, es ist ein spannendes Abenteuer!
Was du brauchst: Die Zutaten für deinen Pilzgarten
Bevor wir loslegen, lass uns sicherstellen, dass wir alles haben, was wir brauchen. Hier ist eine Liste der wichtigsten Materialien:
* Pilzbrut (Spawn): Das ist das “Saatgut” für deine Pilze. Du kannst sie online oder in Gartencentern kaufen. Beliebte Sorten für Anfänger sind Austernpilze (Pleurotus ostreatus) und Shiitake (Lentinula edodes).
* Substrat: Das ist das Material, auf dem deine Pilze wachsen werden. Geeignete Substrate sind Stroh, Holzspäne, Kaffeesatz oder Sägemehl. Die Wahl des Substrats hängt von der Pilzsorte ab.
* Behälter: Du brauchst einen Behälter, um dein Substrat und die Brut zu mischen. Das kann ein Eimer, eine Plastikwanne oder sogar ein spezieller Pilzzuchtbeutel sein.
* Sprühflasche: Um die Feuchtigkeit aufrechtzuerhalten.
* Alkohol (70% Isopropylalkohol): Für die Desinfektion.
* Handschuhe: Um Kontamination zu vermeiden.
* Optional: Plastikfolie oder ein Gewächshaus, um die Luftfeuchtigkeit zu erhöhen.
* Optional: Thermometer und Hygrometer, um Temperatur und Luftfeuchtigkeit zu überwachen.
Schritt-für-Schritt-Anleitung: Dein Pilzzucht-Abenteuer beginnt!
Jetzt, wo wir alles haben, können wir loslegen! Folge diesen Schritten sorgfältig, um die besten Ergebnisse zu erzielen.
1. Substrat vorbereiten: Die Grundlage für dein Pilzwachstum
Die Vorbereitung des Substrats ist entscheidend für den Erfolg deiner Pilzzucht. Je nach gewähltem Substrat sind unterschiedliche Schritte erforderlich.
* Stroh:
1. Schneide das Stroh in kurze Stücke (ca. 5-10 cm).
2. Pasteurisiere das Stroh, indem du es für 1-2 Stunden in heißem Wasser (ca. 70-80°C) einweichst. Dies tötet unerwünschte Mikroorganismen ab.
3. Lasse das Stroh abkühlen und überschüssiges Wasser abtropfen. Es sollte feucht, aber nicht tropfnass sein.
* Holzspäne/Sägemehl:
1. Verwende Hartholzspäne oder Sägemehl (kein behandeltes Holz!).
2. Mische das Holzmaterial mit Wasser, bis es feucht ist, aber nicht tropft. Ein guter Test ist, wenn du es in der Hand zusammendrückst und nur wenige Tropfen Wasser austreten.
3. Sterilisiere das Holzmaterial, indem du es in einem Autoklaven oder Dampfkochtopf für 90-120 Minuten bei 15 PSI (Pfund pro Quadratzoll) sterilisierst. Wenn du keinen Autoklaven hast, kannst du es auch in einem Ofen bei 120°C für 2-3 Stunden backen.
4. Lasse das Holzmaterial vollständig abkühlen, bevor du es verwendest.
* Kaffeesatz:
1. Verwende frischen, gebrauchten Kaffeesatz.
2. Kaffeesatz ist bereits pasteurisiert, da er beim Brühen erhitzt wird. Du kannst ihn direkt verwenden, aber es ist ratsam, ihn kurz in der Mikrowelle zu erhitzen, um sicherzustellen, dass keine unerwünschten Mikroorganismen vorhanden sind.
3. Lasse den Kaffeesatz abkühlen, bevor du ihn verwendest.
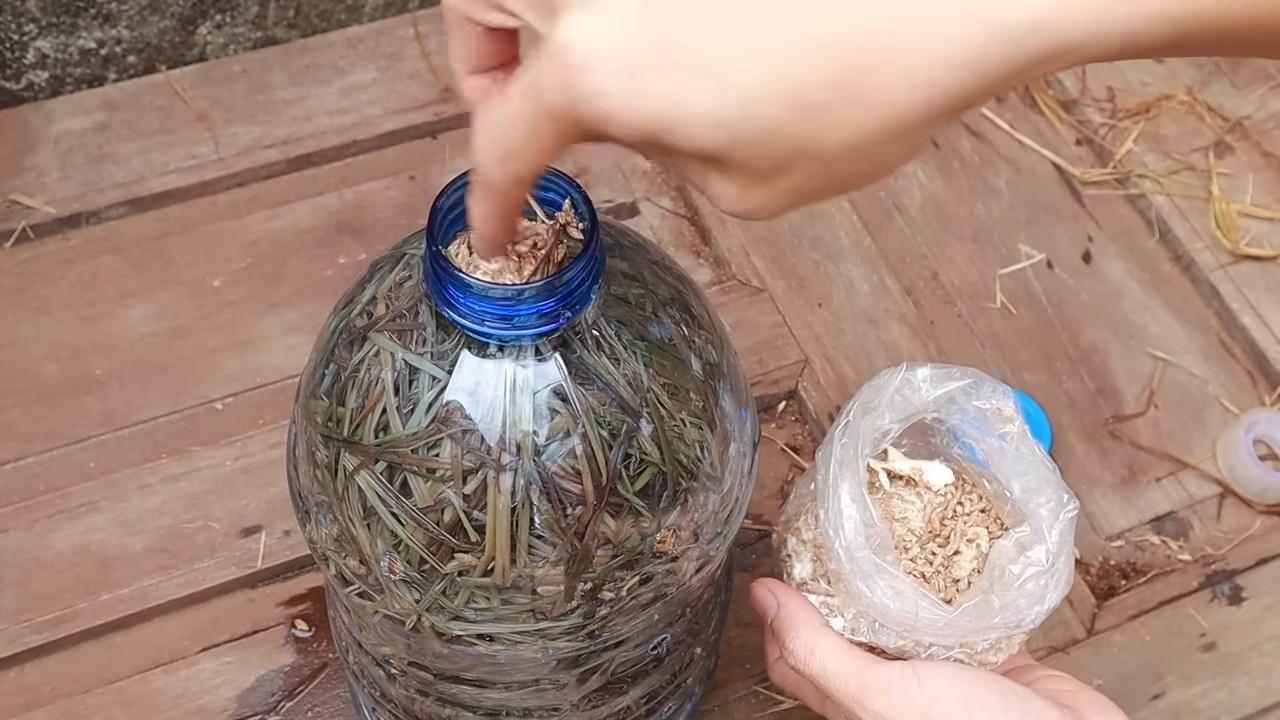
2. Impfen: Die Pilzbrut einbringen
Das Impfen ist der Prozess, bei dem du die Pilzbrut in das vorbereitete Substrat einbringst.
1. Reinige deine Hände gründlich und trage Handschuhe.
2. Desinfiziere die Arbeitsfläche und den Behälter mit Alkohol.
3. Breche die Pilzbrut vorsichtig auf, um sie zu lockern.
4. Mische die Brut gleichmäßig mit dem Substrat. Ein gutes Verhältnis ist etwa 1:10 (Brut:Substrat). Das bedeutet, für 1 kg Substrat benötigst du 100 g Brut.
5. Fülle das geimpfte Substrat in deinen Behälter. Drücke es leicht an, aber nicht zu fest.
3. Inkubation: Das Myzel wächst
Die Inkubation ist die Phase, in der das Myzel (das Wurzelgeflecht der Pilze) das Substrat besiedelt.
1. Platziere den Behälter an einem dunklen, warmen Ort. Die ideale Temperatur hängt von der Pilzsorte ab, liegt aber in der Regel zwischen 20-24°C.
2. Halte die Luftfeuchtigkeit hoch. Du kannst dies erreichen, indem du den Behälter mit Plastikfolie abdeckst oder ihn in einem Gewächshaus platzierst. Besprühe das Substrat regelmäßig mit Wasser, um es feucht zu halten.
3. Überprüfe den Behälter regelmäßig auf Kontaminationen. Wenn du Schimmel oder andere unerwünschte Organismen siehst, entferne die betroffenen Stellen sofort.
4. Nach einigen Wochen (die genaue Zeit hängt von der Pilzsorte und den Bedingungen ab) sollte das Myzel das gesamte Substrat besiedelt haben. Du erkennst dies an einer weißen, flaumigen Schicht, die das Substrat bedeckt.
4. Fruchtung: Die Pilze erscheinen
Die Fruchtung ist die Phase, in der die Pilze tatsächlich wachsen.
1. Sobald das Substrat vollständig vom Myzel besiedelt ist, ist es Zeit, die Bedingungen für die Fruchtung zu ändern.
2. Bringe den Behälter an einen helleren Ort, aber vermeide direktes Sonnenlicht.
3. Senke die Temperatur leicht ab (etwa 16-21°C).
4. Erhöhe die Luftfeuchtigkeit weiter. Besprühe das Substrat regelmäßig mit Wasser und sorge für eine gute Belüftung.
5. Nach einigen Tagen oder Wochen sollten sich kleine Pilzköpfe bilden.
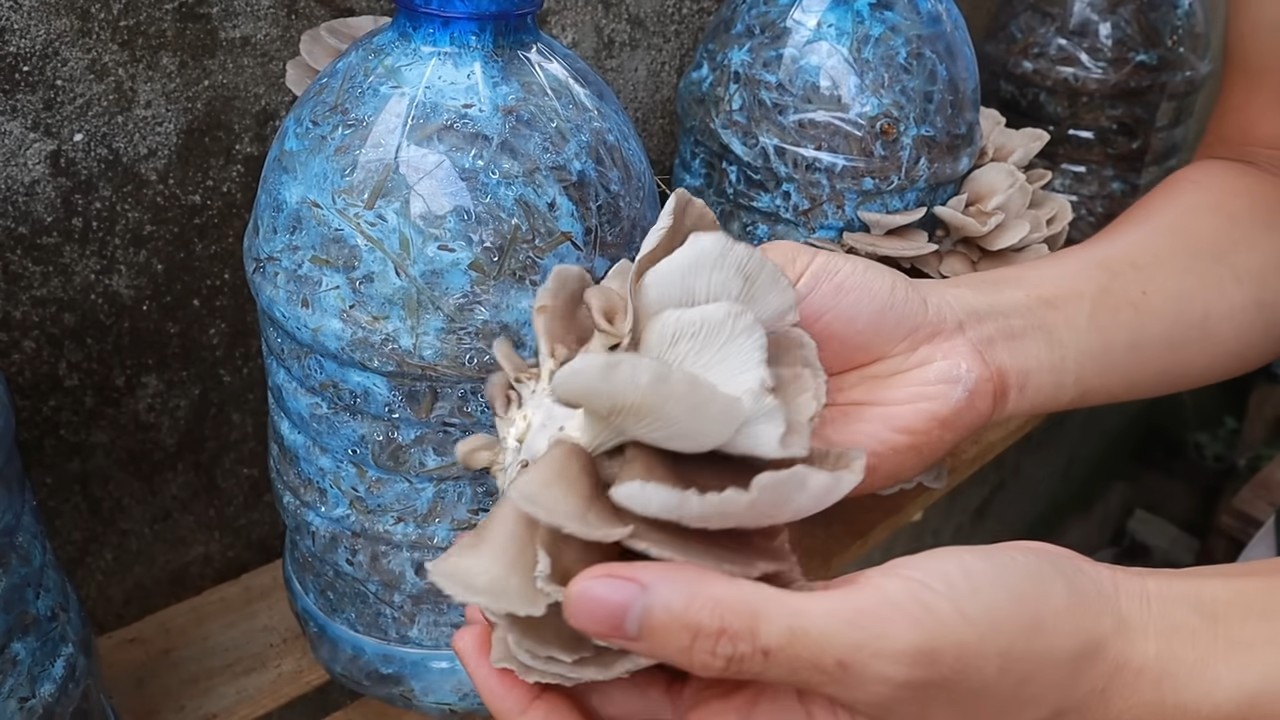
6. Ernte die Pilze, wenn sie reif sind. Der richtige Zeitpunkt für die Ernte hängt von der Pilzsorte ab. Austernpilze sind beispielsweise erntereif, wenn sich die Kappen vollständig entfaltet haben, aber noch nicht zu welken beginnen.
7. Schneide die Pilze am Stielansatz ab oder drehe sie vorsichtig heraus.
5. Nach der Ernte: Die nächste Runde
Nach der Ernte kannst du in der Regel noch weitere Ernten erzielen.
1. Entferne alle Pilzreste vom Substrat.
2. Besprühe das Substrat erneut mit Wasser und sorge für die richtigen Bedingungen für die Fruchtung.
3. Wiederhole den Vorgang, bis das Substrat erschöpft ist.
Häufige Probleme und Lösungen: Was tun, wenn etwas schief geht?
Auch beim Pilzzüchten können Probleme auftreten. Hier sind einige häufige Probleme und wie du sie beheben kannst:
* Kontamination: Schimmel oder andere unerwünschte Organismen können das Wachstum der Pilze behindern. Um Kontaminationen zu vermeiden, ist es wichtig, sauber zu arbeiten und das Substrat richtig zu pasteurisieren oder zu sterilisieren. Wenn du Kontaminationen entdeckst, entferne die betroffenen Stellen sofort.
* Zu wenig Feuchtigkeit: Wenn das Substrat zu trocken ist, können die Pilze nicht richtig wachsen. Besprühe das Substrat regelmäßig mit Wasser, um es feucht zu halten.
* Zu wenig Belüftung: Pilze brauchen Sauerstoff, um zu wachsen. Sorge für eine gute Belüftung, indem du den Behälter regelmäßig öffnest oder einen Ventilator verwendest.
* Falsche Temperatur: Die Temperatur spielt eine wichtige Rolle beim Pilzwachstum. Stelle sicher, dass du die richtige Temperatur für die gewählte Pilzsorte einhältst.
Zusätzliche Tipps und Tricks: So wirst du zum Pilzprofi
Hier sind noch ein paar zusätzliche Tipps, die dir helfen, deine Pilzzucht
Conclusion
So, there you have it! Growing mushrooms at home, once perceived as a complex and daunting task, is now within your reach thanks to this simple, effective DIY trick. We’ve demystified the process and provided you with a clear, step-by-step guide to cultivate your own delicious and nutritious fungi.
Why is this a must-try? Because it offers a multitude of benefits. First and foremost, you gain access to incredibly fresh mushrooms, bursting with flavor and nutrients that often diminish in store-bought varieties due to transportation and storage. Imagine the satisfaction of harvesting your own oyster mushrooms, shiitakes, or even the elusive lion’s mane, knowing exactly where they came from and how they were grown.
Beyond freshness, this DIY approach is incredibly cost-effective. By utilizing readily available materials and a bit of patience, you can significantly reduce your grocery bill and enjoy a continuous supply of mushrooms. Think of all the delicious meals you can create – from savory mushroom soups and creamy pasta sauces to hearty stir-fries and gourmet pizzas.
But the advantages extend beyond the culinary realm. Growing mushrooms at home is also an incredibly rewarding and educational experience. It’s a fascinating glimpse into the world of mycology, allowing you to observe the intricate life cycle of these remarkable organisms firsthand. It’s a fantastic project for families, offering a hands-on learning opportunity for children to connect with nature and understand the origins of their food.
Variations and Suggestions:
Don’t be afraid to experiment! Once you’ve mastered the basic technique, you can explore different types of mushrooms. Oyster mushrooms are a great starting point due to their relatively fast growth and adaptability. Shiitakes offer a more complex flavor profile and are well-suited for indoor cultivation. Lion’s mane, with its unique texture and cognitive benefits, is a more challenging but ultimately rewarding option.
Consider experimenting with different substrates as well. While straw and coffee grounds are excellent choices, you can also explore using hardwood sawdust, cardboard, or even agricultural waste products. Each substrate will impart a slightly different flavor and texture to your mushrooms.
To further optimize your growing environment, you can invest in a humidity controller and a small fan to ensure proper air circulation. These additions can significantly improve your yields and reduce the risk of contamination.
A Final Word:
We wholeheartedly encourage you to try this DIY trick for growing mushrooms at home. It’s a fun, rewarding, and sustainable way to enjoy fresh, delicious fungi. Don’t be intimidated by the process – with a little patience and attention to detail, you’ll be harvesting your own mushrooms in no time.
We’re eager to hear about your experiences! Share your successes, challenges, and variations in the comments below. Let’s build a community of home mushroom growers and learn from each other. Happy growing!
Frequently Asked Questions (FAQ)
What are the easiest types of mushrooms to grow at home using this DIY method?
Oyster mushrooms are generally considered the easiest for beginners. They are fast-growing, relatively forgiving of environmental fluctuations, and can thrive on a variety of substrates like straw, coffee grounds, and even cardboard. Shiitake mushrooms are another good option, though they require a bit more patience as they have a longer incubation period. Avoid more demanding varieties like morels or truffles when you’re just starting out.
What kind of substrate should I use for growing mushrooms at home?
The best substrate depends on the type of mushroom you’re growing. For oyster mushrooms, pasteurized straw or spent coffee grounds are excellent choices. Shiitakes prefer hardwood sawdust or logs. Make sure the substrate is properly pasteurized or sterilized to eliminate competing organisms that could hinder mushroom growth. Pasteurization can be achieved by soaking the substrate in hot water (around 160-180°F) for an hour or two. Sterilization requires higher temperatures and pressure, typically achieved using an autoclave or pressure cooker.
How do I maintain the proper humidity for my mushroom grow?
Humidity is crucial for mushroom development. Aim for a humidity level of 80-90%. You can achieve this by misting the growing area regularly with a spray bottle. A humidity tent or a plastic bag with ventilation holes can also help retain moisture. Consider using a humidity controller for more precise control. Avoid over-misting, as this can lead to bacterial contamination.
How much light do mushrooms need to grow?
Mushrooms don’t require direct sunlight. In fact, too much direct sunlight can be harmful. They thrive in low to moderate light conditions. A dimly lit room or a shaded area is ideal. The light primarily serves as a trigger for fruiting, rather than being essential for photosynthesis (mushrooms are fungi, not plants).
How long does it take to grow mushrooms at home?
The time it takes to grow mushrooms varies depending on the species and the growing conditions. Oyster mushrooms can typically be harvested within a few weeks of inoculation. Shiitakes may take several months to fruit. Patience is key! Monitor your grow regularly and adjust the environment as needed.
What are the signs of contamination in my mushroom grow?
Contamination is a common challenge in mushroom cultivation. Look out for signs like green, black, or orange mold growing on the substrate. A sour or unpleasant odor can also indicate contamination. If you spot contamination, it’s best to remove the affected area immediately to prevent it from spreading. In severe cases, you may need to discard the entire grow. Maintaining a clean growing environment and using sterile techniques can help minimize the risk of contamination.
Can I reuse the substrate after harvesting mushrooms?
Yes, you can often get multiple flushes (harvests) from the same substrate. After harvesting, allow the substrate to rest for a week or two, then rehydrate it by soaking it in water. This will encourage another flush of mushrooms. However, the subsequent flushes may be smaller than the first. Eventually, the substrate will become depleted of nutrients and will no longer produce mushrooms. At that point, you can compost it and use it to enrich your garden soil.
What are the nutritional benefits of growing mushrooms at home?
Homegrown mushrooms are packed with nutrients. They are a good source of protein, fiber, vitamins (especially B vitamins and vitamin D), and minerals (like selenium and potassium). They also contain antioxidants and compounds that may have immune-boosting and anti-inflammatory properties. Growing your own mushrooms ensures that you’re getting the freshest and most nutritious product possible.
Where can I find mushroom spawn or cultures?
Mushroom spawn or cultures can be purchased from reputable online suppliers or local mushroom farms. Make sure to choose a supplier that offers high-quality spawn and provides clear instructions for cultivation. Look for spawn that is specifically suited for home growing and the type of mushroom you want to cultivate.
Is it safe to eat mushrooms that I grow at home?
Yes, it is generally safe to eat mushrooms that you grow at home, provided that you have correctly identified the species and followed proper cultivation techniques. It’s crucial to only consume mushrooms that you are 100% certain are edible. If you are unsure about the identification of a mushroom, it’s best to err on the side of caution and discard it. Always cook mushrooms thoroughly before eating them.
Leave a Comment