
Grow Lettuce at Home – imagine stepping outside your back door and snipping fresh, crisp lettuce for your salad, sandwich, or even a quick snack. No more trips to the grocery store for wilted, overpriced greens! For centuries, cultivating your own food has been a cornerstone of self-sufficiency and a connection to nature. From ancient Roman kitchen gardens to the victory gardens of wartime, growing your own produce has always been a way to ensure fresh, healthy food is available.
But let’s be honest, the idea of starting a full-blown farm can be daunting. That’s where this DIY guide comes in! I’m going to share some simple, effective tricks and hacks that will have you harvesting your own delicious lettuce in no time, even if you have limited space or gardening experience.
Why do you need these tricks? Because store-bought lettuce often lacks flavor and nutrients, and let’s not forget the environmental impact of transportation and packaging. Plus, there’s something incredibly satisfying about nurturing a plant from seed to table. So, let’s dive in and discover how easy it is to grow lettuce at home and enjoy the freshest, most flavorful salads you’ve ever tasted!
Grow Your Own Ginger: A Simple DIY Guide
Hey there, fellow plant enthusiasts! Ever thought about growing your own ginger? It’s surprisingly easy, rewarding, and gives you access to fresh, flavorful ginger whenever you need it. Plus, it’s a fantastic way to reduce your grocery bill and add a touch of green to your home. Let’s dive into how you can cultivate your own ginger patch indoors or outdoors!
Choosing Your Ginger Rhizome
Before we get our hands dirty, we need to select the right ginger rhizome. This is the underground stem that we’ll be planting.
* Look for plump, healthy rhizomes: Choose ginger roots that are firm, not shriveled or dried out. You want them to look fresh and vibrant.
* Multiple “eyes” are key: The “eyes” are small buds or points on the rhizome where new shoots will emerge. The more eyes, the better your chances of successful growth.
* Organic is best: Opt for organic ginger if possible. Non-organic ginger might be treated with growth inhibitors to prevent sprouting during storage.
* Soak it if needed: If your ginger looks a little dry, soak it in water overnight before planting. This will rehydrate it and encourage sprouting.
Preparing for Planting
Now that we have our ginger, let’s get everything else ready.
* Choosing the right pot: Ginger needs room to spread horizontally. Select a wide, shallow pot (at least 12 inches wide and 6-8 inches deep) with drainage holes.
* Soil matters: Use a well-draining potting mix. A mix of potting soil, compost, and perlite or vermiculite works wonders. This ensures good drainage and provides essential nutrients.
* Location, location, location: Ginger thrives in warm, humid environments with partial shade. An east-facing window is ideal if you’re growing indoors. Outdoors, choose a spot that gets morning sun and afternoon shade.
Planting Your Ginger
Alright, time to get planting!
1. Fill the pot: Fill your chosen pot with the well-draining potting mix, leaving about an inch of space at the top.
2. Position the rhizome: Place the ginger rhizome horizontally on top of the soil, with the “eyes” facing upwards.
3. Cover lightly: Cover the rhizome with about 1-2 inches of soil. Gently pat the soil down.
4. Water thoroughly: Water the soil well until water drains out of the bottom of the pot. This helps settle the soil and provides initial moisture.
Caring for Your Ginger Plant
Now comes the part where we nurture our little ginger plant.
* Watering: Keep the soil consistently moist, but not soggy. Water when the top inch of soil feels dry to the touch. Overwatering can lead to root rot, so be careful.
* Humidity: Ginger loves humidity. If you live in a dry climate, mist your plant regularly or place it on a pebble tray filled with water.
* Temperature: Maintain a temperature between 65-80°F (18-27°C). Avoid exposing your plant to cold drafts or extreme temperature fluctuations.
* Fertilizing: Feed your ginger plant every 2-3 weeks with a balanced liquid fertilizer diluted to half strength. This provides essential nutrients for healthy growth.
* Pest control: Keep an eye out for pests like aphids or spider mites. If you spot any, treat them with insecticidal soap or neem oil.
Harvesting Your Ginger
The best part! Harvesting your own ginger.
* When to harvest: You can start harvesting ginger about 8-10 months after planting. The leaves will start to turn yellow and die back, indicating that the rhizome is mature.
* Gentle excavation: Carefully dig around the plant to expose the rhizome. You can harvest the entire rhizome or just a portion of it, leaving the rest to continue growing.
* Wash and enjoy: Wash the harvested ginger rhizome thoroughly and enjoy its fresh, spicy flavor!
Troubleshooting
Sometimes, things don’t go exactly as planned. Here are some common issues and how to address them.
* No sprouting: If your ginger isn’t sprouting, make sure it’s getting enough warmth and moisture. You can also try gently warming the soil with a heat mat.
* Yellowing leaves: Yellowing leaves can indicate overwatering, underwatering, or nutrient deficiency. Adjust your watering schedule and fertilize your plant if needed.
* Root rot: Root rot is caused by overwatering. If you suspect root rot, repot your plant in fresh, well-draining soil and reduce watering.
* Pests: As mentioned earlier, keep an eye out for pests and treat them promptly with insecticidal soap or neem oil.
Propagating Ginger
Want more ginger plants? It’s easy to propagate!
* Division: When you harvest your ginger, you can divide the rhizome into smaller pieces, each with at least one “eye.”
* Replant: Plant each piece in its own pot, following the same planting instructions as before.
* Enjoy your new plants: With proper care, your new ginger plants will thrive and provide you with even more fresh ginger.
Extra Tips for Success
Here are a few extra tips to help you succeed in growing your own ginger.
* Use filtered water: Tap water can contain chlorine and other chemicals that can harm your plants. Use filtered water or let tap water sit out for 24 hours to allow the chlorine to evaporate.
* Rotate your plant: Rotate your plant regularly to ensure that all sides get equal exposure to sunlight. This will help prevent it from leaning towards the light source.
* Be patient: Ginger can take a while to sprout and grow. Don’t get discouraged if you don’t see results immediately. Just keep providing proper care, and your patience will be rewarded.
* Experiment with varieties: There are different varieties of ginger, each with its own unique flavor and characteristics. Experiment with different varieties to find your favorite.
* Ginger tea: Use your fresh ginger to make delicious and healthy ginger tea. Simply grate a small piece of ginger into hot water and add honey or lemon to taste.
* Ginger in cooking: Fresh ginger adds a wonderful flavor to a variety of dishes, from stir-fries to soups to desserts. Get creative and experiment with using your homegrown ginger in your favorite recipes.
* Ginger benefits: Ginger has many health benefits, including anti-inflammatory and antioxidant properties. Growing your own ginger is a great way to access these benefits.
Understanding Ginger Growth Cycle
Knowing the growth cycle of ginger can help you better understand its needs and provide optimal care.
* Dormancy: Ginger rhizomes typically go dormant during the winter months. Growth slows down or stops completely.
* Sprouting: In the spring, the rhizomes begin to sprout and send up new shoots.
* Vegetative growth: During the summer, the plant focuses on vegetative growth, producing leaves and stems.
* Rhizome development: As the plant matures, the rhizomes underground begin to thicken and develop.
* Harvest: In the fall, the leaves begin to die back, indicating that the rhizomes are ready to harvest.
Adapting to Your Climate
The success of growing ginger can depend on your local climate. Here’s how to adapt:
* Cool Climates: If you live in a cooler climate, growing ginger indoors is your best bet. You can control the temperature and humidity more easily. Start the ginger indoors in early spring and keep it in a warm, sunny location.
* Warm Climates: In warmer climates, you can grow ginger outdoors in a partially shaded area. Make sure the soil is well-draining and protect the plant from extreme heat.
* Humidity Control: Regardless of your climate, maintaining adequate humidity is crucial. Use a humidifier, mist the plant regularly, or place it on a pebble tray.
* Seasonal Adjustments: Adjust your watering and fertilizing schedule according to the season. Reduce watering during the winter dormancy period and increase it during the active growing season.
Ginger Varieties to Consider
While common ginger is readily available, exploring different varieties can enhance your gardening experience.
* Common Ginger (Zingiber officinale): This is the most widely available variety, known for its spicy and aromatic flavor.
* Galangal (Alpinia galanga): Also known as Thai ginger, galangal has a citrusy and piney flavor. It’s often used in Southeast Asian cuisine.
* Turmeric (Curcuma longa): Although primarily known for its vibrant yellow color and medicinal properties, turmeric is related to ginger and can be grown similarly.
* Ornamental Ginger: These varieties are grown for their beautiful flowers and foliage rather than their rhizomes. They can add a tropical touch to

Conclusion
So, there you have it! Growing lettuce at home is not only achievable, but it’s also incredibly rewarding. Imagine stepping out into your garden or even just onto your balcony and harvesting fresh, crisp lettuce leaves for your salad, sandwich, or wrap. No more trips to the grocery store for wilted, overpriced greens. This DIY trick empowers you to control the quality, variety, and freshness of your lettuce, all while saving money and reducing your environmental impact.
This isn’t just about convenience; it’s about connecting with your food source and experiencing the satisfaction of nurturing something from seed to table. The vibrant green hues of your homegrown lettuce will brighten your meals and your day. Plus, you’ll know exactly what went into growing it – no harmful pesticides or herbicides, just pure, natural goodness.
Why is this a must-try? Because it’s simple, cost-effective, and delivers unparalleled freshness. You’ll be amazed at how easy it is to cultivate a thriving lettuce patch, even in limited spaces. The taste difference between store-bought and homegrown lettuce is undeniable. The crispness, the subtle sweetness, the vibrant flavor – it’s a culinary experience you won’t want to miss.
Ready to take your lettuce growing to the next level? Consider these variations:
* Succession Planting: Plant new lettuce seeds every two weeks to ensure a continuous harvest throughout the growing season. This way, you’ll always have fresh lettuce on hand.
* Variety is the Spice of Life: Experiment with different lettuce varieties, such as romaine, butterhead, loose-leaf, and crisphead. Each variety offers a unique flavor and texture profile.
* Container Gardening: If you’re short on space, grow lettuce in containers on your patio or balcony. Choose a well-draining potting mix and ensure the containers receive adequate sunlight.
* Vertical Gardening: Maximize your space by growing lettuce in vertical planters or hanging baskets. This is a great option for small apartments or balconies.
* Companion Planting: Plant lettuce alongside other vegetables, such as carrots, radishes, and cucumbers, to deter pests and improve growth.
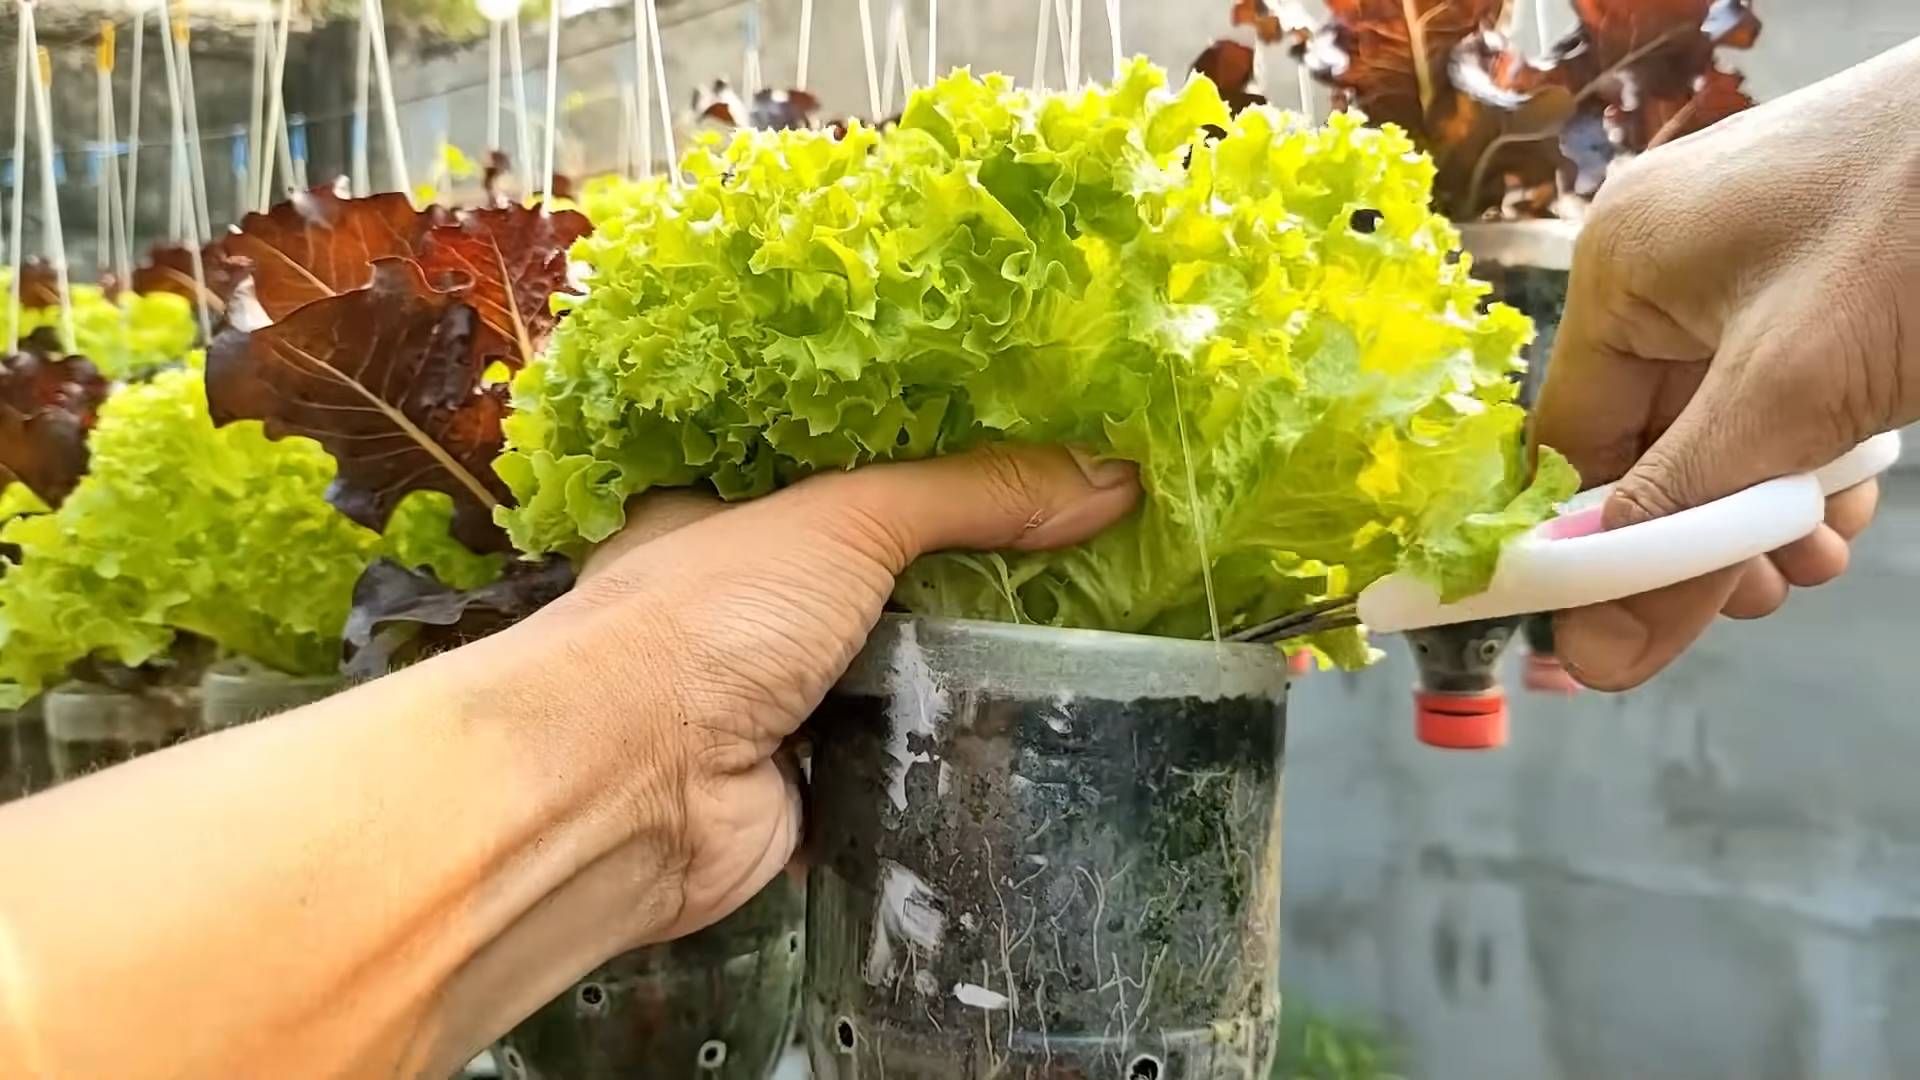
* Hydroponics: For a more advanced approach, explore hydroponic lettuce growing. This method involves growing lettuce in nutrient-rich water without soil.
Don’t be intimidated if you’re a beginner. Start small, be patient, and learn from your experiences. Even if you encounter challenges along the way, the rewards of growing your own lettuce are well worth the effort.
We wholeheartedly encourage you to try this DIY trick and experience the joy of growing your own lettuce at home. It’s a simple yet profound way to connect with nature, improve your diet, and enhance your overall well-being.
Once you’ve given it a try, we’d love to hear about your experience! Share your photos, tips, and stories in the comments below. Let’s build a community of home gardeners and inspire others to embrace the joys of growing their own food. What varieties did you try? What challenges did you face? What successes did you celebrate? Your insights can help others on their lettuce-growing journey. So, get your hands dirty, plant some seeds, and watch your lettuce thrive! Happy gardening!
FAQ
Frequently Asked Questions About Growing Lettuce at Home
Q: What is the best time of year to grow lettuce?
A: Lettuce is a cool-season crop, meaning it thrives in temperatures between 60°F and 70°F (15°C and 21°C). The best time to grow lettuce is in the spring and fall. In warmer climates, you can grow lettuce during the winter months. Avoid growing lettuce during the hottest part of the summer, as it can bolt (go to seed) and become bitter.
Q: What kind of soil does lettuce need?
A: Lettuce prefers well-drained soil that is rich in organic matter. The ideal soil pH is between 6.0 and 7.0. Before planting, amend your soil with compost or other organic matter to improve its fertility and drainage. If you’re growing lettuce in containers, use a high-quality potting mix.
Q: How much sunlight does lettuce need?
A: Lettuce needs at least six hours of sunlight per day. However, in warmer climates, lettuce can benefit from some afternoon shade to prevent bolting. If you’re growing lettuce indoors, use grow lights to provide adequate light.
Q: How often should I water lettuce?
A: Lettuce needs consistent moisture to thrive. Water your lettuce regularly, especially during hot, dry weather. Aim to keep the soil consistently moist but not waterlogged. Check the soil moisture by sticking your finger into the soil. If the top inch of soil is dry, it’s time to water.
Q: How do I prevent lettuce from bolting?
A: Bolting is when lettuce goes to seed, which can make the leaves bitter. To prevent bolting, choose bolt-resistant lettuce varieties, provide afternoon shade, and water regularly. Harvest your lettuce leaves frequently to encourage continued growth and prevent the plant from focusing on seed production.
Q: What are some common lettuce pests and diseases?
A: Common lettuce pests include aphids, slugs, and snails. Common lettuce diseases include downy mildew and powdery mildew. To prevent pests and diseases, practice good garden hygiene, such as removing weeds and debris. You can also use organic pest control methods, such as insecticidal soap or neem oil. Ensure good air circulation around your plants to minimize fungal diseases.
Q: How do I harvest lettuce?
A: You can harvest lettuce leaves as soon as they are large enough to eat. There are two main ways to harvest lettuce:
* Cut-and-Come-Again: Harvest the outer leaves of the lettuce plant, leaving the inner leaves to continue growing. This method allows you to harvest lettuce multiple times from the same plant.
* Head Harvest: Harvest the entire head of lettuce at once. This method is best for head lettuce varieties, such as romaine and crisphead.
To harvest lettuce, use a sharp knife or scissors to cut the leaves or head at the base of the plant.
Q: How do I store lettuce?
A: To store lettuce, wash the leaves thoroughly and dry them with a salad spinner or paper towels. Store the lettuce in a plastic bag or container in the refrigerator. Lettuce will stay fresh for up to a week when stored properly.
Q: Can I grow lettuce indoors?
A: Yes, you can grow lettuce indoors. Choose a sunny windowsill or use grow lights to provide adequate light. Use a well-draining potting mix and water regularly. Consider using a self-watering container to make watering easier.
Q: What are some good companion plants for lettuce?
A: Good companion plants for lettuce include carrots, radishes, cucumbers, and onions. These plants can help deter pests and improve lettuce growth. Avoid planting lettuce near fennel, as it can inhibit lettuce growth.
Q: Is it possible to grow lettuce from kitchen scraps?
A: While you can’t regrow an entire head of lettuce from a single leaf, you can try regrowing lettuce from the base of a romaine lettuce heart. Place the base in a shallow dish of water, and change the water every day or two. After a few days, you should see new roots and leaves sprouting. Once the roots are well-developed, you can transplant the lettuce into soil. However, the resulting lettuce plant may not be as robust as one grown from seed. This is more of a fun experiment than a reliable method for producing a large harvest.

Leave a Comment