
Grow Kale from Seed and unlock a world of fresh, nutritious greens right in your backyard! Forget those wilted, overpriced bunches at the grocery store. Imagine stepping outside and harvesting vibrant, leafy kale whenever you need it. This isn’t just about saving money; it’s about connecting with nature and enjoying the unparalleled flavor of homegrown produce.
Kale, a nutritional powerhouse, has a rich history dating back to ancient Greece and Rome, where it was a staple food. Over centuries, it has spread across the globe, becoming a beloved ingredient in countless cuisines. But did you know that growing your own kale is surprisingly easy, even if you don’t have a sprawling garden?
In today’s fast-paced world, knowing how to grow kale from seed offers a sense of self-sufficiency and control over what you eat. Plus, it’s a fantastic way to reduce your carbon footprint and embrace a more sustainable lifestyle. This DIY guide will walk you through every step, from selecting the right seeds to harvesting your first bountiful crop. So, grab your gardening gloves, and let’s get started! I’m excited to share my favorite tips and tricks to help you succeed, even if you’re a complete beginner.
Growing Kale from Seed: A Beginner’s Guide
Hey there, fellow gardening enthusiasts! I’m so excited to share my experience with growing kale from seed. It’s surprisingly easy, incredibly rewarding, and you’ll have a constant supply of this superfood right in your backyard (or even on your balcony!). This guide will walk you through every step, from choosing the right seeds to harvesting your first batch of delicious kale.
Choosing Your Kale Variety
Before we dive in, let’s talk kale varieties. There’s more to kale than just the curly stuff you see at the grocery store! Here are a few popular options:
* Curly Kale (e.g., ‘Dwarf Blue Curled Vates’): This is your classic kale, with tightly curled, blue-green leaves. It’s cold-hardy and great for soups and salads.
* Lacinato Kale (also known as Dinosaur Kale or Tuscan Kale): This variety has long, narrow, dark green leaves with a slightly bumpy texture. It’s a bit milder in flavor than curly kale and holds up well when cooked.
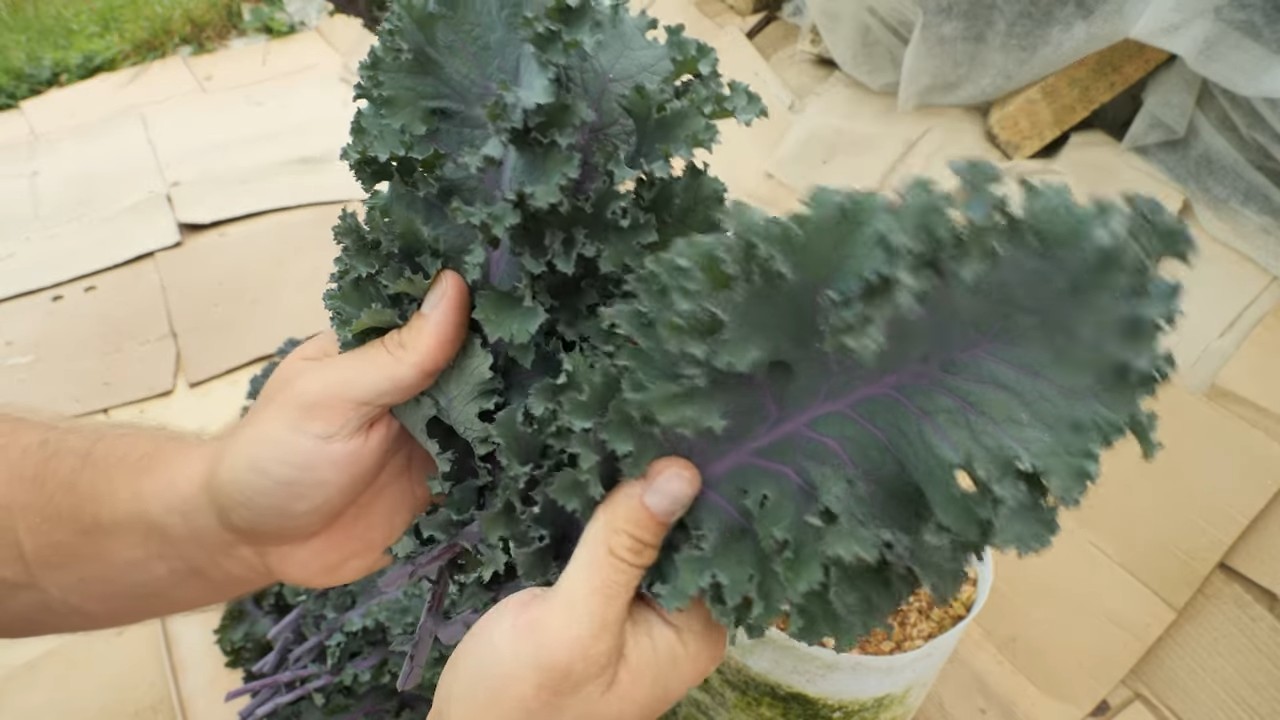
* Red Russian Kale: This kale has flat, fringed leaves with reddish-purple stems. It’s tender and sweet, especially when young, and adds a beautiful pop of color to your garden.
* Redbor Kale: Known for its vibrant purple, deeply frilled leaves, Redbor is as ornamental as it is edible. It’s a bit tougher than other varieties, but its striking appearance makes it a garden favorite.
I personally love growing a mix of varieties to add some visual interest and flavor diversity to my meals.
When to Plant Kale Seeds
Timing is key when it comes to growing kale. Kale is a cool-season crop, meaning it thrives in cooler temperatures.
* For a Spring Harvest: Start seeds indoors 6-8 weeks before the last expected frost. You can also direct sow seeds outdoors 2-4 weeks before the last frost, but be prepared to protect them from unexpected cold snaps.
* For a Fall/Winter Harvest: Direct sow seeds outdoors 6-8 weeks before the first expected frost. This will give your kale plants plenty of time to mature before the cold weather sets in.
I usually start my kale seeds indoors for a spring harvest to get a head start, and then direct sow for a fall harvest.
Materials You’ll Need
Here’s a list of everything you’ll need to get started:
* Kale seeds (of your chosen variety)
* Seed starting trays or small pots
* Seed starting mix (or a well-draining potting mix)
* Watering can or spray bottle
* Grow lights (optional, but recommended for indoor starting)
* Fertilizer (organic is best)
* Gardening gloves
* Trowel or small shovel
* Row covers (optional, for pest protection)
Starting Kale Seeds Indoors (Optional)
Starting seeds indoors gives you a head start on the growing season, especially if you live in an area with a short growing season.
1. Prepare Your Seed Starting Trays: Fill your seed starting trays or small pots with seed starting mix. Gently press down on the soil to remove any air pockets.
2. Sow the Seeds: Make a small indentation (about 1/4 inch deep) in the soil of each cell or pot. Place 2-3 kale seeds in each indentation. This increases the chances of at least one seed germinating.
3. Cover the Seeds: Gently cover the seeds with a thin layer of seed starting mix.
4. Water Thoroughly: Water the soil gently using a watering can or spray bottle. Make sure the soil is moist but not waterlogged.
5. Provide Light: Place the seed starting trays under grow lights or in a sunny window. If using grow lights, keep them about 2-4 inches above the seedlings.
6. Maintain Moisture: Keep the soil consistently moist by watering as needed. Check the soil moisture daily and water when the top inch feels dry to the touch.
7. Thin Seedlings (If Necessary): Once the seedlings have developed their first true leaves (the second set of leaves), thin them out by snipping off the weaker seedlings at the soil line. Leave only one strong seedling per cell or pot.
8. Harden Off Seedlings: About a week before you plan to transplant the seedlings outdoors, start hardening them off. This process gradually acclimates the seedlings to outdoor conditions. Start by placing the seedlings outdoors in a sheltered location for a few hours each day, gradually increasing the amount of time they spend outdoors. Protect them from direct sunlight and strong winds.
Direct Sowing Kale Seeds Outdoors
Direct sowing is a simpler method, but it’s important to make sure the soil is warm enough and the weather is favorable.
1. Prepare the Soil: Choose a sunny location in your garden with well-draining soil. Kale prefers soil that is rich in organic matter. Amend the soil with compost or well-rotted manure before planting.
2. Sow the Seeds: Sow the seeds about 1/2 inch deep and 1-2 inches apart in rows. Space the rows about 18-24 inches apart.
3. Water Thoroughly: Water the soil gently but thoroughly after sowing.
4. Keep the Soil Moist: Keep the soil consistently moist until the seeds germinate.
5. Thin Seedlings: Once the seedlings have developed their first true leaves, thin them out to about 12-18 inches apart. This will give them enough room to grow and mature.
Transplanting Kale Seedlings Outdoors
If you started your kale seeds indoors, it’s time to transplant them to your garden.
1. Prepare the Planting Site: Choose a sunny location in your garden with well-draining soil. Amend the soil with compost or well-rotted manure before planting.
2. Dig Holes: Dig holes that are slightly larger than the root balls of the seedlings. Space the holes about 12-18 inches apart.
3. Remove Seedlings from Trays: Gently remove the seedlings from their seed starting trays or pots. Be careful not to damage the roots.
4. Plant the Seedlings: Place the seedlings in the holes and gently backfill with soil. Make sure the top of the root ball is level with the surrounding soil.
5. Water Thoroughly: Water the seedlings thoroughly after planting.
6. Mulch (Optional): Apply a layer of mulch around the seedlings to help retain moisture and suppress weeds.
Caring for Your Kale Plants
Once your kale plants are established, it’s important to provide them with proper care to ensure a bountiful harvest.
* Watering: Water your kale plants regularly, especially during dry periods. Kale prefers consistently moist soil, but avoid overwatering, which can lead to root rot.
* Fertilizing: Fertilize your kale plants every 2-3 weeks with an organic fertilizer. Look for a fertilizer that is high in nitrogen, which promotes leafy growth.
* Weeding: Keep the area around your kale plants free of weeds. Weeds can compete with kale for nutrients and water.
* Pest Control: Kale is susceptible to a few common pests, such as aphids, cabbage worms, and flea beetles. Inspect your plants regularly for signs of pests and take action as needed. You can use organic pest contro
Hey there, fellow gardening enthusiasts! I’m so excited to share my experience with growing kale from seed. It’s surprisingly easy, incredibly rewarding, and you’ll have a constant supply of this superfood right in your backyard (or even on your balcony!). This guide will walk you through every step, from choosing the right seeds to harvesting your first batch of delicious kale.
Choosing Your Kale Variety
Before we dive in, let’s talk kale varieties. There’s more to kale than just the curly stuff you see at the grocery store! Here are a few popular options:
* Curly Kale (e.g., ‘Dwarf Blue Curled Vates’): This is your classic kale, with tightly curled, blue-green leaves. It’s cold-hardy and great for soups and salads.
* Lacinato Kale (also known as Dinosaur Kale or Tuscan Kale): This variety has long, narrow, dark green leaves with a slightly bumpy texture. It’s a bit milder in flavor than curly kale and holds up well when cooked.
* Red Russian Kale: This kale has flat, fringed leaves with reddish-purple stems. It’s tender and sweet, especially when young, and adds a beautiful pop of color to your garden.
* Redbor Kale: Known for its vibrant purple, deeply frilled leaves, Redbor is as ornamental as it is edible. It’s a bit tougher than other varieties, but its striking appearance makes it a garden favorite.
I personally love growing a mix of varieties to add some visual interest and flavor diversity to my meals.
When to Plant Kale Seeds
Timing is key when it comes to growing kale. Kale is a cool-season crop, meaning it thrives in cooler temperatures.
* For a Spring Harvest: Start seeds indoors 6-8 weeks before the last expected frost. You can also direct sow seeds outdoors 2-4 weeks before the last frost, but be prepared to protect them from unexpected cold snaps.
* For a Fall/Winter Harvest: Direct sow seeds outdoors 6-8 weeks before the first expected frost. This will give your kale plants plenty of time to mature before the cold weather sets in.
I usually start my kale seeds indoors for a spring harvest to get a head start, and then direct sow for a fall harvest.
Materials You’ll Need
Here’s a list of everything you’ll need to get started:
* Kale seeds (of your chosen variety)
* Seed starting trays or small pots
* Seed starting mix (or a well-draining potting mix)
* Watering can or spray bottle
* Grow lights (optional, but recommended for indoor starting)
* Fertilizer (organic is best)
* Gardening gloves
* Trowel or small shovel
* Row covers (optional, for pest protection)
Starting Kale Seeds Indoors (Optional)
Starting seeds indoors gives you a head start on the growing season, especially if you live in an area with a short growing season.
1. Prepare Your Seed Starting Trays: Fill your seed starting trays or small pots with seed starting mix. Gently press down on the soil to remove any air pockets.
2. Sow the Seeds: Make a small indentation (about 1/4 inch deep) in the soil of each cell or pot. Place 2-3 kale seeds in each indentation. This increases the chances of at least one seed germinating.
3. Cover the Seeds: Gently cover the seeds with a thin layer of seed starting mix.
4. Water Thoroughly: Water the soil gently using a watering can or spray bottle. Make sure the soil is moist but not waterlogged.
5. Provide Light: Place the seed starting trays under grow lights or in a sunny window. If using grow lights, keep them about 2-4 inches above the seedlings.
6. Maintain Moisture: Keep the soil consistently moist by watering as needed. Check the soil moisture daily and water when the top inch feels dry to the touch.
7. Thin Seedlings (If Necessary): Once the seedlings have developed their first true leaves (the second set of leaves), thin them out by snipping off the weaker seedlings at the soil line. Leave only one strong seedling per cell or pot.
8. Harden Off Seedlings: About a week before you plan to transplant the seedlings outdoors, start hardening them off. This process gradually acclimates the seedlings to outdoor conditions. Start by placing the seedlings outdoors in a sheltered location for a few hours each day, gradually increasing the amount of time they spend outdoors. Protect them from direct sunlight and strong winds.
Direct Sowing Kale Seeds Outdoors
Direct sowing is a simpler method, but it’s important to make sure the soil is warm enough and the weather is favorable.
1. Prepare the Soil: Choose a sunny location in your garden with well-draining soil. Kale prefers soil that is rich in organic matter. Amend the soil with compost or well-rotted manure before planting.
2. Sow the Seeds: Sow the seeds about 1/2 inch deep and 1-2 inches apart in rows. Space the rows about 18-24 inches apart.
3. Water Thoroughly: Water the soil gently but thoroughly after sowing.
4. Keep the Soil Moist: Keep the soil consistently moist until the seeds germinate.
5. Thin Seedlings: Once the seedlings have developed their first true leaves, thin them out to about 12-18 inches apart. This will give them enough room to grow and mature.
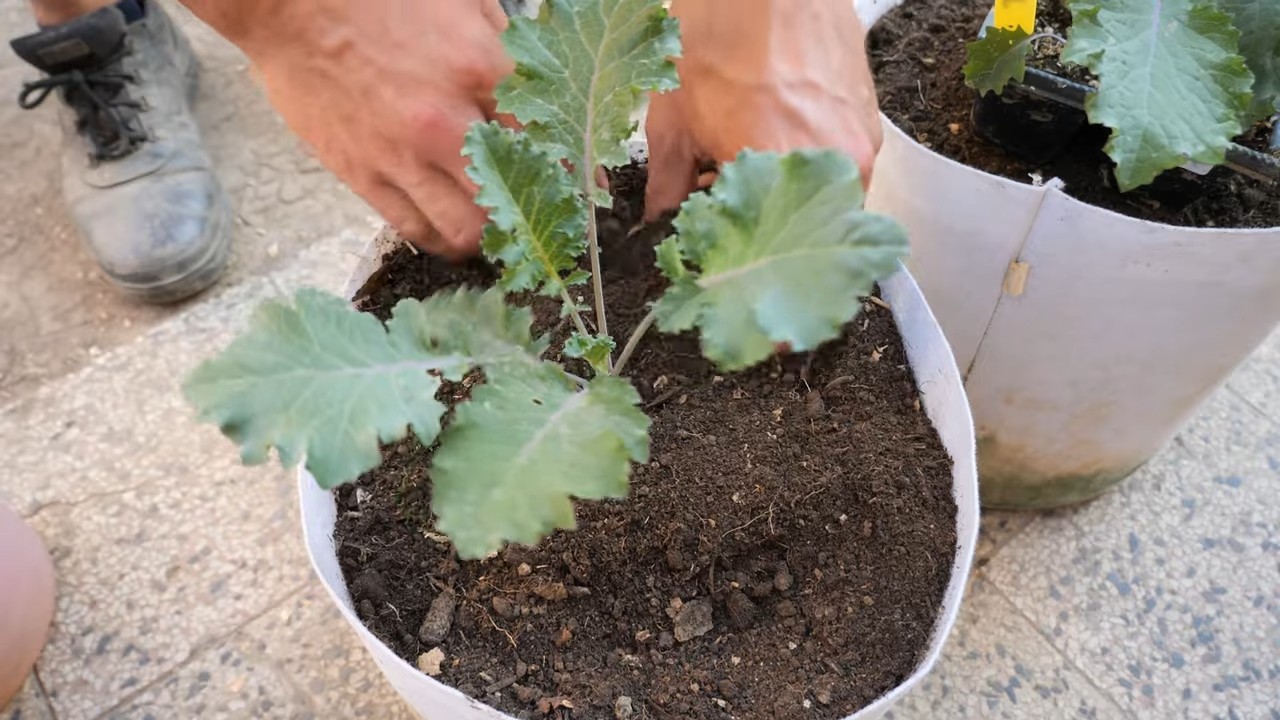
Transplanting Kale Seedlings Outdoors
If you started your kale seeds indoors, it’s time to transplant them to your garden.
1. Prepare the Planting Site: Choose a sunny location in your garden with well-draining soil. Amend the soil with compost or well-rotted manure before planting.
2. Dig Holes: Dig holes that are slightly larger than the root balls of the seedlings. Space the holes about 12-18 inches apart.
3. Remove Seedlings from Trays: Gently remove the seedlings from their seed starting trays or pots. Be careful not to damage the roots.
4. Plant the Seedlings: Place the seedlings in the holes and gently backfill with soil. Make sure the top of the root ball is level with the surrounding soil.
5. Water Thoroughly: Water the seedlings thoroughly after planting.
6. Mulch (Optional): Apply a layer of mulch around the seedlings to help retain moisture and suppress weeds.
Caring for Your Kale Plants
Once your kale plants are established, it’s important to provide them with proper care to ensure a bountiful harvest.
* Watering: Water your kale plants regularly, especially during dry periods. Kale prefers consistently moist soil, but avoid overwatering, which can lead to root rot.
* Fertilizing: Fertilize your kale plants every 2-3 weeks with an organic fertilizer. Look for a fertilizer that is high in nitrogen, which promotes leafy growth.
* Weeding: Keep the area around your kale plants free of weeds. Weeds can compete with kale for nutrients and water.
* Pest Control: Kale is susceptible to a few common pests, such as aphids, cabbage worms, and flea beetles. Inspect your plants regularly for signs of pests and take action as needed. You can use organic pest control methods, such as insecticidal soap or neem oil, to control pests. Row covers can also be used to protect your plants from pests.
* Sunlight: Kale needs at least 6 hours of sunlight per day.
Harvesting Your Kale
The best part of growing kale is, of course, harvesting it! You can start harvesting kale leaves as soon as they are large enough to eat, usually when they are about 4-6 inches long.
1. Harvest Outer Leaves: Harvest the outer leaves of the plant first, leaving the inner leaves to continue growing. This will allow you to harvest kale continuously throughout the growing season.
2. Cut or Snap Leaves: You can either cut the leaves off with a knife or scissors, or simply snap them off with your fingers.
3. Wash and Store: Wash the kale leaves thoroughly before using them. Store them in the refrigerator in a plastic bag or container for up to a week.
Enjoying Your Homegrown Kale
Now that you’ve harvested your kale, it’s time to enjoy it! Kale is a versatile vegetable that can be used in a variety of dishes.
* Salads: Add chopped kale to salads for a boost of nutrients. Massage the kale with olive oil and lemon juice to tenderize it.
* Smoothies: Blend kale into smoothies for a healthy and delicious drink.
* Soups and Stews: Add kale to soups and stews for added flavor and nutrition.
* Sautéed Kale: Sauté kale with garlic and olive oil for a simple and delicious side
Conclusion
So, there you have it! Growing kale from seed isn’t just a gardening project; it’s an investment in your health, your wallet, and your connection to the natural world. We’ve walked through the entire process, from selecting the perfect kale variety to nurturing those tiny seedlings into robust, leafy greens ready for your table.
Why is this DIY trick a must-try? Because it empowers you to control the quality of your food. You know exactly what goes into your kale – no mystery pesticides or questionable growing practices. Plus, the flavor of homegrown kale, harvested at its peak ripeness, is simply unmatched by anything you can buy in the store. It’s fresher, more vibrant, and bursting with nutrients.
Beyond the practical benefits, there’s a profound satisfaction that comes from nurturing a plant from seed to harvest. It’s a tangible reminder of the cycles of nature and your ability to participate in them. And let’s be honest, there’s a certain bragging right that comes with saying, “I grew this myself!”
But don’t stop there! Experiment with different kale varieties. Try ‘Lacinato’ (dinosaur kale) for its unique texture and nutty flavor, or ‘Red Russian’ for its beautiful color and slightly sweeter taste. Consider succession planting – sowing new seeds every few weeks – to ensure a continuous harvest throughout the growing season. You can also explore different growing methods, such as container gardening or raised beds, depending on your space and preferences.
Think about companion planting too. Kale thrives alongside herbs like rosemary and sage, which can help deter pests. Marigolds are also excellent companions, adding a splash of color and further pest control.
And if you’re feeling adventurous, try saving your own kale seeds for future planting! It’s a rewarding way to close the loop and become even more self-sufficient.
Ultimately, the best way to discover the joys of growing kale from seed is to simply dive in and try it. Don’t be afraid to make mistakes – that’s how we learn! The rewards are well worth the effort.
We’re confident that you’ll find the process both enjoyable and rewarding. So, grab some seeds, get your hands dirty, and experience the satisfaction of growing your own delicious and nutritious kale.
We’d love to hear about your experiences! Share your tips, tricks, and triumphs in the comments below. Let’s build a community of kale-growing enthusiasts and inspire others to embrace the joys of homegrown goodness. Happy gardening!
Frequently Asked Questions (FAQ)
What is the best time of year to start growing kale from seed?
The timing depends on your climate. In cooler regions with short growing seasons, start seeds indoors 6-8 weeks before the last expected frost. This gives your seedlings a head start. In warmer climates with mild winters, you can sow seeds directly into the garden in late summer or early fall for a winter harvest. Kale thrives in cooler temperatures and can even tolerate light frosts, which can actually improve its flavor. Check your local frost dates to determine the optimal planting time for your area.
How deep should I plant kale seeds?
Plant kale seeds about ¼ to ½ inch deep. They need light to germinate, so don’t bury them too deeply. Gently cover the seeds with soil and water them thoroughly. Keep the soil consistently moist but not waterlogged until the seedlings emerge.
How long does it take for kale seeds to germinate?
Kale seeds typically germinate within 5-10 days, depending on the temperature and moisture levels. Warmer temperatures (around 65-75°F) will speed up germination. Keep the soil consistently moist during this period. Once the seedlings emerge, provide them with plenty of light to prevent them from becoming leggy.
What kind of soil is best for growing kale?
Kale prefers well-drained soil that is rich in organic matter. Amend your soil with compost or well-rotted manure before planting to improve its fertility and drainage. A slightly acidic to neutral soil pH (around 6.0-7.0) is ideal. You can test your soil pH with a home testing kit or by sending a sample to your local agricultural extension office.
How much sunlight does kale need?
Kale needs at least 6 hours of sunlight per day to thrive. Choose a sunny location in your garden where your kale plants will receive ample sunlight. If you’re growing kale indoors, use grow lights to supplement natural sunlight, especially during the winter months.
How often should I water kale plants?
Water kale plants regularly, especially during dry periods. Keep the soil consistently moist but not waterlogged. Water deeply and less frequently, rather than shallowly and more often. This encourages deep root growth, which will make your plants more drought-tolerant. Mulching around your kale plants can also help to retain moisture in the soil.
What are some common pests and diseases that affect kale?
Common pests that affect kale include aphids, cabbage worms, flea beetles, and slugs. You can control these pests with organic methods such as handpicking, insecticidal soap, or diatomaceous earth. Common diseases that affect kale include clubroot, downy mildew, and leaf spot. Prevent these diseases by practicing crop rotation, providing good air circulation, and avoiding overhead watering.
How do I harvest kale?
You can start harvesting kale leaves when they are about 6-8 inches long. Harvest the outer leaves first, leaving the inner leaves to continue growing. This will allow you to harvest kale continuously throughout the growing season. You can also harvest the entire plant at once if you prefer. Simply cut the stem near the base of the plant.
Can I grow kale in containers?
Yes, kale grows well in containers. Choose a container that is at least 12 inches deep and wide to provide enough room for the roots to grow. Use a well-draining potting mix and water regularly. Container-grown kale may need to be fertilized more frequently than kale grown in the ground.
How do I store kale after harvesting?
Store kale in the refrigerator in a plastic bag or container. It will keep for up to a week. You can also freeze kale for longer storage. Blanch the kale leaves in boiling water for 2-3 minutes, then plunge them into ice water to stop the cooking process. Drain the kale and freeze it in freezer bags or containers.
Is growing kale from seed worth the effort?
Absolutely! Growing kale from seed is a rewarding experience that allows you to control the quality of your food and enjoy the fresh, delicious flavor of homegrown kale. It’s also a cost-effective way to add nutritious greens to your diet. Plus, the satisfaction of nurturing a plant from seed to harvest is simply unmatched. So, give it a try and see for yourself!
Leave a Comment