
Grow Ginger at Home: Imagine stepping into your kitchen, needing a touch of zesty warmth for your stir-fry or a soothing remedy for a scratchy throat, and simply reaching into your own backyard to harvest fresh ginger. Sounds dreamy, right? Well, it’s more achievable than you might think! For centuries, ginger has been prized not only for its culinary versatility but also for its medicinal properties, playing a significant role in traditional medicine across Asia and beyond. From ancient Ayurvedic practices to modern-day kitchens, ginger’s influence is undeniable.
But why rely on store-bought ginger when you can easily grow ginger at home? Let’s face it, supermarket ginger can sometimes be a bit lackluster, lacking the vibrant flavor and freshness of homegrown. Plus, with rising grocery costs, cultivating your own ginger is a fantastic way to save money and reduce your environmental footprint. In this article, I’m going to share some simple yet effective DIY tricks and hacks that will empower you to cultivate a thriving ginger patch, even if you have limited space or gardening experience. Get ready to unlock the secrets to a bountiful ginger harvest right in your own home!
Growing Ginger at Home: Your Simple DIY Guide
Hello, fellow gardeners! Have you ever wondered how to grow your own ginger at home? It’s easier than you think and incredibly fun! Fresh ginger straight from your own garden or pot – what could be better? In this article, I’ll show you step-by-step how you can easily do it yourself. Let’s get started!
What You’ll Need: The Ingredients for Your Ginger Success
Before we get started, here is a list of the things you’ll need for your ginger-growing adventure:
- A ginger rhizome: It’s best to get one from the supermarket that is plump, firm, and has small “eyes” (growth nodes). Organic ginger is often a better choice as it’s less likely to have been treated with growth inhibitors.
- A planter: Choose a pot or container with good drainage. Ginger doesn’t like waterlogged soil! It should be at least 30 cm (12 inches) wide and 20 cm (8 inches) deep.
- High-quality potting soil: A well-draining, nutrient-rich soil is ideal. You can also mix potting soil with compost or coconut coir to improve drainage.
- Water: Clear, clean water for watering.
- A warm, bright location: Ginger loves warmth and indirect sunlight. A spot on a windowsill or in a greenhouse is perfect.
- Patience: Ginger takes time to grow. Be patient and give it the necessary care!
- Optional: Organic fertilizer, spray bottle.
Step-by-Step Guide: How to Plant Your Ginger
Now let’s get down to it! Follow these steps to successfully plant your ginger:
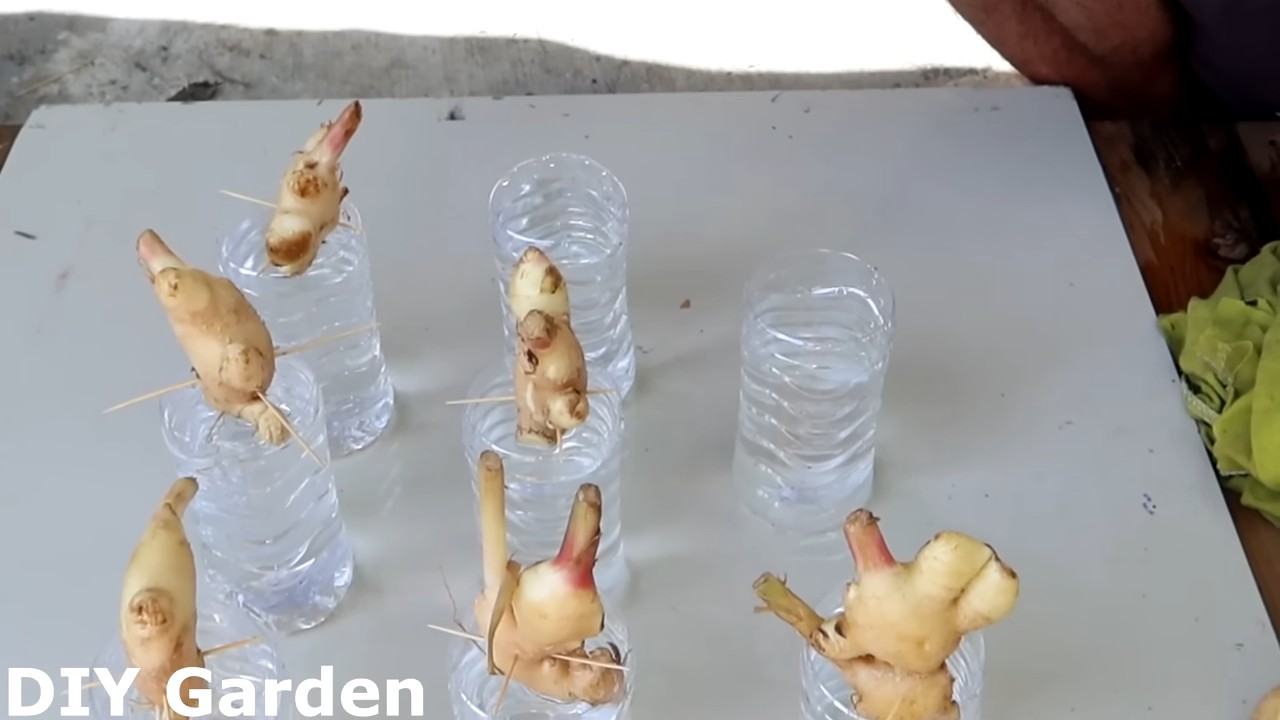
1. Preparing the Ginger Rhizome:
- If your ginger rhizome is very large, you can cut it into smaller pieces. Each piece should have at least one growth node (eye).
- Let the cut surfaces air-dry for a few days before planting them. This helps prevent rot.
- You can also place the rhizome in lukewarm water for a few hours to speed up sprouting.
2. Preparing the Pot:
- Fill the pot with potting soil. Leave about 5 cm (2 inches) of space at the top.
- Gently press the soil down.
3. Planting the Ginger:
- Place the ginger rhizome horizontally on the soil, with the growth nodes facing up.
- Cover the rhizome with about 2-5 cm (1-2 inches) of soil.
- Gently water the soil until it is moist but not soaked.
4. Choosing the Right Location:
- Place the pot in a warm, bright spot with indirect sunlight. Direct sunlight can burn the leaves.
- A temperature between 20°C and 30°C (68°F and 86°F) is ideal for growth.
5. The Right Care: Watering, Fertilizing, and Observing
- Watering: Keep the soil moist, but not soaked. Water when the top layer of soil feels dry. Avoid waterlogging, as this can lead to rot.
- Fertilizing: Fertilize the ginger every few weeks with an organic fertilizer. Be sure to follow the instructions on the package.
- Observing: Regularly observe your ginger for signs of pests or diseases. If you notice anything unusual, act quickly.
The Growth Phases: From Rhizome to Ginger Plant
Growing ginger is an exciting process that I like to divide into different phases:
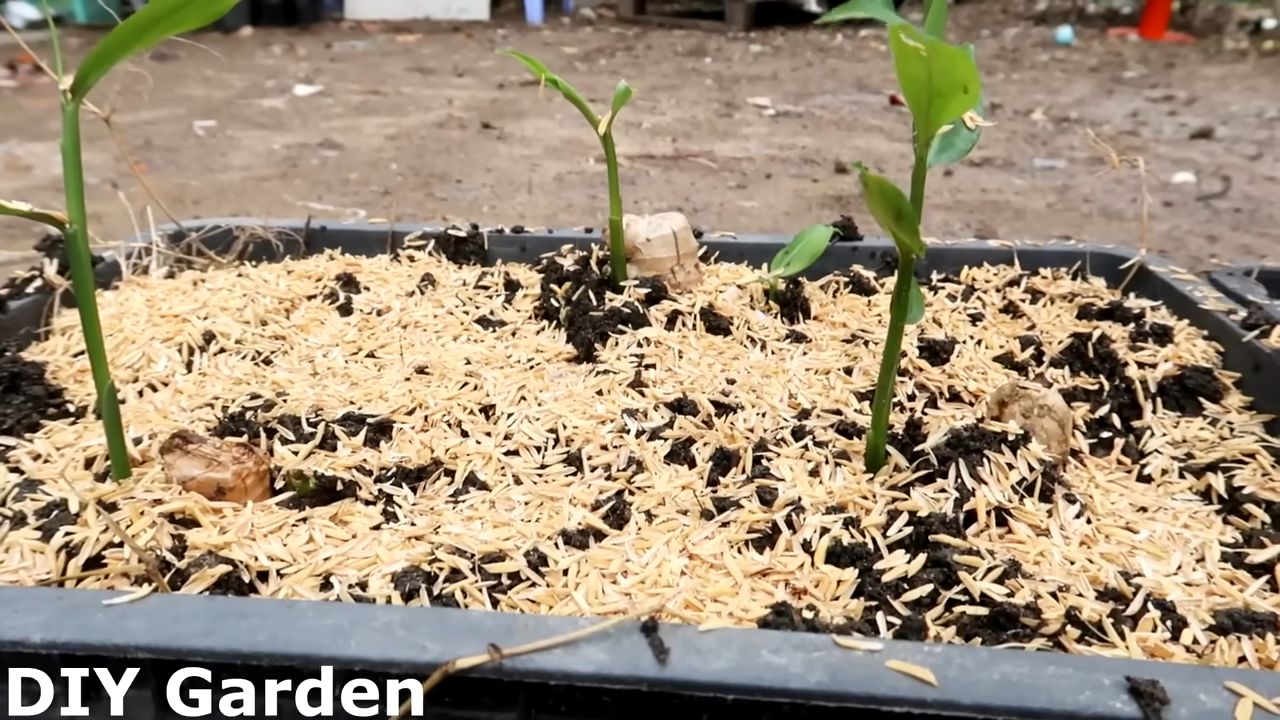
Phase 1: Sprouting (approx. 2-3 weeks)
In this phase, the ginger rhizome begins to form roots and sprout its first shoots. You will see small green tips emerging from the soil. It is important to keep the soil moist during this phase and to place the pot in a warm location. Be patient, it can take a few weeks to see the first signs of growth.
Phase 2: Vegetative Growth (approx. 2-6 months)
Once the first shoots have sprouted, the plant begins to form leaves and grow. In this phase, it is important to water and fertilize the ginger regularly. Make sure the plant gets enough light but is not exposed to direct sunlight. The leaves will get bigger and the plant will become bushier.
Phase 3: The Harvest (approx. 8-10 months)
After about 8-10 months, you can harvest your own ginger! You’ll know it’s time when the leaves turn yellow and die back. You can either dig up the whole plant or harvest only a part of the rhizome and leave the rest in the pot to continue growing.
The Harvest: Your Homegrown Ginger is Ready!
The harvest is the most exciting part! Here’s how to do it:
1. Preparing for Harvest:
- Stop watering the soil a few days before harvesting to let it dry out a bit.
- Prepare a clean container to store the harvested ginger.
2. Harvesting the Ginger:
- Carefully dig the plant out of the pot.
- Shake the soil off the roots.
- Cut the rhizome with a sharp knife.
- You can either harvest the whole plant or cut off only a part of the rhizome and leave the rest in the pot to continue growing.
3. Storing the Ginger:
- Wash the harvested ginger thoroughly.
- Let it air dry.
- You can store the ginger in the refrigerator in an airtight container. It will keep for several weeks.
- You can also freeze the ginger. To do this, slice or grate it and freeze it in small portions.
Common Problems and Solutions: What to Do When Something Goes Wrong?
Even when growing ginger, problems can occur. Here are some common problems and how you can solve them:
- Yellow leaves: Yellow leaves can be a sign of overwatering, underwatering, nutrient deficiency, or too much sunlight. Check the soil moisture, fertilize the plant, and move it to a different location if necessary.
- Rot: Rot can be caused by waterlogging. Make sure the pot has good drainage and don’t water too much.
- Pests: Ginger can be infested by pests like aphids or spider mites. Spray the plant with a natural insecticide or a soap solution.
- No growth: If your ginger is not growing, it could be due to too little light, low temperatures, or a lack of nutrients. Move the pot to a brighter place, provide a warmer environment, and fertilize the plant.
Additional Tips and Tricks: How to Optimize Your Ginger Cultivation
Here are a few more tips that can help you optimize your ginger cultivation:
Rotate the pot regularly: Rotate the pot regularly so that the plant gets even light
Use rainwater for watering: Rainwater is softer than tap water and contains no harmful chemicals.
Mulch the soil: A layer of mulch made of straw or compost helps to retain moisture in the soil and suppress weeds.
Conclusion
So, there you have it! Growing ginger at home is not only achievable, but it’s also a rewarding and surprisingly simple process. Forget those expensive, sometimes lackluster, ginger roots from the grocery store. Imagine the satisfaction of harvesting your own fresh, vibrant ginger, bursting with flavor and ready to elevate your culinary creations. This DIY project transforms a simple root into a source of pride and a constant supply of a valuable ingredient.
Why is this a must-try? Because it empowers you to control the quality and freshness of your ginger. You know exactly where it came from, how it was grown, and that it’s free from any unwanted chemicals or preservatives. Plus, it’s a fantastic way to reduce your reliance on store-bought produce and connect with the natural world, even if you only have a small balcony or windowsill.
Beyond the basic method, there’s plenty of room for experimentation. Try different varieties of ginger, such as the blue ginger known for its striking blue hue and milder flavor, or the variegated ginger with its beautiful striped leaves. You can also adjust the growing conditions to see how they affect the size and potency of your harvest. Consider using different types of soil or fertilizers to optimize growth.
For those in colder climates, consider keeping your ginger indoors year-round. This allows you to enjoy a continuous harvest and adds a touch of greenery to your home. You can even train your ginger plant to grow in a decorative pot, making it a beautiful and functional addition to your living space.
Don’t be intimidated by the thought of growing your own ginger. It’s a forgiving plant that’s relatively easy to care for. With a little patience and attention, you’ll be rewarded with a bountiful harvest of fresh, flavorful ginger.
We wholeheartedly encourage you to embark on this exciting DIY journey. Start small, experiment, and most importantly, have fun! Once you’ve experienced the joy of harvesting your own homegrown ginger, you’ll never look at store-bought ginger the same way again.
And remember, the best part of any DIY project is sharing your experiences and learning from others. We’d love to hear about your successes, challenges, and any unique tips or tricks you discover along the way. Share your photos, stories, and questions in the comments below. Let’s create a community of home ginger growers and inspire others to embrace the joys of sustainable gardening. So go ahead, give it a try, and discover the magic of growing ginger at home!
Frequently Asked Questions (FAQ)
1. What kind of ginger should I use to start growing?
The best ginger to use for planting is a fresh, plump ginger rhizome (the underground stem) from your local grocery store or nursery. Look for rhizomes that are firm, with healthy “eyes” or buds (small bumps) on them. Avoid ginger that is shriveled, moldy, or has soft spots. Organic ginger is often preferred, as it’s less likely to have been treated with growth inhibitors. If you can find a ginger rhizome specifically labeled for planting, that’s even better.
2. How long does it take to grow ginger from a rhizome?
It typically takes around 8-10 months to grow a mature ginger plant ready for harvest. You’ll start to see sprouts within a few weeks of planting, but it takes several months for the rhizomes to develop and mature. The exact time frame can vary depending on the climate, growing conditions, and the specific variety of ginger. Be patient and provide consistent care, and you’ll be rewarded with a bountiful harvest.
3. What are the ideal growing conditions for ginger?
Ginger thrives in warm, humid environments with partial shade. It needs well-draining soil that is rich in organic matter. The ideal temperature range is between 65°F and 90°F (18°C and 32°C). Avoid exposing your ginger plant to direct sunlight, especially during the hottest part of the day, as this can scorch the leaves. Consistent moisture is crucial, but avoid overwatering, which can lead to root rot.
4. How often should I water my ginger plant?
Water your ginger plant regularly, keeping the soil consistently moist but not waterlogged. The frequency of watering will depend on the climate, the type of soil, and the size of the pot. Check the soil moisture regularly by sticking your finger about an inch into the soil. If it feels dry, it’s time to water. During hot, dry weather, you may need to water more frequently. Reduce watering during the cooler months.
5. What kind of soil is best for growing ginger?
Ginger prefers well-draining soil that is rich in organic matter. A good potting mix for ginger would be a combination of potting soil, compost, and perlite or vermiculite. The compost provides nutrients, while the perlite or vermiculite improves drainage. Avoid using heavy clay soil, as it can retain too much moisture and lead to root rot.
6. How do I know when my ginger is ready to harvest?
You can start harvesting ginger after about 8-10 months, when the leaves begin to turn yellow and die back. To harvest, gently dig around the plant and lift the rhizomes from the soil. You can harvest the entire plant or just a portion of the rhizomes, leaving the rest to continue growing. Freshly harvested ginger will have a more delicate flavor and aroma than store-bought ginger.
7. Can I grow ginger indoors?
Yes, you can definitely grow ginger indoors, especially if you live in a colder climate. Choose a pot that is at least 12 inches in diameter and fill it with well-draining potting mix. Place the pot in a warm, sunny location, such as a windowsill that receives indirect sunlight. Water regularly and mist the leaves to increase humidity. You may need to supplement with artificial light during the winter months.
8. What are some common problems when growing ginger and how can I fix them?
Some common problems when growing ginger include root rot, pests, and nutrient deficiencies. Root rot is caused by overwatering and poor drainage. To prevent root rot, ensure that your soil is well-draining and avoid overwatering. Pests, such as aphids and spider mites, can be controlled with insecticidal soap or neem oil. Nutrient deficiencies can be addressed by fertilizing your ginger plant with a balanced fertilizer.
9. Can I grow ginger in a container?
Absolutely! Growing ginger in containers is a great option, especially if you have limited space or live in a colder climate. Choose a container that is at least 12 inches in diameter and has drainage holes. Fill the container with well-draining potting mix and plant your ginger rhizome. Place the container in a warm, sunny location and water regularly.
10. How do I store my harvested ginger?
Freshly harvested ginger can be stored in the refrigerator for several weeks. Wrap the ginger rhizome in a paper towel and place it in a plastic bag or container. You can also freeze ginger for longer storage. To freeze ginger, peel and chop it into small pieces or grate it. Place the ginger in a freezer bag or container and freeze for up to six months. You can also pickle ginger or make ginger syrup for longer-term preservation.
Leave a Comment