
Grow Cabbage on Balcony? Absolutely! Imagine stepping onto your balcony and harvesting fresh, crisp cabbage, ready to be transformed into a delicious slaw or hearty stew. It’s more achievable than you might think, even if you’re short on space. For centuries, humans have cultivated food in limited areas, from ancient rooftop gardens in Babylon to modern-day urban farms. This DIY guide will empower you to join that tradition, bringing the joy of homegrown vegetables right to your doorstep.
Many people believe that growing vegetables requires a sprawling garden, but that’s simply not true! With a few clever tricks and the right setup, you can successfully grow cabbage on balcony, even if you only have a small area. This article will provide you with easy-to-follow instructions, tips, and hacks to maximize your yield and overcome common challenges. Say goodbye to expensive grocery store cabbage and hello to fresh, organic goodness grown with your own two hands. Let’s get started and transform your balcony into a thriving edible oasis!
Kohl auf dem Balkon ziehen: Dein DIY-Guide für eine reiche Ernte
Hey Gartenfreunde! Hast du auch nur einen kleinen Balkon, aber den großen Traum von frischem, selbst angebautem Gemüse? Dann bist du hier genau richtig! Ich zeige dir, wie du ganz einfach Kohl auf deinem Balkon ziehen kannst. Es ist einfacher als du denkst und das Ergebnis ist einfach unschlagbar: knackiger, frischer Kohl direkt von deinem Balkon!
Was du brauchst: Die Vorbereitung
Bevor wir loslegen, lass uns sicherstellen, dass wir alles beisammen haben. Hier ist eine Liste mit allem, was du für dein Kohl-Balkon-Projekt benötigst:
* Kohlsaatgut oder Jungpflanzen: Du kannst entweder mit Samen starten oder dir bereits vorgezogene Jungpflanzen besorgen. Ich persönlich finde Jungpflanzen gerade für Anfänger einfacher, da sie schon einen Wachstumsvorsprung haben. Beliebte Kohlsorten für den Balkon sind Spitzkohl, Blumenkohl (kleinwüchsige Sorten), Rosenkohl und Grünkohl.
* Pflanzgefäße: Wähle ausreichend große Töpfe oder Kübel. Kohl braucht Platz für seine Wurzeln. Ein Topf mit mindestens 30 cm Durchmesser und Tiefe ist ideal.
* Hochwertige Pflanzerde: Verwende am besten spezielle Gemüseerde oder mische Blumenerde mit Kompost. Das sorgt für eine gute Nährstoffversorgung.
* Drainagematerial: Blähton, Kies oder Tonscherben am Boden der Töpfe verhindern Staunässe.
* Dünger: Organischer Gemüsedünger oder Komposttee versorgen den Kohl mit wichtigen Nährstoffen.
* Gießkanne oder Gartenschlauch: Zum regelmäßigen Gießen.
* Schere oder Messer: Zum Ernten.
* Eventuell: Schneckenschutz (Schneckenkorn oder Schneckenzaun), Netz gegen Kohlweißlinge.
Schritt-für-Schritt Anleitung: So pflanzt du deinen Kohl
Jetzt geht’s ans Eingemachte! Folge diesen Schritten, um deinen Kohl erfolgreich auf dem Balkon anzupflanzen:
1. Vorbereitung der Pflanzgefäße:
* Reinige deine Töpfe gründlich.
* Fülle eine Schicht Drainagematerial (Blähton, Kies oder Tonscherben) auf den Boden der Töpfe. Das verhindert Staunässe, die Kohl gar nicht mag.
* Fülle die Töpfe mit Pflanzerde, lasse aber etwa 5 cm Platz bis zum Rand.
2. Aussaat (wenn du mit Samen startest):
* Befeuchte die Erde leicht.
* Säe die Kohlsaat in kleinen Abständen (ca. 2-3 cm) aus.
* Bedecke die Samen mit einer dünnen Schicht Erde (ca. 0,5 cm).
* Gieße vorsichtig mit einer Sprühflasche, um die Erde feucht zu halten.
* Stelle die Töpfe an einen hellen, warmen Ort.
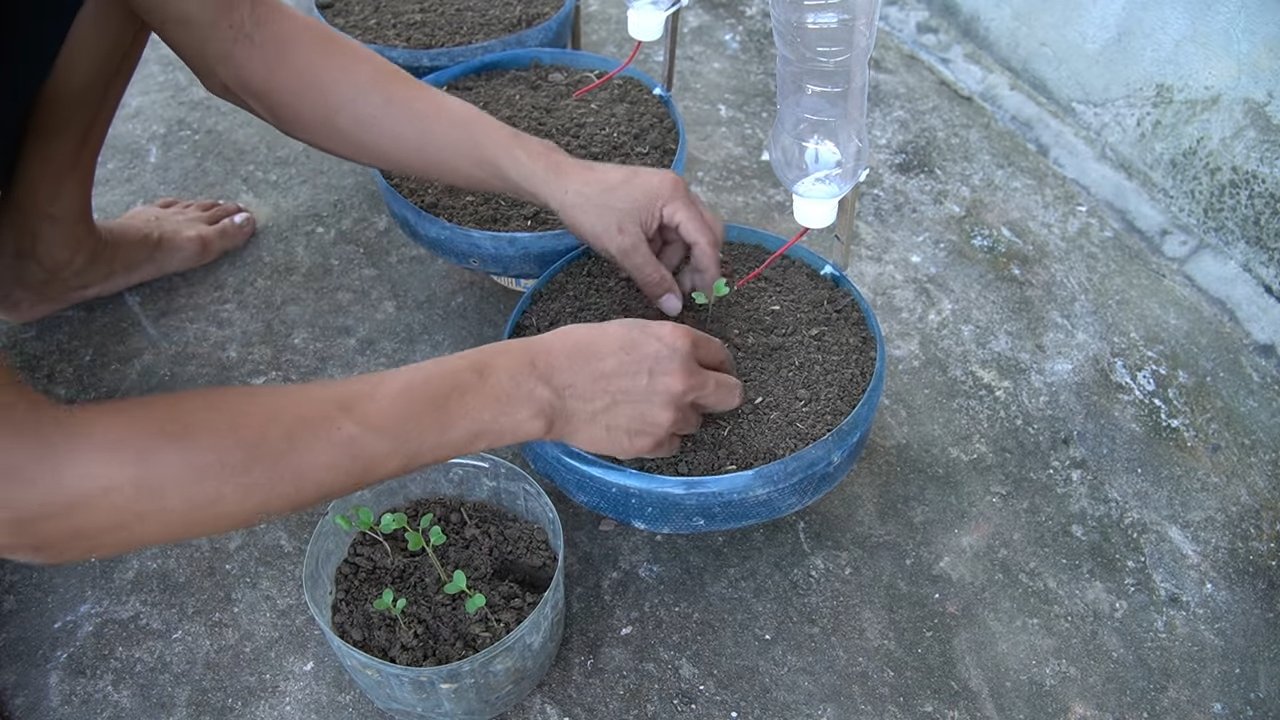
* Sobald die Keimlinge groß genug sind (ca. 5-7 cm), pikiere sie in separate Töpfe.
3. Pflanzen der Jungpflanzen:
* Grabe ein Loch in die Erde, das groß genug ist, um den Wurzelballen der Jungpflanze aufzunehmen.
* Nimm die Jungpflanze vorsichtig aus dem Anzuchttopf.
* Lockere den Wurzelballen leicht auf.
* Setze die Jungpflanze in das Loch und fülle es mit Erde auf.
* Drücke die Erde leicht an.
* Gieße die Pflanze gründlich.
4. Standortwahl:
* Kohl braucht viel Sonne! Wähle einen sonnigen Standort auf deinem Balkon, an dem die Pflanzen mindestens 6 Stunden Sonne pro Tag bekommen.
* Achte darauf, dass der Standort windgeschützt ist, da starke Winde die Pflanzen beschädigen können.
Die Pflege: So bleibt dein Kohl gesund und kräftig
Kohl ist zwar relativ pflegeleicht, aber ein bisschen Aufmerksamkeit braucht er trotzdem. Hier sind meine Tipps für eine erfolgreiche Kohl-Pflege:
* Gießen:
* Gieße regelmäßig, besonders an heißen Tagen. Die Erde sollte immer leicht feucht sein, aber nicht nass. Vermeide Staunässe!
* Gieße am besten morgens oder abends, um Verdunstung zu vermeiden.
* Gieße direkt an die Wurzeln und vermeide es, die Blätter zu benetzen, um Pilzkrankheiten vorzubeugen.
* Düngen:
* Dünge deinen Kohl regelmäßig, etwa alle 2-3 Wochen, mit organischem Gemüsedünger oder Komposttee.
* Befolge die Anweisungen auf der Düngerverpackung.
* Eine gute Nährstoffversorgung ist wichtig für ein gesundes Wachstum und eine reiche Ernte.
* Schädlinge und Krankheiten:
* Kohl ist leider anfällig für Schädlinge wie Kohlweißlinge, Blattläuse und Schnecken.
* Kontrolliere deine Pflanzen regelmäßig auf Schädlinge.
* Bei Befall kannst du natürliche Schädlingsbekämpfungsmittel einsetzen, wie z.B. Brennnesseljauche oder Neemöl.
* Ein Netz über den Pflanzen schützt vor Kohlweißlingen.
* Schneckenkorn oder ein Schneckenzaun können helfen, Schnecken fernzuhalten.
* Achte auf Anzeichen von Krankheiten wie Kohlhernie oder Falscher Mehltau. Entferne befallene Blätter oder Pflanzen sofort, um eine Ausbreitung zu verhindern.
* Ausgeizen (bei Rosenkohl):
* Bei Rosenkohl solltest du die unteren Blätter regelmäßig entfernen, um die Entwicklung der Röschen zu fördern.
Die Ernte: Endlich frischer Kohl vom Balkon!
Nach einigen Wochen oder Monaten (je nach Kohlsorte) ist es endlich soweit: Du kannst deinen eigenen Kohl ernten!
* Erntezeitpunkt:
* Der Erntezeitpunkt hängt von der Kohlsorte ab.
* Spitzkohl ist erntereif, wenn der Kopf fest und geschlossen ist.
* Blumenkohl ist erntereif, wenn der Kopf die gewünschte Größe erreicht hat und noch fest ist.
* Rosenkohl ist erntereif, wenn die Röschen fest und geschlossen sind.
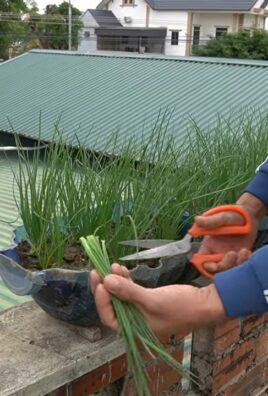
* Grünkohl kann nach Bedarf geerntet werden, indem man die äußeren Blätter abzupft.
* Erntemethode:
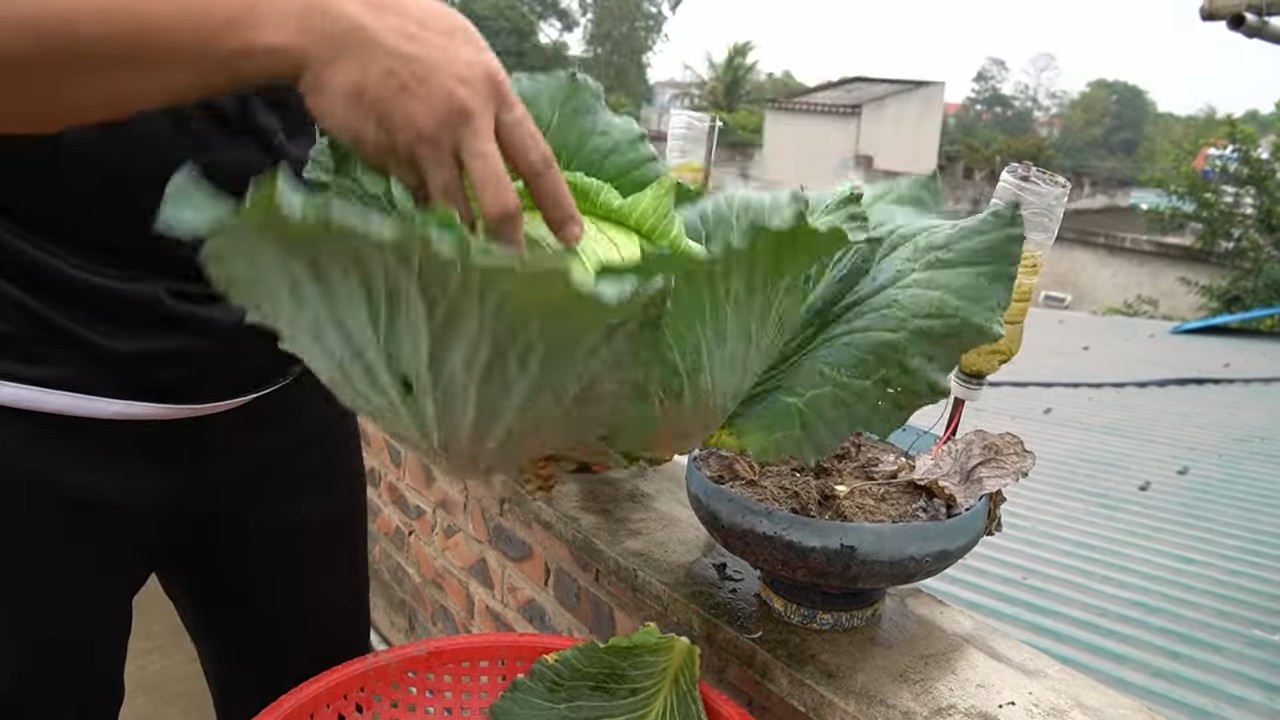
* Schneide den Kohlkopf mit einem scharfen Messer oder einer Schere ab.
* Bei Rosenkohl brichst du die Röschen von unten nach oben ab.
* Grünkohl erntest du, indem du die äußeren Blätter abzupfst.
* Lagerung:
* Frisch geernteter Kohl schmeckt am besten!
* Du kannst Kohl im Kühlschrank lagern, aber er hält sich nicht sehr lange.
* Wickle den Kohl in ein feuchtes Tuch, um ihn länger frisch zu halten.
* Grünkohl kann auch eingefroren werden.
Extra-Tipps für deinen Kohl-Balkon
* Fruchtfolge beachten: Pflanze Kohl nicht jedes Jahr am selben Standort, um Krankheiten vorzubeugen. Wechsle die Pflanzenarten ab.
* Mischkultur: Pflanze Kohl zusammen mit anderen Pflanzen, die sich gegenseitig unterstützen. Gute Nachbarn für Kohl sind z.B. Ringelblumen (gegen Nematoden), Dill (gegen Kohlweißlinge) und Kamille (fördert das Wachstum).
* Sortenwahl: Wähle Sorten, die für den Anbau im Topf geeignet sind. Es gibt spezielle kleinwüchsige Sorten, die sich besonders gut für den Balkon eignen.
* Beobachtung: Beobachte deine Pflanzen regelmäßig und reagiere schnell auf Probleme. Je früher du Schädlinge oder Krankheiten erkennst, desto besser kannst du sie bekämpfen.
Ich hoffe, diese Anleitung hilft dir dabei, deinen eigenen Kohl auf dem Balkon zu ziehen. Es ist ein tolles Gefühl, frisches, selbst angebautes Gemüse zu ernten und zu wissen, wo es herkommt. Viel Spaß beim Gärtnern! Und vergiss nicht: Auch wenn mal etwas schiefgeht, lass dich nicht entmutigen. Gärt
Conclusion
So, there you have it! Growing cabbage on your balcony is not only achievable, but it can be a deeply rewarding experience. Forget those bland, mass-produced cabbages from the supermarket. Imagine stepping onto your balcony and harvesting a crisp, flavorful head of cabbage that you nurtured from a tiny seedling. The taste difference alone is enough to convince anyone to give this a try.
But the benefits extend far beyond just superior flavor. By embracing this DIY project, you’re taking control of your food source, reducing your carbon footprint, and adding a touch of green beauty to your urban landscape. You’re also engaging in a mindful activity that connects you with nature, even in the heart of the city.
This isn’t just about growing cabbage; it’s about cultivating a connection to the earth and enjoying the fruits (or rather, vegetables!) of your labor. And let’s be honest, there’s a certain satisfaction that comes from showing off your homegrown produce to friends and family.
Don’t be afraid to experiment! Try different varieties of cabbage to find your favorite. Red cabbage adds a vibrant splash of color to your balcony garden and offers a slightly sweeter flavor. Savoy cabbage, with its crinkled leaves, brings a unique texture to your dishes. And for a quicker harvest, consider growing smaller, early-maturing varieties.
You can also explore companion planting to enhance your cabbage’s growth and deter pests. Marigolds, for example, are known to repel nematodes and other unwanted visitors. Dill and chamomile can attract beneficial insects that prey on cabbage worms.
Consider adding a trellis or support system if you’re growing larger varieties of cabbage. This will help prevent the heads from becoming too heavy and toppling over. You can also use organic fertilizers to provide your cabbage with the nutrients it needs to thrive.
Remember to monitor your cabbage plants regularly for signs of pests or diseases. Early detection is key to preventing problems from escalating. If you spot any issues, address them promptly with organic pest control methods.
Growing cabbage on your balcony is a journey, not a destination. There will be challenges along the way, but the rewards are well worth the effort. So, grab some seeds or seedlings, prepare your containers, and get ready to embark on this exciting adventure.
We’re confident that you’ll be amazed by what you can achieve with a little bit of effort and dedication. And most importantly, we want to hear about your experiences! Share your photos, tips, and stories with us in the comments below. Let’s create a community of balcony cabbage growers and inspire others to embrace the joy of urban gardening.
Don’t delay, start growing cabbage on your balcony today! You’ll be amazed at how easy and rewarding it can be.
Frequently Asked Questions (FAQ)
What is the best time of year to start growing cabbage on my balcony?
The best time to start growing cabbage depends on your local climate. Cabbage is a cool-season crop, so it thrives in temperatures between 60°F and 70°F (15°C and 21°C). In most regions, you can plant cabbage in early spring for a summer harvest or in late summer for a fall or winter harvest. If you live in a warmer climate, you may be able to grow cabbage throughout the winter. Check your local planting calendar for specific recommendations. Starting seeds indoors 6-8 weeks before the last expected frost is a great way to get a head start.
What size container do I need to grow cabbage on my balcony?
Cabbage plants need plenty of space to grow, so choose a container that is at least 12 inches (30 cm) in diameter and 12 inches deep. Larger containers are even better, as they will provide more room for the roots to develop and help retain moisture. A five-gallon bucket or a large planter box would be ideal. Make sure the container has drainage holes to prevent waterlogging.
What type of soil should I use for growing cabbage in containers?
Use a well-draining potting mix that is rich in organic matter. You can purchase a pre-made potting mix or create your own by combining equal parts of compost, peat moss, and perlite or vermiculite. Avoid using garden soil, as it can be too heavy and compact for container gardening. The ideal pH for cabbage is between 6.0 and 7.0.
How much sunlight does cabbage need?
Cabbage needs at least 6 hours of direct sunlight per day to thrive. Choose a sunny spot on your balcony that receives ample sunlight. If your balcony doesn’t get enough sunlight, you may need to supplement with grow lights. Rotate the containers regularly to ensure that all sides of the plants receive adequate sunlight.
How often should I water my cabbage plants?
Water your cabbage plants regularly, especially during hot, dry weather. The soil should be consistently moist but not waterlogged. Check the soil moisture level by sticking your finger into the soil. If the top inch of soil feels dry, it’s time to water. Water deeply, allowing the water to drain out of the drainage holes. Avoid overhead watering, as this can promote fungal diseases.
What are some common pests and diseases that affect cabbage?
Cabbage plants are susceptible to a variety of pests and diseases, including cabbage worms, aphids, flea beetles, and clubroot. Monitor your plants regularly for signs of infestation or disease. Use organic pest control methods, such as handpicking pests, spraying with insecticidal soap, or using row covers to protect your plants. To prevent clubroot, ensure good drainage and avoid planting cabbage in the same spot year after year.
How do I fertilize my cabbage plants?
Cabbage plants are heavy feeders, so they need regular fertilization. Use a balanced organic fertilizer, such as compost tea or fish emulsion, every 2-3 weeks. You can also side-dress your plants with compost or aged manure. Avoid using synthetic fertilizers, as they can harm beneficial soil microbes.
How long does it take to grow cabbage on a balcony?
The time it takes to grow cabbage depends on the variety and growing conditions. Most cabbage varieties take between 60 and 100 days to mature. Early-maturing varieties can be harvested in as little as 60 days, while late-maturing varieties may take up to 100 days. Check the seed packet or plant label for specific information.
How do I know when my cabbage is ready to harvest?
Cabbage is ready to harvest when the head is firm and compact. The size of the head will vary depending on the variety. To harvest, cut the head off at the base of the plant with a sharp knife. Leave a few outer leaves on the plant, as these can continue to produce smaller heads.
Can I grow other vegetables with cabbage on my balcony?
Yes, you can grow other vegetables with cabbage on your balcony. Companion planting can help to improve the growth of both plants. Good companion plants for cabbage include marigolds, dill, chamomile, and nasturtiums. Avoid planting cabbage near tomatoes, strawberries, or grapes.
What are some creative ways to use my homegrown cabbage?
The possibilities are endless! Use your homegrown cabbage in salads, slaws, soups, stews, stir-fries, and more. You can also ferment it to make sauerkraut or kimchi. Get creative and experiment with different recipes to find your favorites. Freshly harvested cabbage has a superior flavor and texture compared to store-bought cabbage.
Is growing cabbage on a balcony really worth the effort?
Absolutely! While it requires some effort, the rewards of growing your own cabbage are well worth it. You’ll enjoy fresh, flavorful produce, reduce your carbon footprint, and connect with nature in a meaningful way. Plus, it’s a fun and rewarding hobby that you can share with friends and family. So, give it a try and see for yourself!


Leave a Comment