
Grow Broccoli at Home – sounds intimidating, right? But trust me, it’s not! Imagine stepping outside your back door and harvesting fresh, vibrant broccoli for dinner. No more questionable supermarket produce; just crisp, homegrown goodness. For centuries, cultivating your own food has been a source of pride and self-sufficiency. From ancient Roman kitchen gardens to the victory gardens of wartime, growing your own vegetables connects you to a rich history of resourcefulness.
But why should you bother to grow broccoli at home? Well, beyond the historical connection, think about the taste! Freshly picked broccoli has a sweetness and crunch that store-bought varieties simply can’t match. Plus, you control everything – no harmful pesticides or mystery ingredients. In this article, I’m going to share some simple, DIY tricks and hacks that will have you harvesting your own broccoli in no time, even if you think you have a “brown thumb.” We’ll cover everything from seed starting to pest control, making the process fun and rewarding. Get ready to unleash your inner gardener!
Growing Broccoli at Home: A Beginner’s Guide
Hey there, fellow gardening enthusiasts! Ever dreamt of plucking fresh, vibrant broccoli heads straight from your backyard? Well, dream no more! Growing your own broccoli is surprisingly achievable, even for beginners. I’m going to walk you through everything you need to know, from seed to harvest, so you can enjoy delicious, homegrown broccoli.
Choosing Your Broccoli Variety
First things first, let’s talk broccoli varieties. There are tons to choose from, each with its own unique characteristics. Here are a few popular options:
* ‘Waltham 29’: A classic, reliable variety known for its medium-sized heads and good flavor. It’s a great all-around choice.
* ‘Calabrese’: This is probably the most common type you’ll find. It produces large, central heads and smaller side shoots after the main harvest.
* ‘DiCicco’: A fast-maturing variety that’s perfect if you’re a bit impatient. It produces smaller heads but offers a continuous harvest of side shoots.
* ‘Purple Sprouting’: For something a little different, try purple sprouting broccoli. It’s more cold-hardy and produces numerous smaller, purple florets.
Consider your climate and growing season when making your choice. Some varieties are better suited for warmer or cooler temperatures.
Starting Your Broccoli Seeds
Broccoli is a cool-season crop, meaning it thrives in cooler temperatures. In most regions, you’ll want to start your seeds indoors about 6-8 weeks before the last expected frost.
Here’s how I do it:
1. Gather Your Supplies: You’ll need seed starting trays or small pots, seed starting mix (a light, well-draining mix is essential), broccoli seeds, a spray bottle, and a heat mat (optional, but helpful).
2. Fill Your Trays: Fill your seed starting trays or pots with the seed starting mix. Gently tap them to settle the mix.
3. Sow the Seeds: Make a small indentation (about 1/4 inch deep) in the center of each cell or pot. Place 2-3 broccoli seeds in each indentation. This increases the chances of at least one seed germinating.
4. Cover and Water: Gently cover the seeds with more seed starting mix. Lightly mist the surface with water using a spray bottle. You want the soil to be moist, but not soggy.
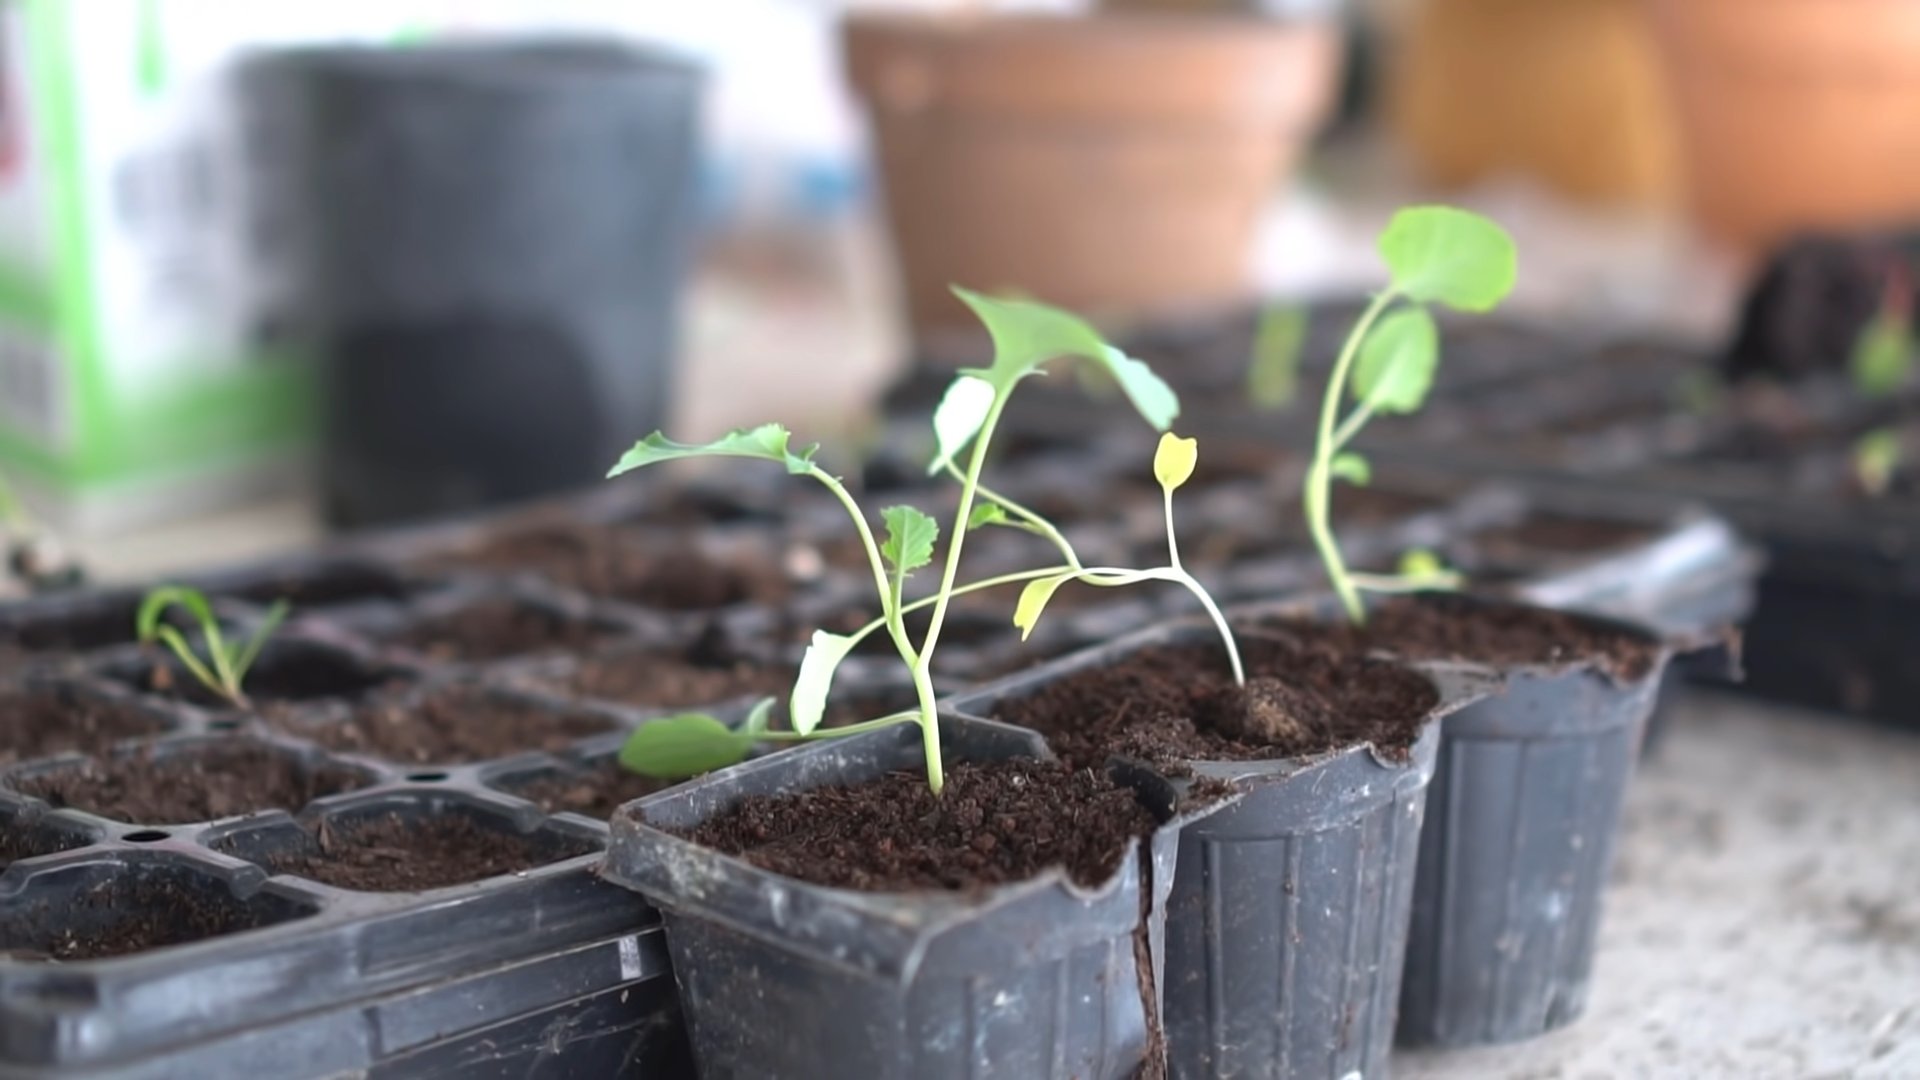
5. Provide Warmth and Light: Place the trays on a heat mat (if using) and cover them with a humidity dome or plastic wrap to create a greenhouse effect. This helps retain moisture and warmth, which promotes germination. Place the trays under grow lights or in a sunny window. Broccoli seedlings need plenty of light to grow strong and healthy.
6. Monitor and Water: Check the trays daily and mist the soil whenever it starts to dry out. Once the seeds germinate (usually within 5-10 days), remove the humidity dome or plastic wrap.
7. Thin the Seedlings: Once the seedlings have their first true leaves (the second set of leaves that appear after the initial seed leaves), thin them out by snipping off the weaker seedlings at the soil line, leaving only the strongest seedling in each cell or pot.
Transplanting Your Broccoli Seedlings
Once your broccoli seedlings have developed several sets of true leaves and the weather has warmed up (but still cool!), it’s time to transplant them into your garden.
1. Harden Off the Seedlings: Before transplanting, you need to “harden off” the seedlings. This means gradually exposing them to outdoor conditions to help them adjust to the sun, wind, and temperature changes. Start by placing the trays outdoors in a sheltered location for a few hours each day, gradually increasing the amount of time they spend outside over the course of a week.
2. Prepare the Garden Bed: Choose a location in your garden that receives at least 6 hours of sunlight per day. Broccoli needs plenty of sun to thrive. Amend the soil with compost or other organic matter to improve drainage and fertility. Broccoli prefers well-drained soil that is rich in nutrients.
3. Transplant the Seedlings: Dig holes that are slightly larger than the root balls of the seedlings. Gently remove the seedlings from their trays or pots and place them in the holes. Space the seedlings about 18-24 inches apart.
4. Water Thoroughly: After transplanting, water the seedlings thoroughly to help them settle in.
5. Mulch: Apply a layer of mulch around the plants to help retain moisture, suppress weeds, and regulate soil temperature. Straw, wood chips, or shredded leaves are all good options.
Caring for Your Broccoli Plants
Now that your broccoli plants are in the ground, it’s important to provide them with the care they need to grow strong and produce delicious heads.
1. Watering: Broccoli needs consistent moisture, especially during head formation. Water deeply and regularly, especially during dry spells. Aim for about 1-1.5 inches of water per week.
2. Fertilizing: Broccoli is a heavy feeder, so it needs plenty of nutrients. Fertilize your plants every 2-3 weeks with a balanced fertilizer or compost tea.
3. Weeding: Keep the garden bed free of weeds, which can compete with the broccoli plants for nutrients and water.
4. Pest Control: Broccoli is susceptible to several pests, including cabbage worms, aphids, and flea beetles. Regularly inspect your plants for signs of pests and take action if necessary. Here are a few organic pest control methods:
* Handpicking: Remove cabbage worms and other pests by hand.
* Floating Row Covers: Cover your plants with floating row covers to prevent pests from reaching them.
* Insecticidal Soap: Spray your plants with insecticidal soap to control aphids and other soft-bodied pests.
* Bacillus thuringiensis (Bt): This is a natural bacteria that is effective against cabbage worms.
5. Supporting the Plants: As the broccoli heads grow larger, they may become heavy and cause the plants to topple over. If this happens, you can support the plants with stakes or cages.
Harvesting Your Broccoli
The moment you’ve been waiting for! Harvesting your homegrown broccoli is incredibly satisfying.
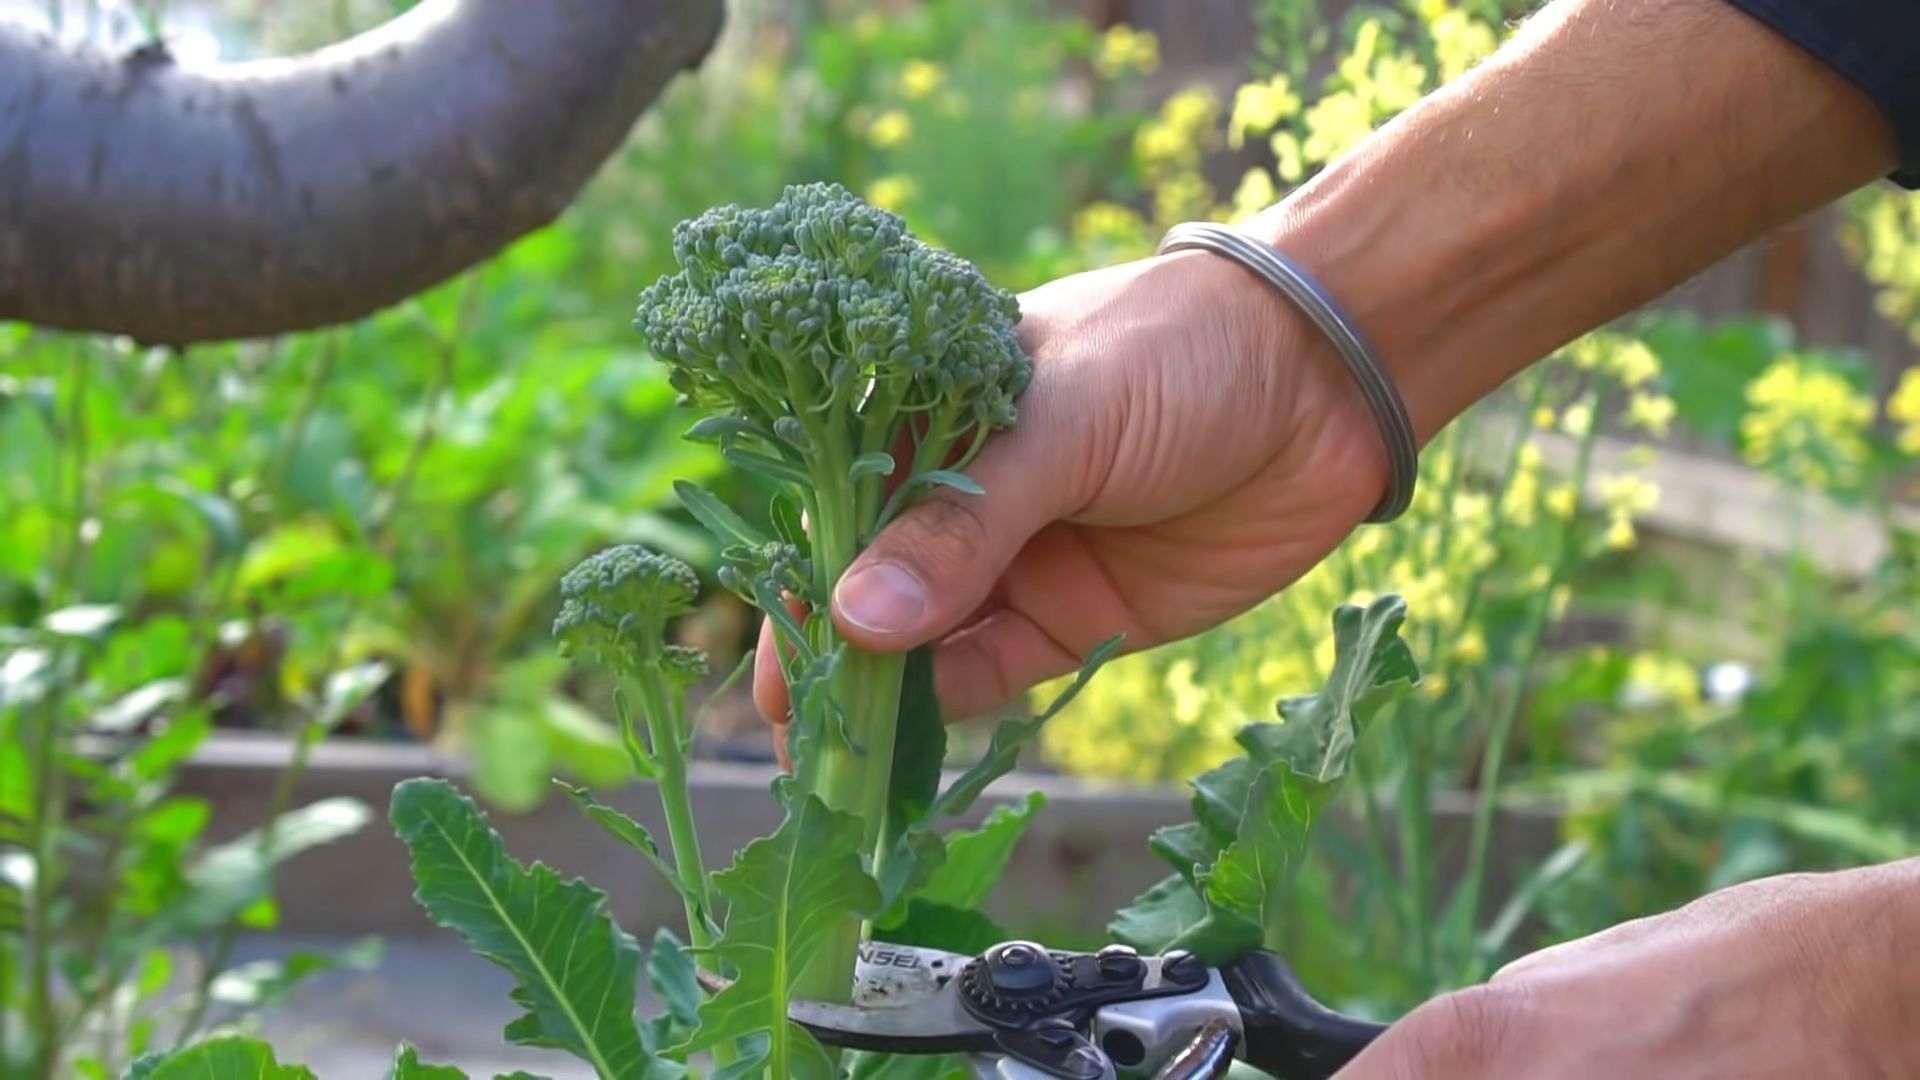
1. Timing is Key: Harvest your broccoli when the heads are firm, tight, and a deep green color. The individual florets should be tightly closed. If the florets start to open and turn yellow, it’s a sign that the broccoli is past its prime.
2. Cut the Head: Use a sharp knife to cut the main head of broccoli from the plant. Cut the stem at an angle, about 5-6 inches below the head.
3. Encourage Side Shoots: After harvesting the main head, the plant will often produce smaller side shoots. Continue to water and fertilize the plant to encourage these side shoots to develop. You can harvest these side shoots as they mature.
4. Storage: Store your freshly harvested broccoli in the refrigerator. It will keep for about a week.
Troubleshooting Common Broccoli Problems
Even with the best care, you might encounter a few problems while growing broccoli. Here are some common issues and how to address them:
* Yellowing Leaves: This can be caused by a variety of factors, including nutrient deficiencies, overwatering, or underwatering. Check the soil moisture and fertilize your plants if necessary.
* Small Heads: Small heads can be caused by insufficient sunlight, poor soil, or lack of nutrients. Make sure your plants are getting enough sun and fertilize them regularly.
* Bolting: Bolting (premature flowering) can occur if the weather gets too hot. Choose heat-tolerant varieties and provide shade during hot weather.
* Pest Infestations: Regularly inspect your plants for signs of pests and take action if necessary.
Enjoying Your Homegrown Broccoli
Congratulations! You’ve successfully grown your own broccoli. Now it’s time to enjoy the fruits (or rather, vegetables) of your labor.
Here are just a few ways to enjoy your homegrown broccoli:
* Steamed: Steaming is a simple and healthy way to cook broccoli.
* Roasted: Roasting broccoli brings out its natural sweetness.
* Stir-fried: Add broccoli to your favorite stir-fry recipe.
* In Soups: Broccoli adds flavor and nutrients to soups.
* Raw: Enjoy raw broccoli florets with your favorite dip.
Growing your own broccoli is a rewarding experience that allows you to enjoy fresh, healthy vegetables right from your backyard. With a little bit of planning and care, you can have a bountiful harvest of delicious broccoli. Happy gardening!
Conclusion
So, there you have it! Growing broccoli at home is not only achievable, but it’s also incredibly rewarding. From the satisfaction of nurturing a tiny seed into a vibrant, edible plant to the unparalleled freshness and flavor of homegrown produce, the benefits are undeniable. We’ve walked you through the essential steps, from selecting the right variety and preparing your soil to warding off pests and harvesting your bounty.
But why is this DIY trick a must-try? Beyond the obvious advantages of cost savings and access to organic, pesticide-free broccoli, growing your own allows you to connect with nature in a tangible way. It’s a therapeutic activity that can reduce stress and improve your overall well-being. Plus, you’ll have the bragging rights of serving up a delicious, homegrown side dish that’s sure to impress your family and friends.
Don’t be afraid to experiment with different varieties of broccoli to find your favorite. Try growing Romanesco broccoli for its stunning fractal patterns or sprouting broccoli for its tender shoots and leaves. You can also explore companion planting to deter pests and improve the health of your broccoli plants. Consider planting herbs like rosemary or thyme nearby, or flowers like marigolds to attract beneficial insects.
Growing broccoli at home is a journey, and like any journey, there may be a few bumps along the road. You might encounter pests, diseases, or unexpected weather conditions. But don’t let these challenges discourage you. With a little patience, persistence, and the knowledge you’ve gained from this guide, you’ll be well on your way to harvesting a bountiful crop of delicious, homegrown broccoli.
We wholeheartedly encourage you to give this DIY project a try. It’s a fun, educational, and ultimately rewarding experience that will transform the way you think about food. And most importantly, we want to hear about your experience! Share your photos, tips, and challenges in the comments below. Let’s create a community of home gardeners who are passionate about growing their own food. Let us know what worked for you, what didn’t, and any creative solutions you came up with. Your insights will help other aspiring broccoli growers succeed. So, grab your seeds, get your hands dirty, and embark on the exciting adventure of growing your own broccoli at home! You’ll be amazed at what you can accomplish.
Frequently Asked Questions (FAQs)
1. What is the best time of year to plant broccoli?
The best time to plant broccoli depends on your climate. Broccoli is a cool-season crop, meaning it thrives in temperatures between 60°F and 70°F (15°C and 21°C). In areas with mild winters, you can plant broccoli in the fall for a winter or early spring harvest. In colder climates, start your seeds indoors 6-8 weeks before the last expected frost and transplant them outdoors in the spring. You can also plant a second crop in late summer for a fall harvest. Pay attention to your local weather patterns and adjust your planting schedule accordingly.
2. How much sunlight does broccoli need?
Broccoli requires at least 6 hours of direct sunlight per day to thrive. Choose a planting location that receives plenty of sunlight throughout the day. If you live in a particularly hot climate, some afternoon shade can be beneficial to prevent the broccoli heads from bolting (going to seed prematurely).
3. What kind of soil is best for growing broccoli?
Broccoli prefers well-drained, fertile soil that is rich in organic matter. Amend your soil with compost or well-rotted manure before planting to improve its fertility and drainage. The ideal soil pH for broccoli is between 6.0 and 7.0. You can test your soil pH with a home testing kit and adjust it accordingly with lime (to raise the pH) or sulfur (to lower the pH).
4. How often should I water my broccoli plants?
Broccoli plants need consistent moisture to grow properly. Water deeply and regularly, especially during dry periods. Aim to keep the soil consistently moist but not waterlogged. A good rule of thumb is to water when the top inch of soil feels dry to the touch. Mulching around your broccoli plants can help retain moisture and suppress weeds.
5. What are some common pests and diseases that affect broccoli?
Broccoli is susceptible to a variety of pests and diseases, including cabbage worms, aphids, flea beetles, clubroot, and downy mildew. Regularly inspect your plants for signs of infestation or disease. You can control many pests with organic methods, such as handpicking, insecticidal soap, or Bacillus thuringiensis (Bt). To prevent diseases, practice crop rotation, ensure good air circulation, and avoid overhead watering.
6. How do I know when my broccoli is ready to harvest?
Broccoli is ready to harvest when the head is firm, compact, and the flower buds are tightly closed. The head should be a deep green color. Use a sharp knife to cut the head off the plant, leaving a few inches of stem. After harvesting the main head, the plant may produce smaller side shoots that you can also harvest.
7. Can I grow broccoli in containers?
Yes, you can grow broccoli in containers, but you’ll need to choose a large container (at least 5 gallons) to accommodate the plant’s root system. Use a high-quality potting mix and ensure the container has good drainage. Water and fertilize your container-grown broccoli plants regularly.
8. What are some good companion plants for broccoli?
Companion planting can help deter pests, attract beneficial insects, and improve the overall health of your broccoli plants. Some good companion plants for broccoli include:
* Herbs: Rosemary, thyme, sage, dill
* Flowers: Marigolds, nasturtiums
* Vegetables: Onions, garlic, lettuce, spinach
9. How can I prevent my broccoli from bolting?
Bolting (going to seed prematurely) can be caused by hot weather, stress, or inconsistent watering. To prevent bolting, choose bolt-resistant varieties, plant your broccoli at the appropriate time of year, provide consistent moisture, and protect your plants from extreme heat.
10. Is homegrown broccoli more nutritious than store-bought broccoli?
Homegrown broccoli is often more nutritious than store-bought broccoli because it is harvested at its peak ripeness and consumed shortly thereafter. Store-bought broccoli may have been harvested days or even weeks before it reaches your plate, resulting in a loss of nutrients. Growing your own broccoli allows you to control the growing conditions and ensure that your plants receive the nutrients they need to produce healthy, flavorful heads.
Leave a Comment