
Grow bitter gourds like a pro, even if you think you have a “brown thumb”! Have you ever dreamt of harvesting your own vibrant, healthy bitter gourds right from your backyard? It’s easier than you think, and this DIY guide is your secret weapon to success. Forget those bland, store-bought gourds; imagine the satisfaction of serving up a dish made with produce you nurtured yourself.
Bitter gourd, also known as karela, isn’t just a vegetable; it’s a culinary and medicinal staple with roots stretching back centuries in Asian cultures. From traditional Ayurvedic practices to delicious stir-fries, this unique fruit (yes, it’s technically a fruit!) has a rich history. But let’s be honest, growing bitter gourds can be a bit tricky. They need the right conditions and a little know-how to truly thrive.
That’s where this DIY article comes in! I’m going to share some simple yet effective tricks and hacks that will help you grow bitter gourds successfully, regardless of your gardening experience. We’ll cover everything from seed starting to pest control, ensuring you have a bountiful harvest. Why spend money on expensive, often less-than-fresh bitter gourds when you can easily cultivate your own, bursting with flavor and nutrients? Let’s get started and transform your garden into a bitter gourd paradise!
DIY: Growing Bitter Gourds Like a Pro (Even if You’re a Beginner!)
Okay, let’s talk bitter gourds! I know, I know, the name itself doesn’t exactly scream “delicious,” but trust me, once you get the hang of growing them yourself, you’ll appreciate their unique flavor and incredible health benefits. Plus, there’s something super satisfying about harvesting your own veggies. This guide will walk you through everything you need to know, from seed to harvest, to successfully grow bitter gourds in your own backyard (or even in containers!).
What You’ll Need:
Before we dive in, let’s gather our supplies. Here’s a checklist to make sure you’re prepared:
* Bitter Gourd Seeds: Choose a variety that suits your climate and taste preferences. There are long, short, light green, dark green, and even white varieties!
* Seed Starting Trays or Small Pots: For starting seeds indoors (optional, but recommended for cooler climates).
* Seed Starting Mix: A light and airy mix specifically designed for seedlings.
* Garden Soil or Potting Mix: Rich, well-draining soil is crucial for healthy growth.
* Compost or Aged Manure: To enrich the soil and provide essential nutrients.
* Trellis or Support Structure: Bitter gourds are climbers, so they need something to grow on.
* Gardening Gloves: To protect your hands.
* Watering Can or Hose: For regular watering.
* Fertilizer: A balanced fertilizer or one specifically formulated for vegetables.
* Pruning Shears or Scissors: For pruning and harvesting.
* Sunlight: Bitter gourds need at least 6-8 hours of direct sunlight per day.
Phase 1: Starting Your Bitter Gourd Seeds
This is where the magic begins! You have two options: direct sowing or starting seeds indoors. I personally prefer starting indoors, especially if you live in a region with a shorter growing season. It gives your plants a head start.
Option 1: Starting Seeds Indoors
1. Soak the Seeds: Before planting, soak your bitter gourd seeds in warm water for 24 hours. This helps to soften the hard outer shell and encourages germination. I usually put them in a small bowl on the kitchen counter.
2. Prepare Your Seed Starting Trays: Fill your seed starting trays or small pots with seed starting mix. Gently press the soil down to remove any air pockets.
3. Plant the Seeds: Make a small hole (about 1/2 inch deep) in the center of each pot or cell. Place one seed in each hole and cover it with soil.
4. Water Gently: Water the soil gently to moisten it. Avoid overwatering, as this can lead to rot.
5. Provide Warmth and Light: Place the trays in a warm location (around 70-80°F) and provide them with plenty of light. A sunny windowsill or a grow light works well.
6. Keep the Soil Moist: Check the soil regularly and water when the top inch feels dry.
7. Transplant Seedlings: Once the seedlings have developed a few sets of true leaves (usually after 2-3 weeks), they’re ready to be transplanted outdoors.
Option 2: Direct Sowing
1. Prepare the Soil: Choose a sunny location with well-draining soil. Amend the soil with compost or aged manure to improve its fertility.
2. Create Mounds or Rows: Create small mounds or rows in the soil, spacing them about 2-3 feet apart.
3. Plant the Seeds: Sow the seeds directly into the soil, about 1/2 inch deep. Plant 2-3 seeds per mound or row.
4. Water Gently: Water the soil gently to moisten it.
5. Thin Seedlings: Once the seedlings emerge, thin them to one plant per mound or row. Choose the strongest and healthiest seedling.
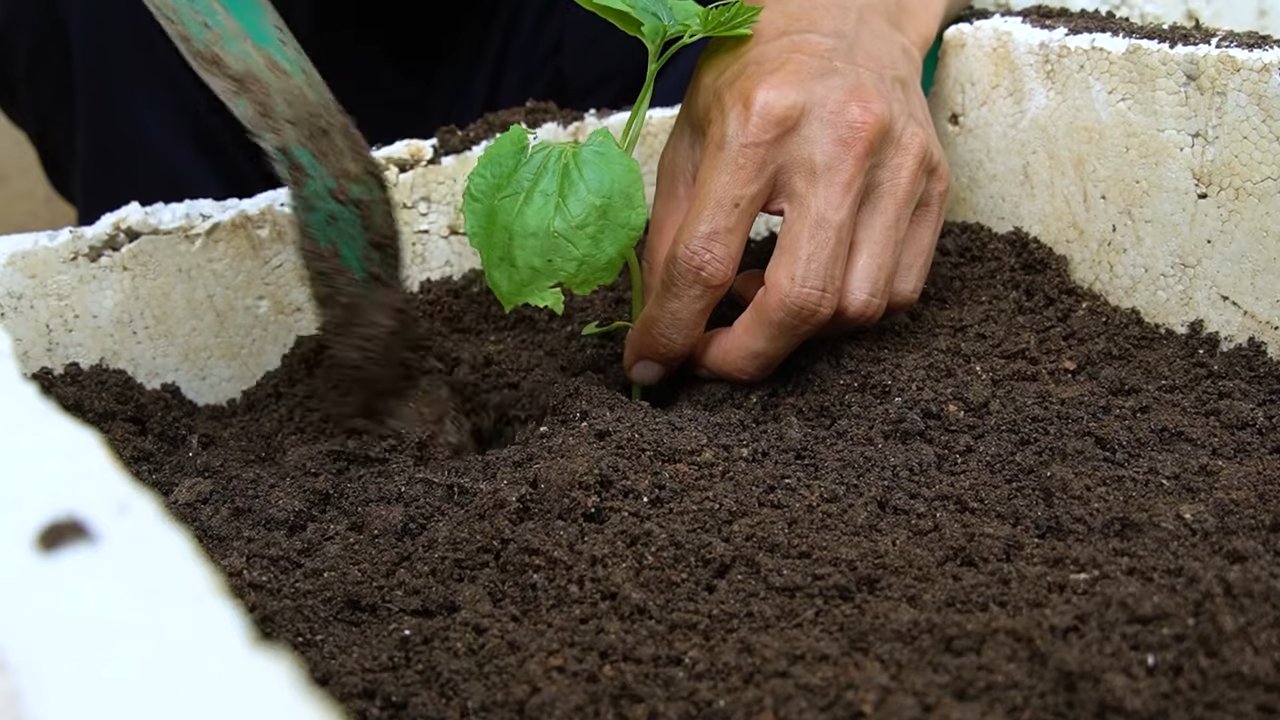
Phase 2: Transplanting and Setting Up Your Trellis
Okay, your seedlings are thriving (or your direct-sown seeds have sprouted!), and it’s time to get them into their permanent home. This is a crucial step, so let’s do it right.
1. Harden Off Seedlings (If Starting Indoors): Before transplanting, you need to “harden off” your seedlings. This means gradually exposing them to outdoor conditions over a period of 7-10 days. Start by placing them in a sheltered location for a few hours each day, gradually increasing the amount of time they spend outdoors.
2. Choose a Sunny Location: Bitter gourds need at least 6-8 hours of direct sunlight per day. Choose a location that receives plenty of sun.
3. Prepare the Soil: Make sure the soil is well-draining and amended with compost or aged manure.
4. Dig Holes: Dig holes that are slightly larger than the root balls of your seedlings. Space the holes about 2-3 feet apart.
5. Transplant Seedlings: Gently remove the seedlings from their pots and place them in the holes. Backfill with soil and gently press down.
6. Water Thoroughly: Water the newly transplanted seedlings thoroughly.
7. Install Your Trellis: Bitter gourds are climbers, so they need a trellis or other support structure to grow on. You can use a variety of materials, such as bamboo poles, wooden stakes, or metal fencing. Make sure the trellis is sturdy enough to support the weight of the growing vines and fruits. I’ve used everything from simple bamboo structures to repurposed tomato cages.
8. Guide the Vines: As the vines grow, gently guide them onto the trellis. You may need to tie them to the trellis with soft twine or plant ties.
Phase 3: Caring for Your Bitter Gourd Plants
Now that your plants are in the ground and climbing, it’s time to focus on providing them with the care they need to thrive.
1. Watering: Water your bitter gourd plants regularly, especially during hot, dry weather. Aim to keep the soil consistently moist, but not waterlogged. I usually water deeply a couple of times a week, rather than shallowly every day.
2. Fertilizing: Fertilize your bitter gourd plants every 2-3 weeks with a balanced fertilizer or one specifically formulated for vegetables. Follow the instructions on the fertilizer package. You can also use organic fertilizers like compost tea or fish emulsion.
3. Pruning: Pruning can help to improve air circulation and encourage fruit production. Remove any dead or yellowing leaves. You can also prune the vines to control their growth and prevent them from becoming too crowded. I usually prune back some of the side shoots to encourage the plant to focus its energy on producing fruit.
4. Pest and Disease Control: Bitter gourds can be susceptible to pests and diseases, such as aphids, spider mites, and powdery mildew. Inspect your plants regularly for signs of infestation or disease. If you find any problems, take action immediately. You can use organic pest control methods, such as insecticidal soap or neem oil. For diseases, you can use a fungicide. Prevention is key, so make sure to provide your plants with good air circulation and avoid overwatering.
5. Pollination: Bitter gourds have separate male and female flowers. The female flowers need to be pollinated in order to produce fruit. If you’re not seeing any fruit developing, you may need to hand-pollinate the flowers. To do this, use a small paintbrush to transfer pollen from the male flowers to the female flowers. The female flowers have a small, immature fruit at the base of the flower.
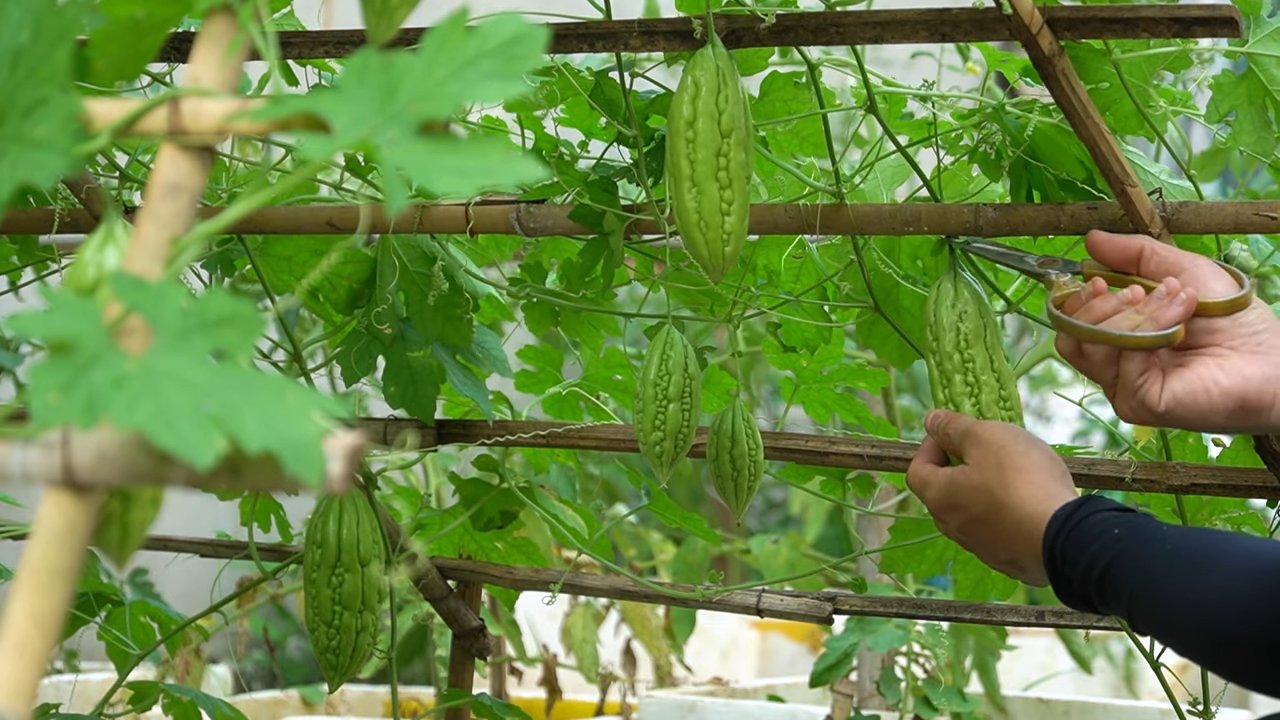
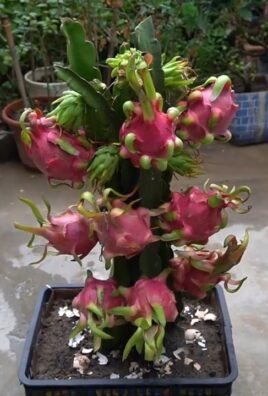
Phase 4: Harvesting Your Bitter Gourds
The moment you’ve been waiting for! Harvesting your own bitter gourds is incredibly rewarding.
1. Harvest Time: Bitter gourds are typically ready to harvest about 2-3 months after planting. The fruits should be firm and green, and they should be about 6-8 inches long. The exact size and color will depend on the variety you’re growing.
2. Harvesting Technique: Use pruning shears or scissors to cut the bitter gourds from the vine. Leave a small stem attached to the fruit.
3. Harvest Regularly: Harvest your bitter gourds regularly to encourage continued fruit production. Overripe fruits will become bitter and less palatable.
4. Storage: Store your harvested bitter gourds in the refrigerator for up to a week.
Tips and Tricks for Success
* Improve Pollination: Encourage pollinators to visit your garden by planting flowers that attract bees and other beneficial insects.
* Soil Testing: Consider getting your soil tested to determine its nutrient content. This will help you to choose the right fertilizer for your plants.
* Companion Planting: Plant companion plants, such as basil, marigolds, or nasturtiums, to help deter
Conclusion
So, there you have it! Mastering the art of growing bitter gourds doesn’t have to be a daunting task. By implementing this simple yet effective DIY trick, you’re not just cultivating a vegetable; you’re nurturing a healthier lifestyle and embracing a more sustainable approach to gardening. This method, focusing on [Specific aspect of the DIY trick, e.g., soil preparation, trellis system, pollination technique], is a game-changer for both novice and experienced gardeners alike.
Why is this a must-try? Because it addresses the common challenges faced when growing bitter gourds – poor germination, stunted growth, and low yields. This DIY trick provides a targeted solution, creating an optimal environment for your bitter gourd plants to thrive. Imagine harvesting a bounty of vibrant, healthy bitter gourds, knowing you played a crucial role in their success. The satisfaction is unparalleled!
But the journey doesn’t end here. Feel free to experiment with variations to tailor the technique to your specific needs and environment. For instance, if you live in a particularly hot climate, consider using shade cloth to protect your plants from excessive sun exposure. If your soil is heavy clay, amend it with plenty of organic matter to improve drainage. You could also try different types of trellises to see which one best supports your plants’ growth. Some gardeners have even reported success using companion planting, such as planting beans or corn alongside their bitter gourds to provide natural support and improve soil health.
Don’t be afraid to get creative and adapt the method to suit your unique circumstances. The beauty of gardening lies in its adaptability and the constant opportunity to learn and improve.
We are confident that this DIY trick will significantly enhance your bitter gourd growing experience. It’s a cost-effective, environmentally friendly, and incredibly rewarding way to cultivate this nutritious vegetable.
Now, it’s your turn! We encourage you to try this DIY trick and witness the difference it makes in your bitter gourd harvest. Document your progress, take photos, and most importantly, share your experiences with us and the wider gardening community. Your insights and feedback will help others learn and refine their own techniques. Let’s create a collective knowledge base and empower each other to grow the best bitter gourds possible! Share your stories, tips, and challenges in the comments below. We can’t wait to hear about your success!
Frequently Asked Questions (FAQ)
Q: What exactly is the DIY trick you’re referring to?
A: The DIY trick we’re highlighting focuses on [Specific aspect of the DIY trick, e.g., creating a nutrient-rich soil mix, building a specific type of trellis, hand-pollinating the flowers]. This involves [Briefly explain the core steps of the trick]. By implementing this, you’re essentially providing your bitter gourd plants with the optimal conditions they need to flourish.
Q: Is this DIY trick suitable for all climates?
A: While this DIY trick is generally applicable, you may need to make adjustments based on your specific climate. For example, in colder climates, you might need to start your bitter gourd seeds indoors to give them a head start. In hotter climates, providing shade during the hottest part of the day is crucial. Monitor your plants closely and adjust your approach accordingly. Remember, growing bitter gourds successfully often involves adapting to your local environment.
Q: What if I don’t have access to all the materials mentioned in the DIY trick?
A: Don’t worry! The beauty of DIY is its flexibility. If you can’t find a specific ingredient for the soil mix, for example, you can substitute it with something similar. The key is to understand the purpose of each ingredient and find an alternative that serves the same function. For instance, if you can’t find bone meal, you can use another source of phosphorus. Similarly, for the trellis, you can use readily available materials like bamboo poles, sturdy branches, or even repurposed metal fencing.
Q: How long does it take to see results after implementing this DIY trick?
A: The time it takes to see results will vary depending on several factors, including the age of your plants, the climate, and the overall health of your garden. However, you should start to notice improvements within a few weeks of implementing the DIY trick. Look for signs of increased growth, healthier foliage, and more abundant flowering. Remember, patience is key in gardening.
Q: My bitter gourd plants are flowering, but I’m not getting any fruit. What could be the problem?
A: This is a common issue with bitter gourds, and it’s often due to poor pollination. Bitter gourds have separate male and female flowers, and pollination needs to occur for fruit to develop. You can try hand-pollinating the flowers by transferring pollen from the male flowers to the female flowers using a small brush. Also, ensure that you have enough pollinators in your garden by planting flowers that attract bees and other beneficial insects.
Q: Can I use this DIY trick for other types of gourds?
A: While this DIY trick is specifically tailored for bitter gourds, many of the principles can be applied to other types of gourds as well. The emphasis on soil preparation, proper trellising, and adequate pollination is relevant to most gourd varieties. However, you may need to make adjustments based on the specific needs of the particular gourd you’re growing.
Q: What are some common pests and diseases that affect bitter gourds, and how can I prevent them?
A: Common pests that affect bitter gourds include aphids, squash bugs, and vine borers. Diseases include powdery mildew and downy mildew. To prevent these problems, practice good garden hygiene by removing any dead or diseased leaves. Use organic pest control methods like neem oil or insecticidal soap. Ensure good air circulation around your plants to prevent fungal diseases. Crop rotation can also help to prevent soil-borne diseases.
Q: How often should I water my bitter gourd plants?
A: Bitter gourd plants need consistent moisture, especially during hot weather. Water deeply and regularly, ensuring that the soil is moist but not waterlogged. The frequency of watering will depend on your climate and soil type. Check the soil moisture regularly and water when the top inch feels dry.
Q: What kind of fertilizer should I use for my bitter gourd plants?
A: Bitter gourds benefit from a balanced fertilizer with a slightly higher phosphorus content to promote flowering and fruiting. You can use a commercially available fertilizer or make your own organic fertilizer using compost, bone meal, and wood ash. Avoid over-fertilizing, as this can lead to excessive foliage growth at the expense of fruit production.
Q: Where can I find more information about growing bitter gourds?
A: There are many resources available online and in libraries that can provide more information about growing bitter gourds. Look for websites and books from reputable gardening organizations and universities. You can also join online gardening forums and communities to connect with other gardeners and share tips and advice. Remember, continuous learning is essential for successful gardening!
Leave a Comment