
Grow bigger collard greens, and watch your garden transform into a vibrant, leafy paradise! Have you ever dreamt of harvesting collard greens so large and luscious they could practically feed a small army? Well, you’re not alone! For generations, collard greens have been a staple in Southern cuisine, symbolizing prosperity and good health. Their rich history stretches back to ancient Greece, and they’ve been a beloved part of American gardens for centuries. But let’s face it, sometimes getting those greens to reach their full potential can feel like a real challenge.
That’s where this DIY guide comes in! I’m going to share some simple yet incredibly effective tricks and hacks that will help you grow bigger collard greens than you ever thought possible. Forget struggling with stunted growth and disappointing harvests. We’ll dive into everything from soil preparation and nutrient boosting to pest control and strategic watering. These are the secrets I’ve learned over years of gardening, and I’m excited to share them with you. Get ready to impress your friends, family, and even yourself with your bountiful collard green crop!
Growing Giant Collard Greens: My Secrets for a Bountiful Harvest
Okay, so you want collard greens the size of dinner plates, right? I get it! There’s nothing quite like a massive, healthy collard green leaf, whether you’re braising it, steaming it, or even using it as a wrap. I’ve spent years perfecting my collard green growing technique, and I’m excited to share my secrets with you. It’s not just about planting and hoping for the best; it’s about understanding what these leafy giants need to thrive. Let’s dive in!
Choosing the Right Variety
First things first, not all collard greens are created equal. Some varieties are naturally larger than others. Here are a few of my favorites for getting those impressive leaves:
* ‘Champion’: This is a classic for a reason. It produces large, slightly savoyed leaves with a mild flavor.
* ‘Georgia Southern’: Another reliable choice, known for its heat tolerance and large, smooth leaves.
* ‘Vates’: A compact variety, but don’t let that fool you. It still produces substantial leaves and is great for smaller gardens.
* ‘Top Bunch’: This one is a bit newer, but it’s quickly becoming a favorite for its disease resistance and impressive leaf size.
Preparing the Soil: The Foundation for Success
Collard greens are heavy feeders, meaning they need a lot of nutrients to grow big and strong. Proper soil preparation is absolutely crucial.
* Soil Testing: Before you do anything, get your soil tested! This will tell you exactly what nutrients are lacking and what the pH level is. You can usually get this done through your local agricultural extension office. Collards prefer a slightly acidic to neutral pH, around 6.0 to 7.0.
* Amending the Soil: Based on your soil test results, amend your soil accordingly. Here’s what I typically do:
* Compost: This is my go-to amendment. I add a generous layer (at least 2-3 inches) of well-rotted compost to the planting area. Compost improves soil structure, drainage, and provides essential nutrients.
* Aged Manure: Another excellent source of nutrients. Make sure it’s well-aged to avoid burning the plants.
* Slow-Release Fertilizer: I like to incorporate a slow-release fertilizer specifically formulated for vegetables. This provides a steady stream of nutrients over time. Look for one with a balanced NPK ratio (nitrogen, phosphorus, and potassium).
* Lime: If your soil is too acidic (pH below 6.0), add lime to raise the pH. Follow the instructions on the lime package.
* Sulfur: If your soil is too alkaline (pH above 7.0), add sulfur to lower the pH. Again, follow the package instructions.
* Tilling or Digging: Once you’ve added your amendments, till or dig them into the soil to a depth of at least 12 inches. This will create a loose, well-drained bed for your collard greens.
Planting Your Collard Greens: Timing is Everything
Collard greens are cool-season crops, meaning they thrive in cooler temperatures.
* Timing: I usually plant my collard greens in early spring (after the last frost) or late summer/early fall. This gives them plenty of time to mature before the weather gets too hot or too cold.
* Starting Seeds Indoors (Optional): If you want a head start, you can start your collard green seeds indoors about 4-6 weeks before the last frost. Sow the seeds in seed-starting trays or pots filled with seed-starting mix. Keep the soil moist and provide plenty of light.
* Direct Sowing: You can also direct sow collard green seeds directly into the garden. Sow the seeds about 1/2 inch deep and 1-2 inches apart. Once the seedlings emerge, thin them to about 18-24 inches apart.
* Transplanting: If you started your seeds indoors, harden them off for a week before transplanting them into the garden. Hardening off involves gradually exposing the seedlings to outdoor conditions. Transplant them 18-24 inches apart.
* Spacing: Proper spacing is crucial for getting those giant leaves. Give your collard greens plenty of room to grow – at least 18-24 inches between plants and 24-36 inches between rows.
Watering and Feeding: Keeping Your Collards Happy
Consistent watering and regular feeding are essential for healthy, productive collard greens.
* Watering: Water deeply and regularly, especially during dry periods. Collard greens need about 1-1.5 inches of water per week. Water at the base of the plants to avoid wetting the leaves, which can lead to fungal diseases.
* Fertilizing: Even with well-amended soil, collard greens benefit from regular fertilization. I like to side-dress my plants with a nitrogen-rich fertilizer every 4-6 weeks. You can use a commercial fertilizer or an organic option like fish emulsion or blood meal. Follow the instructions on the fertilizer package.
* Mulching: Apply a layer of mulch around your collard greens to help retain moisture, suppress weeds, and regulate soil temperature. I like to use straw, hay, or wood chips.
Pest and Disease Control: Protecting Your Investment
Collard greens are susceptible to a few pests and diseases. Here’s how I deal with them:
* Cabbage Worms: These are the most common pest of collard greens. They’re green caterpillars that chew holes in the leaves. I control them by handpicking them off the plants or using Bacillus thuringiensis (Bt), a biological insecticide.
* Aphids: These tiny insects suck the sap from the leaves, causing them to curl and distort. I control them by spraying the plants with a strong stream of water or using insecticidal soap.
* Flea Beetles: These small, jumping beetles chew tiny holes in the leaves. I control them by covering the plants with row covers or using insecticidal soap.
* Downy Mildew: This fungal disease causes yellow spots on the upper surface of the leaves and a white, downy growth on the underside. I prevent it by providing good air circulation and avoiding overhead watering. If it does occur, I treat it with a fungicide.
* Black Rot: This bacterial disease causes yellow, V-shaped lesions on the leaves. I prevent it by using disease-resistant varieties and practicing crop rotation. If it does occur, I remove and destroy the infected plants.
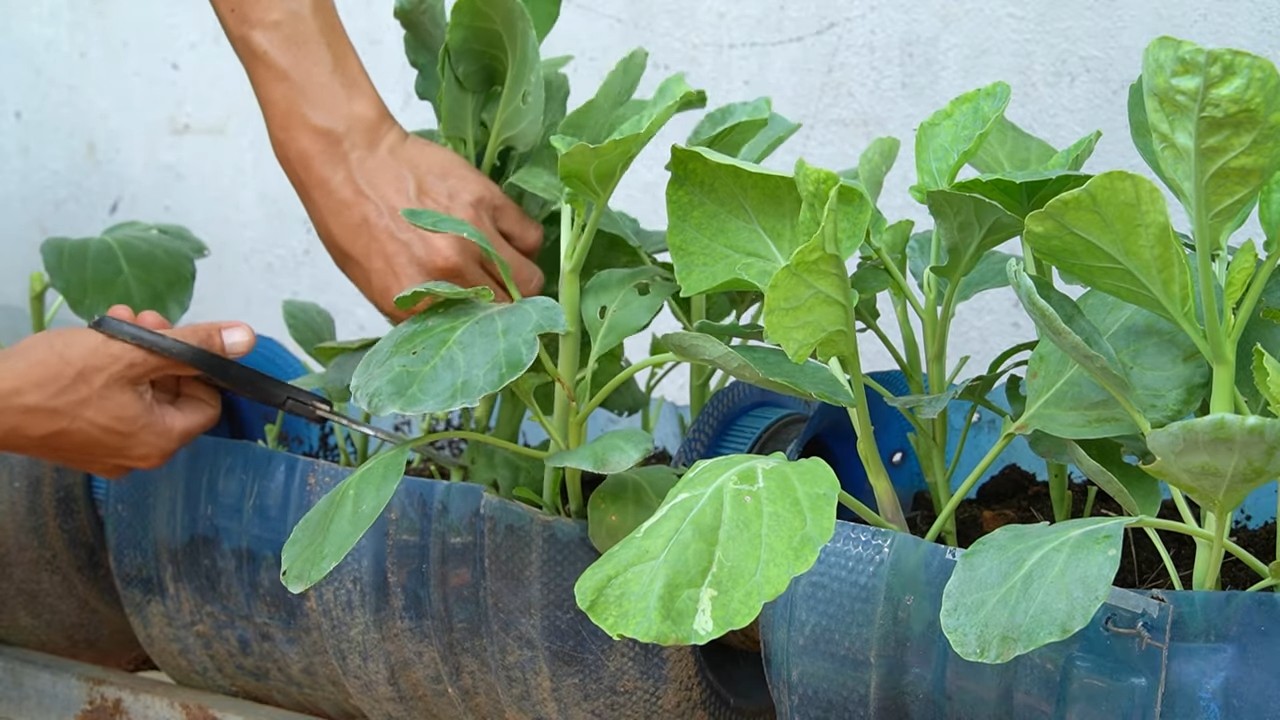
Harvesting Your Giant Collard Greens: The Moment of Truth
Now for the fun part – harvesting your giant collard greens!
* When to Harvest: You can start harvesting collard greens when the leaves are about 10-12 inches long. The lower leaves are usually the first to mature.
* How to Harvest: Simply cut the outer leaves off the plant with a sharp knife or scissors. Leave the inner leaves to continue growing.
* Continuous Harvest: Collard greens will continue to produce new leaves throughout the growing season, so you can harvest them continuously.
* Storage: Store harvested collard greens in the refrigerator for up to a week. Wrap them in a damp paper towel and place them in a plastic bag.
Extra Tips for Extra-Large Leaves
Here are a few extra tips I’ve learned over the years for maximizing the size of your collard green leaves:
* Sunlight: Collard greens need at least 6 hours of sunlight per day.
* Soil pH: Maintain a soil pH of 6.0 to 7.0.
* Nitrogen: Nitrogen is essential for leaf growth. Make sure your collard greens are getting enough nitrogen.
* Watering: Don’t let your collard greens dry out. Consistent watering is crucial.
* Pest Control: Keep pests under control to prevent them from damaging the leaves.
* Patience: Growing giant collard greens takes time and patience. Don’t get discouraged if your first attempt isn’t perfect. Just keep experimenting and learning.
Troubleshooting Common Problems
Even with the best care, you might encounter some problems along the way. Here are a few common issues and how to address them:
* Yellowing Leaves: This could be a sign of nutrient deficiency (especially nitrogen), overwatering, or disease. Check your soil pH and nutrient levels, adjust your watering schedule, and inspect the plants for signs of disease.
* Stunted Growth: This could be caused by poor soil, lack of sunlight, or pest infestation. Amend your soil, ensure the plants are getting enough sunlight, and control pests.
* Bitter Taste: Collard greens can become bitter in hot weather. Try planting them in a location that gets some afternoon shade or harvesting them in the morning when the temperatures are cooler.
Growing giant collard greens

Conclusion
So, there you have it! Unlocking the secret to growing bigger, more bountiful collard greens isn’t about expensive fertilizers or complicated techniques. It’s about understanding the plant’s needs and providing them in a simple, sustainable way. This DIY trick, focusing on enriching your soil with readily available resources and optimizing growing conditions, is a game-changer for any collard green enthusiast, from the novice gardener to the seasoned pro.
Why is this a must-try? Because it’s effective, economical, and environmentally friendly. You’re not relying on harsh chemicals that can harm the soil and potentially affect the taste and nutritional value of your greens. Instead, you’re nurturing a thriving ecosystem in your garden, leading to healthier plants and a more abundant harvest. Imagine the satisfaction of serving up a plate of vibrant, oversized collard greens that you grew yourself, knowing you did it with a little ingenuity and a lot of love.
But don’t just take our word for it. The beauty of this DIY approach is its adaptability. Feel free to experiment with different compost mixtures, adjusting the ratios to suit your specific soil conditions. Consider adding other organic amendments like bone meal for phosphorus or wood ash for potassium, further boosting your collard greens’ growth potential. You could even try companion planting, pairing your collards with herbs like rosemary or thyme, which can deter pests and enhance flavor.
And speaking of flavor, remember that the taste of your collard greens is directly influenced by the soil they grow in. A well-nourished plant will produce leaves that are richer, sweeter, and less bitter. This DIY trick isn’t just about size; it’s about quality. It’s about maximizing the flavor and nutritional benefits of your harvest.
We’re confident that this simple yet powerful technique will transform your collard green growing experience. It’s a testament to the fact that sometimes, the most effective solutions are the simplest ones. So, grab your gardening gloves, gather your supplies, and get ready to witness the incredible potential of your collard greens.
We encourage you to try this DIY trick and share your results with us! Post pictures of your giant collard greens on social media, tag us in your posts, and let us know what variations worked best for you. Your experiences will help other gardeners discover the joy of growing bigger, better collard greens. Let’s build a community of thriving collard green growers, sharing tips, tricks, and the satisfaction of a bountiful harvest. Happy gardening!
FAQ
What exactly does this DIY trick entail?
This DIY trick focuses on improving soil quality and optimizing growing conditions to promote larger collard green growth. It typically involves amending the soil with organic matter like compost, well-rotted manure, or other nutrient-rich materials. The goal is to provide the collard greens with a steady supply of essential nutrients, improve drainage, and enhance water retention. It also includes ensuring proper sunlight exposure (at least 6 hours per day) and adequate watering.
How often should I apply the compost or other soil amendments?
Ideally, you should amend the soil before planting your collard greens. Work the compost or other organic matter into the top 6-8 inches of soil. After planting, you can side-dress your collard greens with additional compost every 4-6 weeks throughout the growing season. This provides a continuous supply of nutrients as the plants grow.
What kind of compost is best for collard greens?
A well-balanced compost is ideal. You can use homemade compost, store-bought compost, or a combination of both. Look for compost that is rich in organic matter and has a good balance of nitrogen, phosphorus, and potassium. Worm castings are also an excellent addition, as they are packed with nutrients and beneficial microbes.
Can I use fertilizer instead of compost?
While fertilizer can provide nutrients, it’s generally not as beneficial as compost. Compost not only provides nutrients but also improves soil structure, drainage, and water retention. If you choose to use fertilizer, opt for an organic fertilizer specifically formulated for leafy greens. Follow the instructions on the fertilizer packaging carefully to avoid over-fertilizing, which can damage your plants.
How much sunlight do collard greens need?
Collard greens need at least 6 hours of direct sunlight per day to thrive. More sunlight is even better. If you’re growing collard greens in a shady area, they may not grow as large or produce as many leaves.
How often should I water my collard greens?
Water your collard greens regularly, especially during dry periods. The soil should be consistently moist but not waterlogged. Water deeply and less frequently, rather than shallowly and more often. This encourages the roots to grow deeper, making the plants more drought-tolerant.
What are some common pests and diseases that affect collard greens?
Common pests that affect collard greens include aphids, cabbage worms, and flea beetles. Common diseases include black rot and downy mildew. To prevent pests and diseases, practice good garden hygiene, such as removing weeds and debris. You can also use organic pest control methods, such as insecticidal soap or neem oil.
How do I know when my collard greens are ready to harvest?
Collard greens are typically ready to harvest when the leaves are about 10-12 inches long. You can harvest individual leaves as needed, starting with the outer leaves. Avoid harvesting more than one-third of the plant at a time, as this can stress the plant.
Will this DIY trick work in all climates?
This DIY trick can be adapted to most climates. However, you may need to adjust your growing practices based on your specific climate. For example, if you live in a hot climate, you may need to provide shade for your collard greens during the hottest part of the day. If you live in a cold climate, you may need to protect your collard greens from frost.
What if I don’t have a garden? Can I still grow bigger collard greens in containers?
Absolutely! You can definitely grow bigger collard greens in containers using this DIY trick. Choose a large container (at least 12 inches in diameter) and fill it with a high-quality potting mix amended with compost. Make sure the container has drainage holes. Follow the same watering and fertilizing guidelines as you would for collard greens grown in the ground. Container-grown collard greens may require more frequent watering and fertilizing, as the nutrients can leach out of the soil more quickly.
Leave a Comment