
Grow Bean Sprouts Easily and unlock a world of fresh, crunchy goodness right in your kitchen! Forget those pricey trips to the grocery store for a handful of sprouts. I’m going to show you how to cultivate your own vibrant batch, bursting with flavor and nutrients, with minimal effort and maximum reward.
Sprouting beans isn’t just a modern health trend; it’s a practice with roots stretching back centuries. In many Asian cultures, bean sprouts have long been a staple ingredient, valued for their nutritional benefits and ease of cultivation, especially during times of scarcity. Think of it as a tiny, edible garden that thrives indoors, regardless of the season!
Why should you learn to grow bean sprouts easily? Well, for starters, they’re incredibly versatile. Toss them into salads for a satisfying crunch, stir-fry them for a quick and healthy meal, or add them to sandwiches for an extra layer of texture and flavor. But more importantly, growing your own sprouts is a fantastic way to ensure you’re consuming fresh, pesticide-free produce. Plus, it’s a surprisingly rewarding experience to watch those tiny seeds transform into vibrant sprouts in just a few days. Ready to ditch the store-bought sprouts and embark on this fun and flavorful DIY adventure with me? Let’s get sprouting!
Bohnensprossen einfach selbst ziehen: Eine Schritt-für-Schritt-Anleitung
Hallo liebe DIY-Freunde! Ich liebe frische Sprossen, besonders Bohnensprossen. Sie sind knackig, gesund und eine tolle Ergänzung zu Salaten, Suppen und asiatischen Gerichten. Und das Beste daran? Sie sind super einfach selbst zu ziehen! Ich zeige euch heute, wie ihr mit minimalem Aufwand und ohne spezielle Ausrüstung eure eigenen Bohnensprossen züchten könnt. Los geht’s!
Was du brauchst:
* Eine Handvoll getrocknete Mungbohnen (gibt’s im Asia-Laden oder Reformhaus)
* Ein großes Einmachglas oder ein anderes Gefäß (mindestens 1 Liter Fassungsvermögen)
* Ein Stück Gaze, ein feinmaschiges Sieb oder ein Sprossendeckel
* Ein Gummiband oder eine Schnur
* Wasser (am besten gefiltert)
* Einen dunklen, kühlen Ort (z.B. ein Küchenschrank)
Die Vorbereitung:
Bevor wir loslegen, ist es wichtig, die Bohnen richtig vorzubereiten. Das ist der Schlüssel für eine erfolgreiche Sprossenzucht.
1. Bohnen auswählen und waschen: Sucht eure Mungbohnen sorgfältig aus und entfernt beschädigte oder verfärbte Exemplare. Gebt die Bohnen dann in ein Sieb und spült sie gründlich unter kaltem Wasser ab. Das entfernt Staub und andere Verunreinigungen.
2. Einweichen: Gebt die gewaschenen Bohnen in euer Einmachglas. Füllt das Glas mit reichlich kaltem Wasser, sodass die Bohnen gut bedeckt sind. Mungbohnen quellen stark auf, also lieber etwas mehr Wasser nehmen. Lasst die Bohnen für mindestens 8 Stunden, idealerweise über Nacht, einweichen. Ich mache das meistens abends, dann kann ich am nächsten Morgen direkt weitermachen.
3. Glas vorbereiten: Während die Bohnen einweichen, könnt ihr euer Glas vorbereiten. Reinigt es gründlich mit heißem Wasser und Spülmittel. Spült es anschließend gut aus, damit keine Spülmittelreste zurückbleiben.
Der Sprossen-Prozess:
Jetzt kommt der spannende Teil: das eigentliche Sprossen!
1. Wasser abgießen: Nach dem Einweichen gießt ihr das Wasser ab. Hier kommt euer Gaze-Tuch, Sieb oder Sprossendeckel ins Spiel. Befestigt das Tuch mit einem Gummiband oder einer Schnur am Glas, sodass die Bohnen nicht herausfallen, aber das Wasser gut ablaufen kann. Wenn ihr einen Sprossendeckel habt, schraubt ihn einfach auf das Glas.
2. Spülen: Spült die Bohnen im Glas gründlich mit frischem, kaltem Wasser. Achtet darauf, dass alle Bohnen gut befeuchtet werden. Das ist wichtig, damit sie nicht austrocknen.
3. Abtropfen lassen: Lasst das Wasser gut abtropfen. Stellt das Glas schräg in eine Schüssel oder einen Abtropfständer, damit überschüssiges Wasser ablaufen kann. Das verhindert Staunässe, die zu Schimmelbildung führen kann.
4. Dunkel lagern: Stellt das Glas an einen dunklen, kühlen Ort. Ein Küchenschrank oder eine Speisekammer sind ideal. Dunkelheit ist wichtig, damit die Sprossen schön weiß und knackig werden. Wenn sie zu viel Licht bekommen, werden sie grün und bitter.
5. Spülen und abtropfen (wiederholen): Spült die Bohnen mindestens zweimal täglich (morgens und abends) mit frischem, kaltem Wasser und lasst sie gut abtropfen. Dieser Schritt ist entscheidend, um die Sprossen feucht zu halten und Schimmelbildung zu verhindern. Ich mache das meistens direkt nach dem Zähneputzen, dann vergesse ich es nicht.
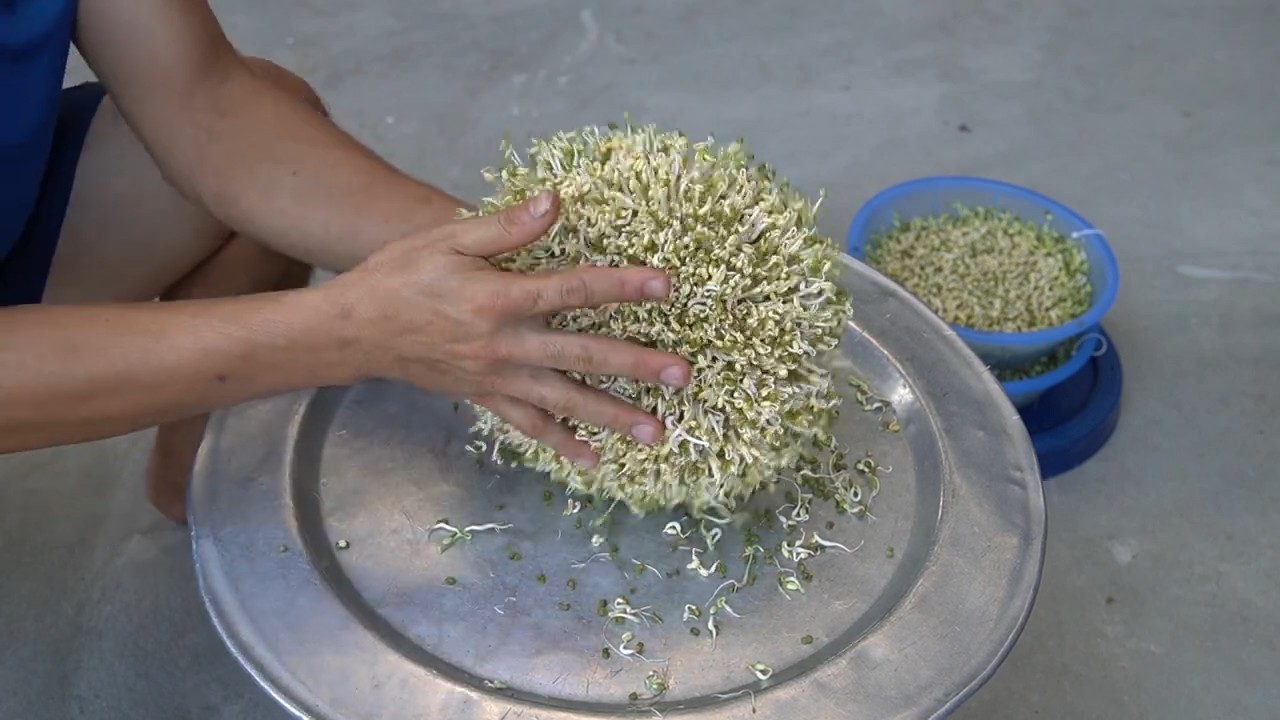
6. Beobachten und Geduld haben: Nach ein paar Tagen werdet ihr sehen, wie die ersten kleinen Sprossen aus den Bohnen sprießen. Je nach Temperatur und Luftfeuchtigkeit dauert es etwa 3-5 Tage, bis die Sprossen die gewünschte Länge erreicht haben.
Die Ernte:
Wenn die Sprossen etwa 5-7 cm lang sind, sind sie erntereif.
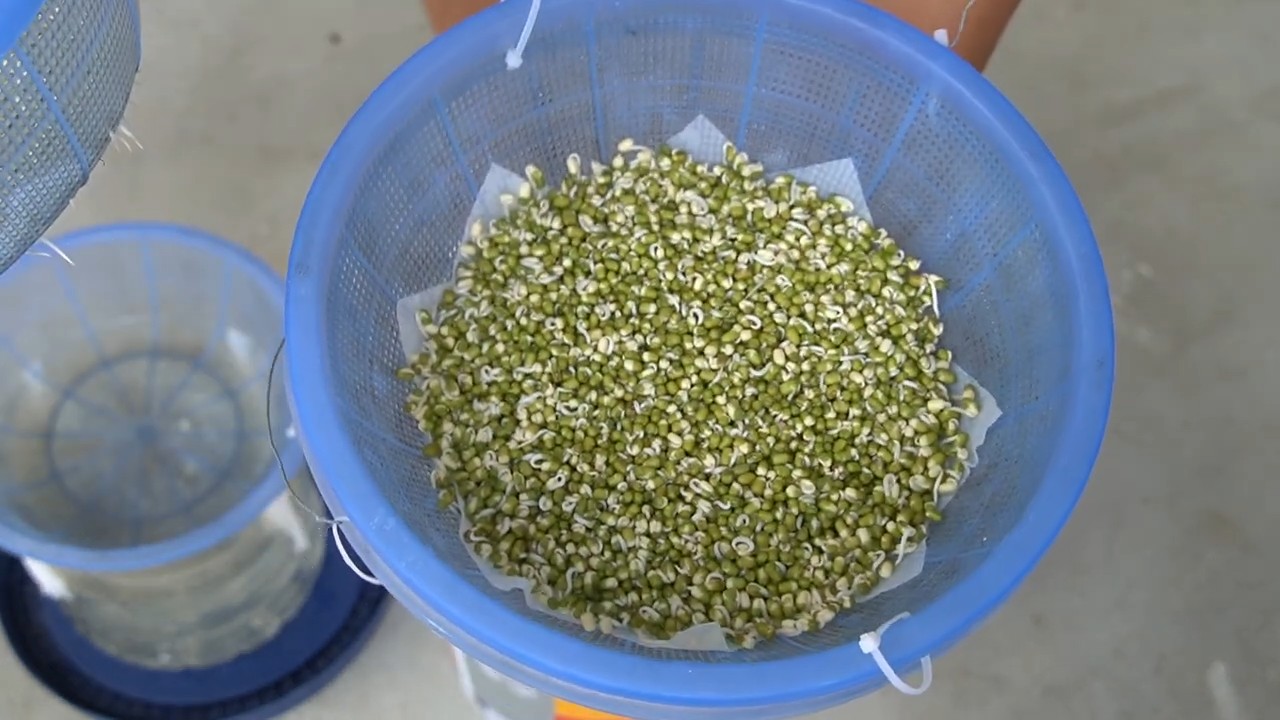
1. Ernten: Spült die Sprossen noch einmal gründlich mit kaltem Wasser ab. Entfernt eventuelle Schalenreste.
2. Abtropfen lassen: Lasst die Sprossen gut abtropfen.
3. Lagern: Bewahrt die Sprossen in einem luftdichten Behälter im Kühlschrank auf. Sie halten sich dort etwa 3-5 Tage.
Tipps und Tricks für perfekte Bohnensprossen:
Hallo liebe DIY-Freunde! Ich liebe frische Sprossen, besonders Bohnensprossen. Sie sind knackig, gesund und eine tolle Ergänzung zu Salaten, Suppen und asiatischen Gerichten. Und das Beste daran? Sie sind super einfach selbst zu ziehen! Ich zeige euch heute, wie ihr mit minimalem Aufwand und ohne spezielle Ausrüstung eure eigenen Bohnensprossen züchten könnt. Los geht’s!
Was du brauchst:
* Eine Handvoll getrocknete Mungbohnen (gibt’s im Asia-Laden oder Reformhaus)
* Ein großes Einmachglas oder ein anderes Gefäß (mindestens 1 Liter Fassungsvermögen)
* Ein Stück Gaze, ein feinmaschiges Sieb oder ein Sprossendeckel
* Ein Gummiband oder eine Schnur
* Wasser (am besten gefiltert)
* Einen dunklen, kühlen Ort (z.B. ein Küchenschrank)
Die Vorbereitung:
Bevor wir loslegen, ist es wichtig, die Bohnen richtig vorzubereiten. Das ist der Schlüssel für eine erfolgreiche Sprossenzucht.
1. Bohnen auswählen und waschen: Sucht eure Mungbohnen sorgfältig aus und entfernt beschädigte oder verfärbte Exemplare. Gebt die Bohnen dann in ein Sieb und spült sie gründlich unter kaltem Wasser ab. Das entfernt Staub und andere Verunreinigungen.
2. Einweichen: Gebt die gewaschenen Bohnen in euer Einmachglas. Füllt das Glas mit reichlich kaltem Wasser, sodass die Bohnen gut bedeckt sind. Mungbohnen quellen stark auf, also lieber etwas mehr Wasser nehmen. Lasst die Bohnen für mindestens 8 Stunden, idealerweise über Nacht, einweichen. Ich mache das meistens abends, dann kann ich am nächsten Morgen direkt weitermachen.
3. Glas vorbereiten: Während die Bohnen einweichen, könnt ihr euer Glas vorbereiten. Reinigt es gründlich mit heißem Wasser und Spülmittel. Spült es anschließend gut aus, damit keine Spülmittelreste zurückbleiben.
Der Sprossen-Prozess:
Jetzt kommt der spannende Teil: das eigentliche Sprossen!
1. Wasser abgießen: Nach dem Einweichen gießt ihr das Wasser ab. Hier kommt euer Gaze-Tuch, Sieb oder Sprossendeckel ins Spiel. Befestigt das Tuch mit einem Gummiband oder einer Schnur am Glas, sodass die Bohnen nicht herausfallen, aber das Wasser gut ablaufen kann. Wenn ihr einen Sprossendeckel habt, schraubt ihn einfach auf das Glas.
2. Spülen: Spült die Bohnen im Glas gründlich mit frischem, kaltem Wasser. Achtet darauf, dass alle Bohnen gut befeuchtet werden. Das ist wichtig, damit sie nicht austrocknen.
3. Abtropfen lassen: Lasst das Wasser gut abtropfen. Stellt das Glas schräg in eine Schüssel oder einen Abtropfständer, damit überschüssiges Wasser ablaufen kann. Das verhindert Staunässe, die zu Schimmelbildung führen kann.
4. Dunkel lagern: Stellt das Glas an einen dunklen, kühlen Ort. Ein Küchenschrank oder eine Speisekammer sind ideal. Dunkelheit ist wichtig, damit die Sprossen schön weiß und knackig werden. Wenn sie zu viel Licht bekommen, werden sie grün und bitter.
5. Spülen und abtropfen (wiederholen): Spült die Bohnen mindestens zweimal täglich (morgens und abends) mit frischem, kaltem Wasser und lasst sie gut abtropfen. Dieser Schritt ist entscheidend, um die Sprossen feucht zu halten und Schimmelbildung zu verhindern. Ich mache das meistens direkt nach dem Zähneputzen, dann vergesse ich es nicht.
6. Beobachten und Geduld haben: Nach ein paar Tagen werdet ihr sehen, wie die ersten kleinen Sprossen aus den Bohnen sprießen. Je nach Temperatur und Luftfeuchtigkeit dauert es etwa 3-5 Tage, bis die Sprossen die gewünschte Länge erreicht haben.
Die Ernte:
Wenn die Sprossen etwa 5-7 cm lang sind, sind sie erntereif.
1. Ernten: Spült die Sprossen noch einmal gründlich mit kaltem Wasser ab. Entfernt eventuelle Schalenreste.
2. Abtropfen lassen: Lasst die Sprossen gut abtropfen.
3. Lagern: Bewahrt die Sprossen in einem luftdichten Behälter im Kühlschrank auf. Sie halten sich dort etwa 3-5 Tage.
Tipps und Tricks für perfekte Bohnensprossen:
* Qualität der Bohnen: Verwendet nur frische, qualitativ hochwertige Mungbohnen. Alte Bohnen keimen möglicherweise nicht richtig.
* Hygiene: Achtet auf Sauberkeit! Verwendet saubere Gläser und spült die Sprossen regelmäßig, um Schimmelbildung zu vermeiden.
* Belüftung: Sorgt für eine gute Belüftung, damit die Sprossen nicht faulen. Stellt das Glas nicht zu eng in den Schrank.
* Temperatur: Die ideale Temperatur für die Sprossenzucht liegt zwischen 20 und 25 Grad Celsius.
* Schimmel vermeiden: Wenn ihr Schimmel entdeckt, entsorgt die Sprossen sofort. Schimmel ist gesundheitsschädlich.
* Variationen: Ihr könnt auch andere Bohnen oder Samen sprießen lassen, z.B. Linsen, Kichererbsen oder Radieschensamen. Die Vorgehensweise ist ähnlich.
* Geschmack: Der Geschmack der Sprossen variiert je nach Sorte. Probiert verschiedene Sorten aus, um eure Lieblingssorte zu finden.
* Verwendung: Bohnensprossen sind vielseitig einsetzbar. Sie passen gut zu Salaten, Suppen, Wok-Gerichten, Frühlingsrollen und vielem mehr.
* Gesundheit: Sprossen sind reich an Vitaminen, Mineralstoffen und Enzymen. Sie sind eine gesunde und leckere Ergänzung zu eurer Ernährung.
Häufige Probleme und Lösungen:
* Schimmelbildung: Ursache: Zu wenig Belüftung, zu hohe Luftfeuchtigkeit, unsaubere Gläser. Lösung: Sorgt für bessere Belüftung, spült die Sprossen häufiger, verwendet saubere Gläser.
* Keine Keimung: Ursache: Alte Bohnen, zu wenig Wasser, zu niedrige Temperatur. Lösung: Verwendet frische Bohnen, achtet auf ausreichend Wasser, sorgt für eine angemessene Temperatur.
* Bitterer Geschmack: Ursache: Zu viel Licht. Lösung: Lagert die Sprossen an einem dunkleren Ort.
* Faule Sprossen: Ursache: Staunässe. Lösung: Lasst das Wasser nach dem Spülen gut abtropfen.
Fazit:
Bohnensprossen selbst zu ziehen ist wirklich kinderleicht und macht Spaß! Mit dieser Anleitung könnt ihr euch jederzeit frische, gesunde Sprossen auf den Tisch zaubern. Probiert es aus und lasst euch von dem Ergebnis überraschen! Ich wünsche euch viel Erfolg beim Sprossen ziehen! Und denkt daran: Übung macht den Meister! Also nicht aufgeben, wenn es beim ersten Mal nicht perfekt klappt. Viel Spaß!
Conclusion
So, there you have it! Growing your own bean sprouts at home is not only incredibly easy and cost-effective, but it also provides you with a constant supply of fresh, nutritious ingredients right at your fingertips. Forget those limp, pre-packaged sprouts from the grocery store – with this simple DIY trick, you can enjoy crisp, flavorful bean sprouts whenever you want.
The beauty of this method lies in its simplicity. You don’t need any fancy equipment or specialized knowledge. Just a jar, some beans, water, and a little patience. The entire process is remarkably hands-off, requiring only a few minutes of your time each day. And the reward? A bounty of fresh, crunchy bean sprouts bursting with vitamins and minerals.
But the benefits extend beyond convenience and cost savings. By growing your own bean sprouts, you have complete control over the quality of your ingredients. You can choose organic beans, ensuring that your sprouts are free from pesticides and other harmful chemicals. You also know exactly where your food is coming from, which is a comforting thought in today’s world.
Looking for variations? Absolutely! Experiment with different types of beans to discover your favorite flavor profiles. Mung beans are the most common choice, but you can also try adzuki beans, lentil sprouts, or even alfalfa seeds. Each variety offers a unique taste and texture, adding exciting new dimensions to your salads, sandwiches, and stir-fries.
Consider adding a touch of spice to your sprouting process. A pinch of red pepper flakes or a few slices of ginger can infuse your bean sprouts with a subtle heat and complexity. You can also experiment with different sprouting mediums, such as hemp seeds or flax seeds, to add extra nutritional value.
Another fun variation is to grow your bean sprouts in a tiered sprouting system. These systems allow you to grow multiple batches of sprouts simultaneously, ensuring a continuous supply. They also provide better air circulation and drainage, which can help prevent mold growth.
This DIY trick for growing bean sprouts is a must-try for anyone looking to add fresh, healthy ingredients to their diet. It’s a simple, sustainable, and rewarding way to connect with your food and enjoy the delicious flavors of homegrown produce.
We wholeheartedly encourage you to give this method a try. Once you experience the satisfaction of harvesting your own bean sprouts, you’ll never go back to store-bought again. And don’t forget to share your experiences with us! We’d love to hear about your successes, your challenges, and your creative variations. Post photos of your homegrown bean sprouts on social media and tag us. Let’s spread the word about this amazing DIY trick and inspire others to grow their own food!
Frequently Asked Questions (FAQ)
What types of beans can I use to grow bean sprouts?
The most common and readily available bean for sprouting is the mung bean. However, you can also successfully sprout other types of beans and seeds, including adzuki beans, lentils, chickpeas, alfalfa seeds, radish seeds, and broccoli seeds. Each type will have a slightly different flavor and texture. Experiment to find your favorites! Avoid using kidney beans or other beans that are toxic when raw; these require cooking to be safe for consumption.
How long does it take to grow bean sprouts?
Generally, bean sprouts take between 3 to 5 days to grow to a usable size. The exact time will depend on the type of bean, the temperature, and the humidity. Mung beans tend to sprout relatively quickly, while other varieties may take a bit longer. Keep an eye on your sprouts and harvest them when they reach your desired length and thickness.
What is the best way to store bean sprouts?
Once your bean sprouts are ready, rinse them thoroughly and drain them well. Store them in an airtight container lined with a paper towel in the refrigerator. The paper towel will help absorb excess moisture and prevent the sprouts from becoming soggy. Properly stored bean sprouts can last for up to a week in the refrigerator.
How often should I rinse the bean sprouts?
Rinsing your bean sprouts is crucial for preventing mold growth and ensuring that they stay fresh and crisp. You should rinse them at least twice a day, preferably in the morning and evening. Use cool, clean water and gently swish the sprouts around to remove any debris or build-up. Drain them thoroughly after rinsing.
What if my bean sprouts start to smell bad?
A foul odor is a sign that your bean sprouts have gone bad and are likely contaminated with bacteria or mold. Discard them immediately. To prevent this, ensure you are rinsing them regularly and thoroughly, and that your sprouting container is clean. Proper air circulation is also important.
Can I eat the bean sprout roots?
Yes, the roots of bean sprouts are perfectly edible. They are a natural part of the sprouting process and are safe to consume. Some people even prefer the slightly nutty flavor of the roots.
Why are my bean sprouts not sprouting?
There could be several reasons why your bean sprouts are not sprouting. First, make sure that your beans are viable and haven’t expired. Old beans may have a lower germination rate. Second, ensure that you are providing adequate moisture. The beans should be kept consistently moist but not waterlogged. Third, check the temperature. Bean sprouts prefer a warm environment, ideally between 70-80°F (21-27°C). Finally, make sure the beans are not exposed to direct sunlight, which can inhibit sprouting.
Is it safe to eat raw bean sprouts?
While bean sprouts are generally safe to eat raw, there is a small risk of bacterial contamination. To minimize this risk, purchase your beans from a reputable source, rinse them thoroughly before sprouting, and maintain a clean sprouting environment. If you are concerned about food safety, you can lightly cook your bean sprouts before eating them.
Can I grow bean sprouts without a jar?
Yes, you can grow bean sprouts without a jar. You can use a sprouting bag, a tiered sprouting system, or even a colander lined with cheesecloth. The key is to provide adequate moisture, drainage, and air circulation.
What are the nutritional benefits of bean sprouts?
Bean sprouts are a nutritional powerhouse, packed with vitamins, minerals, and antioxidants. They are a good source of vitamin C, vitamin K, folate, and fiber. They are also low in calories and fat, making them a healthy addition to any diet. Growing bean sprouts allows you to access these benefits easily and affordably.
How do I prevent mold from growing on my bean sprouts?
Preventing mold growth is essential for successful bean sprouting. The most important factors are cleanliness, proper rinsing, and good air circulation. Use a clean sprouting container, rinse your sprouts thoroughly at least twice a day, and ensure that the container is well-ventilated. Avoid overcrowding the sprouts, as this can trap moisture and promote mold growth. If you notice any signs of mold, discard the entire batch immediately.
Can I use tap water to grow bean sprouts?
While tap water is generally safe to use, it may contain chlorine or other chemicals that can inhibit sprouting. If you are concerned about the quality of your tap water, you can use filtered water or let the tap water sit for 24 hours to allow the chlorine to dissipate.
What do I do if my bean sprouts are too bitter?
Bitterness in bean sprouts can sometimes occur due to over-sprouting or exposure to too much light. To avoid this, harvest your sprouts when they reach your desired size and keep them out of direct sunlight. You can also try soaking the sprouts in cold water for a few hours before eating them to reduce the bitterness.
Leave a Comment