
Grow bags for cantaloupe: Ever dreamt of biting into a juicy, sun-ripened cantaloupe, bursting with flavor, grown right in your own backyard? I know I have! But the reality of limited space or less-than-ideal soil can often squash those dreams faster than you can say “melon.” That’s where the magic of grow bags comes in, transforming even the smallest patios into thriving cantaloupe havens.
For centuries, humans have cultivated melons, with evidence suggesting their presence in ancient Egypt and beyond. While traditional in-ground gardening has its merits, modern life often demands more adaptable solutions. That’s where grow bags shine. They offer a portable, space-saving alternative, allowing you to control the soil quality and drainage – crucial for those sweet, orange delights.
This DIY guide is your passport to cantaloupe success, regardless of your gardening experience. I’ll walk you through the simple steps of using grow bags for cantaloupe, from choosing the right bag size to providing the perfect nutrients. Imagine the satisfaction of harvesting your own homegrown cantaloupe, knowing you nurtured it from seed to table. Say goodbye to bland, store-bought melons and hello to a summer filled with sweet, homegrown goodness! Let’s get growing!
DIY Cantaloupe Grow Bags: Bountiful Harvests in Small Spaces!
Hey there, fellow gardeners! Are you dreaming of juicy, sweet cantaloupes but short on garden space? Don’t worry, I’ve got you covered! I’m going to walk you through creating your own super-effective cantaloupe grow bags. This is a fantastic way to enjoy homegrown melons, even if you only have a balcony, patio, or small yard. Let’s get started!
Why Grow Bags for Cantaloupes?
Grow bags offer several advantages over traditional in-ground gardening, especially for cantaloupes:
* Improved Drainage: Cantaloupes hate soggy roots. Grow bags provide excellent drainage, preventing root rot and promoting healthy growth.
* Better Aeration: The fabric of grow bags allows air to circulate around the roots, leading to stronger, more vigorous plants.
* Temperature Control: Grow bags warm up faster in the spring, giving your cantaloupes a head start. They also help regulate soil temperature during hot summer months.
* Portability: Need to move your cantaloupes to a sunnier spot or protect them from a sudden frost? No problem! Grow bags are easy to move.
* Space Saving: Perfect for small spaces, grow bags allow you to grow cantaloupes where you might not have thought possible.
* Reduced Soilborne Diseases: By using fresh potting mix in your grow bags, you minimize the risk of soilborne diseases that can plague in-ground gardens.
Materials You’ll Need
Before we dive in, let’s gather our supplies. Here’s what you’ll need to create your cantaloupe grow bags:
* Heavy-Duty Landscape Fabric: This is the key ingredient! Choose a thick, durable landscape fabric that can withstand the weight of the soil and the growing cantaloupe plant. I recommend a fabric that is at least 6 oz.
* Potting Mix: A high-quality potting mix is essential for healthy cantaloupe growth. Look for a mix that is well-draining and contains plenty of organic matter. Avoid using garden soil, as it can compact in grow bags and hinder drainage.
* Measuring Tape: To ensure your grow bags are the right size.
* Scissors or Utility Knife: For cutting the landscape fabric.
* Sewing Machine (Optional): While you can hand-sew the grow bags, a sewing machine will make the process much faster and more durable.
* Heavy-Duty Thread: If using a sewing machine, choose a strong thread that can withstand outdoor conditions.
* Safety Pins or Clips: To hold the fabric in place while sewing.
* Grommets and Grommet Tool (Optional): For adding drainage holes to the bottom of the grow bags.
* Watering Can or Hose: For watering your cantaloupe plants.
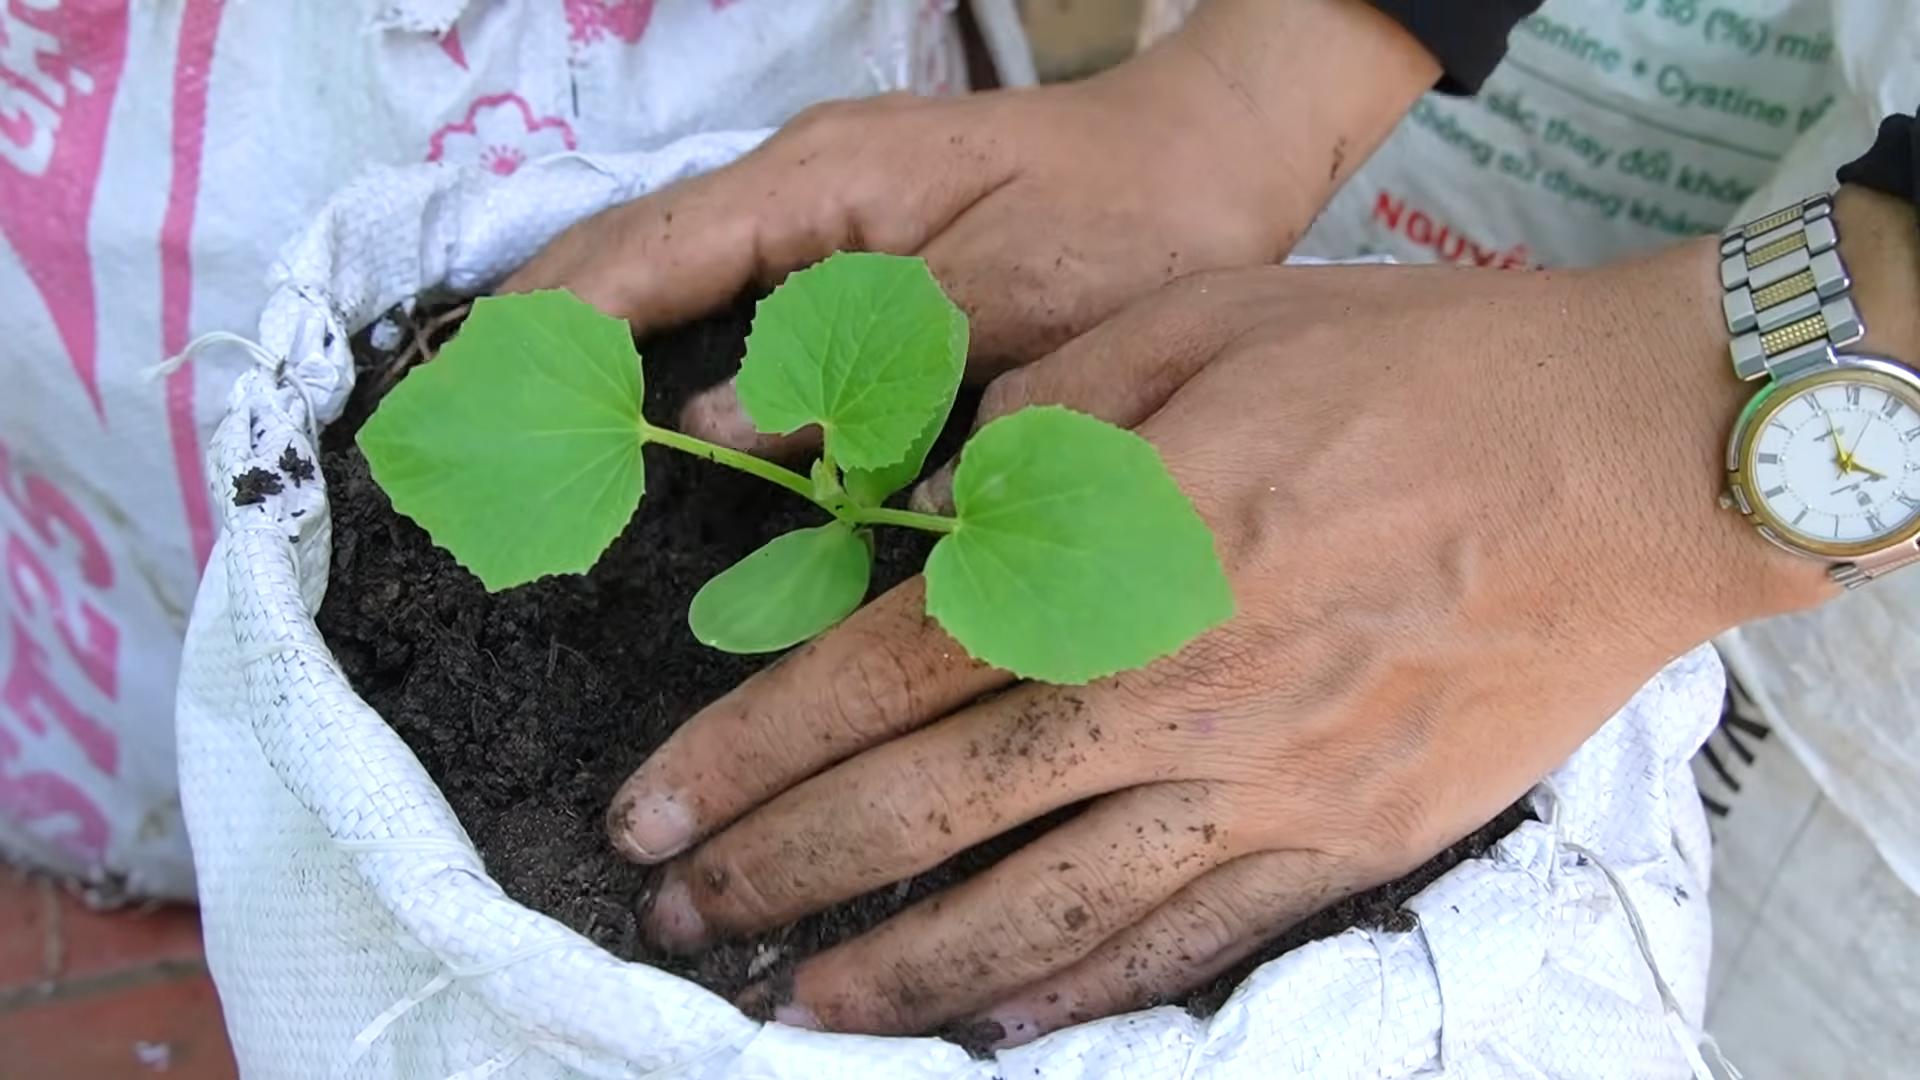
* Cantaloupe Seedlings or Seeds: Of course, you’ll need something to grow! You can either start your cantaloupes from seed indoors or purchase seedlings from a local nursery.
* Slow-Release Fertilizer: To provide your cantaloupe plants with the nutrients they need throughout the growing season.
* Trellis or Support System: Cantaloupes are vining plants and will need support as they grow. A trellis, tomato cage, or even a sturdy stake will work.
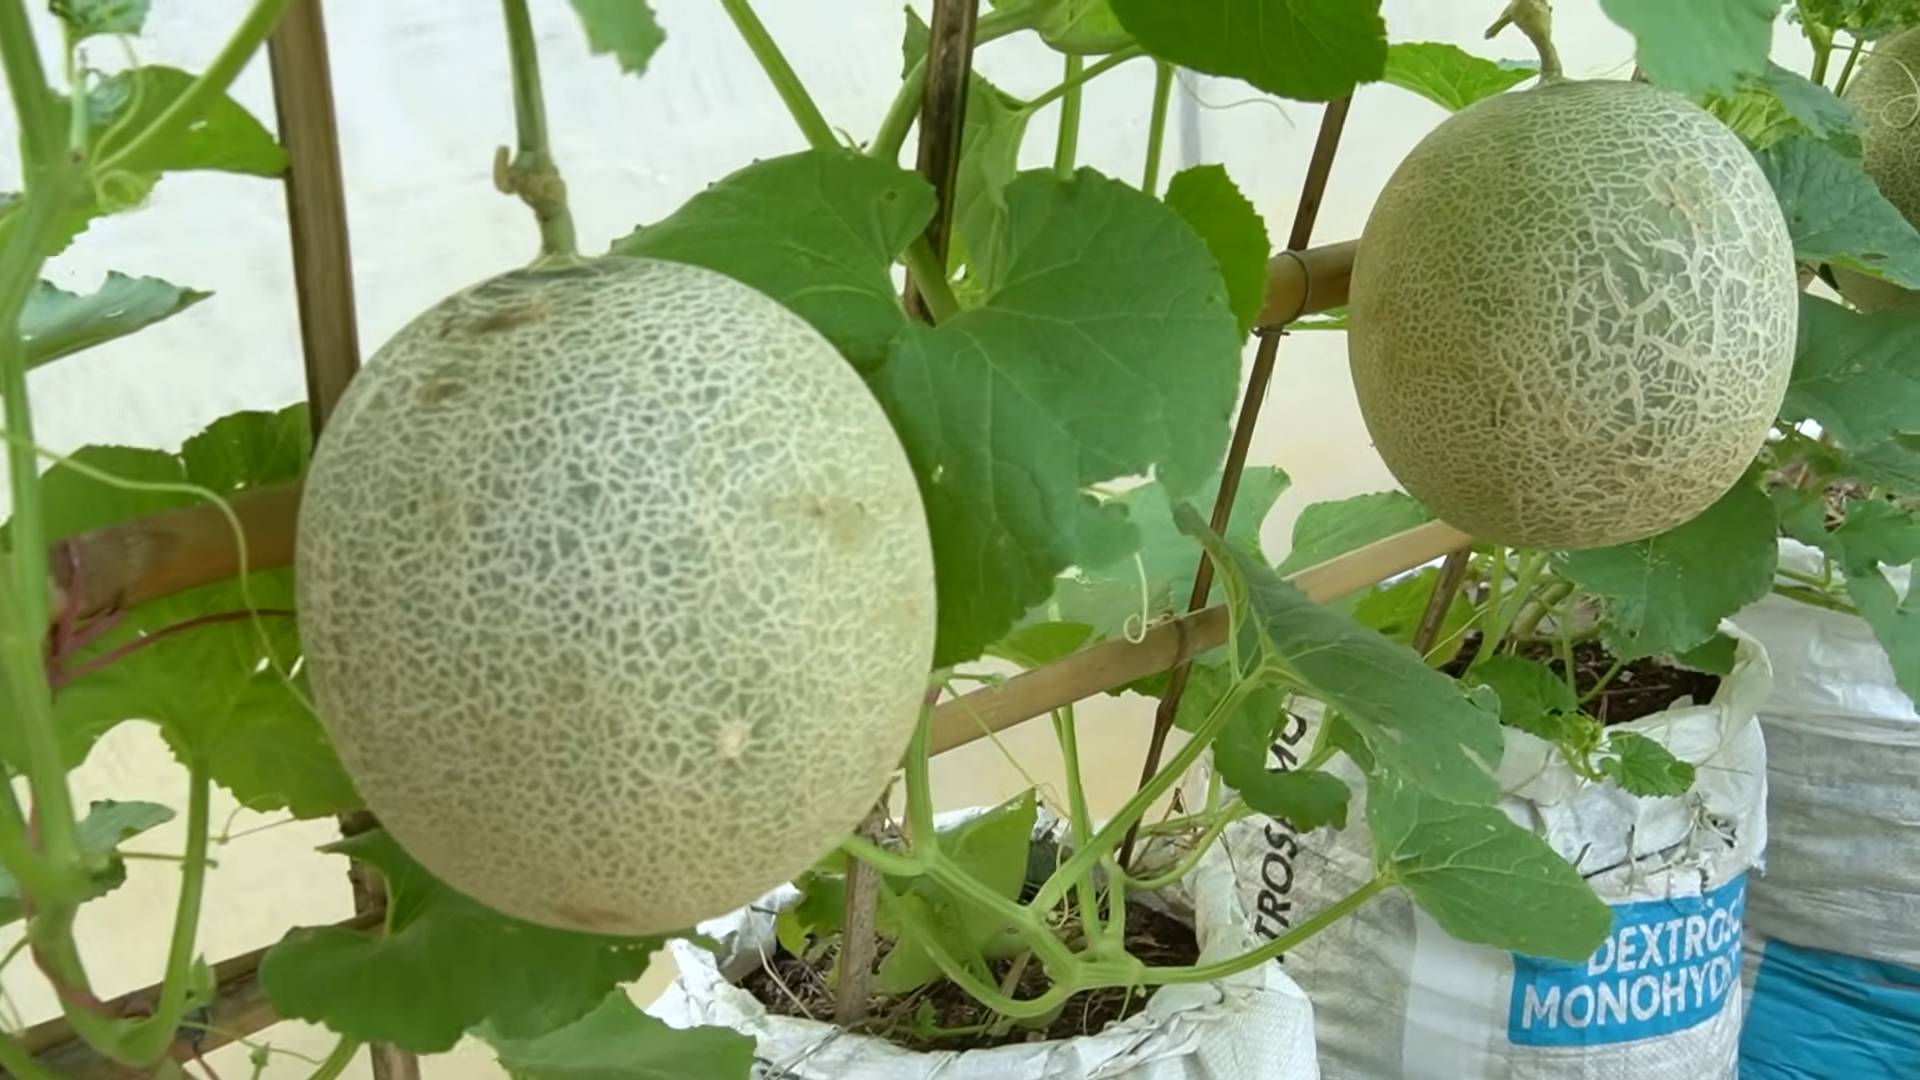
Sizing Your Grow Bags
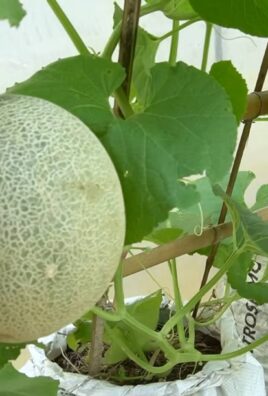
Cantaloupes need plenty of room for their roots to grow. I’ve found that a grow bag that is at least 18 inches in diameter and 18 inches deep is ideal. This will provide enough space for the roots to spread out and access the nutrients they need.
Step-by-Step Instructions: Creating Your Cantaloupe Grow Bags
Alright, let’s get our hands dirty and build these grow bags!
Phase 1: Cutting and Preparing the Fabric
1. Measure and Cut the Fabric: For an 18-inch diameter and 18-inch deep grow bag, you’ll need to cut a rectangle of landscape fabric that is approximately 57 inches wide and 18 inches tall. This will give you enough fabric to create the cylindrical shape and allow for seams. To calculate this, use the formula: Circumference = pi * diameter (3.14 * 18 inches = 56.52 inches). Add an extra inch for seam allowance.
2. Fold the Fabric: Fold the rectangle of landscape fabric in half lengthwise, with the right sides (usually the smoother side) facing each other. This will create a long, narrow rectangle that is 57 inches wide and 9 inches tall.
3. Pin or Clip the Edges: Secure the edges of the folded fabric with safety pins or clips. This will prevent the fabric from shifting while you sew.
Phase 2: Sewing the Grow Bag
1. Sew the Side Seam: Using a sewing machine or hand-sewing, sew along the long edge of the folded fabric, creating a seam that is about 1/2 inch from the edge. Be sure to use a strong stitch and heavy-duty thread. This will form the side of the grow bag.
2. Create the Bottom: Now, we need to create the bottom of the grow bag. With the side seam sewn, you’ll have a tube of fabric. Flatten the tube so that the side seam is centered. This will create two points at the bottom of the tube.
3. Sew the Bottom Seam: Sew across the bottom of the tube, creating a seam that is about 1/2 inch from the edge. Reinforce the corners by sewing back and forth several times. This will create a closed bottom for the grow bag.
4. Reinforce the Seams (Optional): For added durability, you can reinforce the seams by sewing a second line of stitching next to the first one. This is especially important if you are using a thinner landscape fabric.
5. Turn the Bag Right Side Out: Carefully turn the grow bag right side out. You should now have a cylindrical bag with a closed bottom.
Phase 3: Adding Drainage and Finishing Touches
1. Add Drainage Holes (Optional): While landscape fabric is naturally porous, you can add extra drainage holes to the bottom of the grow bag for added insurance. Use a grommet tool to install grommets in the bottom of the bag, or simply cut small slits in the fabric with scissors or a utility knife.
2. Reinforce the Top Edge (Optional): To prevent the top edge of the grow bag from fraying, you can fold it over and sew it down. This will create a clean, finished edge and add extra durability to the bag.
3. Prepare the Soil: Fill the grow bag with high-quality potting mix, leaving a few inches of space at the top. Mix in a slow-release fertilizer according to the package directions. This will provide your cantaloupe plants with the nutrients they need throughout the growing season.
Planting Your Cantaloupe
Now that your grow bag is ready, it’s time to plant your cantaloupe!
1. Choose a Sunny Location: Cantaloupes need at least 6-8 hours of sunlight per day to thrive. Choose a location for your grow bag that receives plenty of sun.
2. Plant Your Seedling or Seeds: If you are using seedlings, gently remove them from their containers and plant them in the center of the grow bag. If you are starting from seed, sow the seeds directly into the potting mix, following the instructions on the seed packet.
3. Water Thoroughly: Water the newly planted cantaloupe thoroughly, making sure to moisten the entire root zone.
4. Add Support: Install a trellis, tomato cage, or sturdy stake near the cantaloupe plant to provide support as it grows. Cantaloupes are vining plants and will need something to climb on.
Caring for Your Cantaloupe Plants
Once your cantaloupe plants are established, here are a few tips for keeping them healthy and productive:
* Water Regularly: Cantaloupes need consistent moisture, especially during hot weather. Water deeply whenever the top inch of soil feels dry to the touch.
* Fertilize Regularly: Cantaloupes are heavy feeders and will benefit from regular fertilization. Use a balanced fertilizer or a fertilizer specifically formulated for melons.
* Prune as Needed: Prune away any dead or diseased leaves and stems. You can also prune the vines to encourage more fruit production.
* Protect from Pests and Diseases: Keep an eye out for common cantaloupe pests and diseases, such as aphids, squash bugs, and powdery mildew. Take action to control these problems as soon as they appear.
* Hand Pollinate (If Necessary): If you are not seeing many cantaloupes developing, you may need to hand-pollinate the flowers. Use a small paintbrush to transfer pollen from the male flowers to the female flowers.
Conclusion
So, there you have it! Growing cantaloupe in grow bags isn’t just a trend; it’s a game-changer for gardeners of all levels. From space-saving convenience to enhanced drainage and temperature control, the benefits are undeniable. If you’ve been struggling to cultivate these sweet, juicy melons in the past, or if you’re simply looking for a more efficient and rewarding gardening experience, then embracing this DIY trick is an absolute must.
Think about it: no more wrestling with heavy clay soil, no more worrying about root rot, and no more limited by the size of your garden. With grow bags, you’re essentially creating the perfect microclimate for your cantaloupe to thrive. You’re giving them the ideal conditions to develop those incredible flavors and textures that make homegrown cantaloupe so much better than anything you can buy in the store.
But don’t just take our word for it. The real magic happens when you get your hands dirty and experience the difference for yourself. And the best part is, there’s plenty of room for experimentation!
Consider these variations to personalize your grow bag cantaloupe journey:
* **Vertical Gardening:** Train your cantaloupe vines to climb a trellis or support structure near your grow bags. This not only saves space but also improves air circulation around the plants, reducing the risk of fungal diseases.
* **Companion Planting:** Plant beneficial herbs and flowers like basil, marigolds, or nasturtiums around your grow bags. These companions can help deter pests and attract pollinators, creating a healthier and more productive growing environment.
* **Nutrient Boost:** Experiment with different organic fertilizers and soil amendments to find the perfect nutrient balance for your cantaloupe. Compost tea, worm castings, and bone meal can all provide valuable nutrients that promote healthy growth and delicious fruit.
* **Grow Bag Size:** While we’ve recommended a specific size, feel free to experiment with slightly larger or smaller grow bags depending on the variety of cantaloupe you’re growing and the available space. Just be sure to provide adequate support for the vines as they grow.
Ultimately, the key to success with grow bag cantaloupe is to be observant, adaptable, and willing to learn from your experiences. Pay attention to your plants’ needs, adjust your watering and feeding schedules as necessary, and don’t be afraid to try new things.
We are confident that once you experience the ease and effectiveness of growing cantaloupe in grow bags, you’ll never go back to traditional gardening methods. It’s a simple, affordable, and incredibly rewarding way to enjoy the taste of homegrown cantaloupe all season long.
So, what are you waiting for? Grab some grow bags, select your favorite cantaloupe variety, and get ready to embark on a delicious gardening adventure. And once you’ve harvested your first crop of sweet, juicy melons, be sure to share your experiences with us! We’d love to hear your tips, tricks, and success stories. Let’s build a community of grow bag cantaloupe enthusiasts and spread the joy of homegrown goodness.
Frequently Asked Questions (FAQ)
What size grow bag is best for cantaloupe?
A 15-20 gallon grow bag is generally recommended for growing cantaloupe. This size provides ample space for the root system to develop and allows for sufficient drainage. Smaller grow bags may restrict root growth, leading to smaller or less flavorful fruit. Larger grow bags, while not necessarily harmful, may be unnecessary and take up more space. The key is to ensure the grow bag is deep and wide enough to accommodate the mature cantaloupe plant.
What type of soil should I use in my grow bag for cantaloupe?
A well-draining, nutrient-rich soil mix is crucial for successful cantaloupe cultivation in grow bags. A good starting point is a mix of equal parts compost, peat moss (or coconut coir), and perlite or vermiculite. The compost provides essential nutrients, the peat moss or coconut coir helps retain moisture, and the perlite or vermiculite improves drainage and aeration. Avoid using heavy clay soil, as it can become waterlogged and suffocate the roots. You can also amend the soil with slow-release organic fertilizer to provide a steady supply of nutrients throughout the growing season.
How often should I water my cantaloupe plants in grow bags?
Watering frequency depends on several factors, including the weather, the size of the grow bag, and the stage of plant growth. Generally, you should water your cantaloupe plants deeply whenever the top inch of soil feels dry to the touch. During hot, dry weather, this may mean watering daily or even twice a day. In cooler, more humid conditions, you may only need to water every few days. Be careful not to overwater, as this can lead to root rot. Grow bags offer better drainage than traditional pots, but it’s still important to monitor the soil moisture levels.
Do I need to fertilize my cantaloupe plants in grow bags?
Yes, fertilizing is essential for healthy cantaloupe growth and abundant fruit production. Cantaloupe are heavy feeders and require a steady supply of nutrients, especially during the flowering and fruiting stages. Use a balanced fertilizer with a higher phosphorus and potassium content to promote flower and fruit development. You can use a slow-release granular fertilizer at planting time, followed by regular applications of a liquid fertilizer every 2-3 weeks. Organic options like compost tea, fish emulsion, and seaweed extract are also excellent choices.
How much sunlight do cantaloupe plants need in grow bags?
Cantaloupe plants require at least 6-8 hours of direct sunlight per day to thrive. Choose a location for your grow bags that receives plenty of sunlight throughout the day. If you live in a particularly hot climate, you may need to provide some afternoon shade to prevent the plants from overheating. Insufficient sunlight can lead to weak growth, poor fruit set, and bland-tasting melons.
How do I support cantaloupe vines in grow bags?
Cantaloupe vines can become quite long and heavy, so providing support is crucial to prevent them from sprawling on the ground and becoming susceptible to pests and diseases. You can use a trellis, stakes, or a tomato cage to support the vines. Train the vines to climb the support structure as they grow, and tie them loosely with soft twine or plant ties. For heavier melons, you may need to provide additional support by placing them in slings made from netting or fabric.
What are some common pests and diseases that affect cantaloupe plants in grow bags?
Common pests that can affect cantaloupe plants include aphids, squash bugs, cucumber beetles, and vine borers. Diseases include powdery mildew, downy mildew, and fusarium wilt. Regularly inspect your plants for signs of pests or diseases, and take action promptly to prevent them from spreading. Organic pest control methods, such as insecticidal soap, neem oil, and handpicking, can be effective for controlling pests. For diseases, ensure good air circulation around the plants, avoid overhead watering, and use disease-resistant varieties.
When is the best time to harvest cantaloupe grown in grow bags?
Cantaloupe are typically ready to harvest 75-90 days after planting. The best way to determine ripeness is to look for several signs: the stem should easily slip from the vine with a gentle tug, the skin should turn from green to a tan or yellowish color, and the melon should have a sweet, fragrant aroma. You can also check the tendril closest to the fruit; if it’s brown and dry, the melon is likely ripe. Avoid harvesting cantaloupe too early, as they will not ripen properly off the vine.
Can I reuse grow bags for cantaloupe?
Yes, grow bags can be reused for multiple seasons, provided they are properly cleaned and maintained. After harvesting your cantaloupe, remove the old soil and wash the grow bags thoroughly with soap and water. Allow them to dry completely before storing them in a cool, dry place. You may also want to disinfect the grow bags with a diluted bleach solution to kill any remaining pathogens. When reusing grow bags, it’s important to replenish the soil with fresh compost and nutrients to ensure optimal plant growth.
Are there any specific cantaloupe varieties that are better suited for grow bags?
While most cantaloupe varieties can be grown in grow bags, some are better suited than others. Bush or compact varieties, such as ‘Minnesota Midget’ or ‘Sugar Baby’, are ideal for smaller grow bags or limited spaces. Vining varieties, such as ‘Hales Best’ or ‘Athena’, can also be grown in grow bags, but they will require more support and space. Choose a variety that is well-suited to your local climate and growing conditions.
Leave a Comment