
Grow Angled Luffa at Home and unlock a world of natural sponges right in your backyard! Have you ever imagined ditching those synthetic scrubbers and replacing them with something you’ve nurtured yourself? This DIY guide will show you how to cultivate your very own angled luffa, also known as Chinese okra, a vegetable with a fascinating history and incredible versatility.
The angled luffa isn’t just a modern marvel; it’s been a staple in Asian cuisine and traditional medicine for centuries. From stir-fries to soothing skin treatments, this gourd has a rich cultural significance. But beyond its culinary and medicinal uses, the real magic happens when it matures – transforming into a fantastic, all-natural sponge!
Why should you embark on this DIY adventure? Well, for starters, it’s incredibly rewarding to grow your own food and household items. Plus, in a world increasingly conscious of sustainability, cultivating your own luffa sponges is a fantastic way to reduce your reliance on plastic and embrace a more eco-friendly lifestyle. This guide will provide you with all the tips and tricks you need to successfully grow angled luffa at home, even if you’re a complete beginner. Let’s get our hands dirty and create something amazing together!
Grow Your Own Angled Luffa Sponges: A Beginner’s Guide
Hey there, fellow gardening enthusiasts! Have you ever thought about growing your own sponges? I know, it sounds a little crazy, but it’s totally possible, and incredibly rewarding! I’m talking about angled luffa (also sometimes spelled loofah), the plant that gives us those amazing exfoliating sponges we love. Forget buying them at the store – let’s grow our own! This guide will walk you through everything you need to know, from seed to scrub.
What You’ll Need
Before we dive in, let’s gather our supplies. Here’s what you’ll need to successfully grow angled luffa at home:
* Angled Luffa Seeds: You can find these online or at some specialty garden centers. Make sure they are angled luffa (Luffa acutangula), not the smooth luffa (Luffa aegyptiaca), if you want the ridged sponges.
* Seed Starting Trays or Small Pots: For starting your seeds indoors.
* Seed Starting Mix: A light, well-draining mix is crucial for germination.
* Larger Pots (Optional): If you’re starting indoors and need to transplant before the weather warms up.
* Well-Draining Soil: Luffa loves rich, well-drained soil. Amend your garden soil with compost or aged manure.
* Trellis or Support Structure: Luffa vines are vigorous climbers and need something to grow on. Think sturdy trellis, fence, or even a pergola.
* Watering Can or Hose: For regular watering.
* Fertilizer: A balanced fertilizer or compost tea to feed your growing vines.
* Pruning Shears or Scissors: For trimming the vines as needed.
* Gloves: To protect your hands.
* Patience: Luffa takes a while to mature, so be prepared to wait!
Starting Your Luffa Seeds
Luffa has a long growing season, so starting your seeds indoors is usually the best bet, especially if you live in a cooler climate. Here’s how I do it:
1. Soak the Seeds: To help speed up germination, soak your luffa seeds in warm water for 24-48 hours before planting. This softens the hard outer shell. I usually put them in a small bowl on my kitchen counter.
2. Prepare Your Seed Starting Trays: Fill your seed starting trays or small pots with seed starting mix. Moisten the mix thoroughly, but don’t let it get soggy.
3. Plant the Seeds: Plant the seeds about 1 inch deep in the soil. I usually plant 2-3 seeds per cell or pot, just in case some don’t germinate.
4. Provide Warmth: Luffa seeds need warmth to germinate. The ideal temperature is between 70-80°F (21-27°C). You can use a heat mat under your seed starting trays to provide consistent warmth.
5. Keep the Soil Moist: Keep the soil consistently moist, but not waterlogged. I use a spray bottle to gently mist the soil surface.
6. Wait Patiently: Germination can take anywhere from 1-3 weeks, so be patient! Once the seedlings emerge, provide them with plenty of light. A sunny windowsill or grow lights will work well.
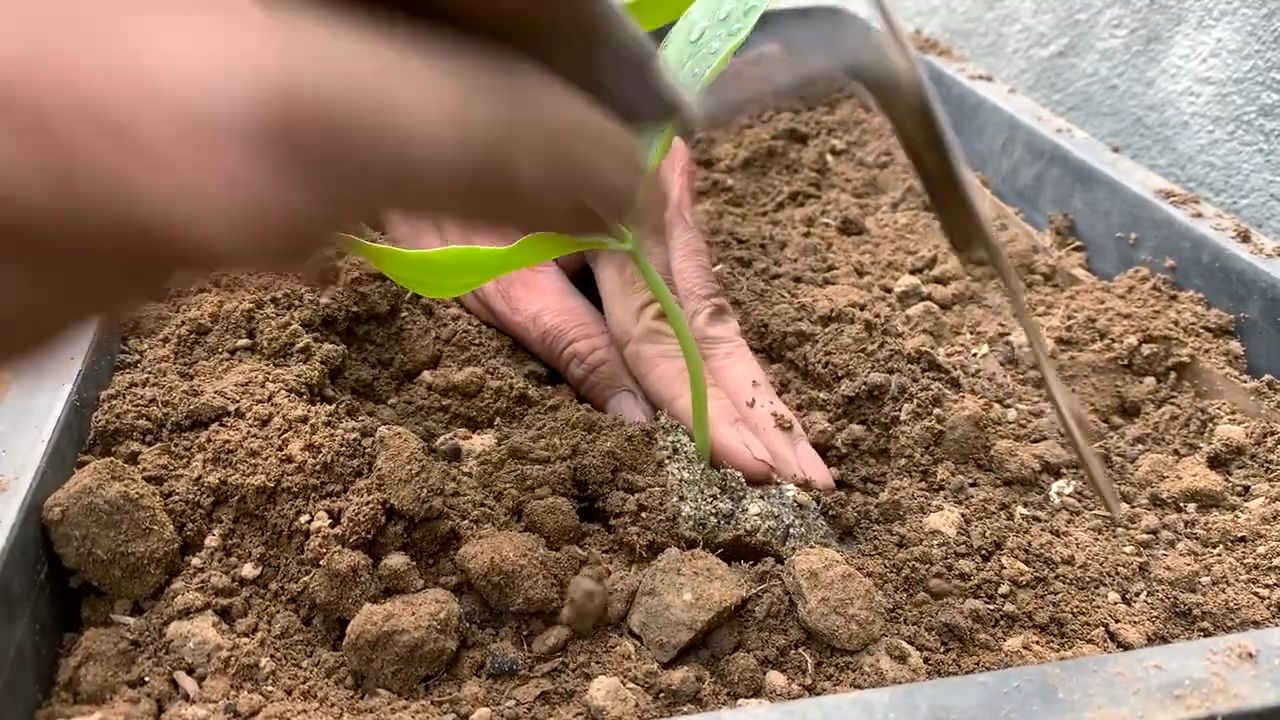
Transplanting Your Luffa Seedlings
Once your luffa seedlings have developed a few sets of true leaves (the leaves that look like miniature versions of the adult leaves), and the weather has warmed up, it’s time to transplant them outdoors.
1. Harden Off the Seedlings: Before transplanting, you need to “harden off” the seedlings. This means gradually exposing them to outdoor conditions over a period of 7-10 days. Start by placing them in a sheltered spot outdoors for a few hours each day, gradually increasing the amount of time they spend outside. This helps them acclimate to the sun, wind, and temperature changes.
2. Prepare the Planting Site: Choose a sunny location with well-draining soil. Luffa vines need at least 6-8 hours of sunlight per day. Amend the soil with compost or aged manure to improve its fertility and drainage.
3. Install Your Trellis or Support Structure: Before you transplant, make sure your trellis or support structure is in place. Luffa vines can get very heavy, so you’ll need something sturdy.
4. Transplant the Seedlings: Gently remove the seedlings from their pots or trays, being careful not to damage the roots. Plant them about 2-3 feet apart, near the base of your trellis or support structure.
5. Water Thoroughly: After transplanting, water the seedlings thoroughly.
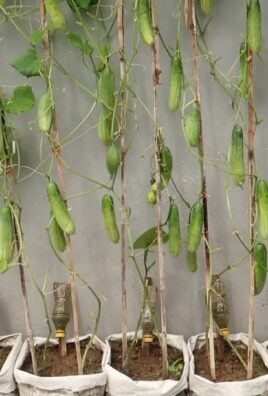
Caring for Your Luffa Vines
Now that your luffa vines are in the ground, it’s time to provide them with the care they need to thrive.
1. Water Regularly: Luffa vines need consistent moisture, especially during hot, dry weather. Water deeply whenever the soil feels dry to the touch.
2. Fertilize: Feed your luffa vines with a balanced fertilizer or compost tea every few weeks. This will help them produce plenty of flowers and fruits.
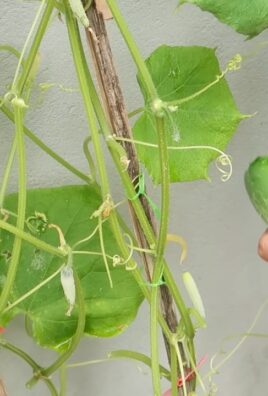
3. Prune as Needed: Luffa vines can get quite unruly, so you may need to prune them to keep them under control. You can trim back the vines to encourage branching and fruit production. I usually remove any dead or yellowing leaves as well.
4. Provide Support: As the vines grow, make sure they are properly supported by your trellis or support structure. You may need to tie the vines to the trellis with twine or plant ties.
5. Watch for Pests and Diseases: Luffa vines are generally pest and disease resistant, but they can be susceptible to certain problems, such as squash bugs, vine borers, and powdery mildew. Inspect your plants regularly and take action if you notice any signs of trouble. Insecticidal soap or neem oil can be effective for controlling pests, and a fungicide can help prevent or treat powdery mildew.
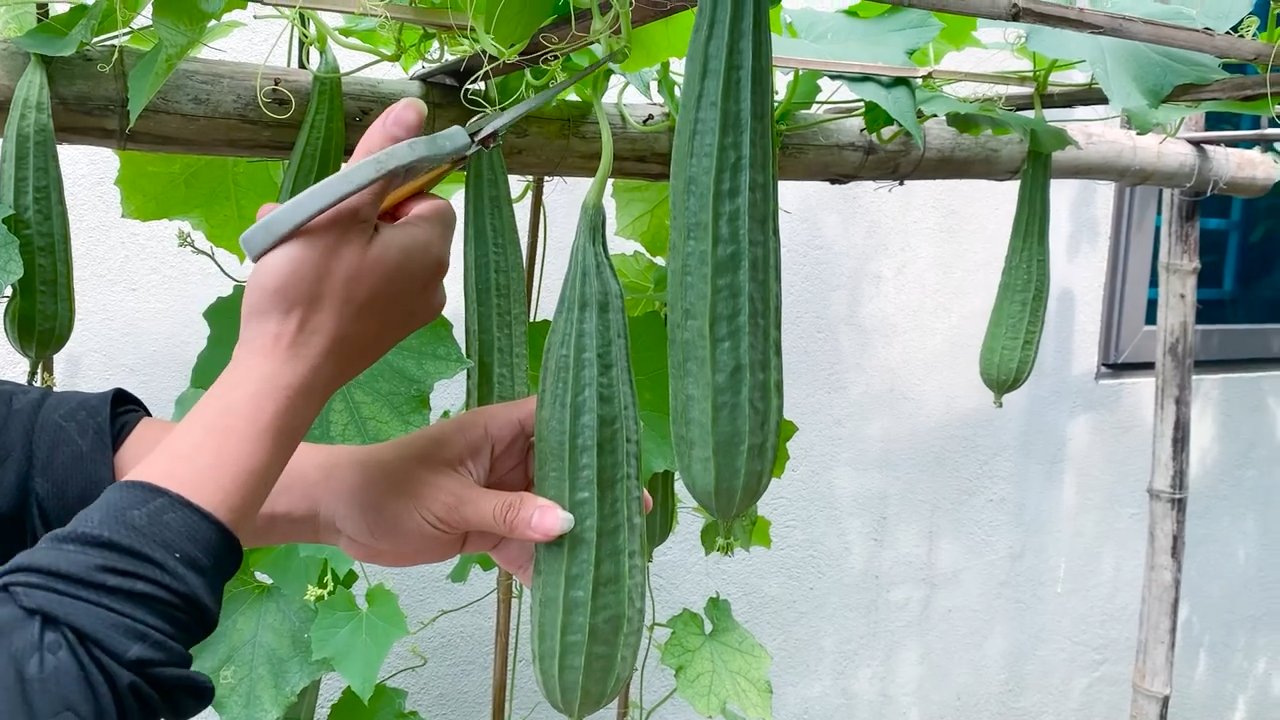
Harvesting Your Luffa Sponges
This is the exciting part! Harvesting your own luffa sponges is so satisfying.
1. Wait for Maturity: Luffa fruits are ready to harvest when they turn yellow or brown and the skin becomes dry and brittle. You should be able to easily press your fingernail into the skin. If the skin is still green and firm, it’s not ready yet.
2. Cut the Luffa: Use pruning shears or a sharp knife to cut the luffa from the vine. Leave a few inches of stem attached.
3. Dry the Luffa: Allow the luffa to dry completely. This can take several weeks, depending on the humidity. You can hang the luffa in a well-ventilated area or place it on a screen to dry.
Processing Your Luffa Sponges
Once the luffa is completely dry, it’s time to process it into a usable sponge.
1. Remove the Skin: The easiest way to remove the skin is to soak the dried luffa in water for a few minutes. This will soften the skin and make it easier to peel off. You can also try crushing the dried luffa with your hands to crack the skin.
2. Remove the Seeds: Once the skin is removed, shake out the seeds. You can save these seeds for planting next year!
3. Rinse and Clean: Rinse the luffa thoroughly with water to remove any remaining pulp or debris. You can use a hose or a bucket of water.
4. Bleach (Optional): If you want to lighten the color of your luffa sponge, you can soak it in a diluted bleach solution for a few minutes. Be sure to rinse it thoroughly afterwards. I personally skip this step, as I prefer the natural color.
5. Dry Again: Allow the luffa sponge to dry completely before using it.
6. Cut to Size: Once the luffa is dry, you can cut it into smaller pieces using scissors or a knife. I like to cut mine into sizes that are comfortable to hold in my hand.
Using Your Homegrown Luffa Sponges
Congratulations! You’ve successfully grown and processed your own luffa sponges. Now it’s time to enjoy the fruits (or rather, vegetables) of your labor.
* Exfoliating: Luffa sponges are great for exfoliating your skin in the shower or bath.
* Cleaning: You can also use them for cleaning dishes, scrubbing vegetables, or cleaning other household surfaces.
* Crafting: Get creative! Luffa sponges can be used in a variety of craft projects.
Troubleshooting
Even
Conclusion
So, there you have it! Growing angled luffa at home is not just a gardening project; it’s an investment in sustainable living, a journey of discovery, and a pathway to creating your own natural sponges. Forget those mass-produced, chemically treated sponges from the store. Imagine the satisfaction of scrubbing your dishes, exfoliating your skin, or even crafting unique gifts with a luffa you nurtured from seed to harvest.
This DIY trick is a must-try for several compelling reasons. First, it’s incredibly rewarding to witness the entire life cycle of a plant, from tiny sprout to mature, sponge-yielding gourd. Second, you gain complete control over the growing process, ensuring your luffas are free from harmful pesticides and chemicals. Third, it’s a cost-effective alternative to purchasing commercially produced luffas, especially if you plan to use them regularly. Finally, it’s a fantastic conversation starter and a unique way to connect with nature.
But the beauty of growing angled luffa at home lies in its adaptability. Feel free to experiment with different growing techniques. Try vertical gardening to maximize space, or interplant your luffas with companion plants like beans or corn to improve soil health. Consider saving seeds from your best-performing luffas to cultivate a strain perfectly adapted to your local climate.
For a unique twist, try harvesting your luffas at different stages of maturity. Younger, smaller luffas can be used for delicate facial exfoliation, while larger, more mature luffas are ideal for tougher scrubbing tasks. You can even experiment with dyeing your luffas using natural plant-based dyes to create colorful and personalized sponges.
Don’t be intimidated if you’re a beginner gardener. Growing angled luffa is a relatively straightforward process, and with a little patience and attention, you’ll be rewarded with a bountiful harvest. Remember to provide your luffas with plenty of sunlight, water, and a sturdy trellis to climb on.
We wholeheartedly encourage you to embark on this exciting gardening adventure. The benefits of growing angled luffa at home are numerous, from reducing your environmental footprint to enjoying the satisfaction of creating your own natural products.
So, grab some seeds, prepare your garden, and get ready to experience the joy of growing your own angled luffa. And most importantly, we want to hear about your experiences! Share your tips, tricks, and photos with us in the comments below. Let’s create a community of luffa enthusiasts and inspire others to embrace this sustainable and rewarding DIY project. Happy gardening!
Frequently Asked Questions (FAQ)
What is the best time to plant angled luffa seeds?
The ideal time to plant angled luffa seeds is after the last frost, when the soil has warmed up to at least 70°F (21°C). Luffas are heat-loving plants and require a long growing season of at least 150-200 days to mature fully. If you live in a cooler climate, you can start the seeds indoors 6-8 weeks before the last frost and transplant them outdoors once the weather warms up. Starting indoors gives the plants a head start and ensures a better chance of a successful harvest.
How much space do angled luffa plants need?
Angled luffa vines can grow quite long, reaching lengths of 15-30 feet (4.5-9 meters). Therefore, they require ample space to spread out and climb. It’s recommended to provide at least 3-4 feet (0.9-1.2 meters) of spacing between plants. A sturdy trellis, fence, or arbor is essential to support the heavy vines and developing gourds. Ensure the support structure is strong enough to withstand the weight of the mature luffas, especially after rainfall.
What type of soil is best for growing angled luffa?
Angled luffa thrives in well-drained, fertile soil that is rich in organic matter. Before planting, amend the soil with compost, aged manure, or other organic amendments to improve its fertility and drainage. A slightly acidic to neutral soil pH of 6.0-7.0 is ideal. Avoid planting in heavy clay soil, as it can retain too much moisture and lead to root rot. If you have clay soil, amend it with sand and organic matter to improve drainage.
How often should I water angled luffa plants?
Angled luffa plants require consistent watering, especially during hot and dry weather. Water deeply and regularly, ensuring the soil remains consistently moist but not waterlogged. Avoid overhead watering, as it can increase the risk of fungal diseases. Drip irrigation or soaker hoses are excellent options for delivering water directly to the roots. During periods of heavy rainfall, reduce watering accordingly.
How do I know when to harvest angled luffa?
The timing of harvest depends on the intended use of the luffa. For sponges, harvest the luffas when the skin turns yellow or brown and becomes dry and brittle. The luffa should feel lightweight and the seeds should rattle inside. If you’re planning to use the young luffas as a vegetable, harvest them when they are still green and tender, typically around 6-8 inches (15-20 cm) long.
How do I process angled luffa into a sponge?
Processing angled luffa into a sponge is a relatively simple process. First, cut off both ends of the luffa. Then, soak the luffa in water for a few days to soften the skin. Once the skin is soft, peel it off using your hands or a knife. Remove the seeds and rinse the luffa thoroughly to remove any remaining pulp. Allow the luffa to dry completely in the sun or a well-ventilated area. Once dry, you can cut the luffa into desired sizes and shapes.
Are there any pests or diseases that affect angled luffa?
Angled luffa can be susceptible to certain pests and diseases, such as squash bugs, squash vine borers, and powdery mildew. Regularly inspect your plants for signs of infestation or disease. Use organic pest control methods, such as insecticidal soap or neem oil, to control pests. To prevent powdery mildew, ensure good air circulation around the plants and avoid overhead watering. Remove any infected leaves promptly.
Can I save seeds from my angled luffa plants?
Yes, you can easily save seeds from your angled luffa plants. Allow a few luffas to fully mature on the vine until they are completely dry and brown. Harvest the luffas and extract the seeds. Spread the seeds out on a paper towel to dry completely. Store the dried seeds in an airtight container in a cool, dark, and dry place. The seeds should remain viable for several years.
What are some creative uses for angled luffa sponges?
Besides using angled luffa sponges for dishwashing and exfoliating, there are many other creative uses. You can use them for crafting projects, such as making soap dishes, bath mats, or even decorative items. Luffa sponges can also be used for cleaning cars, scrubbing floors, or even as a natural filter in aquariums. The possibilities are endless!
Is growing angled luffa at home environmentally friendly?
Absolutely! Growing angled luffa at home is a sustainable and environmentally friendly practice. By growing your own luffas, you reduce your reliance on commercially produced sponges, which often contain synthetic materials and are manufactured using energy-intensive processes. Growing your own luffas also reduces waste and promotes a more sustainable lifestyle. Plus, you can compost the leftover luffa scraps and seeds, further reducing your environmental footprint.

Leave a Comment